Owner's Manual
Page 2
... operation is prohibited 10 Resetting the microprocessor 10 Feature demo mode 10 What's what Head unit 11 Optional remote control 11 Basic Operations Power ON/OFF 12 Selecting a source 12 Adjusting the volume 13 Touch panel key basic operation 13 Built-in DVD player basic operations 15 Radio ...7 After-sales service for Pioneer products 8 Visit our website 8 Features 8 When an operation is prohibited 10 ! After reading, please keep the manual in strong signals 18 Playing DVD discs Watching a DVD 19 Skipping back or forward to another title 20 Operating the DVD menu 20 Resume playback (Bookmark...
... operation is prohibited 10 Resetting the microprocessor 10 Feature demo mode 10 What's what Head unit 11 Optional remote control 11 Basic Operations Power ON/OFF 12 Selecting a source 12 Adjusting the volume 13 Touch panel key basic operation 13 Built-in DVD player basic operations 15 Radio ...7 After-sales service for Pioneer products 8 Visit our website 8 Features 8 When an operation is prohibited 10 ! After reading, please keep the manual in strong signals 18 Playing DVD discs Watching a DVD 19 Skipping back or forward to another title 20 Operating the DVD menu 20 Resume playback (Bookmark...
Owner's Manual
Page 4
...PIN code for Bluetooth wireless connection 51 Correcting distorted sound 52 Auto TA and EQ (auto-time alignment and auto-equalizing) 52 Resetting the audio functions 52 System settings Introduction of system adjustments 53 Changing the wide screen mode 53 Changing the picture adjustment 54 ...Troubleshooting 94 Error messages 96 Understanding auto TA and EQ error messages 98 Understanding messages 99 Handling guideline of discs and player 100 DVD discs 100 DVD-R/DVD-RW discs 101 AVCHD recorded discs 101 CD-R/CD-RW discs 101 Dual Discs 101 Compressed audio compatibility 101 Handling guideline...
...PIN code for Bluetooth wireless connection 51 Correcting distorted sound 52 Auto TA and EQ (auto-time alignment and auto-equalizing) 52 Resetting the audio functions 52 System settings Introduction of system adjustments 53 Changing the wide screen mode 53 Changing the picture adjustment 54 ...Troubleshooting 94 Error messages 96 Understanding auto TA and EQ error messages 98 Understanding messages 99 Handling guideline of discs and player 100 DVD discs 100 DVD-R/DVD-RW discs 101 AVCHD recorded discs 101 CD-R/CD-RW discs 101 Dual Discs 101 Compressed audio compatibility 101 Handling guideline...
Owner's Manual
Page 10
... demo continues operating when the car engine is turned off operations. If this unit for the first time after installation ! Resetting the microprocessor Pressing RESET lets you reset the microprocessor to its initial (factory) settings, switch your engine ON or set to ACC or ON. Feature demo mode... because of this happens, the icon appears on /off , it may not be reset under the following conditions: ! Section 02 Before You Start When an operation is prohibited When you are watching a DVD and attempt to perform an operation, it may drain battery power. The demo continues ...
... demo continues operating when the car engine is turned off operations. If this unit for the first time after installation ! Resetting the microprocessor Pressing RESET lets you reset the microprocessor to its initial (factory) settings, switch your engine ON or set to ACC or ON. Feature demo mode... because of this happens, the icon appears on /off , it may not be reset under the following conditions: ! Section 02 Before You Start When an operation is prohibited When you are watching a DVD and attempt to perform an operation, it may drain battery power. The demo continues ...
Owner's Manual
Page 11
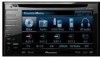
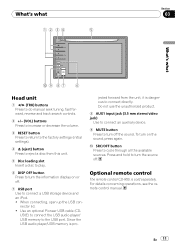
... unit 1 c/d (TRK) buttons Press to do manual seek tuning, fast forward, reverse and track search controls. 2 +/- (VOL) buttons Press to increase or decrease the volume. 3 RESET button Press to return to the factory settings (initial settings). 4 h (eject) button Press to eject a disc from the unit, it is pro- Do not use... product. 8 AUX1 input jack (3.5 mm stereo/video jack) Use to connect an auxiliary device. 9 MUTE button Press to turn on or off . Use an optional Pioneer USB cable (CDU50E) to connect the USB audio player/ USB memory to cycle through all the available sources.
... unit 1 c/d (TRK) buttons Press to do manual seek tuning, fast forward, reverse and track search controls. 2 +/- (VOL) buttons Press to increase or decrease the volume. 3 RESET button Press to return to the factory settings (initial settings). 4 h (eject) button Press to eject a disc from the unit, it is pro- Do not use... product. 8 AUX1 input jack (3.5 mm stereo/video jack) Use to connect an auxiliary device. 9 MUTE button Press to turn on or off . Use an optional Pioneer USB cable (CDU50E) to connect the USB audio player/ USB memory to cycle through all the available sources.
Owner's Manual
Page 52
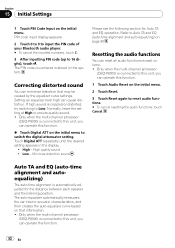
...is connected to this system. PIN code input display appears. 2 Touch 0 to 9 to input the PIN code of your Bluetooth audio player. # To cancel the inputted numbers, touch C. 3 After inputting PIN code (up to switch the digital attenuator setting. Normally, leave the setting... at High to reset audio functions. # To cancel resetting the audio functions, touch Cancel. High quality sound ! The auto-equalizer automatically measures the car interior acoustic characteristics, and then...
...is connected to this system. PIN code input display appears. 2 Touch 0 to 9 to input the PIN code of your Bluetooth audio player. # To cancel the inputted numbers, touch C. 3 After inputting PIN code (up to switch the digital attenuator setting. Normally, leave the setting... at High to reset audio functions. # To cancel resetting the audio functions, touch Cancel. High quality sound ! The auto-equalizer automatically measures the car interior acoustic characteristics, and then...
Owner's Manual
Page 94
... a normal operation. 94 En The unit does not operate cor- Make sure the remote control selection switch setting and code type setting are causing Press RESET. (Page 10) the built-in microprocessor to your display. Load new battery. Check by -frame playback. cannot play. Non compatible video system disc Change to...
... a normal operation. 94 En The unit does not operate cor- Make sure the remote control selection switch setting and code type setting are causing Press RESET. (Page 10) the built-in microprocessor to your display. Load new battery. Check by -frame playback. cannot play. Non compatible video system disc Change to...
Owner's Manual
Page 96
... disc does not contain Replace disc. Replace disc. Connect the cables correctly. Built-in DVD player Message Cause Action Different Region Disc The disc does not have the error message recorded....play DivX HD file. File Not Playable-High Defini- Action Disconnect the cable from iPod. Reset the iPod. secured by DRM Replace disc. pired DivX VOD content. The inserted disc contains..., 2-channel audio is out- Error messages When you contact your dealer or your nearest Pioneer Service Center, be played back Protect All the files on the inserted disc are incorrectly ...
... disc does not contain Replace disc. Replace disc. Connect the cables correctly. Built-in DVD player Message Cause Action Different Region Disc The disc does not have the error message recorded....play DivX HD file. File Not Playable-High Defini- Action Disconnect the cable from iPod. Reset the iPod. secured by DRM Replace disc. pired DivX VOD content. The inserted disc contains..., 2-channel audio is out- Error messages When you contact your dealer or your nearest Pioneer Service Center, be played back Protect All the files on the inserted disc are incorrectly ...

Owner's Manual
Page 98
.../-DX Cause Communication failure iPod failure Error-02-67 No Songs Stop Old version of the power amp connected to the speakers. ! Reset the iPod. Please check Center speaker., Error. Please check Rear speaker., Error. Please check Front-R speaker., Error. Please check noise... below to iPod. Microphone is displayed, connect the cable again. Error. Set the microphone correctly. Set the microphone correctly. 98 En Reset the iPod. Select a list that the speakers are connected correctly. ! Please check Subwoofer. Transfer the songs to see what the problem...
.../-DX Cause Communication failure iPod failure Error-02-67 No Songs Stop Old version of the power amp connected to the speakers. ! Reset the iPod. Please check Center speaker., Error. Please check Rear speaker., Error. Please check Front-R speaker., Error. Please check noise... below to iPod. Microphone is displayed, connect the cable again. Error. Set the microphone correctly. Set the microphone correctly. 98 En Reset the iPod. Select a list that the speakers are connected correctly. ! Please check Subwoofer. Transfer the songs to see what the problem...


