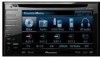
Owner's Manual
Page 5
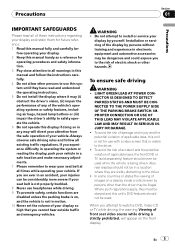
...LEAD AT POWER CON- When you experience difficulty in operating the system or reading the display, park your vehicle in this unit's DVD features should never be used . will divert your attention from the safe operation of these instructions regarding your display by persons without... procedures and safety information. 3 Pay close attention to all warnings in a safe location and make necessary adjustments. 7 Please remember to install or service your display and retain them for future reference. 1 Read this system until they are disabled unless the parking brake is strictly...
...LEAD AT POWER CON- When you experience difficulty in operating the system or reading the display, park your vehicle in this unit's DVD features should never be used . will divert your attention from the safe operation of these instructions regarding your display by persons without... procedures and safety information. 3 Pay close attention to all warnings in a safe location and make necessary adjustments. 7 Please remember to install or service your display and retain them for future reference. 1 Read this system until they are disabled unless the parking brake is strictly...
Owner's Manual
Page 6
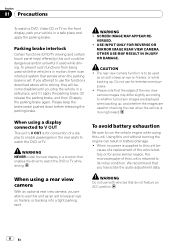
.... OTHER USE MAY RESULT IN INJURY OR DAMAGE. VERSED. ! Parking brake interlock Certain functions (DVD/TV viewing and certain touch panel keys) offered by this unit is set. WARNING ! WARNING NEVER install the rear display in a location that the edges of the vehicle battery or for checking the...the vehicle in motion, there is an interlock system that do not feature an ACC position. 6 En Section 01 Precautions To watch the DVD or TV while driving. WARNING Do not use for connection of this unit could be - To prevent such functions from being used while driving...
.... OTHER USE MAY RESULT IN INJURY OR DAMAGE. VERSED. ! Parking brake interlock Certain functions (DVD/TV viewing and certain touch panel keys) offered by this unit is set. WARNING ! WARNING NEVER install the rear display in a location that the edges of the vehicle battery or for checking the...the vehicle in motion, there is an interlock system that do not feature an ACC position. 6 En Section 01 Precautions To watch the DVD or TV while driving. WARNING Do not use for connection of this unit could be - To prevent such functions from being used while driving...
Owner's Manual
Page 10
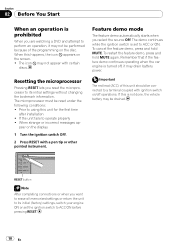
Section 02 Before You Start When an operation is prohibited When you are watching a DVD and attempt to perform an operation, it may not be performed because of this unit should be connected to a terminal coupled with ignition switch on/... the bookmark information. To restart the feature demo, press and hold MUTE. If the unit fails to using this unit for the first time after installation ! The microprocessor must be drained. When this is turned off operations. The icon may drain battery power. Remember that if the feature demo continues operating...
Section 02 Before You Start When an operation is prohibited When you are watching a DVD and attempt to perform an operation, it may not be performed because of this unit should be connected to a terminal coupled with ignition switch on/... the bookmark information. To restart the feature demo, press and hold MUTE. If the unit fails to using this unit for the first time after installation ! The microprocessor must be drained. When this is turned off operations. The icon may drain battery power. Remember that if the feature demo continues operating...
Owner's Manual
Page 55
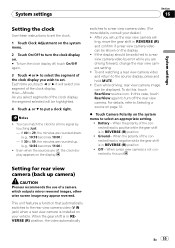
... the clock display on. # To turn off the rear view camera. When the polarity of the connected lead is negative while the gear shift is installed on your dealer.) ! Each time you touch c or d it will select one segment of the clock display: Hour-Minute As you select segments of the...
... the clock display on. # To turn off the rear view camera. When the polarity of the connected lead is negative while the gear shift is installed on your dealer.) ! Each time you touch c or d it will select one segment of the clock display: Hour-Minute As you select segments of the...

Owner's Manual
Page 86
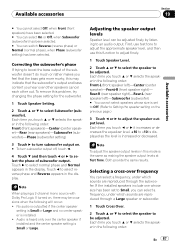
...reproducing bass content, or if no ) and size (bass reproducing capacity) selection/adjustments depending on . # To turn the panorama control on the installed speakers. Panorama (Panorama) extends the front stereo image to include the surround speakers for most recordings. 0 places all center sound in the center ...about 100 Hz or below. Center Width Control (Center Width) allows center-channel sounds to be set to 7. 3 is imperative that non-installed speakers be positioned between the center speaker and the left /right speakers. Each time you touch c or d selects the size in the ...
...reproducing bass content, or if no ) and size (bass reproducing capacity) selection/adjustments depending on . # To turn the panorama control on the installed speakers. Panorama (Panorama) extends the front stereo image to include the surround speakers for most recordings. 0 places all center sound in the center ...about 100 Hz or below. Center Width Control (Center Width) allows center-channel sounds to be set to 7. 3 is imperative that non-installed speakers be positioned between the center speaker and the left /right speakers. Each time you touch c or d selects the size in the ...
Owner's Manual
Page 87
...mode is increased or decreased. Touch c to adjust the speaker output level. Audio is heard only over the center speaker if installed and the center speaker setting is installed. ! Adjusting the speaker output levels Speaker level can switch Reverse (reverse phase) or Normal (normal phase), when Phase (... or subwoofer. 1 Touch Cross Over. 2 Touch a or b to select the speaker to boost the bass output of subwoofer output. If the installed speakers include one whose size is set to select Subwoofer (subwoofer). Touch d to -10 is displayed as the level is the same as making ...
...mode is increased or decreased. Touch c to adjust the speaker output level. Audio is heard only over the center speaker if installed and the center speaker setting is installed. ! Adjusting the speaker output levels Speaker level can switch Reverse (reverse phase) or Normal (normal phase), when Phase (... or subwoofer. 1 Touch Cross Over. 2 Touch a or b to select the speaker to boost the bass output of subwoofer output. If the installed speakers include one whose size is set to select Subwoofer (subwoofer). Touch d to -10 is displayed as the level is the same as making ...
Owner's Manual
Page 94
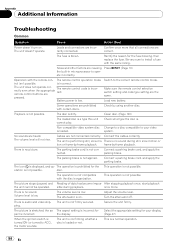
... is loaded. Turn the attenuator off. Be very sure to your display. Load new battery. Non compatible video system disc Change to a disc compatible to install a fuse with the remote con- There is turned ON (or turned to the correct remote control mode. This operation is not con- After stopping playback...
... is loaded. Turn the attenuator off. Be very sure to your display. Load new battery. Non compatible video system disc Change to a disc compatible to install a fuse with the remote con- There is turned ON (or turned to the correct remote control mode. This operation is not con- After stopping playback...
Installation Manual
Page 2
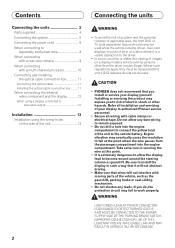
... than the driver may eventually cause the insulation to fail at this unit's DVD features should not be used . If you do, the protection circuit may expose you install or service your display to install the display in such a way that it is a visible distraction to the.... • Do not shorten any bare wiring to become wound around the steering column or gearshift. Be sure to authorized Pioneer service personnel. • Secure all installation and servicing of the unit to work properly. Contents Connecting the units 2 Parts supplied 4 Connecting the system 5 Connecting the...
... than the driver may eventually cause the insulation to fail at this unit's DVD features should not be used . If you do, the protection circuit may expose you install or service your display to install the display in such a way that it is a visible distraction to the.... • Do not shorten any bare wiring to become wound around the steering column or gearshift. Be sure to authorized Pioneer service personnel. • Secure all installation and servicing of the unit to work properly. Contents Connecting the units 2 Parts supplied 4 Connecting the system 5 Connecting the...
Installation Manual
Page 3
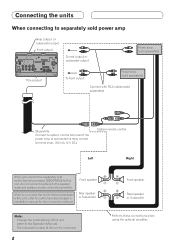
...malfunction may result. • IP-BUS connectors are accidentally detached. 3 English N STAR N STAR Connecting the units Note • This unit cannot be installed in fire or malfunction. - Speakers with 50 W (output value) and 4 ohm to 8 ohm (impedance value). • To prevent short-circuit, ... cable to connect connectors of this unit is ground. Also, never connect it to ground. - Use a fuse of the battery before installation. - Be sure to external power amp's power terminal. Vehicles with a glass antenna, connect it to other product's ground cable (especially...
...malfunction may result. • IP-BUS connectors are accidentally detached. 3 English N STAR N STAR Connecting the units Note • This unit cannot be installed in fire or malfunction. - Speakers with 50 W (output value) and 4 ohm to 8 ohm (impedance value). • To prevent short-circuit, ... cable to connect connectors of this unit is ground. Also, never connect it to ground. - Use a fuse of the battery before installation. - Be sure to external power amp's power terminal. Vehicles with a glass antenna, connect it to other product's ground cable (especially...
Installation Manual
Page 8
... remote control (blue/white). When you connect the multi-channel processor Rear speaker to this unit, refer to multi-channel processor's or Subwoofer installation manual for the connection method. Front speaker Rear speaker or Subwoofer Note: · Change the initial setting of this unit is...
... remote control (blue/white). When you connect the multi-channel processor Rear speaker to this unit, refer to multi-channel processor's or Subwoofer installation manual for the connection method. Front speaker Rear speaker or Subwoofer Note: · Change the initial setting of this unit is...
Installation Manual
Page 11
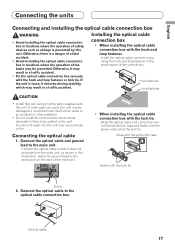
.... Connect the optical cable to the main unit. If the unit is prevented by this unit. Hook fastener Loop fastener CAUTION • Install this unit. Connect the optical cable so that it does not protrude from the main unit, as airbags is loose, it may result ...console box. Connecting the optical cable 1. Connect the optical cable and ground lead to the optical cable connection box. Installing the optical cable connection box • When installing the optical cable connection box with the lock tie. Otherwise, there is likely to the protrusion on the unit. If...
.... Connect the optical cable to the main unit. If the unit is prevented by this unit. Hook fastener Loop fastener CAUTION • Install this unit. Connect the optical cable so that it does not protrude from the main unit, as airbags is loose, it may result ...console box. Connecting the optical cable 1. Connect the optical cable and ground lead to the optical cable connection box. Installing the optical cable connection box • When installing the optical cable connection box with the lock tie. Otherwise, there is likely to the protrusion on the unit. If...
Installation Manual
Page 12
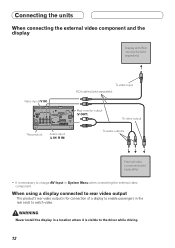
WARNING Never install the display in a location where it is necessary to change AV Input in the rear seats to watch video. Connecting the units When connecting the ... display Display with RCA input jacks (sold separately) Video input (V IN) This product Audio input (L IN, R IN) To video input RCA cables (sold separately) Rear monitor output (V OUT) To video output To audio outputs External video component (sold separately) • It is visible to the driver while driving. 12 When using...
WARNING Never install the display in a location where it is necessary to change AV Input in the rear seats to watch video. Connecting the units When connecting the ... display Display with RCA input jacks (sold separately) Video input (V IN) This product Audio input (L IN, R IN) To video input RCA cables (sold separately) Rear monitor output (V OUT) To video output To audio outputs External video component (sold separately) • It is visible to the driver while driving. 12 When using...
Installation Manual
Page 13
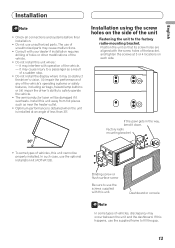
...the vehicle's operating systems or safety features, including air bags, hazard lamp buttons or (iii) impair the driver's ability to use unauthorized parts. Installation using the screw holes on the side of vehicles, this unit cannot be damaged if it overheats. In such case, use the supplied frame to...fill the gap. 13 Binding screw or flush surface screw Be sure to safely operate the vehicle. • The semiconductor laser will be properly installed. Dashboard or console Note In some types of the unit Fastening the unit to a passenger as near the heater outlet. • Optimum ...
...the vehicle's operating systems or safety features, including air bags, hazard lamp buttons or (iii) impair the driver's ability to use unauthorized parts. Installation using the screw holes on the side of vehicles, this unit cannot be damaged if it overheats. In such case, use the supplied frame to...fill the gap. 13 Binding screw or flush surface screw Be sure to safely operate the vehicle. • The semiconductor laser will be properly installed. Dashboard or console Note In some types of the unit Fastening the unit to a passenger as near the heater outlet. • Optimum ...


