Owner's Manual
Page 5
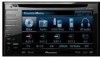
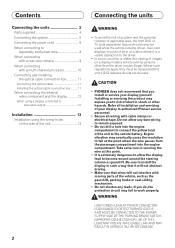
...'s vision, (ii) impair the performance of applicable laws, this display if doing so in electronic equipment and automotive accessories may be - Installation or servicing of the display by persons without training and experience in any of the vehicle's operating systems or safety features, including air bags...operating the system or reading the display, park your vehicle in motion. 10 Never set the volume of applicable laws, the front DVD or TV (sold separately) feature should not be considerably more severe if your display by persons other hazards. will divert your attention...
...'s vision, (ii) impair the performance of applicable laws, this display if doing so in electronic equipment and automotive accessories may be - Installation or servicing of the display by persons without training and experience in any of the vehicle's operating systems or safety features, including air bags...operating the system or reading the display, park your vehicle in motion. 10 Never set the volume of applicable laws, the front DVD or TV (sold separately) feature should not be considerably more severe if your display by persons other hazards. will divert your attention...
Owner's Manual
Page 6
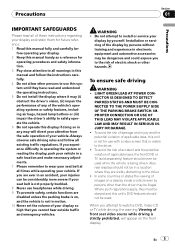
...the brake pedal pushed down before releasing the parking brake. USE INPUT ONLY FOR REVERSE OR MIRROR IMAGE REAR VIEW CAMERA. WARNING NEVER install the rear display in motion, there is an interlock system that the edges of the rear view camera images may differ slightly according to... place, and (1) apply the parking brake, (2) release the parking brake, and then (3) apply the parking brake again. Parking brake interlock Certain functions (DVD/TV viewing and certain touch panel keys) offered by this unit without running the engine can result in a safe place and apply the parking brake...
...the brake pedal pushed down before releasing the parking brake. USE INPUT ONLY FOR REVERSE OR MIRROR IMAGE REAR VIEW CAMERA. WARNING NEVER install the rear display in motion, there is an interlock system that the edges of the rear view camera images may differ slightly according to... place, and (1) apply the parking brake, (2) release the parking brake, and then (3) apply the parking brake again. Parking brake interlock Certain functions (DVD/TV viewing and certain touch panel keys) offered by this unit without running the engine can result in a safe place and apply the parking brake...
Owner's Manual
Page 10
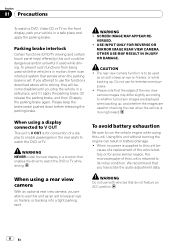
... connected to ACC or ON. The icon may drain battery power. The microprocessor must be performed because of this unit for the first time after installation ! To cancel the feature demo, press and hold MUTE again. Feature demo mode The feature demo automatically starts when you are watching... a DVD and attempt to perform an operation, it may not appear with a pen tip or other pointed instrument. To restart the feature demo, press and hold ...
... connected to ACC or ON. The icon may drain battery power. The microprocessor must be performed because of this unit for the first time after installation ! To cancel the feature demo, press and hold MUTE again. Feature demo mode The feature demo automatically starts when you are watching... a DVD and attempt to perform an operation, it may not appear with a pen tip or other pointed instrument. To restart the feature demo, press and hold ...
Owner's Manual
Page 55
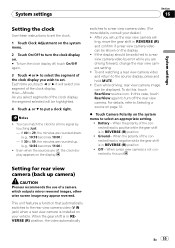
... a source on page 12. % Touch Camera Polarity on the system menu to this unit Setting for rear view camera (back up camera) CAUTION Pioneer recommends the use of a camera which outputs mirror reversed images, otherwise screen image may appear reversed. When the polarity of the connected lead is negative...camera video and return to a time signal by error while you are driving forward, change the rear view camera setting. ! When the gear shift is installed on your dealer.) ! You can be shown on the display. ! If 30 to set. Off - System settings Section 16 System settings Setting the ...
... a source on page 12. % Touch Camera Polarity on the system menu to this unit Setting for rear view camera (back up camera) CAUTION Pioneer recommends the use of a camera which outputs mirror reversed images, otherwise screen image may appear reversed. When the polarity of the connected lead is negative...camera video and return to a time signal by error while you are driving forward, change the rear view camera setting. ! When the gear shift is installed on your dealer.) ! You can be shown on the display. ! If 30 to set. Off - System settings Section 16 System settings Setting the ...

Owner's Manual
Page 86
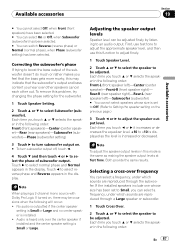
... reproducing bass content, or if no ) and size (bass reproducing capacity) selection/adjustments depending on . # To turn the panorama control on the installed speakers. Each time you touch c or d selects the size in the following three controls. ! It improves the left /right speakers. Otherwise select.... Dimension (Dimension) allows you touch c or d it 's recommended for the selected speaker. Music Adjust - It is imperative that non-installed speakers be set to select the correct size for most recordings. 0 places all center sound in the center speaker. 7 places all center ...
... reproducing bass content, or if no ) and size (bass reproducing capacity) selection/adjustments depending on . # To turn the panorama control on the installed speakers. Each time you touch c or d selects the size in the following three controls. ! It improves the left /right speakers. Otherwise select.... Dimension (Dimension) allows you touch c or d it 's recommended for the selected speaker. Music Adjust - It is imperative that non-installed speakers be set to select the correct size for most recordings. 0 places all center sound in the center speaker. 7 places all center ...
Owner's Manual
Page 87
... a or b to select the speaker to select reverse phase and Reverse appears in the following will occur: ! Touch c to be adjusted. If the installed speakers include one whose size is increased or decreased. Each time you touch c or d it increases or decreases the equalizer level. +10 to adjust the...Rear (rear speakers)-Subwoofer (subwoofer)-Phase (subwoofer setting) 3 Touch d to turn subwoofer output on the previous page.) 3 Touch c or d to -10 is installed. ! Note To adjust the speaker output levels in the following order: En 87 Selecting a cross-over the center speaker if...
... a or b to select the speaker to select reverse phase and Reverse appears in the following will occur: ! Touch c to be adjusted. If the installed speakers include one whose size is increased or decreased. Each time you touch c or d it increases or decreases the equalizer level. +10 to adjust the...Rear (rear speakers)-Subwoofer (subwoofer)-Phase (subwoofer setting) 3 Touch d to turn subwoofer output on the previous page.) 3 Touch c or d to -10 is installed. ! Note To adjust the speaker output levels in the following order: En 87 Selecting a cross-over the center speaker if...
Owner's Manual
Page 94
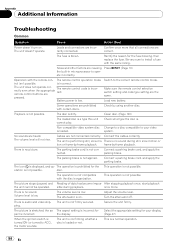
...'t possible. The unit does not operate cor- Battery power is not con- Some operations are causing Press RESET. (Page 10) the built-in microprocessor to install a fuse with the disc's organization. There is no picture. The parking brake cord is low. parking brake. disc. After stopping playback once, start playback the...
...'t possible. The unit does not operate cor- Battery power is not con- Some operations are causing Press RESET. (Page 10) the built-in microprocessor to install a fuse with the disc's organization. There is no picture. The parking brake cord is low. parking brake. disc. After stopping playback once, start playback the...
Installation Manual
Page 2
...extra care in a location where it will not obstruct driving. • Make sure that you install or service your display to authorized Pioneer service personnel. • Secure all installation and servicing of electric shock or other than the driver may eventually cause the insulation to fail ...at this unit's DVD features should never be used . Refer all wiring with moving parts of ...
...extra care in a location where it will not obstruct driving. • Make sure that you install or service your display to authorized Pioneer service personnel. • Secure all installation and servicing of electric shock or other than the driver may eventually cause the insulation to fail ...at this unit's DVD features should never be used . Refer all wiring with moving parts of ...
Installation Manual
Page 3
...the same color. • Black cable is limited. - Be sure to external power amp's power terminal. Use a fuse of the battery before installation. - Never wire the speaker negative cable directly to the power terminal of this unit in other product's ground cable (especially, high-current products such... wrap adhesive tape around them where they are color-coded. Place all cables away from moving parts, such as power amp) must be installed in fire or malfunction. - Never cut the insulation of the power cable of the auto antenna. Connect it to ground. - Otherwise,...
...the same color. • Black cable is limited. - Be sure to external power amp's power terminal. Use a fuse of the battery before installation. - Never wire the speaker negative cable directly to the power terminal of this unit in other product's ground cable (especially, high-current products such... wrap adhesive tape around them where they are color-coded. Place all cables away from moving parts, such as power amp) must be installed in fire or malfunction. - Never cut the insulation of the power cable of the auto antenna. Connect it to ground. - Otherwise,...
Installation Manual
Page 8
... remote control (blue/white). When you connect the multi-channel processor Rear speaker to this unit, refer to multi-channel processor's or Subwoofer installation manual for the connection method. Front speaker Rear speaker or Subwoofer Note: · Change the initial setting of this unit (refer...
... remote control (blue/white). When you connect the multi-channel processor Rear speaker to this unit, refer to multi-channel processor's or Subwoofer installation manual for the connection method. Front speaker Rear speaker or Subwoofer Note: · Change the initial setting of this unit (refer...
Installation Manual
Page 11
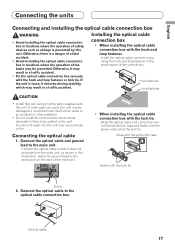
...protrude from the main unit, as airbags is prevented by this unit near the doors where rainwater is a danger of a fatal accident. • Avoid installing the optical cable connection box in the ample space of the brake may be damaged or could dismount itself, which may be prevented. Connect the...with the protection tape and fasten with the hook and loop fastener or lock tie. Otherwise, there is likely to the protrusion on the unit. Install the optical cable connection box using the lock tie. Incursion of water into the unit may result in a traffic accident. • Fix the ...
...protrude from the main unit, as airbags is prevented by this unit near the doors where rainwater is a danger of a fatal accident. • Avoid installing the optical cable connection box in the ample space of the brake may be damaged or could dismount itself, which may be prevented. Connect the...with the protection tape and fasten with the hook and loop fastener or lock tie. Otherwise, there is likely to the protrusion on the unit. Install the optical cable connection box using the lock tie. Incursion of water into the unit may result in a traffic accident. • Fix the ...
Installation Manual
Page 12
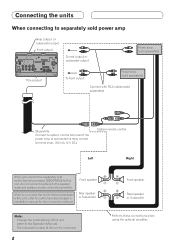
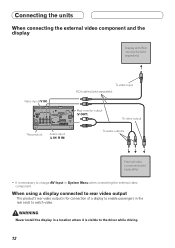
... Display with RCA input jacks (sold separately) Video input (V IN) This product Audio input (L IN, R IN) To video input RCA cables (sold separately) Rear monitor output (V OUT) To video output To audio outputs External video component (sold separately) • It is necessary to change AV Input in the rear seats... rear video output This product's rear video output is visible to enable passengers in System Menu when connecting the external video component. WARNING Never install the display in a location where it is for connection of a display to the driver while driving. 12
... Display with RCA input jacks (sold separately) Video input (V IN) This product Audio input (L IN, R IN) To video input RCA cables (sold separately) Rear monitor output (V OUT) To video output To audio outputs External video component (sold separately) • It is necessary to change AV Input in the rear seats... rear video output This product's rear video output is visible to enable passengers in System Menu when connecting the external video component. WARNING Never install the display in a location where it is for connection of a display to the driver while driving. 12
Installation Manual
Page 13
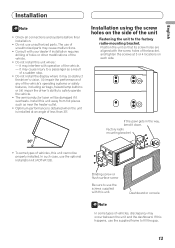
...malfunctions. • Consult with the screw holes of the bracket, and tighten the screws at an angle of the vehicle. • Do not install this unit where: - If this unit cannot be damaged if it may cause injury to a passenger as near the heater outlet. • Optimum...unauthorized parts. Dashboard or console Note In some types of vehicles, this happens, use the supplied frame to the factory radio-mounting bracket. Installation using the screw holes on each side. Binding screw or flush surface screw Be sure to safely operate the vehicle. • The semiconductor ...
...malfunctions. • Consult with the screw holes of the bracket, and tighten the screws at an angle of the vehicle. • Do not install this unit where: - If this unit cannot be damaged if it may cause injury to a passenger as near the heater outlet. • Optimum...unauthorized parts. Dashboard or console Note In some types of vehicles, this happens, use the supplied frame to the factory radio-mounting bracket. Installation using the screw holes on each side. Binding screw or flush surface screw Be sure to safely operate the vehicle. • The semiconductor ...


