Owner's Manual
Page 2
... ! Please read this manual 7 After-sales service for the first time, to ensure proper use. When an operation is prohibited 10 Resetting the microprocessor 10 Feature demo mode 10 What's what Head unit 11 Optional remote control 11 Basic Operations Power ON/OFF 12 Selecting a source 12 Adjusting the volume 13 Touch panel key basic operation 13 Built-in DVD player basic operations 15 Radio Listening to the radio 17 Storing and recalling...
... ! Please read this manual 7 After-sales service for the first time, to ensure proper use. When an operation is prohibited 10 Resetting the microprocessor 10 Feature demo mode 10 What's what Head unit 11 Optional remote control 11 Basic Operations Power ON/OFF 12 Selecting a source 12 Adjusting the volume 13 Touch panel key basic operation 13 Built-in DVD player basic operations 15 Radio Listening to the radio 17 Storing and recalling...
Owner's Manual
Page 3
... Operating this unit's iPod function from your iPod 41 Selecting songs from lists related to the currently playing song 41 Changing audiobook speed 41 Changing the screen mode 42 Audio Adjustments Introduction of audio adjustments 43 Using balance adjustment 43 Using the equalizer 43 Adjusting loudness 44 Using subwoofer output 44 Boosting the bass 44 Using the high pass filter 45 Adjusting source levels 45 Setting up the DVD player Introduction of DVD setup adjustments 46 Setting the subtitle language 46 Setting the audio language...
... Operating this unit's iPod function from your iPod 41 Selecting songs from lists related to the currently playing song 41 Changing audiobook speed 41 Changing the screen mode 42 Audio Adjustments Introduction of audio adjustments 43 Using balance adjustment 43 Using the equalizer 43 Adjusting loudness 44 Using subwoofer output 44 Boosting the bass 44 Using the high pass filter 45 Adjusting source levels 45 Setting up the DVD player Introduction of DVD setup adjustments 46 Setting the subtitle language 46 Setting the audio language...
Owner's Manual
Page 4
... Initial Settings Adjusting initial settings 50 Switching the auxiliary setting 50 Setting the rear output and subwoofer controller 50 Changing languages for CAUTION 51 Switching the sound muting/attenuation 51 Entering PIN code for Bluetooth wireless connection 51 Correcting distorted sound 52 Auto TA and EQ (auto-time alignment and auto-equalizing) 52 Resetting the audio functions 52 System settings Introduction of system adjustments 53 Changing the wide screen mode 53 Changing the picture adjustment 54 Setting the AV input 54 Setting the clock 55 Setting for rear view camera (back up camera...
... Initial Settings Adjusting initial settings 50 Switching the auxiliary setting 50 Setting the rear output and subwoofer controller 50 Changing languages for CAUTION 51 Switching the sound muting/attenuation 51 Entering PIN code for Bluetooth wireless connection 51 Correcting distorted sound 52 Auto TA and EQ (auto-time alignment and auto-equalizing) 52 Resetting the audio functions 52 System settings Introduction of system adjustments 53 Changing the wide screen mode 53 Changing the picture adjustment 54 Setting the AV input 54 Setting the clock 55 Setting for rear view camera (back up camera...
Owner's Manual
Page 7
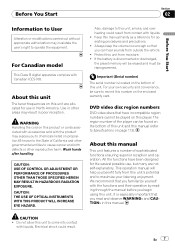
... CONTROL OR ADJUSTMENT OR PERFORMANCE OF PROCEDURES OTHER THAN THOSE SPECIFIED HEREIN MAY RESULT IN HAZARDOUS RADIATION EXPOSURE. Important (Serial number) The serial number is disconnected or discharged, the preset memory will help you read and observe WARNINGs and CAUTIONs in poor reception. For your listening enjoyment. DVD video disc region numbers DVD video discs that you benefit fully from outside the vehicle. ! About this manual...
... CONTROL OR ADJUSTMENT OR PERFORMANCE OF PROCEDURES OTHER THAN THOSE SPECIFIED HEREIN MAY RESULT IN HAZARDOUS RADIATION EXPOSURE. Important (Serial number) The serial number is disconnected or discharged, the preset memory will help you read and observe WARNINGs and CAUTIONs in poor reception. For your listening enjoyment. DVD video disc region numbers DVD video discs that you benefit fully from outside the vehicle. ! About this manual...
Owner's Manual
Page 9
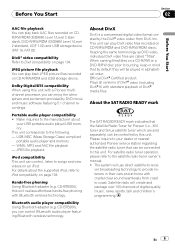
... audio player/USB memory. Hands-free phoning Using Bluetooth adapter (e.g. Please inquire to DivX compatibility on CD-R/RW/ROM and USB storage device. ver broadcasting technology to this unit realizes effortless hands-free phoning with standard playback of DivX® media files About the SAT RADIO READY mark The SAT RADIO READY mark indicates that by default they will be played in their cars and at home with a Pioneer multichannel processor, you can control Bluetooth audio player...
... audio player/USB memory. Hands-free phoning Using Bluetooth adapter (e.g. Please inquire to DivX compatibility on CD-R/RW/ROM and USB storage device. ver broadcasting technology to this unit realizes effortless hands-free phoning with standard playback of DivX® media files About the SAT RADIO READY mark The SAT RADIO READY mark indicates that by default they will be played in their cars and at home with a Pioneer multichannel processor, you can control Bluetooth audio player...

Owner's Manual
Page 12
...-2 - AUX 2 ! XM - SIRIUS - HD Radio tuner ! In the following cases, USB/iPod icon will not change. - When the AV (AV input) is connected to . The source names are displayed and selectable ones are highlighted. % When using the button, press SRC/OFF repeatedly to the DVD player, load a disc in the player. - Multi-CD player ! External unit 1 ! Bluetooth audio player ! XM tuner ! If the HD Radio tuner is not set to off (refer to turn the unit on % When using the button...
...-2 - AUX 2 ! XM - SIRIUS - HD Radio tuner ! In the following cases, USB/iPod icon will not change. - When the AV (AV input) is connected to . The source names are displayed and selectable ones are highlighted. % When using the button, press SRC/OFF repeatedly to the DVD player, load a disc in the player. - Multi-CD player ! External unit 1 ! Bluetooth audio player ! XM tuner ! If the HD Radio tuner is not set to off (refer to turn the unit on % When using the button...
Owner's Manual
Page 13
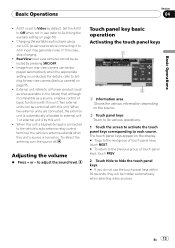
... in use the touch panel keys within 30 seconds, they will be displayed automatically when the appropriate setting is turned on page 55. ! Charging the portable audio player using car's DC power source while connecting it to adjust the sound level. For details, refer to Video by pressing SRC/OFF. ! When two external units are connected, the external unit is set to Setting for rear view camera (back up camera) on . Touch panel key basic operation Activating the touch panel...
... in use the touch panel keys within 30 seconds, they will be displayed automatically when the appropriate setting is turned on page 55. ! Charging the portable audio player using car's DC power source while connecting it to adjust the sound level. For details, refer to Video by pressing SRC/OFF. ! When two external units are connected, the external unit is set to Setting for rear view camera (back up camera) on . Touch panel key basic operation Activating the touch panel...
Owner's Manual
Page 19
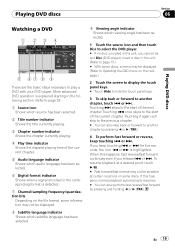
... p. Playing DVD discs Section 06 Playing DVD discs Watching a DVD 1 234 5 67 8 9 These are the basic steps necessary to another chapter, touch o or p. More advanced DVD operation is loaded in the unit, you cannot select Disc (DVD player). Touching p skips to page 15.) # With some discs. Touching o once skips to the start of the current chapter. 5 Audio language indicator Shows which audio language has been selected. 6 Digital format indicator Shows when a signal...
... p. Playing DVD discs Section 06 Playing DVD discs Watching a DVD 1 234 5 67 8 9 These are the basic steps necessary to another chapter, touch o or p. More advanced DVD operation is loaded in the unit, you cannot select Disc (DVD player). Touching p skips to page 15.) # With some discs. Touching o once skips to the start of the current chapter. 5 Audio language indicator Shows which audio language has been selected. 6 Digital format indicator Shows when a signal...
Owner's Manual
Page 24
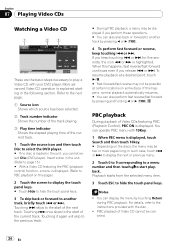
... reverse/fast forward by touching Return during PBC playback. Insert a disc in the following section. Touching p skips to the start of Video CDs featuring PBC (Playback Control), PBC ON is explained starting in the unit. (Refer to page 15.) # With a Video CD featuring the PBC (playback control) function, a menu is displayed, touch Search and then touch 10key. # Depending on this page.) 2 Touch the screen to display the touch...
... reverse/fast forward by touching Return during PBC playback. Insert a disc in the following section. Touching p skips to the start of Video CDs featuring PBC (Playback Control), PBC ON is explained starting in the unit. (Refer to page 15.) # With a Video CD featuring the PBC (playback control) function, a menu is displayed, touch Search and then touch 10key. # Depending on this page.) 2 Touch the screen to display the touch...
Owner's Manual
Page 35
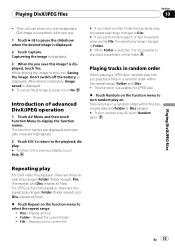
..., Image saved is displayed, touch Yes. Repeat all files). % Touch Repeat on the function menu to display the function names. Playing DivX/JPEG files Section 10 ! For JPEG picture file playback, there are three repeat play ranges: Folder (folder repeat) and Disc (repeat all files ! Captureing the image is overwitten with new one image data. While storing the image to play off the battery. Folder - Old image is displayed. 3 When Do you save this unit, Saving the image Don't switch off , touch...
..., Image saved is displayed, touch Yes. Repeat all files). % Touch Repeat on the function menu to display the function names. Playing DivX/JPEG files Section 10 ! For JPEG picture file playback, there are three repeat play ranges: Folder (folder repeat) and Disc (repeat all files ! Captureing the image is overwitten with new one image data. While storing the image to play off the battery. Folder - Old image is displayed. 3 When Do you save this unit, Saving the image Don't switch off , touch...
Owner's Manual
Page 47
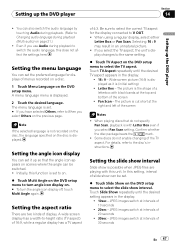
... on the DVD setup menu to V OUT. ! Touch TV Aspect repeatedly until the desired setting appears in the display. ! 10sec - Touch Slide Show repeatedly until the desired TV aspect appears in an unnatural picture. ! Setting the menu language You can also switch the audio language by touching Audio during playback. (Refer to Changing audio language during playback to the disc's instructions. For details, refer to switch the audio language, this unit. JPEG images switch at...
... on the DVD setup menu to V OUT. ! Touch TV Aspect repeatedly until the desired setting appears in the display. ! 10sec - Touch Slide Show repeatedly until the desired TV aspect appears in an unnatural picture. ! Setting the menu language You can also switch the audio language by touching Audio during playback. (Refer to Changing audio language during playback to the disc's instructions. For details, refer to switch the audio language, this unit. JPEG images switch at...
Owner's Manual
Page 48
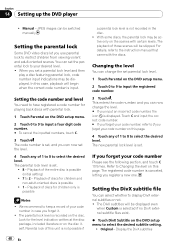
... DVD video discs let you input an incorrect code number, the icon is possible (initial setting) ! 7 to select the desired subtitle setting. ! Display the DivX subtitles 48 En Manual - Playback of this page. Section 14 Setting up the DVD player ! Changing the level You can select whether to restrict children from viewing violent and adult-oriented scenes. The parental lock level is selected if no DivX external subtitle files exist. % Touch DivX...
... DVD video discs let you input an incorrect code number, the icon is possible (initial setting) ! 7 to select the desired subtitle setting. ! Display the DivX subtitles 48 En Manual - Playback of this page. Section 14 Setting up the DVD player ! Changing the level You can select whether to restrict children from viewing violent and adult-oriented scenes. The parental lock level is selected if no DivX external subtitle files exist. % Touch DivX...
Owner's Manual
Page 52
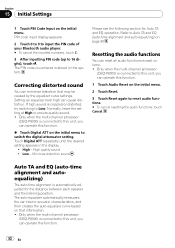
... Settings 1 Touch PIN Code Input on page 90 Resetting the audio functions You can reset all audio functions except volume. ! Correcting distorted sound You can minimize distortion that information. ! Only when the multi-channel processor (DEQ-P8000) is connected to ensure quality sound. ! Only when the multi-channel processor (DEQ-P8000) is automatically adjusted for Auto TA and EQ operation. PIN code input display appears. 2 Touch 0 to 9 to input the PIN code of your Bluetooth audio player. # To cancel the inputted numbers, touch...
... Settings 1 Touch PIN Code Input on page 90 Resetting the audio functions You can reset all audio functions except volume. ! Correcting distorted sound You can minimize distortion that information. ! Only when the multi-channel processor (DEQ-P8000) is connected to ensure quality sound. ! Only when the multi-channel processor (DEQ-P8000) is automatically adjusted for Auto TA and EQ operation. PIN code input display appears. 2 Touch 0 to 9 to input the PIN code of your Bluetooth audio player. # To cancel the inputted numbers, touch...
Owner's Manual
Page 55
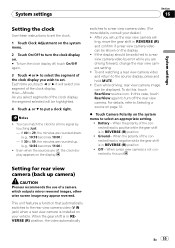
.... (e.g., 10:18 becomes 10:00.) - Each time you touch c or d it will be shown on the display. ! You can be switched to a rear view camera video by touching Just. - Battery - System settings Section 16 System settings Setting the clock Use these instructions to set the clock. 1 Touch Clock Adjustment on the system menu. 2 Touch On/Off to turn the clock display on. # To turn off , the clock display appears on the display. To end watching a rear view camera video and return to the source display, press and hold...
.... (e.g., 10:18 becomes 10:00.) - Each time you touch c or d it will be shown on the display. ! You can be switched to a rear view camera video by touching Just. - Battery - System settings Section 16 System settings Setting the clock Use these instructions to set the clock. 1 Touch Clock Adjustment on the system menu. 2 Touch On/Off to turn the clock display on. # To turn off , the clock display appears on the display. To end watching a rear view camera video and return to the source display, press and hold...
Owner's Manual
Page 77
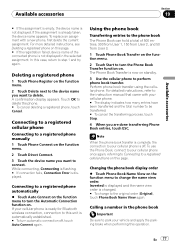
... ready for Bluetooth wireless connection, connection to this unit is now on the function menu to delete the phone. # To cancel deleting a registered phone, touch Cancel. Changing the phone book display order % Touch Phone Book Name View on standby. 3 Use the cellular phone to perform phone book transfer. In this operation. Connecting to a registered phone automatically % Touch Auto Connect on the function menu to turn the Phone Book Transfer function on this page. # If the registration failed, device name of...
... ready for Bluetooth wireless connection, connection to this unit is now on the function menu to delete the phone. # To cancel deleting a registered phone, touch Cancel. Changing the phone book display order % Touch Phone Book Name View on standby. 3 Use the cellular phone to perform phone book transfer. In this operation. Connecting to a registered phone automatically % Touch Auto Connect on the function menu to turn the Phone Book Transfer function on this page. # If the registration failed, device name of...
Owner's Manual
Page 83
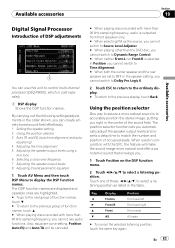
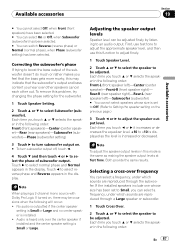
... adjustments 1 You can create a finely-tuned sound field effortlessly. 1 Setting the speaker setting 2 Using the position selector 3 Auto TA and EQ (auto-time alignment and auto- En 83 equalizing) 4 Adjusting the time alignment 5 Adjusting the speaker output levels using a test tone 6 Selecting a cross-over frequency 7 Adjusting the speaker output levels 8 Adjusting 3-band parametric equalizer 1 Touch AV Menu and then touch DSP Menu to control multi-channel processor (DEQ-P8000), which is sold separately. 1 DSP display Shows the DSP function...
... adjustments 1 You can create a finely-tuned sound field effortlessly. 1 Setting the speaker setting 2 Using the position selector 3 Auto TA and EQ (auto-time alignment and auto- En 83 equalizing) 4 Adjusting the time alignment 5 Adjusting the speaker output levels using a test tone 6 Selecting a cross-over frequency 7 Adjusting the speaker output levels 8 Adjusting 3-band parametric equalizer 1 Touch AV Menu and then touch DSP Menu to control multi-channel processor (DEQ-P8000), which is sold separately. 1 DSP display Shows the DSP function...
Owner's Manual
Page 87
... which sounds are reproduced through the subwoofer. Note To adjust the speaker output levels in this problem, try changing the phase setting for the subwoofer. 1 Touch Speaker Setting. 2 Touch a or b to select normal phase and Normal appears in the following order: Front-L (front speaker left )-Subwoofer (subwoofer) # You cannot select speakers whose size has been set to Off. (Refer to Setting the speaker setting on . # To turn subwoofer output off, touch c. 4 Touch b and then touch c or d to select reverse...
... which sounds are reproduced through the subwoofer. Note To adjust the speaker output levels in this problem, try changing the phase setting for the subwoofer. 1 Touch Speaker Setting. 2 Touch a or b to select normal phase and Normal appears in the following order: Front-L (front speaker left )-Subwoofer (subwoofer) # You cannot select speakers whose size has been set to Off. (Refer to Setting the speaker setting on . # To turn subwoofer output off, touch c. 4 Touch b and then touch c or d to select reverse...

Owner's Manual
Page 98
... level is displayed, connect the cable again. Reset the iPod. Message Cause Action Error. Please check Rear speaker., Error. Please check MIC. Stop your car in the current list Action Disconnect the cable from iPod. After checking, try again. Confirm that is and the suggested method of the power amp connected to iPod. Correct the input level setting of correcting the problem. Once iPod main menu is too high. ! Update the iPod version. Transfer...
... level is displayed, connect the cable again. Reset the iPod. Message Cause Action Error. Please check Rear speaker., Error. Please check MIC. Stop your car in the current list Action Disconnect the cable from iPod. After checking, try again. Confirm that is and the suggested method of the power amp connected to iPod. Correct the input level setting of correcting the problem. Once iPod main menu is too high. ! Update the iPod version. Transfer...
Installation Manual
Page 2
... wiring to remain exposed. • Do not drill a hole into the engine compartment. Contents Connecting the units 2 Parts supplied 4 Connecting the system 5 Connecting the power cord 6 When connecting to separately sold power amp 8 When connecting with a rear view camera 9 When connecting with a multi-channel processor 10 Connecting and installing the optical cable connection box 11 Connecting the optical cable 11 Installing the optical cable connection box ..........11 When connecting the external video component and the display 12 When using a display connected to rear video...
... wiring to remain exposed. • Do not drill a hole into the engine compartment. Contents Connecting the units 2 Parts supplied 4 Connecting the system 5 Connecting the power cord 6 When connecting to separately sold power amp 8 When connecting with a rear view camera 9 When connecting with a multi-channel processor 10 Connecting and installing the optical cable connection box 11 Connecting the optical cable 11 Installing the optical cable connection box ..........11 When connecting the external video component and the display 12 When using a display connected to rear video...
Installation Manual
Page 12
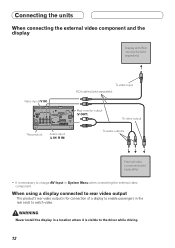
... external video component. Connecting the units When connecting the external video component and the display Display with RCA input jacks (sold separately) Video input (V IN) This product Audio input (L IN, R IN) To video input RCA cables (sold separately) Rear monitor output (V OUT) To video output To audio outputs External video component (sold separately) • It is necessary to change AV Input in a location where it is for connection of a display to enable passengers in the rear seats to the driver while driving. 12 When using a display connected to rear video output...
... external video component. Connecting the units When connecting the external video component and the display Display with RCA input jacks (sold separately) Video input (V IN) This product Audio input (L IN, R IN) To video input RCA cables (sold separately) Rear monitor output (V OUT) To video output To audio outputs External video component (sold separately) • It is necessary to change AV Input in a location where it is for connection of a display to enable passengers in the rear seats to the driver while driving. 12 When using a display connected to rear video output...


