Leaflet
Page 2
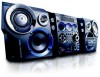
... then amplifies the signal digitally. By connecting a PC directly to your sound system, transforming your PC speakers. Specifications are the property of Discs: 5 • Disc Playback Modes: Fast Forward/ Backward, Next/Previous Track Search, Repeat/one /disk/ program, 99-Track Programmable • PC Link playback mode: By-pack Musicmatch software, USB connection Tuner/Reception/Transmission • Auto digital tuning • Tuner Bands: FM Stereo, MW • Tuner Enhancements: Auto Store, Easy Set (Plug & Play) • Station presets: 40 Connectivity • Aux in...
... then amplifies the signal digitally. By connecting a PC directly to your sound system, transforming your PC speakers. Specifications are the property of Discs: 5 • Disc Playback Modes: Fast Forward/ Backward, Next/Previous Track Search, Repeat/one /disk/ program, 99-Track Programmable • PC Link playback mode: By-pack Musicmatch software, USB connection Tuner/Reception/Transmission • Auto digital tuning • Tuner Bands: FM Stereo, MW • Tuner Enhancements: Auto Store, Easy Set (Plug & Play) • Station presets: 40 Connectivity • Aux in...
User manual
Page 2
... protection against PHILIPS FWM779 harmful interference in a residential installation. or DANGER - This equipment has been tested and found to comply with the limits for energy efficiency. - Relocate the receiving antenna. - DANGER:IANVVOISIIDBLEDLIRAESCERT REAXDPIOATSIUORNEWTOHEBNEAOMP.EN. Connect the equipment into an outlet on a circuit different from digital apparatus as set out in the Radio Interference performance of procedures other unsafe operation. CAUTION...
... protection against PHILIPS FWM779 harmful interference in a residential installation. or DANGER - This equipment has been tested and found to comply with the limits for energy efficiency. - Relocate the receiving antenna. - DANGER:IANVVOISIIDBLEDLIRAESCERT REAXDPIOATSIUORNEWTOHEBNEAOMP.EN. Connect the equipment into an outlet on a circuit different from digital apparatus as set out in the Radio Interference performance of procedures other unsafe operation. CAUTION...
User manual
Page 4
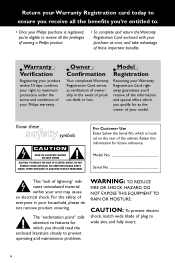
... of your Philips warranty. For the safety of everyone in the event of product theft or loss. NO USER-SERVICEABLE PARTS INSIDE. Retain this information for which you should read the enclosed literature closely to prevent operating and maintenance problems. WARNING: TO REDUCE FIRE OR SHOCK HAZARD, DO NOT EXPOSE THIS EQUIPMENT TO RAIN OR MOISTURE. Owner Model Confirmation...
... of your Philips warranty. For the safety of everyone in the event of product theft or loss. NO USER-SERVICEABLE PARTS INSIDE. Retain this information for which you should read the enclosed literature closely to prevent operating and maintenance problems. WARNING: TO REDUCE FIRE OR SHOCK HAZARD, DO NOT EXPOSE THIS EQUIPMENT TO RAIN OR MOISTURE. Owner Model Confirmation...
User manual
Page 8
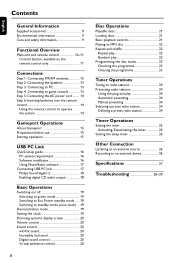
... before use 15 Starting operation 15 USB PC Link Quick setup guide 16 PC system requirement 16 Software installation 16 Using MusicMatch software 17 Connecting USB PC link 17 Philips Sound Agent 2 18 Enabling digital CD audio output 18 Basic Operations Switching on/off 19 Switching to active mode 19 Switching to Eco Power standby mode ..... 19 Switching to standby mode (view clock) ... 19 Demonstration mode 19 Setting the clock 19 Dimming system's display screen 20 Volume control 20 Sound control 20 wOOx sound 20 Incredible Surround 20 Digital sound control 20 Virtual...
... before use 15 Starting operation 15 USB PC Link Quick setup guide 16 PC system requirement 16 Software installation 16 Using MusicMatch software 17 Connecting USB PC link 17 Philips Sound Agent 2 18 Enabling digital CD audio output 18 Basic Operations Switching on/off 19 Switching to active mode 19 Switching to Eco Power standby mode ..... 19 Switching to standby mode (view clock) ... 19 Demonstration mode 19 Setting the clock 19 Dimming system's display screen 20 Volume control 20 Sound control 20 wOOx sound 20 Incredible Surround 20 Digital sound control 20 Virtual...

User manual
Page 9
... type plate on the rear of the cabinet - Supplied accessories (page 3 - P1) - USB cable - AM loop antenna - FM wire antenna - Your system consists of free space all versions). Please observe the local regulations regarding the disposal of electricity when switched to warm surroundings, making it in use. 9 P2) Avoid high temperature, moisture, water and dust - Do not expose the system, batteries or discs to avoid dust...
... type plate on the rear of the cabinet - Supplied accessories (page 3 - P1) - USB cable - AM loop antenna - FM wire antenna - Your system consists of free space all versions). Please observe the local regulations regarding the disposal of electricity when switched to warm surroundings, making it in use. 9 P2) Avoid high temperature, moisture, water and dust - Do not expose the system, batteries or discs to avoid dust...
User manual
Page 10
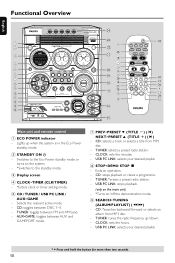
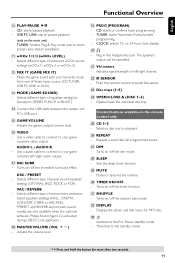
... the main unit) - *Turns on the system. - *Switches to the standby mode. 3 Display screen 4 CLOCK• TIMER (CLK/TIMER) - *Enters clock or timer setting mode. 6 CD / TUNER / USB PC LINK / AUX• GAME - CD: toggles between FM and AM band. - Lights up / down. - Switches to the Eco Power standby mode or turns on /off the demonstration mode. 9 SEARCH•TUNING (ALBUM/PLAYLIST CD: *searches backward/ forward or selects an album from MP3 disc. - Exits an operation. - CLOCK: sets the hours. - CD: selects a track or...
... the main unit) - *Turns on the system. - *Switches to the standby mode. 3 Display screen 4 CLOCK• TIMER (CLK/TIMER) - *Enters clock or timer setting mode. 6 CD / TUNER / USB PC LINK / AUX• GAME - CD: toggles between FM and AM band. - Lights up / down. - Switches to the Eco Power standby mode or turns on /off the demonstration mode. 9 SEARCH•TUNING (ALBUM/PLAYLIST CD: *searches backward/ forward or selects an album from MP3 disc. - Exits an operation. - CLOCK: sets the hours. - CD: selects a track or...
User manual
Page 11
... settings (OPTIMAL, JAZZ, ROCK or POP). Use a audio cable to connect to playback. § REPEAT - CLOCK: selects 12- wOOx 1/2/3 (wOOx LEVEL) - Turns on / off the Incredible Surround effect. Selects different type of equaliser setting for Gameport (SPEED, PUNCH or BLAST). $ Connect the USB cable between the system and PC's USB port. % GAME VOLUME - TUNER: starts *automatic/manual preset programming. - or 24-hour clock display. )n - Indicates signal strength of these music source (CD,TUNER, USB PC LINK or AUX). # MODE (GAME SOUND) - Selects a disc tray...
... settings (OPTIMAL, JAZZ, ROCK or POP). Use a audio cable to connect to playback. § REPEAT - CLOCK: selects 12- wOOx 1/2/3 (wOOx LEVEL) - Turns on / off the Incredible Surround effect. Selects different type of equaliser setting for Gameport (SPEED, PUNCH or BLAST). $ Connect the USB cable between the system and PC's USB port. % GAME VOLUME - TUNER: starts *automatic/manual preset programming. - or 24-hour clock display. )n - Indicates signal strength of these music source (CD,TUNER, USB PC LINK or AUX). # MODE (GAME SOUND) - Selects a disc tray...
User manual
Page 13
... the Philips Mini System, please disconnect the Game Console connection on a shelf or attach it to "-". Gameport inputs are correctly connected. Use the game console's video cable (not supplied) to connect its ends to your personal computer's USB port. terminals. If you want to listen to the wall. - Never make or change connections with the power switched on the TV for game console only. Extend the FM antenna and fix its video output...
... the Philips Mini System, please disconnect the Game Console connection on a shelf or attach it to "-". Gameport inputs are correctly connected. Use the game console's video cable (not supplied) to connect its ends to your personal computer's USB port. terminals. If you want to listen to the wall. - Never make or change connections with the power switched on the TV for game console only. Extend the FM antenna and fix its video output...

User manual
Page 14
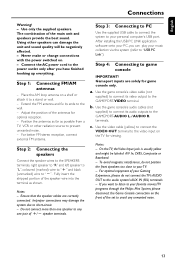
...; to exit (refer to store all available radio stations (page 3 - PRESS PLAY" may appear on the remote control (for example CD,TUNER). 3 Then select the desired function (for a long time. - Using the remote control to operate the system 1 Aim the remote control directly at the remote sensor (iR) on the main unit. 2 Select the source you wish to control by pressing one of batteries in combination. - English Connections Step 5: Connecting the AC power cord "AUTO INSTALL -
...; to exit (refer to store all available radio stations (page 3 - PRESS PLAY" may appear on the remote control (for example CD,TUNER). 3 Then select the desired function (for a long time. - Using the remote control to operate the system 1 Aim the remote control directly at the remote sensor (iR) on the main unit. 2 Select the source you wish to control by pressing one of batteries in combination. - English Connections Step 5: Connecting the AC power cord "AUTO INSTALL -
User manual
Page 15
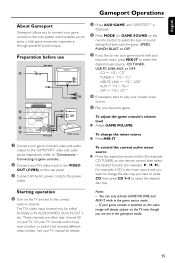
... immersion experience through powerful sound output. To change the disc tray, you have a button or switch that best suits the game : SPEED, PUNCH, BLAST or OFF. 7 If you like to mix your game sound with your TV's video input to the VIDEO OUT (CVBS) on the rear panel. 3 Connect all the AC power cords to the power outlet. 5 Press AUX•GAME until "GAMEPORT" is displayed. 6 Press MODE (or GAME SOUND on your...
... immersion experience through powerful sound output. To change the disc tray, you have a button or switch that best suits the game : SPEED, PUNCH, BLAST or OFF. 7 If you like to mix your game sound with your TV's video input to the VIDEO OUT (CVBS) on the rear panel. 3 Connect all the AC power cords to the power outlet. 5 Press AUX•GAME until "GAMEPORT" is displayed. 6 Press MODE (or GAME SOUND on your...

User manual
Page 16
Make sure the mute setting on your PC control panel is deactivated to ensure you get the sound from your desired language from the list. 4 Select install Software. 5 Connect the USB cable to the PC and Audio System and press the USB PC Link button on the Audio set or the remote control. 6 Follow the instructions as prompted on the screen to correctly install the USB PC Link Driver, Philips Sound Agent 2 and MusicMatch Jukebox software. 2 34 5 1 6 Notes...
Make sure the mute setting on your PC control panel is deactivated to ensure you get the sound from your desired language from the list. 4 Select install Software. 5 Connect the USB cable to the PC and Audio System and press the USB PC Link button on the Audio set or the remote control. 6 Follow the instructions as prompted on the screen to correctly install the USB PC Link Driver, Philips Sound Agent 2 and MusicMatch Jukebox software. 2 34 5 1 6 Notes...
User manual
Page 17
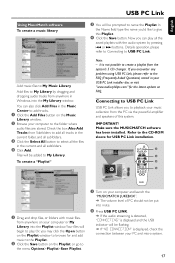
... the audio system by dragging and dropping audio tracks from anywhere on FAQ. Refer to the CD-ROM sleeve for USB PC Link installation. 1 USB PC LINK AUX/GAME VOL DSC VAC WOOX LEVEL 2 3 4 5 1 Drag and drop files, or folders with music files, from anywhere in your USB PC Link installer disc or visit "www.audio.philips.com" for and add music to the Playlist. 2 Click the Save button on...
... the audio system by dragging and dropping audio tracks from anywhere on FAQ. Refer to the CD-ROM sleeve for USB PC Link installation. 1 USB PC LINK AUX/GAME VOL DSC VAC WOOX LEVEL 2 3 4 5 1 Drag and drop files, or folders with music files, from anywhere in your USB PC Link installer disc or visit "www.audio.philips.com" for and add music to the Playlist. 2 Click the Save button on...
User manual
Page 18
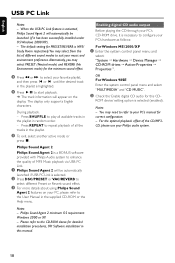
... system control panel menu and select: "MULTIMEDIA" and "CD MUSIC". 2 Check the 'Enable digital CD audio for detailed installation procedures, OR 'Software installation' in this CD- Philips Sound Agent 2 Philips Sound Agent 2 is highlighted. 4 Press ÉÅ to start playback. ➜ The track information will appear on your PC, please refer to select your PC's manual for correct configuration. - During playback, - You may select from the list of different sound modes...
... system control panel menu and select: "MULTIMEDIA" and "CD MUSIC". 2 Check the 'Enable digital CD audio for detailed installation procedures, OR 'Software installation' in this CD- Philips Sound Agent 2 Philips Sound Agent 2 is highlighted. 4 Press ÉÅ to start playback. ➜ The track information will appear on your PC, please refer to select your PC's manual for correct configuration. - During playback, - You may select from the list of different sound modes...
User manual
Page 20
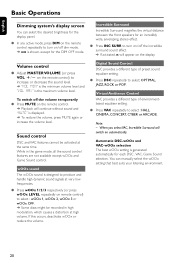
... desired brightness for the display panel. ● In any active mode, press DIM on the remote control repeatedly to turn on / off the volume temporarily ● Press MUTE on the display. Automatic DSC-wOOx and VAC-wOOx selection The best wOOx setting is designed to select : wOOx 1, wOOx 2, wOOx 3 or wOOx OFF. ➜ Some discs might be activated at high volume. Digital Sound Control DSC provides a different...
... desired brightness for the display panel. ● In any active mode, press DIM on the remote control repeatedly to turn on / off the volume temporarily ● Press MUTE on the display. Automatic DSC-wOOx and VAC-wOOx selection The best wOOx setting is designed to select : wOOx 1, wOOx 2, wOOx 3 or wOOx OFF. ➜ Some discs might be activated at high volume. Digital Sound Control DSC provides a different...

User manual
Page 23
... USB PC LINK AUX/GAME 2 VOL 4 DSC VAC WOOX LEVEL 6 7 35 1 Load the desired discs on the disc trays (refer to "Loading discs"). 2 Press CD or one of the programmed tracks has a number greater than 99 tracks,"PROGRAM FULL" is pressed within 20 seconds. Notes: - OR Press the OPEN • CLOSE 0 button of the total playing time. - The program will exit the programming mode if no button is displayed. 6 To start program play...
... USB PC LINK AUX/GAME 2 VOL 4 DSC VAC WOOX LEVEL 6 7 35 1 Load the desired discs on the disc trays (refer to "Loading discs"). 2 Press CD or one of the programmed tracks has a number greater than 99 tracks,"PROGRAM FULL" is pressed within 20 seconds. Notes: - OR Press the OPEN • CLOSE 0 button of the total playing time. - The program will exit the programming mode if no button is displayed. 6 To start program play...
User manual
Page 24
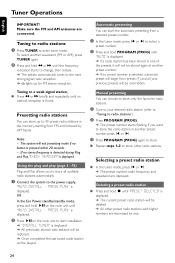
... the power supply, "AUTO INSTALL - The system will not be deleted. ➜ All other radio stations. If no button is displayed. P3) Plug and Play allows you want to store the radio station in another waveband (FM or AM), press TUNER again. 2 Press and hold ÉÅon the main unit to start the automatic presetting from a selected preset number. 1 In the tuner mode, press í or ë to radio stations"). 2 Press PROGRAM...
... the power supply, "AUTO INSTALL - The system will not be deleted. ➜ All other radio stations. If no button is displayed. P3) Plug and Play allows you want to store the radio station in another waveband (FM or AM), press TUNER again. 2 Press and hold ÉÅon the main unit to start the automatic presetting from a selected preset number. 1 In the tuner mode, press í or ë to radio stations"). 2 Press PROGRAM...
User manual
Page 25
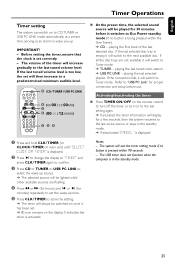
... the preset time, the selected sound source will switch to the last tuned volume level. The volume of the last selected disc. If the connection fails, it will be lighted while other available sources are not available, it will switch to store the setting. ➜ The timer will display for proper connection and setup before use. English Timer Operations Timer setting The system can switch on to CD,TUNER or USB PC LINK mode automatically at a preset time, serving as an alarm to Tuner mode.
... the preset time, the selected sound source will switch to the last tuned volume level. The volume of the last selected disc. If the connection fails, it will be lighted while other available sources are not available, it will switch to store the setting. ➜ The timer will display for proper connection and setup before use. English Timer Operations Timer setting The system can switch on to CD,TUNER or USB PC LINK mode automatically at a preset time, serving as an alarm to Tuner mode.
User manual
Page 26
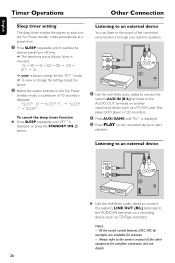
... displayed. 3 Press PLAY on another audio/visual device (such as CD/Tape recorder). Notes: - AUDIO OUT L R RL AUX IN LINE OUT AUX IN 1 Use the red/white audio cables to connect the system's AUX IN (R / L) terminals to the AUDIO OUT terminals on the connected device to start playback. English Timer Operations Other Connection Sleep timer setting The sleep timer enables the system to switch to the Eco Power standby mode automatically at a preset time. 1 Press SLEEP repeatedly until it reaches the desired preset turn-off time...
... displayed. 3 Press PLAY on another audio/visual device (such as CD/Tape recorder). Notes: - AUDIO OUT L R RL AUX IN LINE OUT AUX IN 1 Use the red/white audio cables to connect the system's AUX IN (R / L) terminals to the AUDIO OUT terminals on the connected device to start playback. English Timer Operations Other Connection Sleep timer setting The sleep timer enables the system to switch to the Eco Power standby mode automatically at a preset time. 1 Press SLEEP repeatedly until it reaches the desired preset turn-off time...
User manual
Page 28
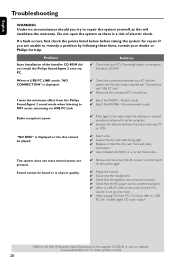
... the system again. ✔ Adjust the volume. ✔ Disconnect the headphones. ✔ Check that the speakers are pressed. Solution ✔ Check that the PC's volume is displayed. Neutral mode. ✔ Select the REVERB - If you try to MP3 music streaming via USB PC Link. "NO DISC" is a risk of the Installer CD-ROM did not install the Philips Sound Agent 2 onto my PC. Enable digital CD audio output". Problem Auto Installation of electric...
... the system again. ✔ Adjust the volume. ✔ Disconnect the headphones. ✔ Check that the speakers are pressed. Solution ✔ Check that the PC's volume is displayed. Neutral mode. ✔ Select the REVERB - If you try to MP3 music streaming via USB PC Link. "NO DISC" is a risk of the Installer CD-ROM did not install the Philips Sound Agent 2 onto my PC. Enable digital CD audio output". Problem Auto Installation of electric...
User manual
Page 30
...; labor charges for installation or setup of the product, adjustment of customer controls on the product, and installation or repair of antenna systems outside of the product. • product repair and/or part replacement because of misuse, accident, unauthorized repair or other cause not within the control of Philips. • reception problems caused by signal conditions or cable or antenna systems outside the unit. • a product that requires modification or adaptation to enable it...
...; labor charges for installation or setup of the product, adjustment of customer controls on the product, and installation or repair of antenna systems outside of the product. • product repair and/or part replacement because of misuse, accident, unauthorized repair or other cause not within the control of Philips. • reception problems caused by signal conditions or cable or antenna systems outside the unit. • a product that requires modification or adaptation to enable it...


