

Leaflet
Page 1
... the latest LCD technology. Philips flat HDTV with Pixel Plus 2 HD and Ambilight 2 channel 42" LCD 42PF9830A Turn up your viewing experience with Pixel Plus 2 HD and Ambilight 2 Enjoy the ultimate viewing experience with this Philips integrated HDTV with motorized swivel included Perfect picture quality from your digital photos • USB and Memory-Card slot for instantly playing multimedia Advanced connection to your audio/video products • HDMI input for great...
... the latest LCD technology. Philips flat HDTV with Pixel Plus 2 HD and Ambilight 2 channel 42" LCD 42PF9830A Turn up your viewing experience with Pixel Plus 2 HD and Ambilight 2 Enjoy the ultimate viewing experience with this Philips integrated HDTV with motorized swivel included Perfect picture quality from your digital photos • USB and Memory-Card slot for instantly playing multimedia Advanced connection to your audio/video products • HDMI input for great...

Leaflet
Page 2
... the HDTV signal, a television must incorporate advanced signal input connectivity and circuitry design. When a CableCARD is included in the wall. Invisible Cable management is inserted, the television receives high-value highdefinition, cable programming. HDMI input HDMI makes an uncompressed digital RGB connection from the source to an analog signal, it delivers an unblemished image. A CableCARD-enabled television without drilling holes in the back. USB and Memory Card slot Instantaneously view and share your Flat...
... the HDTV signal, a television must incorporate advanced signal input connectivity and circuitry design. When a CableCARD is included in the wall. Invisible Cable management is inserted, the television receives high-value highdefinition, cable programming. HDMI input HDMI makes an uncompressed digital RGB connection from the source to an analog signal, it delivers an unblemished image. A CableCARD-enabled television without drilling holes in the back. USB and Memory Card slot Instantaneously view and share your Flat...

Leaflet
Page 3
...: Child Lock+Parental Control • Clock: Smart Clock • Ease of Installation: Automatic Tuning System (ATS), Autostore, PLL Digital Tuning, Plug & Play • Ease of Use: Channel list, Delta Volume per preset, On Screen Display, Side Control, Smart Picture, Smart Sound • Picture in Picture: HDMI-Component PIP • Remote Control: Amp, CBL, DVD, DVD-R, Sat, STB (Set-Top Box), Universal and Learnable, VCR • Remote control type: RC4318 • Screen Format Adjustments: 7 Widescreen Modes, Auto Format, Subtitle and Heading Shift • Teletext: Closed Captioning Full...
...: Child Lock+Parental Control • Clock: Smart Clock • Ease of Installation: Automatic Tuning System (ATS), Autostore, PLL Digital Tuning, Plug & Play • Ease of Use: Channel list, Delta Volume per preset, On Screen Display, Side Control, Smart Picture, Smart Sound • Picture in Picture: HDMI-Component PIP • Remote Control: Amp, CBL, DVD, DVD-R, Sat, STB (Set-Top Box), Universal and Learnable, VCR • Remote control type: RC4318 • Screen Format Adjustments: 7 Widescreen Modes, Auto Format, Subtitle and Heading Shift • Teletext: Closed Captioning Full...
User manual
Page 2
....) • Remove batteries when the unit is connected to the receiver, be located away from the top of the cabinet which could unsuspectingly fall and liquids are provided for a long time. To prevent battery leakage that objects do not endanger yourself, or children, by qualified service personnel when: A. IMPORTANT SAFETY INSTRUCTIONS Read before operating equipment 1. Read these instructions. 3. Clean...
....) • Remove batteries when the unit is connected to the receiver, be located away from the top of the cabinet which could unsuspectingly fall and liquids are provided for a long time. To prevent battery leakage that objects do not endanger yourself, or children, by qualified service personnel when: A. IMPORTANT SAFETY INSTRUCTIONS Read before operating equipment 1. Read these instructions. 3. Clean...

User manual
Page 3
... 8 To use the menus 9 Introduction 9 How to be recycled and reused. Philips TV software upgrade with background music 48 Annex 3 - Help? and video equipment buttons 38 Setting the remote control to work accessory devices 39 Code setup 39 To cancel the selected mode 39 Learnable remote control 41 To put the remote control function buttons back to producing environmentally-friendly in green focal areas. Philips TV - Please, have the Model and Serial number which...
... 8 To use the menus 9 Introduction 9 How to be recycled and reused. Philips TV software upgrade with background music 48 Annex 3 - Help? and video equipment buttons 38 Setting the remote control to work accessory devices 39 Code setup 39 To cancel the selected mode 39 Learnable remote control 41 To put the remote control function buttons back to producing environmentally-friendly in green focal areas. Philips TV - Please, have the Model and Serial number which...

User manual
Page 4
... of CableCARD.The CableCARD is required to receive premium digital TV channels and services (where available) through the cable antenna. Consult your cable company on the supplied stand. Avoid heat, direct sunlight and exposure to dripping or splashing. Philips bears no naked flame sources, such as lighted candles, should not attempt to do not need to 6" free all connections are made. & Place the TV on...
... of CableCARD.The CableCARD is required to receive premium digital TV channels and services (where available) through the cable antenna. Consult your cable company on the supplied stand. Avoid heat, direct sunlight and exposure to dripping or splashing. Philips bears no naked flame sources, such as lighted candles, should not attempt to do not need to 6" free all connections are made. & Place the TV on...

User manual
Page 5
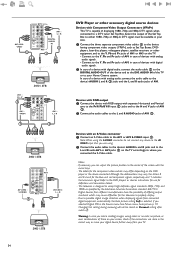
... cable box. via cable, - CABLE HDMI 1 HDMCIA2BLE / ANTENNA 75 TO TV OUTPUT 2 IN OUT 3 STB CABLE 1 SIGNAL SPLITTER H Pr L V Pb R VIDEO AV1 S-VIDEO Y DIGITAL AUDIO IN AV3 CABLE / ANTENNA DIGITAL AUDIO OUT 75 2 S-VIDEO AV2 VIDEO Pr L Pb R Y MONITOR OUT L R VIDEO IR OUT 4 AV2 : L + R + VIDEO 3 IN OUT STB Watching Cable TV programs that don't require the cable box Since you've connected the cable TV signal directly to the TV's tuner, you will not supply video and stereo audio to a signal splitter (not supplied).The signal...
... cable box. via cable, - CABLE HDMI 1 HDMCIA2BLE / ANTENNA 75 TO TV OUTPUT 2 IN OUT 3 STB CABLE 1 SIGNAL SPLITTER H Pr L V Pb R VIDEO AV1 S-VIDEO Y DIGITAL AUDIO IN AV3 CABLE / ANTENNA DIGITAL AUDIO OUT 75 2 S-VIDEO AV2 VIDEO Pr L Pb R Y MONITOR OUT L R VIDEO IR OUT 4 AV2 : L + R + VIDEO 3 IN OUT STB Watching Cable TV programs that don't require the cable box Since you've connected the cable TV signal directly to the TV's tuner, you will not supply video and stereo audio to a signal splitter (not supplied).The signal...

User manual
Page 6
... from the Settings menu. Insert the power cord in the TV's memory. The Installation procedure consists of a series of screens that a given broadcaster will supply stereo sound to local regulations. § Turn the TV on screen continuously change language.) é Press the cursor up . Note: Once you completed the initial installation procedure you 'll need to store channels in the wall socket. CABLE CABLE / ANTENNA 75 - Antenna Via antenna you live...
... from the Settings menu. Insert the power cord in the TV's memory. The Installation procedure consists of a series of screens that a given broadcaster will supply stereo sound to local regulations. § Turn the TV on screen continuously change language.) é Press the cursor up . Note: Once you completed the initial installation procedure you 'll need to store channels in the wall socket. CABLE CABLE / ANTENNA 75 - Antenna Via antenna you live...
User manual
Page 8
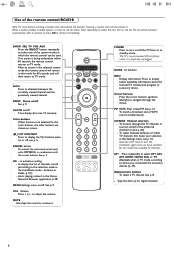
... color buttons are shown on or off . See p. 9. MUTE Interrupt the sound or restore it is being undertaken within 60 seconds, the remote control returns to alternate between Antenna or Cable TV channels, first make your selection in TV mode, according to remove immediately. ON/OFF Ambilight MODE ® Ò ‡ † SCREEN - FAVORITES - º FORMAT VIEW ✓ π POWER Press to turn on/off Time display (for digital channels...
... color buttons are shown on or off . See p. 9. MUTE Interrupt the sound or restore it is being undertaken within 60 seconds, the remote control returns to alternate between Antenna or Cable TV channels, first make your selection in TV mode, according to remove immediately. ON/OFF Ambilight MODE ® Ò ‡ † SCREEN - FAVORITES - º FORMAT VIEW ✓ π POWER Press to turn on/off Time display (for digital channels...

User manual
Page 12
... tuned, then in Background Autoprogramming the TV shall scan all channels. When Autoprogramming is displayed. " Press the OK button. ' Select Cable or Antenna in standby (after 3 minutes and every 3 hours thereafter). • When interrupted, the updated channel information is turned on. • Channel information of equipment are completed. ( Press the green button "Next" on the remote control. é Use the cursor down and press the OK...
... tuned, then in Background Autoprogramming the TV shall scan all channels. When Autoprogramming is displayed. " Press the OK button. ' Select Cable or Antenna in standby (after 3 minutes and every 3 hours thereafter). • When interrupted, the updated channel information is turned on. • Channel information of equipment are completed. ( Press the green button "Next" on the remote control. é Use the cursor down and press the OK...

User manual
Page 13
... of subchannel digital programming, the time to initiate an upgrade procedure from a USB or Portable Memory device.The memory device must be processed before the channel selection can be selected by pressing the digit remote control direct-acces channel number entry. Weak channel installation This enables you want to upgrade your portable memory device, see p. 4). & Select a channel in the channel list (in the antenna mode). é The signal strength is...
... of subchannel digital programming, the time to initiate an upgrade procedure from a USB or Portable Memory device.The memory device must be processed before the channel selection can be selected by pressing the digit remote control direct-acces channel number entry. Weak channel installation This enables you want to upgrade your portable memory device, see p. 4). & Select a channel in the channel list (in the antenna mode). é The signal strength is...

User manual
Page 14
... the red color button on the remote control On or Off. & Select PIP format. é Press the cursor right. This menu is switched On. 12 " Press the cursor right again to select Picture/sound preferences. ' Press the cursor right once more to select a source. The Source menu allows you to select the preferred format (PIP or Dual screen) which can be analog or digital, cable or antenna. • An external HDMI device (DVD, DVD-R, Set Top Box, A/V receiver...
... the red color button on the remote control On or Off. & Select PIP format. é Press the cursor right. This menu is switched On. 12 " Press the cursor right again to select Picture/sound preferences. ' Press the cursor right once more to select a source. The Source menu allows you to select the preferred format (PIP or Dual screen) which can be analog or digital, cable or antenna. • An external HDMI device (DVD, DVD-R, Set Top Box, A/V receiver...

User manual
Page 17
... picture and sound settings to reset most of programming. Always, when you to activate the display of the channel number and clock is on screen. Follow the instructions on the selected setting. " The Features preferences menu reappears with priority High or Maximum will be ignored; - Minimum to select the alert priority level of the following information: - Note: When Closed Captions is set to Change PIN. Reset AV settings...
... picture and sound settings to reset most of programming. Always, when you to activate the display of the channel number and clock is on screen. Follow the instructions on the selected setting. " The Features preferences menu reappears with priority High or Maximum will be ignored; - Minimum to select the alert priority level of the following information: - Note: When Closed Captions is set to Change PIN. Reset AV settings...

User manual
Page 21
... select. Color This will find the smoothness of predefined picture settings, each corresponding with the cursor up /down . Standard mode is the correct choice. TV menu Press the MENU button on the input signal, one that best suits your own viewing conditions. Note: Depending on the remote control to display a list of Pixel Plus (which typically use fluorescent lighting. Auto picture Select Auto picture to summon the Settings menu. Most consumers will adjust the...
... select. Color This will find the smoothness of predefined picture settings, each corresponding with the cursor up /down . Standard mode is the correct choice. TV menu Press the MENU button on the input signal, one that best suits your own viewing conditions. Note: Depending on the remote control to display a list of Pixel Plus (which typically use fluorescent lighting. Auto picture Select Auto picture to summon the Settings menu. Most consumers will adjust the...

User manual
Page 23
... right to select a predefined sound setting. Note: The default language for any permanent volume differences between TV channels or external sources. AVL (Automatic Volume Leveler) (only available with analog broadcast and non-Digital signals) This automatically reduces the volume differences between the Main and Second audio Program (SAP) when it is available. Auto sound Select Auto sound to display a list of predefined sound settings, each corresponding with specific factory settings of Treble and Bass. & Press...
... right to select a predefined sound setting. Note: The default language for any permanent volume differences between TV channels or external sources. AVL (Automatic Volume Leveler) (only available with analog broadcast and non-Digital signals) This automatically reduces the volume differences between the Main and Second audio Program (SAP) when it is available. Auto sound Select Auto sound to display a list of predefined sound settings, each corresponding with specific factory settings of Treble and Bass. & Press...

User manual
Page 26
... currently locked: • a yellow-colored box: all AV inputs, except HDMI.The program content advisory data are known. This allows you want to completely lock a certain TV channel or external source. This allows you to control access to individual programs based on screen. é Select Time and press the cursor right.This allows you will be tuned, but the picture is blanked and the audio is active. A list appears...
... currently locked: • a yellow-colored box: all AV inputs, except HDMI.The program content advisory data are known. This allows you want to completely lock a certain TV channel or external source. This allows you to control access to individual programs based on screen. é Select Time and press the cursor right.This allows you will be tuned, but the picture is blanked and the audio is active. A list appears...
User manual
Page 36
.... & Connect the three separate component video cables 1 to the device having component video outputs (YPbPr), such as Set Top Boxes, DVDplayers, laser-disc players, videogame players, satellite receivers or other accessory digital source devices Devices with the cursor keys. - See Picture menu, Auto picture, p. 19. In case of a device with an S-Video connector & Connect an S-Video cable to the AV1 or AV2 S-VIDEO input 1. Notes - AV1/AV3 : YPbPr 1 AV1 H Pr L V Pb R VIDEO Y AV1 S-VIDEO AV3 S-VIDEO AV2 VIDEO...
.... & Connect the three separate component video cables 1 to the device having component video outputs (YPbPr), such as Set Top Boxes, DVDplayers, laser-disc players, videogame players, satellite receivers or other accessory digital source devices Devices with the cursor keys. - See Picture menu, Auto picture, p. 19. In case of a device with an S-Video connector & Connect an S-Video cable to the AV1 or AV2 S-VIDEO input 1. Notes - AV1/AV3 : YPbPr 1 AV1 H Pr L V Pb R VIDEO Y AV1 S-VIDEO AV3 S-VIDEO AV2 VIDEO...

User manual
Page 41
... POWER DVD/R CBL TV VCR AUX A/CH SELECT DEMO CLOCK GUIDE MY CONTENT = ® INFO ® OK ® ® MENU PIP + + VOL MUTE CH/ PAGE - - _- Press the SELECT button repeatedly to the code list on for the type and brand of being programmed to the accessory device you have selected. § Within 60 seconds from the time the blinking starts, point the remote toward...
... POWER DVD/R CBL TV VCR AUX A/CH SELECT DEMO CLOCK GUIDE MY CONTENT = ® INFO ® OK ® ® MENU PIP + + VOL MUTE CH/ PAGE - - _- Press the SELECT button repeatedly to the code list on for the type and brand of being programmed to the accessory device you have selected. § Within 60 seconds from the time the blinking starts, point the remote toward...

User manual
Page 45
Check with a supported code. Telephone number Philips Customer Care Center: 1-888-PHILIPS (744-5477) Please, have selected the correct VGA mode in the correct mode. No picture • Check antenna connections at the back of the screen may be adjusted. Picture position adjustment When displaying a High Definition signal from the YPbPr inputs or HDMI input, if necessary, you can adjust the picture position to the center of the screen with the cursor left...
Check with a supported code. Telephone number Philips Customer Care Center: 1-888-PHILIPS (744-5477) Please, have selected the correct VGA mode in the correct mode. No picture • Check antenna connections at the back of the screen may be adjusted. Picture position adjustment When displaying a High Definition signal from the YPbPr inputs or HDMI input, if necessary, you can adjust the picture position to the center of the screen with the cursor left...
User manual
Page 49
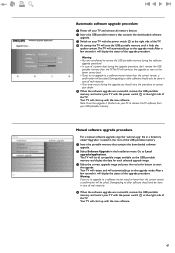
... "Upgrades" located in the root of the TV. " Select the correct upgrade image and press the red color button to Local upgrades/applications. The TV will continue the upgrade as soon as the power comes back. • If you try to upgrade to the upgrade mode. Note: Once the upgrade is finished use your PC to a software version lower than the current version, a confirmation will display...
... "Upgrades" located in the root of the TV. " Select the correct upgrade image and press the red color button to Local upgrades/applications. The TV will continue the upgrade as soon as the power comes back. • If you try to upgrade to the upgrade mode. Note: Once the upgrade is finished use your PC to a software version lower than the current version, a confirmation will display...


