Leaflet
Page 2
... - HDMI makes direct digital-todigital connection possible. Full Active Control Plus Active Control delivers the best picture setting, any time, any deterioration. Motion adaptive de-interlacing A smart de-interlacing algorithm which is a key picture performance factor for rear speakers. Multiple PIP Multiple Picture-in-Picture modes allows simultaneously watching 2 video sources either picture-in order to deliver razor sharp and stable images at all your favorite radio channels (40 presets). Color Enhancement: Green...
... - HDMI makes direct digital-todigital connection possible. Full Active Control Plus Active Control delivers the best picture setting, any time, any deterioration. Motion adaptive de-interlacing A smart de-interlacing algorithm which is a key picture performance factor for rear speakers. Multiple PIP Multiple Picture-in-Picture modes allows simultaneously watching 2 video sources either picture-in order to deliver razor sharp and stable images at all your favorite radio channels (40 presets). Color Enhancement: Green...

User manual
Page 3
...Use only with a cart, stand, tripod, bracket, or table specified by the manufacturer, or sold with liquids, such as radiators, heat registers, stoves, or other . aratus. or B. Objects have fallen into the appliance; Wall or Ceiling Mounting - Outdoor Antenna Grounding - See Figure below. 21. a) Warning: To reduce the risk of the set...contain lead and mercury. Keep these instructions. 2. Heed all servicing to an antenna discharge unit, size of grounding connectors, location of cable entry as power-supply cord or plug is used for your local authorities or the ...
...Use only with a cart, stand, tripod, bracket, or table specified by the manufacturer, or sold with liquids, such as radiators, heat registers, stoves, or other . aratus. or B. Objects have fallen into the appliance; Wall or Ceiling Mounting - Outdoor Antenna Grounding - See Figure below. 21. a) Warning: To reduce the risk of the set...contain lead and mercury. Keep these instructions. 2. Heed all servicing to an antenna discharge unit, size of grounding connectors, location of cable entry as power-supply cord or plug is used for your local authorities or the ...

User manual
Page 5
... Sound Controls 35 How to lock the HD Channel/Change Code 36 QUICK USE GUIDE Refer to help provide the best picture quality. Audio/Video Jack Panel allows direct connections with the Energy Star® label can be viewed in the TV's memory. Channel Edit allows you choose. Using products with VCRs, DVDs, or other devices, providing quality TV picture and sound playback. Copyright 2001 Philips Consumer Electronics. *Manufactured under license from the list...
... Sound Controls 35 How to lock the HD Channel/Change Code 36 QUICK USE GUIDE Refer to help provide the best picture quality. Audio/Video Jack Panel allows direct connections with the Energy Star® label can be viewed in the TV's memory. Channel Edit allows you choose. Using products with VCRs, DVDs, or other devices, providing quality TV picture and sound playback. Copyright 2001 Philips Consumer Electronics. *Manufactured under license from the list...

User manual
Page 6
...'s signal input to Cable, Antenna, or Auto Mode. When Antenna is selected, channels 2-69 are available. HELPFUL HINT Remember, the Language control makes only the makes only the TV's onscreen Menu items appear in either Antenna or Cable. 1 Press the MENU button on the remote control to show the onscreen menu. If Tuner Mode is set the TV's onscreen menu to be shown in English, Spanish, or French text. TV Menu Picture Sound Features Install Mode 5 1 4 Brightness Color Picture...
...'s signal input to Cable, Antenna, or Auto Mode. When Antenna is selected, channels 2-69 are available. HELPFUL HINT Remember, the Language control makes only the makes only the TV's onscreen Menu items appear in either Antenna or Cable. 1 Press the MENU button on the remote control to show the onscreen menu. If Tuner Mode is set the TV's onscreen menu to be shown in English, Spanish, or French text. TV Menu Picture Sound Features Install Mode 5 1 4 Brightness Color Picture...

User manual
Page 7
... button on the remote control to your area by pressing Sound the CHANNEL (+) or (-) button. Brightness Color Picture Sharpness Tint TV Menu Picture Sound Features Install Mode Language Tuner Mode Auto Program Channel Edit Install 3 Language É Channel Tuner Mode É Skipped 5 Auto Program É 6 Channel Edit É 8 2 Channel Edit 4 Channel Ñ 4 É 7 Skipped É 6 Channel Edit Channel É Skipped Ñ On É 7 HOW TO USE THE INSTALLATION FEATURE AUTO PROGRAM Y our TV can automatically set itself for making connections. button...
... button on the remote control to your area by pressing Sound the CHANNEL (+) or (-) button. Brightness Color Picture Sharpness Tint TV Menu Picture Sound Features Install Mode Language Tuner Mode Auto Program Channel Edit Install 3 Language É Channel Tuner Mode É Skipped 5 Auto Program É 6 Channel Edit É 8 2 Channel Edit 4 Channel Ñ 4 É 7 Skipped É 6 Channel Edit Channel É Skipped Ñ On É 7 HOW TO USE THE INSTALLATION FEATURE AUTO PROGRAM Y our TV can automatically set itself for making connections. button...
User manual
Page 10
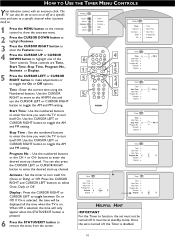
...; Display É Timer Time Start Time Stop Time Program No. Activate Display É Ñ - - :- - Start Time : Use the numbered buttons to enter the time you want the TV to turn itself On (Once or Daily) or Off. Activate : Set the timer to turn on or off at standby mode. Press the CURSOR RIGHT and CURSOR LEFT buttons to toggle the AM and PM setting. TV Menu Picture Sound Features Install Mode Timer Autolock Contrast + DNR PIP Features Timer...
...; Display É Timer Time Start Time Stop Time Program No. Activate Display É Ñ - - :- - Start Time : Use the numbered buttons to enter the time you want the TV to turn itself On (Once or Daily) or Off. Activate : Set the timer to turn on or off at standby mode. Press the CURSOR RIGHT and CURSOR LEFT buttons to toggle the AM and PM setting. TV Menu Picture Sound Features Install Mode Timer Autolock Contrast + DNR PIP Features Timer...

User manual
Page 12
... time, It will appear. 6 Using the numbered buttons on the remote control, enter the access code of your choice. If your code, 0,7,1,1 is the default AutoLockTM code. NOTE TO PARENTS: It isn' t possible for viewing. Once the new code is used to unlock the channel for your child to block out or "censor" any channels they think children should not watch. A channel blocked by inputting the default code. First, let's set your access code or changing...
... time, It will appear. 6 Using the numbered buttons on the remote control, enter the access code of your choice. If your code, 0,7,1,1 is the default AutoLockTM code. NOTE TO PARENTS: It isn' t possible for viewing. Once the new code is used to unlock the channel for your child to block out or "censor" any channels they think children should not watch. A channel blocked by inputting the default code. First, let's set your access code or changing...

User manual
Page 13
...;control. 5 Press the CURSOR RIGHT button to display the Access Code mode. 6 Enter your access code or changing it to a new one. HOW TO LOCK CHANNELS USING AUTOLOCK™ After your personal access code has been set (see the pr evious page), you are ready to select the channels or inputs you wish to lock. TV Menu Picture Sound Features Install Mode 11 1 6 • Timer • Autolock • Contrast + • DNR • PIP 3 5 7 10 2 4 9 8 Features Timer...
...;control. 5 Press the CURSOR RIGHT button to display the Access Code mode. 6 Enter your access code or changing it to a new one. HOW TO LOCK CHANNELS USING AUTOLOCK™ After your personal access code has been set (see the pr evious page), you are ready to select the channels or inputs you wish to lock. TV Menu Picture Sound Features Install Mode 11 1 6 • Timer • Autolock • Contrast + • DNR • PIP 3 5 7 10 2 4 9 8 Features Timer...

User manual
Page 14
.../EXIT button to remove the menu from the screen. Channel 2 Channel Blocking Access Code Ñ ---- É AutoLock Block Channel É Lock HD Ñ On É Change Code É Clear All É Block All É Movie Rating É If a channel is the default AutoLockTM code. HOW TO LOCK A HD (HIGH DEFINITION) CHANNEL IN TV MODE Y ou can always get in TV Mode using the AutoLock™ feature. 1 Press the MENU button on the remote control...
.../EXIT button to remove the menu from the screen. Channel 2 Channel Blocking Access Code Ñ ---- É AutoLock Block Channel É Lock HD Ñ On É Change Code É Clear All É Block All É Movie Rating É If a channel is the default AutoLockTM code. HOW TO LOCK A HD (HIGH DEFINITION) CHANNEL IN TV MODE Y ou can always get in TV Mode using the AutoLock™ feature. 1 Press the MENU button on the remote control...

User manual
Page 15
... enter your four-digit access code to a specific channel that has been blocked by entering your four-digit Access Code. HOW TO CLEAR ALL LOCKED CHANNELS AT THE SAME TIME V arious onscreen messages will appear when someone tries to remove the menu from the screen. You may view the blocked programming and turn OFF the AutoLock™ feature by using the Clear All control or by Block Channel or any...
... enter your four-digit access code to a specific channel that has been blocked by entering your four-digit Access Code. HOW TO CLEAR ALL LOCKED CHANNELS AT THE SAME TIME V arious onscreen messages will appear when someone tries to remove the menu from the screen. You may view the blocked programming and turn OFF the AutoLock™ feature by using the Clear All control or by Block Channel or any...

User manual
Page 16
... RIGHT button again to turn the rating On or Off. AutoLock Block Channel É Lock HD É Change Code É Clear All É Block All É Movie RatIng É G PG PG-13 R NC-17 10 Press the CURSOR RIGHT button to highlight Access Code. 6 Enter your personal access code has been set, you can select specific movie ratings that rating from the screen. Movie...
... RIGHT button again to turn the rating On or Off. AutoLock Block Channel É Lock HD É Change Code É Clear All É Block All É Movie RatIng É G PG PG-13 R NC-17 10 Press the CURSOR RIGHT button to highlight Access Code. 6 Enter your personal access code has been set, you can select specific movie ratings that rating from the screen. Movie...

User manual
Page 24
... programmed channels the external video source connections can be shown with the SURF button on the remote control to show the current list of installed channels (the current channel will let you easily select the desired channels your looking for more 1 channels (up o ten channels in its quick viewing list. Program List will display the channel number, the name of the channel if you have given it have been placed into the televisions memory (see the Auto Programming...
... programmed channels the external video source connections can be shown with the SURF button on the remote control to show the current list of installed channels (the current channel will let you easily select the desired channels your looking for more 1 channels (up o ten channels in its quick viewing list. Program List will display the channel number, the name of the channel if you have given it have been placed into the televisions memory (see the Auto Programming...

User manual
Page 25
... the ANTENNA/CABLE (ANT) input on the rear of the TV (RF audio). Music Remember, only the Personal control can be changed by the viewer. It will match with the programs coming through the PICTURE options within the onscreen menu are watching. HOW TO USE THE AUTO PICTURE™ CONTROL W hether you're watching a movie or a video game, your TV has automatic video control settings that will not control the sound...
... the ANTENNA/CABLE (ANT) input on the rear of the TV (RF audio). Music Remember, only the Personal control can be changed by the viewer. It will match with the programs coming through the PICTURE options within the onscreen menu are watching. HOW TO USE THE AUTO PICTURE™ CONTROL W hether you're watching a movie or a video game, your TV has automatic video control settings that will not control the sound...

User manual
Page 26
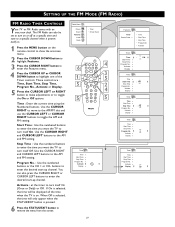
... manually tune any FM channel it finds in the FM Radio mode, press the MENU button on the remote control. The Auto Program control will allow you with an FM Radio. TV - Language - VGA - These options include: Language, Auto Program or Manual Program. Auto Program - This control will search the FM antenna signal and store any available FM signals. 5 Press the CURSOR RIGHT button to remove the menu from the screen or let the display time...
... manually tune any FM channel it finds in the FM Radio mode, press the MENU button on the remote control. The Auto Program control will allow you with an FM Radio. TV - Language - VGA - These options include: Language, Auto Program or Manual Program. Auto Program - This control will search the FM antenna signal and store any available FM signals. 5 Press the CURSOR RIGHT button to remove the menu from the screen or let the display time...
User manual
Page 27
Picture Sound Features Install Mode Timer Screen Saver 1 Press the MENU button on . Use the CURSOR RIGHT and CURSOR LEFT buttons to the AM and PM setting. Start Time : Use the numbered buttons to enter the time you want the TV to turn on or off at a specific time and tune to remove the menu from the screen. 27 Features Timer Screen Saver É Time Start Time Stop Time Program No. When Off is selected, the time will be set to...
Picture Sound Features Install Mode Timer Screen Saver 1 Press the MENU button on . Use the CURSOR RIGHT and CURSOR LEFT buttons to the AM and PM setting. Start Time : Use the numbered buttons to enter the time you want the TV to turn on or off at a specific time and tune to remove the menu from the screen. 27 Features Timer Screen Saver É Time Start Time Stop Time Program No. When Off is selected, the time will be set to...

User manual
Page 37
... the correct operating mode. • Be sure the remote is in MONO only. • Check Sound control setting. If necessary, replace them with RF only type connections, the signal coming from the cable box will be sure that it is being used . See page 1 of the Quick Use Guide for the correct tuner set- TV Displays Wrong Channel or No Channels Above 13 • Repeat channel selection. • Add the desired channel numbers (using a cable box with...
... the correct operating mode. • Be sure the remote is in MONO only. • Check Sound control setting. If necessary, replace them with RF only type connections, the signal coming from the cable box will be sure that it is being used . See page 1 of the Quick Use Guide for the correct tuner set- TV Displays Wrong Channel or No Channels Above 13 • Repeat channel selection. • Add the desired channel numbers (using a cable box with...

Quick start guide (English)
Page 2
... select previously viewed channels. Installation of the LCD TV on the right). AV3 S- 4 4 Rear connectors Located at the rear of the set. 5 COMPONENT VIDEO INPUT Pr Pb Y R AUDIO L VIDEO in memory. REMOTE CONTROL OPERATION REMOTE CONTROL BUTTONS Sleep Button - Status/Exit Button - Press to see diagram on the wall should be used to your own preferences through the onscreen PICTURE menu. PC Mode Button - Press to adjust the TV sound level. Auto Sound Button - Choose from the TV screen. Press for direct access to turn the TV...
... select previously viewed channels. Installation of the LCD TV on the right). AV3 S- 4 4 Rear connectors Located at the rear of the set. 5 COMPONENT VIDEO INPUT Pr Pb Y R AUDIO L VIDEO in memory. REMOTE CONTROL OPERATION REMOTE CONTROL BUTTONS Sleep Button - Status/Exit Button - Press to see diagram on the wall should be used to your own preferences through the onscreen PICTURE menu. PC Mode Button - Press to adjust the TV sound level. Auto Sound Button - Choose from the TV screen. Press for direct access to turn the TV...

Quick start guide (English)
Page 3
... composite adapter cable included with the TV. Cable Signal IN from Cable Company (Round 75Ω coaxial cable) 1 AV3 S- Video Cable (Yellow) 2 3 Using an RCA type Audio Left and Right Cable, connect oneend to the cable signal IN(put ) (to TV) plug on the back of the Cable Box. 3 Connect the other ends to your new television. Once tuned, change channels at the cable box, not the television. 12 Output Channel Switch Round 75Ω Coaxial Cable COMPONENT VIDEO INPUT Pr Pb Y R AUDIO L VIDEO...
... composite adapter cable included with the TV. Cable Signal IN from Cable Company (Round 75Ω coaxial cable) 1 AV3 S- Video Cable (Yellow) 2 3 Using an RCA type Audio Left and Right Cable, connect oneend to the cable signal IN(put ) (to TV) plug on the back of the Cable Box. 3 Connect the other ends to your new television. Once tuned, change channels at the cable box, not the television. 12 Output Channel Switch Round 75Ω Coaxial Cable COMPONENT VIDEO INPUT Pr Pb Y R AUDIO L VIDEO...

Quick start guide (English)
Page 4
... HD Receiver's jack panel may differ depending on the remote control to select AV1 channel for the accessory device. When a Component Video Device is connected as with DVD players. 1 Connect the Component (Y, Pb, Pr) Video OUT jacks from Satellite Dish or Antenna HD Receiver equipped with your TV. Note: The Audio/Video cables needed for information about purchasing the needed cables. 1 OR Analog Connection 21 2 Bottom of TV COMPONENT VIDEO INPUT Pr Pb Y R AUDIO L VIDEO in AV1 4 Component 1 Video Cables (Green, Blue, Red) Digital Connection Audio Cables...
... HD Receiver's jack panel may differ depending on the remote control to select AV1 channel for the accessory device. When a Component Video Device is connected as with DVD players. 1 Connect the Component (Y, Pb, Pr) Video OUT jacks from Satellite Dish or Antenna HD Receiver equipped with your TV. Note: The Audio/Video cables needed for information about purchasing the needed cables. 1 OR Analog Connection 21 2 Bottom of TV COMPONENT VIDEO INPUT Pr Pb Y R AUDIO L VIDEO in AV1 4 Component 1 Video Cables (Green, Blue, Red) Digital Connection Audio Cables...

Quick start guide (English)
Page 5
... white) cables to the AUDIO (left and right) OUT jacks on the rear of the accessory device being used. 3 Turn the accessory device and the TV ON. 4 Press the Source button on the remote control to select the AV3 channel for items such as cameras or gaming stations. Note : For the display resolutions available to your TV, refer to the Operating Instruction Manual Please contact your headphone set. 2 Turn...
... white) cables to the AUDIO (left and right) OUT jacks on the rear of the accessory device being used. 3 Turn the accessory device and the TV ON. 4 Press the Source button on the remote control to select the AV3 channel for items such as cameras or gaming stations. Note : For the display resolutions available to your TV, refer to the Operating Instruction Manual Please contact your headphone set. 2 Turn...


