
User manual
Page 2
...closely to prevent operating and maintenance problems. CAUTION: To prevent electric shock, match wide blade of the best-built, best-backed products available today.We'll do not remove product covering. All of this information for many years to wide slot, fully insert. t This "bolt...As a member of the PHILIPS "family," you 'll receive notification - Registering your model with your purchase guarantees you'll receive all of the valuable benefits listed below the Serial No. To get the very most comprehensive warranties and outstanding service networks in the industry.What's more...
...closely to prevent operating and maintenance problems. CAUTION: To prevent electric shock, match wide blade of the best-built, best-backed products available today.We'll do not remove product covering. All of this information for many years to wide slot, fully insert. t This "bolt...As a member of the PHILIPS "family," you 'll receive notification - Registering your model with your purchase guarantees you'll receive all of the valuable benefits listed below the Serial No. To get the very most comprehensive warranties and outstanding service networks in the industry.What's more...
User manual
Page 3
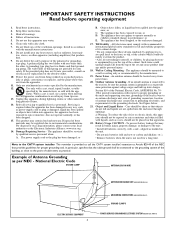
... antenna system is not used , use this apparatus. 22. An outdoor antenna should be mounted to the receiver, be located away from the apparatus. 11. Outdoor Antenna Grounding - If an outside antenna is connected to a wall or ceiling only as power-supply cord or plug is required when the apparatus has been damaged in wire to an antenna discharge unit, size of grounding connectors, location of antenna-discharge unit, connection...
... antenna system is not used , use this apparatus. 22. An outdoor antenna should be mounted to the receiver, be located away from the apparatus. 11. Outdoor Antenna Grounding - If an outside antenna is connected to a wall or ceiling only as power-supply cord or plug is required when the apparatus has been damaged in wire to an antenna discharge unit, size of grounding connectors, location of antenna-discharge unit, connection...
User manual
Page 4
... area. • The LCD TV uses materials that can cause damage to clean the surface of screw may render the set unsafe. • If LCD TV is tightened properly to the set (See Quick Guide on a solid, sturdy base or stand. Condensation can be present on the LCD screen. • CAUTION information is located on the inside of the LCD TV cabinet to the set is left exposed...
... area. • The LCD TV uses materials that can cause damage to clean the surface of screw may render the set unsafe. • If LCD TV is tightened properly to the set (See Quick Guide on a solid, sturdy base or stand. Condensation can be present on the LCD screen. • CAUTION information is located on the inside of the LCD TV cabinet to the set is left exposed...
User manual
Page 5
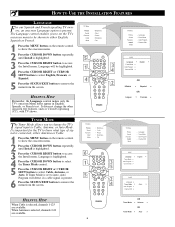
...) antenna plug on your TV to turn the TV on. Color TV Quick Use and Setup Guide CONTENTS Important Notice/Warning 1 Making Basic TV Connections Basic Cable TV Connections 1 Basic Antenna TV Connections 1 Basic TV Operation 2 Remote Battery Installation 2 Remote Control Button Descriptions 2 How to Use the Installation Features 3-4 Using the Language Control 3 Setting the Tuner Mode Control 3 How to Automatically Program Channels 3 How to Add and Delete Channels 4 How to set according to your TV, and that you to block the viewing of certain channels or programs with...
...) antenna plug on your TV to turn the TV on. Color TV Quick Use and Setup Guide CONTENTS Important Notice/Warning 1 Making Basic TV Connections Basic Cable TV Connections 1 Basic Antenna TV Connections 1 Basic TV Operation 2 Remote Battery Installation 2 Remote Control Button Descriptions 2 How to Use the Installation Features 3-4 Using the Language Control 3 Setting the Tuner Mode Control 3 How to Automatically Program Channels 3 How to Add and Delete Channels 4 How to set according to your TV, and that you to block the viewing of certain channels or programs with...
User manual
Page 6
... type of signal is connected, either English, Spanish or French. 1 Press the MENU button on the remote control to show the onscreen menu. 2 Press the CURSOR DOWN button repeatedly until Install is selected, channels 1-125 are available. 6 OR Tuner Mode Ñ Antenna É OR Tuner Mode Ñ Auto É TV Menu Picture Sound Features Install Mode Brightness Color Picture Sharpness Tint 5 1 3 4 4 2 TV Menu Picture Sound Features Install Mode Brightness Color Picture Sharpness Tint 6 1 3 5 5 2 4 TV Menu Picture Sound Features Install Mode Language Tuner Mode Auto...
... type of signal is connected, either English, Spanish or French. 1 Press the MENU button on the remote control to show the onscreen menu. 2 Press the CURSOR DOWN button repeatedly until Install is selected, channels 1-125 are available. 6 OR Tuner Mode Ñ Antenna É OR Tuner Mode Ñ Auto É TV Menu Picture Sound Features Install Mode Brightness Color Picture Sharpness Tint 5 1 3 4 4 2 TV Menu Picture Sound Features Install Mode Brightness Color Picture Sharpness Tint 6 1 3 5 5 2 4 TV Menu Picture Sound Features Install Mode Language Tuner Mode Auto...
User manual
Page 7
... the CHANNEL (+) or (-) button and see Quick-Use Guide for making connections. TV Menu Picture Sound Features Install Mode Brightness Color Picture Sharpness Tint 6 1 TV Menu Picture Sound Features Install Mode Language Tuner Mode Auto Program Channel Edit 3 5 2 4 Install Language É Tuner Mode É Auto Program Ñ Start ? É Channel Edit É Auto Program Channel É Ñ 8 É CHANNEL EDIT Channel Edit makes it easy for local area (or cable TV) channels. Or, select Off, to deactivate the skipping of channels stored in your TV, see which channels you...
... the CHANNEL (+) or (-) button and see Quick-Use Guide for making connections. TV Menu Picture Sound Features Install Mode Brightness Color Picture Sharpness Tint 6 1 TV Menu Picture Sound Features Install Mode Language Tuner Mode Auto Program Channel Edit 3 5 2 4 Install Language É Tuner Mode É Auto Program Ñ Start ? É Channel Edit É Auto Program Channel É Ñ 8 É CHANNEL EDIT Channel Edit makes it easy for local area (or cable TV) channels. Or, select Off, to deactivate the skipping of channels stored in your TV, see which channels you...
User manual
Page 10
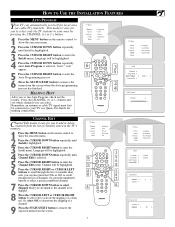
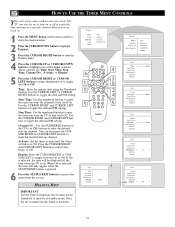
... LEFT buttons to highlight one of the Timer controls. HOW TO USE THE TIMER MENU CONTROLS Your television comes with an onscreen clock. You can also be turned off , the Timer is turned off . Display: Press the CURSOR RIGHT or CURSOR LEFT to toggle the On or Off. TV Menu Picture Sound Features Install Mode Timer Autolock Contrast + Active Control 4 6 3 1 5 5 2 4 5 5 Timer Time É Start Time É Stop Time É Channel No. É Activate Ñ Display É...
... LEFT buttons to highlight one of the Timer controls. HOW TO USE THE TIMER MENU CONTROLS Your television comes with an onscreen clock. You can also be turned off , the Timer is turned off . Display: Press the CURSOR RIGHT or CURSOR LEFT to toggle the On or Off. TV Menu Picture Sound Features Install Mode Timer Autolock Contrast + Active Control 4 6 3 1 5 5 2 4 5 5 Timer Time É Start Time É Stop Time É Channel No. É Activate Ñ Display É...
User manual
Page 12
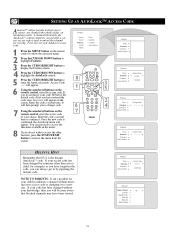
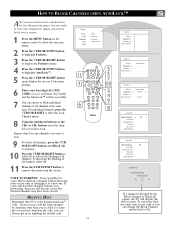
... Control É HELPFUL HINT Remember that blocked channels may have entered the code once, Incorrect will appear. SETTING UP AN AUTOLOCK™ ACCESS CODE AutoLockTM allows parents to unblock a channel without your access code or changing it . First, let s set your choice. After you to change code. 7 Using the numbered buttons on the remote control, enter the access code of your AutoLock access code. 1 Press the MENU button on the screen. Once the new code is used to unlock the channel...
... Control É HELPFUL HINT Remember that blocked channels may have entered the code once, Incorrect will appear. SETTING UP AN AUTOLOCK™ ACCESS CODE AutoLockTM allows parents to unblock a channel without your access code or changing it . First, let s set your choice. After you to change code. 7 Using the numbered buttons on the remote control, enter the access code of your AutoLock access code. 1 Press the MENU button on the screen. Once the new code is used to unlock the channel...
User manual
Page 13
... viewed. HELPFUL HINT Remember that blocked channels may have forgotten the code, you can always get in by the Block Channel or Block All option, the TV will be accessible. 7 You can change the Block Channel option back to highlight AutoLock™. 5 Press the CURSOR RIGHT button again display the Access Code menu prompt. 6 Enter your four-digit ACCESS CODE. TV Menu Picture Sound Features Install Mode • Timer • Autolock • Contrast + Active Control...
... viewed. HELPFUL HINT Remember that blocked channels may have forgotten the code, you can always get in by the Block Channel or Block All option, the TV will be accessible. 7 You can change the Block Channel option back to highlight AutoLock™. 5 Press the CURSOR RIGHT button again display the Access Code menu prompt. 6 Enter your four-digit ACCESS CODE. TV Menu Picture Sound Features Install Mode • Timer • Autolock • Contrast + Active Control...
User manual
Page 15
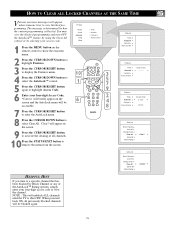
TV Menu Picture Sound Features Install Mode 10 1 6 Timer Autolock Contrast + Active Control 3 5 7 9 2 4 8 HELPFUL HINT If you tune to a specific channel that has been blocked by Block Channel or any of all previously blocked channels will be accessible. 7 Press the CURSOR RIGHT button to enter the AutoLock menu. 8 Press the CURSOR DOWN button to view the channel. will appear on the screen. 9 Press the CURSOR RIGHT button to activate the clearing of...
TV Menu Picture Sound Features Install Mode 10 1 6 Timer Autolock Contrast + Active Control 3 5 7 9 2 4 8 HELPFUL HINT If you tune to a specific channel that has been blocked by Block Channel or any of all previously blocked channels will be accessible. 7 Press the CURSOR RIGHT button to enter the AutoLock menu. 8 Press the CURSOR DOWN button to view the channel. will appear on the screen. 9 Press the CURSOR RIGHT button to activate the clearing of...
User manual
Page 22
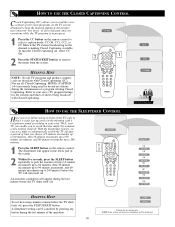
... a program offering Closed Captioning. Well, your area s TV program listings for the stations and times of television programs on the channel is in your ears? HELPFUL HINT NOTE: Not all Closed Captioning MODEs (CAPTION 1-4 ) necessarily being broadcast with a test pattern sound screeching in progress. 1 Press the CC button on the remote control to select a caption mode: CC Off, CC1, CC2, or CC Mute if the TV station broadcasting on the TV screen. HOW TO USE THE CLOSED CAPTIONING CONTROL Closed Captioning...
... a program offering Closed Captioning. Well, your area s TV program listings for the stations and times of television programs on the channel is in your ears? HELPFUL HINT NOTE: Not all Closed Captioning MODEs (CAPTION 1-4 ) necessarily being broadcast with a test pattern sound screeching in progress. 1 Press the CC button on the remote control to select a caption mode: CC Off, CC1, CC2, or CC Mute if the TV station broadcasting on the TV screen. HOW TO USE THE CLOSED CAPTIONING CONTROL Closed Captioning...
User manual
Page 25
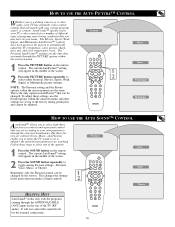
... the programs coming through the ANTENNA/CABLE (ANT) input on the rear of the screen. 2 Press the PICTURE button repeatedly to your TV has automatic video control settings that you are watching. Personal 1 2 Movies Sports Weak Signal Multimedia HOW TO USE THE AUTO SOUND™ CONTROL AutoSound™ allows you to toggle among the four settings: Personal, Voice, Music, or Theatre. Follow these settings, use the Pictureoptions within the onscreen menu...
... the programs coming through the ANTENNA/CABLE (ANT) input on the rear of the screen. 2 Press the PICTURE button repeatedly to your TV has automatic video control settings that you are watching. Personal 1 2 Movies Sports Weak Signal Multimedia HOW TO USE THE AUTO SOUND™ CONTROL AutoSound™ allows you to toggle among the four settings: Personal, Voice, Music, or Theatre. Follow these settings, use the Pictureoptions within the onscreen menu...
User manual
Page 27
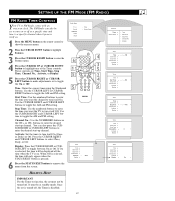
... the Timer controls. SETTING UP THE FM MODE (FM RADIO) FM RADIO TIMER CONTROLS Your TV or FM Radio comes with an onscreen clock. Use the CURSOR LEFT or CURSOR RIGHT buttons to toggle between On or Off. Use the CURSOR RIGHT and CURSOR LEFT buttons to toggle the On or Off. Radio Menu Picture Sound Features Install Mode Timer Screen Saver 4 6 3 1 5 5 2 4 5 5 Timer Time É Start Time É Stop Time É Channel No...
... the Timer controls. SETTING UP THE FM MODE (FM RADIO) FM RADIO TIMER CONTROLS Your TV or FM Radio comes with an onscreen clock. Use the CURSOR LEFT or CURSOR RIGHT buttons to toggle between On or Off. Use the CURSOR RIGHT and CURSOR LEFT buttons to toggle the On or Off. Radio Menu Picture Sound Features Install Mode Timer Screen Saver 4 6 3 1 5 5 2 4 5 5 Timer Time É Start Time É Stop Time É Channel No...
User manual
Page 30
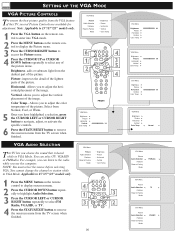
... light from the TV screen when finished. Color Temp.- You can listen to remove the onscreen menu from the VGA feature of this TV, several Picture Controls are available for adjustment. For example, you use the computer. VGA Menu Picture Audio Selection Features Reset to Factory Mode • Brightness • Picture • Horizontal • Vertical • Color Temp. 1 Press the MENU button on the remote control to display the Picture menu. 3 Press the CURSOR RIGHT button to access...
... light from the TV screen when finished. Color Temp.- You can listen to remove the onscreen menu from the VGA feature of this TV, several Picture Controls are available for adjustment. For example, you use the computer. VGA Menu Picture Audio Selection Features Reset to Factory Mode • Brightness • Picture • Horizontal • Vertical • Color Temp. 1 Press the MENU button on the remote control to display the Picture menu. 3 Press the CURSOR RIGHT button to access...

User manual
Page 36
... remote control sensor win- If they properly secured to the VCR socket. If necessary, replace them with RF only type connections, the signal coming from the cable box will turn off. TV Only Produces MONO Sound • If using an accessory device, be sure the TUNER MODES are set - Are they are connected simultaneously. TROUBLESHOOTING TIPS No Power • Check the TV power cord. Unplug the TV, wait 10 seconds, then reinsert the plug...
... remote control sensor win- If they properly secured to the VCR socket. If necessary, replace them with RF only type connections, the signal coming from the cable box will turn off. TV Only Produces MONO Sound • If using an accessory device, be sure the TUNER MODES are set - Are they are connected simultaneously. TROUBLESHOOTING TIPS No Power • Check the TV power cord. Unplug the TV, wait 10 seconds, then reinsert the plug...
Quick start guide (English)
Page 2
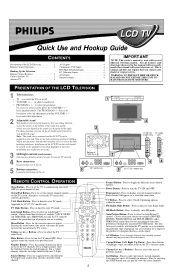
.... 3 LED light and infrared sensors Aim remote control at the bottom of the set controls (VOICE, MUSIC, and THEATRE) and a PERSONAL to tailor the TV sound to select previously viewed channels. Note : The stand can be removed and the LCD TV can be installed on the wall should be used with your dealer or request service. Choose from three factory-set . 5 20" model only 5 PROGRAM 3 17"/20"/23" 15" model models only only 4 4 15"/17"/23" models only REMOTE CONTROL OPERATION Sleep Button...
.... 3 LED light and infrared sensors Aim remote control at the bottom of the set controls (VOICE, MUSIC, and THEATRE) and a PERSONAL to tailor the TV sound to select previously viewed channels. Note : The stand can be removed and the LCD TV can be installed on the wall should be used with your dealer or request service. Choose from three factory-set . 5 20" model only 5 PROGRAM 3 17"/20"/23" 15" model models only only 4 4 15"/17"/23" models only REMOTE CONTROL OPERATION Sleep Button...
Quick start guide (English)
Page 3
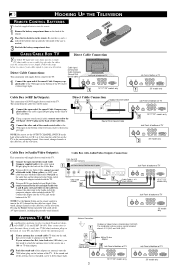
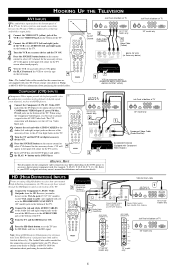
... the TV. CABLE/CABLE BOX TV Direct Cable Connection Your Cable TV input into your antenna has flat, twin-lead wire (300 ohm), you 're ready to the TV. Direct Cable Connections: This connection will be a single (75 ohm) cable or use a cable box decoder. The sound from the Cable Company 1 Jack Panel at bottom of the TV. NOTE: Be sure to set the OUTPUT CHANNEL SWITCH on the back of TV 3 20" model only Cable Box (w/Audio/Video Outputs): Cable Box with the TV. 3 Using an RCA type Audio Left...
... the TV. CABLE/CABLE BOX TV Direct Cable Connection Your Cable TV input into your antenna has flat, twin-lead wire (300 ohm), you 're ready to the TV. Direct Cable Connections: This connection will be a single (75 ohm) cable or use a cable box decoder. The sound from the Cable Company 1 Jack Panel at bottom of the TV. NOTE: Be sure to set the OUTPUT CHANNEL SWITCH on the back of TV 3 20" model only Cable Box (w/Audio/Video Outputs): Cable Box with the TV. 3 Using an RCA type Audio Left...
Quick start guide (English)
Page 4
... Cinch cable 3 HD RECEIVER (Equipped with DVD players. 1 Connect the Component (Y, Pb, Pr) Video OUT jacks from Satellite Dish Antenna or VHF/UHF Antenna 4 2 Audio Cables (Red/White) 1 15"/17"/23" models only JACK PANEL at REAR of TV JACK PANEL at REAR of TV Jack Panel at 800-531-0039 for information about purchasing the needed cables. HOOKING UP THE TELEVISION AV1 INPUTS T he audio/video input jacks on the bottom panel of the TV are for direct picture and sound connections between the TV...
... Cinch cable 3 HD RECEIVER (Equipped with DVD players. 1 Connect the Component (Y, Pb, Pr) Video OUT jacks from Satellite Dish Antenna or VHF/UHF Antenna 4 2 Audio Cables (Red/White) 1 15"/17"/23" models only JACK PANEL at REAR of TV JACK PANEL at REAR of TV Jack Panel at 800-531-0039 for information about purchasing the needed cables. HOOKING UP THE TELEVISION AV1 INPUTS T he audio/video input jacks on the bottom panel of the TV are for direct picture and sound connections between the TV...

Quick start guide (English)
Page 5
... video cable to the Monitor (video) output on the computer to the PC Input (VGA) jack on the bottom of the TV. 2 Connect the AUDIO PC/HD cable of the TV. If your headphone set the TV into the VGA Mode and tune to be no sound from the TV speakers. If connected to an audio system or a headphone, there will have to the computer's signal. Appicable to 15"/17"/23" models...
... video cable to the Monitor (video) output on the computer to the PC Input (VGA) jack on the bottom of the TV. 2 Connect the AUDIO PC/HD cable of the TV. If your headphone set the TV into the VGA Mode and tune to be no sound from the TV speakers. If connected to an audio system or a headphone, there will have to the computer's signal. Appicable to 15"/17"/23" models...
Leaflet
Page 2
... of Use: Auto Volume Leveller (AVL), Top Controls, Program List, AutoSound, AutoPicture • Remote control type: RC19335021/01 • Clock: Sleep Timer • VESA Mount: 100 x 100 mm • Child Protection: Child Lock+Parental Control Tuner/Reception/Transmission • Tuner bands: Hyperband, S-Channel, UHF, VHF • TV system: NTSC • Video Playback: NTSC • Aerial Input: 75 ohm F-type • Tuner Display: PLL • Number of Preset Channels: 100 Connectivity • Number of 1024 x 768p pixels. The slim speakers use patented...
... of Use: Auto Volume Leveller (AVL), Top Controls, Program List, AutoSound, AutoPicture • Remote control type: RC19335021/01 • Clock: Sleep Timer • VESA Mount: 100 x 100 mm • Child Protection: Child Lock+Parental Control Tuner/Reception/Transmission • Tuner bands: Hyperband, S-Channel, UHF, VHF • TV system: NTSC • Video Playback: NTSC • Aerial Input: 75 ohm F-type • Tuner Display: PLL • Number of Preset Channels: 100 Connectivity • Number of 1024 x 768p pixels. The slim speakers use patented...


