
User Manual
Page 1
... 21 VESA Wall Mounting...22 Using Other Menus ...23 Using the Remote Control ...23 Selecting a source input ...23 Adjusting the picture preference...23 Adjusting the sound preference ...23 Selecting a preferred OSD language...24 Locking the set / Parental Controls...24 Closed caption...27 Automatic tuning ...27 Manual tuning (Fine tune) ...27 Skipping...
... 21 VESA Wall Mounting...22 Using Other Menus ...23 Using the Remote Control ...23 Selecting a source input ...23 Adjusting the picture preference...23 Adjusting the sound preference ...23 Selecting a preferred OSD language...24 Locking the set / Parental Controls...24 Closed caption...27 Automatic tuning ...27 Manual tuning (Fine tune) ...27 Skipping...

User Manual
Page 9
... Select video source for main display: • PC VGA input • Antenna or cable TV input • CVBS composite video input • S-video input PICTURE SOUND BRIGHTNESS CONTRAST COLOR SHARPNESS TINT COLOR TEMP EXIT TREBLE BASS Adjust picture characteristics to suit personal preference • Normal • Cool • Warm Adjust audio...
... Select video source for main display: • PC VGA input • Antenna or cable TV input • CVBS composite video input • S-video input PICTURE SOUND BRIGHTNESS CONTRAST COLOR SHARPNESS TINT COLOR TEMP EXIT TREBLE BASS Adjust picture characteristics to suit personal preference • Normal • Cool • Warm Adjust audio...

User Manual
Page 14
...settings of time after which the set is in OSD and clear menu from screen. To restore sound, press button again. To access the last program viewed. For direct access to standby mode. ... /down/right/left to 240 minutes) To choose MONO, Stereo and SAP (2nd audio program) Sound system To select TV/Video/PC sources To show OSD status. 1 Standby 2 Selecting TV programs 3 Closed Caption 4... Volume 5 Menu 6 Cursor 7 Sleep timer 8 Sound mode 9 AV source 10 Status 11 Mute 12 A/CH 13 Numerical keys To set the TV temporarily to ...
...settings of time after which the set is in OSD and clear menu from screen. To restore sound, press button again. To access the last program viewed. For direct access to standby mode. ... /down/right/left to 240 minutes) To choose MONO, Stereo and SAP (2nd audio program) Sound system To select TV/Video/PC sources To show OSD status. 1 Standby 2 Selecting TV programs 3 Closed Caption 4... Volume 5 Menu 6 Cursor 7 Sleep timer 8 Sound mode 9 AV source 10 Status 11 Mute 12 A/CH 13 Numerical keys To set the TV temporarily to ...
User Manual
Page 16
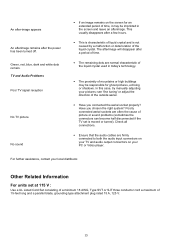
...feet long and a parallel blade, grounding type attachment plug rated 15 A, 125 V. 15 TV and Audio Problems Poor TV signal reception No TV picture No sound • If an image remains on your pictures: see 'fine tuning' or adjust the direction of time, it may be imprinted in today's technology.... on the screen for ghost pictures, echoing or shadows. Check all connections. • Ensure that the audio cables are often the cause of picture or sound problems (sometimes the connectors can become half disconnected if the TV set at 115 V : Use a UL Listed Cord Set consisting of a minimum 18 ...
...feet long and a parallel blade, grounding type attachment plug rated 15 A, 125 V. 15 TV and Audio Problems Poor TV signal reception No TV picture No sound • If an image remains on your pictures: see 'fine tuning' or adjust the direction of time, it may be imprinted in today's technology.... on the screen for ghost pictures, echoing or shadows. Check all connections. • Ensure that the audio cables are often the cause of picture or sound problems (sometimes the connectors can become half disconnected if the TV set at 115 V : Use a UL Listed Cord Set consisting of a minimum 18 ...

User Manual
Page 18
... to an appropriate external AV device such as a DVD/VCR/VCD 1. While the headphone is connected, the sound from the external speakers will be connected to the headphone output on the back of the sound card on the back of tuner box. 17 Connect one end of Audio Chin cable to AUDIO...
... to an appropriate external AV device such as a DVD/VCR/VCD 1. While the headphone is connected, the sound from the external speakers will be connected to the headphone output on the back of the sound card on the back of tuner box. 17 Connect one end of Audio Chin cable to AUDIO...

User Manual
Page 24
... to be selected. Use , again to scroll the highlighted sub-item to be selected. 3. When the setting is fine, use MENU to balance the sound between light and dark tones. • COLOR: alters the color intensity. • SHARPNESS: alters the crispness of the image. • TINT: Adjusts tint. • ...and right speakers. • SURROUND ON/OFF: to exit from the menu. Or use , to highlight EXIT item and press MENU to turn the surrounding sound effect on or off. 4. Use , to exit from the menu. 23 Use , to highlight EXIT and then press MENU to scroll the highlight INPUT SELECT...
... to be selected. Use , again to scroll the highlighted sub-item to be selected. 3. When the setting is fine, use MENU to balance the sound between light and dark tones. • COLOR: alters the color intensity. • SHARPNESS: alters the crispness of the image. • TINT: Adjusts tint. • ...and right speakers. • SURROUND ON/OFF: to exit from the menu. Or use , to highlight EXIT item and press MENU to turn the surrounding sound effect on or off. 4. Use , to exit from the menu. 23 Use , to highlight EXIT and then press MENU to scroll the highlight INPUT SELECT...


