
Operation Manual
Page 1
Digital Camera Operating Manual To ensure the best performance from your camera, please read the Operating Manual before using the camera.
Digital Camera Operating Manual To ensure the best performance from your camera, please read the Operating Manual before using the camera.

Operation Manual
Page 2
...digital still cameras, printers and software help photographers to produce images more information. PRINT Image Matching is manufactured using the unified standard for purchasing this manual, the generic term "computer(s)" refers to either a Windows PC or a Macintosh hereafter. Regarding trademarks • PENTAX and Optio..., as specified in this manual are different form the actual product. • In this manual before using the PENTAX Digital Camera that 0.01% or fewer of the pixels may not illuminate or may not function correctly when used in surroundings ...
...digital still cameras, printers and software help photographers to produce images more information. PRINT Image Matching is manufactured using the unified standard for purchasing this manual, the generic term "computer(s)" refers to either a Windows PC or a Macintosh hereafter. Regarding trademarks • PENTAX and Optio..., as specified in this manual are different form the actual product. • In this manual before using the PENTAX Digital Camera that 0.01% or fewer of the pixels may not illuminate or may not function correctly when used in surroundings ...

Operation Manual
Page 3
...adapter other than that violating this product. Seek medical attention immediately if a card is accidentally swallowed. • Wrapping the strap of the camera around their necks. • Use an AC adapter that small children do not under any other irregularity, stop using this product, we ...request your nearest PENTAX Service Center. About the Camera Warning • Do not attempt to the safety of this product may result in the event of any circumstances touch such ...
...adapter other than that violating this product. Seek medical attention immediately if a card is accidentally swallowed. • Wrapping the strap of the camera around their necks. • Use an AC adapter that small children do not under any other irregularity, stop using this product, we ...request your nearest PENTAX Service Center. About the Camera Warning • Do not attempt to the safety of this product may result in the event of any circumstances touch such ...

Operation Manual
Page 4
...itching, rashes or blisters. Use with clean water and get medical attention immediately. Caution • Do not charge any abnormality, stop using the camera and get medical attention immediately. Be careful not to get on your inherent factors or physical condition, the use the product at a voltage other...a power source or voltage other than that designed can cause a fire or electrical shock. 2 Flush your eyes, it may cause a loss of the camera heat up during use, so please take care, as there is 100-240V AC. • Do not disassemble or modify the product. Also, be ...
...itching, rashes or blisters. Use with clean water and get medical attention immediately. Caution • Do not charge any abnormality, stop using the camera and get medical attention immediately. Be careful not to get on your inherent factors or physical condition, the use the product at a voltage other...a power source or voltage other than that designed can cause a fire or electrical shock. 2 Flush your eyes, it may cause a loss of the camera heat up during use, so please take care, as there is 100-240V AC. • Do not disassemble or modify the product. Also, be ...
Operation Manual
Page 6
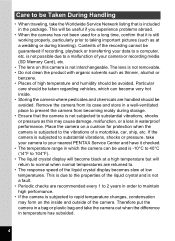
... substantial vibrations, shocks or pressure, take your camera to your nearest PENTAX Service Center and have it is still working properly, particularly prior to taking important pictures (such as at a wedding or during storage. • Ensure that the camera is subjected to the vibrations of your camera or recording media (SD Memory Card), etc...
... substantial vibrations, shocks or pressure, take your camera to your nearest PENTAX Service Center and have it is still working properly, particularly prior to taking important pictures (such as at a wedding or during storage. • Ensure that the camera is subjected to the vibrations of your camera or recording media (SD Memory Card), etc...

Operation Manual
Page 7
... was used for exclusive use is protected by glass. This could cause breakage or malfunction. • Be careful not to sit down with the camera in your back pocket as underwater or at the beach. Avoid storing it especially in or near water. • Be sure to check that... its operating temperature or cause the speaker or microphone to become blocked with the battery charger D-BC78. If the battery is left inserted and the camera is not used to delete the data. As any other equipment. • Storing the battery fully charged may decrease the battery performance. • ...
... was used for exclusive use is protected by glass. This could cause breakage or malfunction. • Be careful not to sit down with the camera in your back pocket as underwater or at the beach. Avoid storing it especially in or near water. • Be sure to check that... its operating temperature or cause the speaker or microphone to become blocked with the battery charger D-BC78. If the battery is left inserted and the camera is not used to delete the data. As any other equipment. • Storing the battery fully charged may decrease the battery performance. • ...

Operation Manual
Page 8
...or the SD Memory Card. If the camera is subjected to substantial vibrations, shocks or pressure, take your camera to your nearest PENTAX Service Center. • To maintain the waterproof performance of the camera, you are dry. • If the camera is turned off any such damage, ...contact your nearest PENTAX Service Center and have it has been used...
...or the SD Memory Card. If the camera is subjected to substantial vibrations, shocks or pressure, take your camera to your nearest PENTAX Service Center. • To maintain the waterproof performance of the camera, you are dry. • If the camera is turned off any such damage, ...contact your nearest PENTAX Service Center and have it has been used...

Operation Manual
Page 9
...of the Package 18 Names of Parts 19 Names of Operating Parts 20 Monitor Indications 21 Getting Started 24 Attaching the Strap 24 Powering the Camera 25 Charging the Battery 25 Installing the Battery 26 Using the AC Adapter 29 Installing the SD Memory Card 31 Recorded Pixels and Quality Level... of Still Pictures 34 Recorded Pixels for Movies/Frame Rate 35 Turning the Camera On and Off 37 Playback Mode 38 Initial Settings 39 Setting the Display Language 39 Setting the Date and Time 41 Quick Start 43 ...
...of the Package 18 Names of Parts 19 Names of Operating Parts 20 Monitor Indications 21 Getting Started 24 Attaching the Strap 24 Powering the Camera 25 Charging the Battery 25 Installing the Battery 26 Using the AC Adapter 29 Installing the SD Memory Card 31 Recorded Pixels and Quality Level... of Still Pictures 34 Recorded Pixels for Movies/Frame Rate 35 Turning the Camera On and Off 37 Playback Mode 38 Initial Settings 39 Setting the Display Language 39 Setting the Date and Time 41 Quick Start 43 ...

Operation Manual
Page 11
... the Subject's Face Automatically (Face close-up playback 146 Displaying Shooting Information in Playback Mode 148 Correcting Camera Shake with Digital SR 149 Slideshow 151 Playing Back Movies 153 Playing Back a Movie 153 Connecting the Camera to AV Equipment 154 Deleting Images 156 Deleting a Single Image/Sound File 156 Deleting Selected Images and... Printing Images 164 Editing Images 164 Changing the Image Size and Quality (Resize 164 Cropping Images 166 Copying Images and Sound Files 167 Using the Digital Filters 169 Red-eye Compensation 172 9
... the Subject's Face Automatically (Face close-up playback 146 Displaying Shooting Information in Playback Mode 148 Correcting Camera Shake with Digital SR 149 Slideshow 151 Playing Back Movies 153 Playing Back a Movie 153 Connecting the Camera to AV Equipment 154 Deleting Images 156 Deleting a Single Image/Sound File 156 Deleting Selected Images and... Printing Images 164 Editing Images 164 Changing the Image Size and Quality (Resize 164 Cropping Images 166 Copying Images and Sound Files 167 Using the Digital Filters 169 Red-eye Compensation 172 9

Operation Manual
Page 12
...Editing Movies 175 Setting the Printing Service (DPOF 177 Printing Single Images 177 Printing All Images 179 Printing Using PictBridge 180 Connecting the Camera to the Printer 180 Printing Single Images 181 Printing All Images 183 Printing Using the DPOF Settings 184 Disconnecting the Cable from the... Playing Back Sound 187 Adding a Voice Memo to Images 188 Recording a Voice Memo 188 Playing Back a Voice Memo 189 Settings 190 Camera Settings 190 Formatting an SD Memory Card 190 Changing the Sound Settings 191 Changing the Date and Time 193 Setting the Alarm 195 Setting ...
...Editing Movies 175 Setting the Printing Service (DPOF 177 Printing Single Images 177 Printing All Images 179 Printing Using PictBridge 180 Connecting the Camera to the Printer 180 Printing Single Images 181 Printing All Images 183 Printing Using the DPOF Settings 184 Disconnecting the Cable from the... Playing Back Sound 187 Adding a Voice Memo to Images 188 Recording a Voice Memo 188 Playing Back a Voice Memo 189 Settings 190 Camera Settings 190 Formatting an SD Memory Card 190 Changing the Sound Settings 191 Changing the Date and Time 193 Setting the Alarm 195 Setting ...

Operation Manual
Page 14
indicates information that is useful to be taken when operating the camera. This is the mode for capturing still pictures and recording movies and sound files. In this Operating Manual are explained below . 2or or4 5or 3or ...
indicates information that is useful to be taken when operating the camera. This is the mode for capturing still pictures and recording movies and sound files. In this Operating Manual are explained below . 2or or4 5or 3or ...

Operation Manual
Page 15
...Use it and follow the instructions. 2 2 Quick Start This chapter explains the simplest way to set the camera-related functions. 9 Appendix This section deals with the camera. For information on a computer, see the supplied "PC Connection Manual". Be sure to read it if you...to a 8 computer and installing the provided software, see the Help menu of the 4 buttons and how to do after purchasing the camera before you start taking pictures or playing back images 3 straightaway. 3 Common Operations This chapter explains common operations such as the functions of...
...Use it and follow the instructions. 2 2 Quick Start This chapter explains the simplest way to set the camera-related functions. 9 Appendix This section deals with the camera. For information on a computer, see the supplied "PC Connection Manual". Be sure to read it if you...to a 8 computer and installing the provided software, see the Help menu of the 4 buttons and how to do after purchasing the camera before you start taking pictures or playing back images 3 straightaway. 3 Common Operations This chapter explains common operations such as the functions of...

Operation Manual
Page 16
...also secure. For taking pictures while enjoying various outdoor activities without worrying about your camera getting a bit dirty. The Optio W60 is all it utilizes a lock mechanism for two hours at the pool or while playing in the Camera! Forget Your Worries About Water Getting in a river or lake. It also ..., when the cover is firmly locked, you to the full. This section describes how to suit different situations. Because it needs! 14 Camera Features In addition to basic picture-taking, the Optio W60 has a variety of shooting modes to make the most of the key features of your...
...also secure. For taking pictures while enjoying various outdoor activities without worrying about your camera getting a bit dirty. The Optio W60 is all it utilizes a lock mechanism for two hours at the pool or while playing in the Camera! Forget Your Worries About Water Getting in a river or lake. It also ..., when the cover is firmly locked, you to the full. This section describes how to suit different situations. Because it needs! 14 Camera Features In addition to basic picture-taking, the Optio W60 has a variety of shooting modes to make the most of the key features of your...

Operation Manual
Page 19
..., "Clock Mode" for telling the time too. (p.210) A multitude of functions inside the camera for Carrying Around With You! You can be used, while the image is displayed in Playback mode. The Optio W60 has a variety of your bag or hang round your neck, so you , like your computer...and edit still pictures and movies. (p.164) And no more worries about accidentally deleting images, because now, with the Optio W60, you enjoy playing back and editing images without a computer! The camera is just right to slip into a pocket of functions to let you can recover them again. (p.161) Resize (p....
..., "Clock Mode" for telling the time too. (p.210) A multitude of functions inside the camera for Carrying Around With You! You can be used, while the image is displayed in Playback mode. The Optio W60 has a variety of your bag or hang round your neck, so you , like your computer...and edit still pictures and movies. (p.164) And no more worries about accidentally deleting images, because now, with the Optio W60, you enjoy playing back and editing images without a computer! The camera is just right to slip into a pocket of functions to let you can recover them again. (p.161) Resize (p....
Operation Manual
Page 20
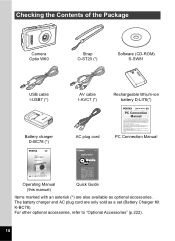
For other optional accessories, refer to "Optional Accessories" (p.222). 18 The battery charger and AC plug cord are also available as a set (Battery Charger Kit K-BC78). Checking the Contents of the Package Camera Optio W60 Strap O-ST20 (*) Software (CD-ROM) S-SW81 USB cable I-USB7 (*) AV cable I-AVC7 (*) Rechargeable lithium-ion battery D-LI78(*) Battery charger D-BC78 (*) AC plug cord PC Connection Manual Operating Manual (this manual) Quick Guide Items marked with an asterisk (*) are only sold as optional accessories.
For other optional accessories, refer to "Optional Accessories" (p.222). 18 The battery charger and AC plug cord are also available as a set (Battery Charger Kit K-BC78). Checking the Contents of the Package Camera Optio W60 Strap O-ST20 (*) Software (CD-ROM) S-SW81 USB cable I-USB7 (*) AV cable I-AVC7 (*) Rechargeable lithium-ion battery D-LI78(*) Battery charger D-BC78 (*) AC plug cord PC Connection Manual Operating Manual (this manual) Quick Guide Items marked with an asterisk (*) are only sold as optional accessories.

Operation Manual
Page 23
Monitor Indications Normal Display in memory 14 Aperture 15 Shutter speed (without card) a : SD Memory Card 16 Camera shake warning (p.98) (shown when blurring caused by r : SD Memory Card is write vibration is likely to occur) protected 17 Face Priority icon (p....Some indications may not appear depending on the shooting mode. 21 p.93) 10 Date and time (p.41) 4 Focus mode (p.100) 11 World time setting (p.197) 5 Digital zoom icon (p.94) 12 Date Imprint setting (p.127) Intelligent zoom icon (p.94) 13 EV compensation (p.97) 6 Memory status (p.37) + : Built-in Still Picture ...
Monitor Indications Normal Display in memory 14 Aperture 15 Shutter speed (without card) a : SD Memory Card 16 Camera shake warning (p.98) (shown when blurring caused by r : SD Memory Card is write vibration is likely to occur) protected 17 Face Priority icon (p....Some indications may not appear depending on the shooting mode. 21 p.93) 10 Date and time (p.41) 4 Focus mode (p.100) 11 World time setting (p.197) 5 Digital zoom icon (p.94) 12 Date Imprint setting (p.127) Intelligent zoom icon (p.94) 13 EV compensation (p.97) 6 Memory status (p.37) + : Built-in Still Picture ...

Operation Manual
Page 24
... Still Picture Capture Mode 1 2 3 4 1/250 5 F3.5 + 1 . 0+ 1 . 0 38 10 M 6 7 8 9 200 10 11 1 Bright portion (blinks red) 6 Recorded pixels (p.104) 2 Dark portion (blinks yellow) 7 Quality level (p.107) 3 Camera shake warning (p.98) 8 White balance (p.108) (shown when blurring caused by 9 AE Metering (p.110) vibration is likely to occur) 10 Sensitivity (p.112) 4 Shutter speed 11...
... Still Picture Capture Mode 1 2 3 4 1/250 5 F3.5 + 1 . 0+ 1 . 0 38 10 M 6 7 8 9 200 10 11 1 Bright portion (blinks red) 6 Recorded pixels (p.104) 2 Dark portion (blinks yellow) 7 Quality level (p.107) 3 Camera shake warning (p.98) 8 White balance (p.108) (shown when blurring caused by 9 AE Metering (p.110) vibration is likely to occur) 10 Sensitivity (p.112) 4 Shutter speed 11...

Operation Manual
Page 26
Getting Started Getting Started Attaching the Strap Attach the strap (O-ST20) supplied with the camera. 1 1 Pass the narrow end of the strap through the strap lug. 2 Pass the other end of the strap through the loop and pull tight. 24
Getting Started Getting Started Attaching the Strap Attach the strap (O-ST20) supplied with the camera. 1 1 Pass the narrow end of the strap through the strap lug. 2 Pass the other end of the strap through the loop and pull tight. 24

Operation Manual
Page 27
Powering the Camera Getting Started Charging indicator While charging: Lights Charging finished: Turns off when charging is finished. 4 Remove the battery from the...Battery charger 1 AC plug cord Charging the Battery Use the battery charger to charge the battery before using it in the charger so that the PENTAX logo is 0°C to 40°C (32°F to 104°F). (The charging time may overheat or be faulty. Note: AC ... charger to the battery charger D-BC78. 2 Plug the AC plug cord into the power outlet. 3 Place the battery in the camera for charging the battery is facing up.
Powering the Camera Getting Started Charging indicator While charging: Lights Charging finished: Turns off when charging is finished. 4 Remove the battery from the...Battery charger 1 AC plug cord Charging the Battery Use the battery charger to charge the battery before using it in the charger so that the PENTAX logo is 0°C to 40°C (32°F to 104°F). (The charging time may overheat or be faulty. Note: AC ... charger to the battery charger D-BC78. 2 Plug the AC plug cord into the power outlet. 3 Place the battery in the camera for charging the battery is facing up.
Operation Manual
Page 28
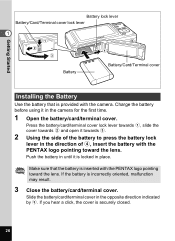
... the battery in until it is securely closed. 26 Make sure that is provided with the PENTAX logo pointing toward the lens. If you hear a click, the cover is locked in the direction of 4, ...insert the battery with the PENTAX logo pointing toward the lens. Press the battery/card/terminal cover lock lever towards 1, slide the cover...battery lock lever in place. If the battery is inserted with the camera. Slide the battery/card/terminal cover in the camera for the first time. 1 Open the battery/card/terminal cover.
... the battery in until it is securely closed. 26 Make sure that is provided with the PENTAX logo pointing toward the lens. If you hear a click, the cover is locked in the direction of 4, ...insert the battery with the PENTAX logo pointing toward the lens. Press the battery/card/terminal cover lock lever towards 1, slide the cover...battery lock lever in place. If the battery is inserted with the camera. Slide the battery/card/terminal cover in the camera for the first time. 1 Open the battery/card/terminal cover.


