
PVDF204 User Guide
Page 7
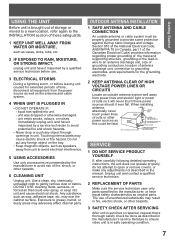
.... - Use a clean, dry, chemically untreated cloth to open or remove covers, or make any foreign object on the tray. • Keep magnetic objects, such as this could over-spray, or seep into unit. - may result in safe operating condition. 7 NATIONAL ELECTRICAL CODE POWER SERVICE GROUNDING ELECTRODE SYSTEM (NEC ART 250, PART H) SERVICE 1 DO NOT SERVICE PRODUCT YOURSELF If, after carefully following detailed operating instructions...
.... - Use a clean, dry, chemically untreated cloth to open or remove covers, or make any foreign object on the tray. • Keep magnetic objects, such as this could over-spray, or seep into unit. - may result in safe operating condition. 7 NATIONAL ELECTRICAL CODE POWER SERVICE GROUNDING ELECTRODE SYSTEM (NEC ART 250, PART H) SERVICE 1 DO NOT SERVICE PRODUCT YOURSELF If, after carefully following detailed operating instructions...
PVDF204 User Guide
Page 8
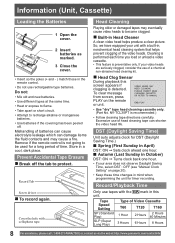
... each time you load or unload a video cassette. • This feature is not going to protect. END:PLAY • Use "dry" type head cleaning cassette only. (Part No. Record/Playback Time Only use rechargeable type batteries. Information (Unit, Cassette) Loading the Batteries 1 Open the cover. 2 Insert batteries as marked. 3 Close the cover. • Insert so the poles (+ and - ) match those in a cool, dark place. Store in the remote control. •...
... each time you load or unload a video cassette. • This feature is not going to protect. END:PLAY • Use "dry" type head cleaning cassette only. (Part No. Record/Playback Time Only use rechargeable type batteries. Information (Unit, Cassette) Loading the Batteries 1 Open the cover. 2 Insert batteries as marked. 3 Close the cover. • Insert so the poles (+ and - ) match those in a cool, dark place. Store in the remote control. •...

PVDF204 User Guide
Page 11
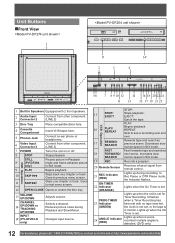
... closes. Stops recording or playback. Records a program. In Playback mode, skips over 1 to 3 minutes of tape. 33 SPEED / RETURN Returns to "0:00:00" at desired portion of tape. 30 SURROUND / VSS Creates a effect. If pressed in Still mode. In DVD mode, displays disc and unit information. You can set Timer Program and On-Timer. Controls navigation around on some DVDs. Displays Play List. (DVD-RAM) 24 SET Sets selected menu. 25 VOLUME UP/DOWN Adjusts volume. 26 PLAY Begins playback. 27 FF/SLOW+ Fast forwards...
... closes. Stops recording or playback. Records a program. In Playback mode, skips over 1 to 3 minutes of tape. 33 SPEED / RETURN Returns to "0:00:00" at desired portion of tape. 30 SURROUND / VSS Creates a effect. If pressed in Still mode. In DVD mode, displays disc and unit information. You can set Timer Program and On-Timer. Controls navigation around on some DVDs. Displays Play List. (DVD-RAM) 24 SET Sets selected menu. 25 VOLUME UP/DOWN Adjusts volume. 26 PLAY Begins playback. 27 FF/SLOW+ Fast forwards...
PVDF204 User Guide
Page 12
... in Still mode. 19 REC Records a program. 20 Remote Sensor Receives infrared signal from remote control. 21 REC Indicator (RED) Lights up during Playback and Slow Motion. Skips back one chapter or track. Goes to previous menu screen. It flashes when a Timer Recording has been set with 2 front speakers. 2 Audio Input Connector 2 Connect from other component. (LINE 2) 3 Disc Tray Place compatible discs here. 4 Cassette Compartment 5 Phones Jack 6 Video Input Connector 2 7 POWER 8 STOP STILL 8' (PV-DF204 only) 9 PLAY 10...
... in Still mode. 19 REC Records a program. 20 Remote Sensor Receives infrared signal from remote control. 21 REC Indicator (RED) Lights up during Playback and Slow Motion. Skips back one chapter or track. Goes to previous menu screen. It flashes when a Timer Recording has been set with 2 front speakers. 2 Audio Input Connector 2 Connect from other component. (LINE 2) 3 Disc Tray Place compatible discs here. 4 Cassette Compartment 5 Phones Jack 6 Video Input Connector 2 7 POWER 8 STOP STILL 8' (PV-DF204 only) 9 PLAY 10...
PVDF204 User Guide
Page 16
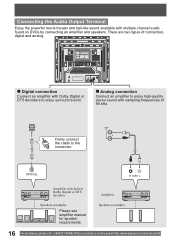
...:http://www.panasonic.com/contactinfo Firmly connect the cable to enjoy high-quality stereo sound with multiple channel audio found on DVDs by connecting an amplifier and speakers. There are two types of 96 kHz. Amplifier Speakers (example) Please see amplifier manual for speaker requirements. Connecting the Audio Output Terminal Enjoy the powerful movie theater and hall-like sound available with sampling frequencies of connection, digital and...
...:http://www.panasonic.com/contactinfo Firmly connect the cable to enjoy high-quality stereo sound with multiple channel audio found on DVDs by connecting an amplifier and speakers. There are two types of 96 kHz. Amplifier Speakers (example) Please see amplifier manual for speaker requirements. Connecting the Audio Output Terminal Enjoy the powerful movie theater and hall-like sound available with sampling frequencies of connection, digital and...
PVDF204 User Guide
Page 17
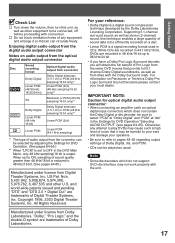
.... For your reference: • Dolby Digital is a signal recording format used in the Settings for DVD Operation "Selecting AUDIO OUTPUT" (see pages 64-65). Supporting 5.1-channel surround sound, as well as stereo (2-channel) sound, this unit, as well as other U.S. Note • Some dts decoders which does not contain the Dolby Digital or dts decoder, be sure to pages 64-65 regarding output settings of Dolby Digital, dts, and PCM. • CDs can be harmful...
.... For your reference: • Dolby Digital is a signal recording format used in the Settings for DVD Operation "Selecting AUDIO OUTPUT" (see pages 64-65). Supporting 5.1-channel surround sound, as well as stereo (2-channel) sound, this unit, as well as other U.S. Note • Some dts decoders which does not contain the Dolby Digital or dts decoder, be sure to pages 64-65 regarding output settings of Dolby Digital, dts, and PCM. • CDs can be harmful...
PVDF204 User Guide
Page 18
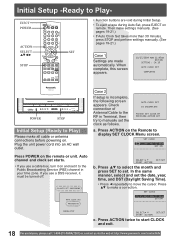
... Broadcasting Service (PBS) channel in Terminal, then try to manually set the date, year, time, and DST (Daylight Saving Time). • Press ◄ repeatedly to move the cursor. EJECT POWER ACTION SELECT STOP • Function buttons are made automatically. Plug the unit power cord into an AC wall outlet. Press ▲▼ to display SET CLOCK Menu screen. When complete, this screen DST:ON SETTING : CH 10 AUTO CLOCK SET appears. Initial Setup -Ready to start CLOCK...
... Broadcasting Service (PBS) channel in Terminal, then try to manually set the date, year, time, and DST (Daylight Saving Time). • Press ◄ repeatedly to move the cursor. EJECT POWER ACTION SELECT STOP • Function buttons are made automatically. Plug the unit power cord into an AC wall outlet. Press ▲▼ to display SET CLOCK Menu screen. When complete, this screen DST:ON SETTING : CH 10 AUTO CLOCK SET appears. Initial Setup -Ready to start CLOCK...

PVDF204 User Guide
Page 25
... set for auto power off . Highest CH125 channel VCR To Make Corrections, use ▲▼ and ◄ ► to move back and correct. 6 Press PROG to the normal screen. • Pressing DISPLAY with sleep timer set displays remaining time. 25 Then, press ADD/DLT to clear the time in one of 3 modes (TV, VCR Playback, or Disc.) 1 Press PROG to display SET PROGRAM screen. 2 Press ▲▼ to select "ON TIMER." 3 Press SET to display ON TIMER screen. ON TIMER...
... set for auto power off . Highest CH125 channel VCR To Make Corrections, use ▲▼ and ◄ ► to move back and correct. 6 Press PROG to the normal screen. • Pressing DISPLAY with sleep timer set displays remaining time. 25 Then, press ADD/DLT to clear the time in one of 3 modes (TV, VCR Playback, or Disc.) 1 Press PROG to display SET PROGRAM screen. 2 Press ▲▼ to select "ON TIMER." 3 Press SET to display ON TIMER screen. ON TIMER...
PVDF204 User Guide
Page 28
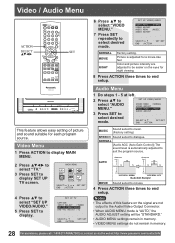
... AUDIO MENU : AUTO MOVIE Sound suited to movies. 4 Press ACTION three times to select desired mode. Video Menu 1 Press ACTION to display MAIN MENU. 2 Press to select "TV." 3 Press SET to suit the program source. SET UP VIDEO/AUDIO VIDEO MENU :NORMAL VIDEO ADJUST AUDIO MENU :MUSIC AUDIO ADJUST SELECT: SET:SET END :ACTION NORMAL MOVIE NIGHT Factory setting. Color and picture intensity are adjusted to be easier on the signal are not output to the Audio/Video Output Connector. • When AUDIO MENU mode is automatically adjusted to display SET UP TV screen. Video / Audio Menu...
... AUDIO MENU : AUTO MOVIE Sound suited to movies. 4 Press ACTION three times to select desired mode. Video Menu 1 Press ACTION to display MAIN MENU. 2 Press to select "TV." 3 Press SET to suit the program source. SET UP VIDEO/AUDIO VIDEO MENU :NORMAL VIDEO ADJUST AUDIO MENU :MUSIC AUDIO ADJUST SELECT: SET:SET END :ACTION NORMAL MOVIE NIGHT Factory setting. Color and picture intensity are adjusted to be easier on the signal are not output to the Audio/Video Output Connector. • When AUDIO MENU mode is automatically adjusted to display SET UP TV screen. Video / Audio Menu...

PVDF204 User Guide
Page 31
... playback with record tab. • The unit power comes on page 24. One Touch Recording (OTR) Press REC repeatedly to stop automatically to "MTS Broadcast / TV Stereo System" on automatically. 2 Press CH ▲▼ or NUMBER keys to Select Channel. • For "LINE" input, see page 8). Press STILL/PAUSE to "Audio Mode for 5 minutes, it is not possible to record from DVD/CD to VHS tape using...
... playback with record tab. • The unit power comes on page 24. One Touch Recording (OTR) Press REC repeatedly to stop automatically to "MTS Broadcast / TV Stereo System" on automatically. 2 Press CH ▲▼ or NUMBER keys to Select Channel. • For "LINE" input, see page 8). Press STILL/PAUSE to "Audio Mode for 5 minutes, it is not possible to record from DVD/CD to VHS tape using...

PVDF204 User Guide
Page 43
...: V-Chip Control is deactivated. TV / VCR Operation 43 OFF: V-Chip Control is activated. VIEW E PROGRAMS? : YES G UNLOCKED 8 ANS+ 13 ANS+ 16 ANS+ 18 ANS+ GENERAL AUDIENCE SELECT: SET:SET END :ACTION G General Audience 8 ANS + Not recommended for children under the age of 16 18 ANS + Programming restricted to adults 10 Press ACTION three times to display screen. LOCK CANADIAN ENGLISH :OFF CHANGE SETTINGS CANADIAN FRENCH :OFF CHANGE SETTINGS PREVIOUS PAGE SELECT: SET:SET END...
...: V-Chip Control is deactivated. TV / VCR Operation 43 OFF: V-Chip Control is activated. VIEW E PROGRAMS? : YES G UNLOCKED 8 ANS+ 13 ANS+ 16 ANS+ 18 ANS+ GENERAL AUDIENCE SELECT: SET:SET END :ACTION G General Audience 8 ANS + Not recommended for children under the age of 16 18 ANS + Programming restricted to adults 10 Press ACTION three times to display screen. LOCK CANADIAN ENGLISH :OFF CHANGE SETTINGS CANADIAN FRENCH :OFF CHANGE SETTINGS PREVIOUS PAGE SELECT: SET:SET END...

PVDF204 User Guide
Page 51
... may result in Play or Stop mode to display "On-Screen Display." • Each press of DISPLAY changes the on the screen while a button is being pressed, it means that the corresponding operation is prohibited by the unit or the disc. Picture Zoom DVD-V DVD-RAM You can enlarge specific portions of a picture and select the zoom ratio using the ZOOM button on the remote during DVD playback. 1 Press ZOOM repeatedly to change display as follows. (Please...
... may result in Play or Stop mode to display "On-Screen Display." • Each press of DISPLAY changes the on the screen while a button is being pressed, it means that the corresponding operation is prohibited by the unit or the disc. Picture Zoom DVD-V DVD-RAM You can enlarge specific portions of a picture and select the zoom ratio using the ZOOM button on the remote during DVD playback. 1 Press ZOOM repeatedly to change display as follows. (Please...

PVDF204 User Guide
Page 52
... title or scene selection. Direct Navigator Page1/4 No. With Play List, up to 99 programs can be displayed. • While DVD MAIN MENU is displayed, Play List and Direct Navigator display will not appear even if PLAYLIST or D.NAVI is not possible. Play a DVD-RAM DVD-RAM 1 Press POWER on the remote or unit. 2 Press DVD to set remote to DVD mode. 3 Press OPEN/CLOSE. 4 Place disc into disc tray. 5 Press PLAY to display Play List or Direct Navigator menu for playback only. Date Length...
... title or scene selection. Direct Navigator Page1/4 No. With Play List, up to 99 programs can be displayed. • While DVD MAIN MENU is displayed, Play List and Direct Navigator display will not appear even if PLAYLIST or D.NAVI is not possible. Play a DVD-RAM DVD-RAM 1 Press POWER on the remote or unit. 2 Press DVD to set remote to DVD mode. 3 Press OPEN/CLOSE. 4 Place disc into disc tray. 5 Press PLAY to display Play List or Direct Navigator menu for playback only. Date Length...

PVDF204 User Guide
Page 58
To cancel, press STOP during play . 1 Press ACTION in the sequence selected. DVD LOCK LANGUAGE TV CLOCK CH SELECT: SET:SET END :ACTION DVD MAIN MENU DISC LANGUAGES AUDIO OUTPUT STILL MODE :AUTO TV MODE :4:3 Pan&Scan PLAY MODE SELECT SET END : :SET :ACTION 10 Press to select "START." 11 Press SET to display DVD MAIN MENU. Special Disc Operation ACTION SELECT NUMBER keys CLEAR SET 6 Press ▲▼ to select "PROGRAM PLAY." 7 Press SET to display PLAY MODE screen. PROGRAM PLAY DISC PROGRAM 1 6 11 16 58 2 7 12 17 15 6 3 8 13 18 1 13 4 9 14 19 32 ...
To cancel, press STOP during play . 1 Press ACTION in the sequence selected. DVD LOCK LANGUAGE TV CLOCK CH SELECT: SET:SET END :ACTION DVD MAIN MENU DISC LANGUAGES AUDIO OUTPUT STILL MODE :AUTO TV MODE :4:3 Pan&Scan PLAY MODE SELECT SET END : :SET :ACTION 10 Press to select "START." 11 Press SET to display DVD MAIN MENU. Special Disc Operation ACTION SELECT NUMBER keys CLEAR SET 6 Press ▲▼ to select "PROGRAM PLAY." 7 Press SET to display PLAY MODE screen. PROGRAM PLAY DISC PROGRAM 1 6 11 16 58 2 7 12 17 15 6 3 8 13 18 1 13 4 9 14 19 32 ...

PVDF204 User Guide
Page 62
... DVD LOCK LANGUAGE TV CLOCK CH SELECT: SET:SET END :ACTION DVD MAIN MENU DISC LANGUAGES AUDIO OUTPUT STILL MODE :AUTO TV MODE :4:3 Pan&Scan SELECT SET END : :SET :ACTION MENUS To select the language used during playback, the subtitles will always operate under the same conditions (especially DVDs) each time. 8 Press ACTION twice to display DISC LANGUAGES screen. SELECT SET END : :SET :ACTION AUDIO To select the audio soundtrack language. (Factory preset: English) English/Spanish/French/Japanese Original: Original disc language Other :Other language selection*1 Disc...
... DVD LOCK LANGUAGE TV CLOCK CH SELECT: SET:SET END :ACTION DVD MAIN MENU DISC LANGUAGES AUDIO OUTPUT STILL MODE :AUTO TV MODE :4:3 Pan&Scan SELECT SET END : :SET :ACTION MENUS To select the language used during playback, the subtitles will always operate under the same conditions (especially DVDs) each time. 8 Press ACTION twice to display DISC LANGUAGES screen. SELECT SET END : :SET :ACTION AUDIO To select the audio soundtrack language. (Factory preset: English) English/Spanish/French/Japanese Original: Original disc language Other :Other language selection*1 Disc...

PVDF204 User Guide
Page 65
... redisplay DVD MAIN MENU and go to step 4 to select "STILL MODE." 5 Press SET repeatedly for late-night listening. [Dolby Digital DVDs only]. • When appears on the screen while a button is being pressed, it means that the corresponding operation is selected. (Factory preset) ON: For dynamic sound even at low volume. DRC (Dynamic Range Compression) OFF: Normal audio range is prohibited by the unit or the disc. Type of...
... redisplay DVD MAIN MENU and go to step 4 to select "STILL MODE." 5 Press SET repeatedly for late-night listening. [Dolby Digital DVDs only]. • When appears on the screen while a button is being pressed, it means that the corresponding operation is selected. (Factory preset) ON: For dynamic sound even at low volume. DRC (Dynamic Range Compression) OFF: Normal audio range is prohibited by the unit or the disc. Type of...
PVDF204 User Guide
Page 68
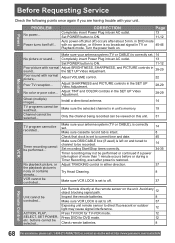
... blocking signal path. 12 Inspect the remote batteries. 8 Make sure VCR LOCK is restored. Completely insert Power Plug into an AC outlet. 13 Set POWER button to ON. 11-12 Poor picture with your unit. Only the channel being recorded can be recorded... Make sure DSS/CABLE box (if used) is correctly set. 14 No picture or sound... Timer recording cannot be selected... VCR cannot be watched... Turn the power back on and tuned to channel to direct fluorescent...
... blocking signal path. 12 Inspect the remote batteries. 8 Make sure VCR LOCK is restored. Completely insert Power Plug into an AC outlet. 13 Set POWER button to ON. 11-12 Poor picture with your unit. Only the channel being recorded can be recorded... Make sure DSS/CABLE box (if used) is correctly set. 14 No picture or sound... Timer recording cannot be selected... VCR cannot be watched... Turn the power back on and tuned to channel to direct fluorescent...
PVDF204 User Guide
Page 80
... sound from stereo (2-channel) audio, these signals can be recorded with a regional code, the DVD player must be multichannel audio. A regular television shows these numbers. Sampling Frequency This is the number of coding digital signals developed by Dolby Laboratories. This effect also works with Dolby Digital 2-channel discs. 80 For assistance, please call : 1-800-211-PANA(7262) or, contact us via the web at the bottom of you are the still pictures...
... sound from stereo (2-channel) audio, these signals can be recorded with a regional code, the DVD player must be multichannel audio. A regular television shows these numbers. Sampling Frequency This is the number of coding digital signals developed by Dolby Laboratories. This effect also works with Dolby Digital 2-channel discs. 80 For assistance, please call : 1-800-211-PANA(7262) or, contact us via the web at the bottom of you are the still pictures...
PVDF204 User Guide
Page 82
... Frame picture [Tape 30 H Head Cleaning 8 I Important Safeguards and Precautions ...... 6 Index Search 32 Information Display 51 Initial Setup (Ready to Play 18 INPUT button 11 L Language Code List 63 Loading the Batteries 8 Location of Controls 11 M Main Menu of DVD 48 Manual Clock Setting 20 Manual Tracking Control 37 MENU/PLAY LIST button 11 Multiple Angle Viewing 61 MUTE button 11 N NUMBER Keys 11 O ON-TIMER 25 One Touch Recording (OTR 31 ON TIMER Indicator 12 OPEN/CLOSE/EJECT button 11 Optical digital audio output connector...
... Frame picture [Tape 30 H Head Cleaning 8 I Important Safeguards and Precautions ...... 6 Index Search 32 Information Display 51 Initial Setup (Ready to Play 18 INPUT button 11 L Language Code List 63 Loading the Batteries 8 Location of Controls 11 M Main Menu of DVD 48 Manual Clock Setting 20 Manual Tracking Control 37 MENU/PLAY LIST button 11 Multiple Angle Viewing 61 MUTE button 11 N NUMBER Keys 11 O ON-TIMER 25 One Touch Recording (OTR 31 ON TIMER Indicator 12 OPEN/CLOSE/EJECT button 11 Optical digital audio output connector...

PVDF204 User Guide
Page 83
... TV PROGRAMS Ratings 41 V V-Lock Control 37 V.S.S. (Virtual Surround Sound 61 VCR Lock 37 VHF/UHF Antenna Input Terminal 13 Video Adjustment 29 Video Input Connector 1 13 Video Input Connector 2 12 Video Menu 28 Vocal selection for Karaoke discs 49 VOLUME UP/DOWN button 11 W Warning and Instruction Displays 67 Weak Signal Display Feature 23 Z Zero Search 33 ZOOM/COUNTER RESET button 11 83 Information P Pause a Recording 31 Phones Jack 12 Picture Zoom 51 Playback Auto Eject 36 Playback a Tape 30 Play a DVD-RAM 52 PLAY button...
... TV PROGRAMS Ratings 41 V V-Lock Control 37 V.S.S. (Virtual Surround Sound 61 VCR Lock 37 VHF/UHF Antenna Input Terminal 13 Video Adjustment 29 Video Input Connector 1 13 Video Input Connector 2 12 Video Menu 28 Vocal selection for Karaoke discs 49 VOLUME UP/DOWN button 11 W Warning and Instruction Displays 67 Weak Signal Display Feature 23 Z Zero Search 33 ZOOM/COUNTER RESET button 11 83 Information P Pause a Recording 31 Phones Jack 12 Picture Zoom 51 Playback Auto Eject 36 Playback a Tape 30 Play a DVD-RAM 52 PLAY button...


