Digital Video Camcorder
Page 7
... recordable time 14 Turning the Camcorder on 14 Setting date and time 15 Using the LCD monitor 16 Using the viewfinder 16 Quick Start 17 Inserting/removing a cassette 18 Inserting/removing a card 19 Selecting a mode 20 How to use the joystick 20 Help mode 22 Switching the language 22 Using the menu screen 22 Adjusting LCD monitor/viewfinder 23 Recording with the built-in LED video light 24 Record mode Check before recording 25 Recording on a tape 26 Recording check 27 Blank search function 27 Recording still pictures on a card while recording image...
... recordable time 14 Turning the Camcorder on 14 Setting date and time 15 Using the LCD monitor 16 Using the viewfinder 16 Quick Start 17 Inserting/removing a cassette 18 Inserting/removing a card 19 Selecting a mode 20 How to use the joystick 20 Help mode 22 Switching the language 22 Using the menu screen 22 Adjusting LCD monitor/viewfinder 23 Recording with the built-in LED video light 24 Record mode Check before recording 25 Recording on a tape 26 Recording check 27 Blank search function 27 Recording still pictures on a card while recording image...

Digital Video Camcorder
Page 9
...; Playing back tape ≥Set to Tape Playback Mode. 1 Press the recording start/stop button again to pause recording. 1/;: 6: 5: ∫: Playback/Pause Rewind/Review playback (Reverts to playback with the 1/; icon.) Fast forward/Cue playback (Reverts to playback with joystick. icon.) Stop ª Playing back card ≥Set to Card Playback Mode. E: D: 1/∫: Plays back the previous picture. Plays back the next picture. PC PC PC 2 Press the recording start/stop button to start recording. 1 Operate with joystick. Before using ª How to turn off the power...
...; Playing back tape ≥Set to Tape Playback Mode. 1 Press the recording start/stop button again to pause recording. 1/;: 6: 5: ∫: Playback/Pause Rewind/Review playback (Reverts to playback with the 1/; icon.) Fast forward/Cue playback (Reverts to playback with joystick. icon.) Stop ª Playing back card ≥Set to Card Playback Mode. E: D: 1/∫: Plays back the previous picture. Plays back the next picture. PC PC PC 2 Press the recording start/stop button to start recording. 1 Operate with joystick. Before using ª How to turn off the power...

Digital Video Camcorder
Page 14
... used will become shorter in the table are approximations. The recordable time will also heat up after removing the lens cap. ª How to turn on the power 1 While pressing the button 1, set the [OFF/ON] switch to [ON]. 1 OFF ON ≥The Status indicator lights red and the power turns on. ≥In Tape Recording Mode or Card Recording Mode, if the [OFF/ON] switch is set to [ON] while the LCD...
... used will become shorter in the table are approximations. The recordable time will also heat up after removing the lens cap. ª How to turn on the power 1 While pressing the button 1, set the [OFF/ON] switch to [ON]. 1 OFF ON ≥The Status indicator lights red and the power turns on. ≥In Tape Recording Mode or Card Recording Mode, if the [OFF/ON] switch is set to [ON] while the LCD...

Digital Video Camcorder
Page 15
.... Connect the AC adaptor to the Camcorder or attach the battery to the Camcorder and the built-in Tape Recording Mode or Card Recording Mode. Select [YES] and set . OFF ON 1 Open the LCD monitor out or extend the viewfinder to use the Camcorder again. When turning on and use . (-16-) ≥The LCD monitor or viewfinder will be recharged. If the screen shows the incorrect date/time, then adjust it. ≥Set...
.... Connect the AC adaptor to the Camcorder or attach the battery to the Camcorder and the built-in Tape Recording Mode or Card Recording Mode. Select [YES] and set . OFF ON 1 Open the LCD monitor out or extend the viewfinder to use the Camcorder again. When turning on and use . (-16-) ≥The LCD monitor or viewfinder will be recharged. If the screen shows the incorrect date/time, then adjust it. ≥Set...
Digital Video Camcorder
Page 17
...;Set to Tape/Card Recording Mode. 1 Set [SETUP] >> [QUICK START] >> [ON]. (-22-) 2 While the [OFF/ON] switch is still being consumed, even when the LCD Monitor and the Viewfinder are removed while using the battery in Tape Recording Mode. ≥When the card is removed while using the battery in quick start standby mode, the power turns off. ≥If the standby continues for approx. 30 minutes, then the Status indicator will reduce the battery recording/playback time...
...;Set to Tape/Card Recording Mode. 1 Set [SETUP] >> [QUICK START] >> [ON]. (-22-) 2 While the [OFF/ON] switch is still being consumed, even when the LCD Monitor and the Viewfinder are removed while using the battery in Tape Recording Mode. ≥When the card is removed while using the battery in quick start standby mode, the power turns off. ≥If the standby continues for approx. 30 minutes, then the Status indicator will reduce the battery recording/playback time...

Digital Video Camcorder
Page 18
... opened, the cassette holder will come out ≥Close the cassette cover completely and then open the cassette cover. Before using Inserting/removing a cassette 1 Fit the AC adaptor or the battery and turn on the heads or the cassette tape. (-63-) 18 LSQT1181 ª When the cassette holder cannot be housed ≥Set the [OFF/ON] switch to [OFF], then to [ON] again. ≥Check if the battery...
... opened, the cassette holder will come out ≥Close the cassette cover completely and then open the cassette cover. Before using Inserting/removing a cassette 1 Fit the AC adaptor or the battery and turn on the heads or the cassette tape. (-63-) 18 LSQT1181 ª When the cassette holder cannot be housed ≥Set the [OFF/ON] switch to [OFF], then to [ON] again. ≥Check if the battery...
Digital Video Camcorder
Page 20
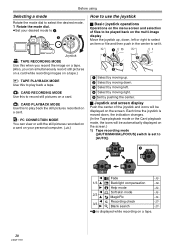
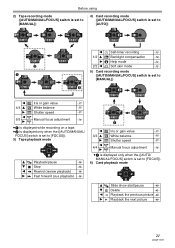
... How to use the joystick ª Basic joystick operations Operations on the menu screen and selection of files to be played back on the multi-image display Move the joystick up, down, left . 4 Select by moving down , the indication changes. (In the Tape playback mode or the Card playback mode, the icons will be automatically displayed on the screen.) 1) Tape recording mode ([AUTO/MANUAL/FOCUS] switch is set to play back the still pictures recorded on a card. Each time the joystick...
... How to use the joystick ª Basic joystick operations Operations on the menu screen and selection of files to be played back on the multi-image display Move the joystick up, down, left . 4 Select by moving down , the indication changes. (In the Tape playback mode or the Card playback mode, the icons will be automatically displayed on the screen.) 1) Tape recording mode ([AUTO/MANUAL/FOCUS] switch is set to play back the still pictures recorded on a card. Each time the joystick...
Digital Video Camcorder
Page 21
... Card recording mode ([AUTO/MANUAL/FOCUS] switch is set to [FOCUS]). 6) Card playback mode 3 Slide show start/pause -40- 4 Delete -41- 2 Playback the previous picture -40- 1 Playback the next picture -40- 21 LSQT1181 Shutter speed -37- Manual focus adjustment -36- ≥1 is displayed while recording on a tape. ≥2 is displayed only when the ([AUTO/MANUAL/ FOCUS] switch is set to [FOCUS]). 3) Tape playback mode 3 Playback/pause -38- 4 Stop -38- 2 Rewind (review playback) -38- 1 Fast forward (cue playback) -38- 1 2 Iris or gain value -37- 3/3 3 White balance...
... Card recording mode ([AUTO/MANUAL/FOCUS] switch is set to [FOCUS]). 6) Card playback mode 3 Slide show start/pause -40- 4 Delete -41- 2 Playback the previous picture -40- 1 Playback the next picture -40- 21 LSQT1181 Shutter speed -37- Manual focus adjustment -36- ≥1 is displayed while recording on a tape. ≥2 is displayed only when the ([AUTO/MANUAL/ FOCUS] switch is set to [FOCUS]). 3) Tape playback mode 3 Playback/pause -38- 4 Stop -38- 2 Rewind (review playback) -38- 1 Fast forward (cue playback) -38- 1 2 Iris or gain value -37- 3/3 3 White balance...

Digital Video Camcorder
Page 22
Using the menu screen For each individual menu, please refer to -54-. 1 Press the [MENU] button. MENU ≥The help mode explains the operation icons that are displayed when the [AUTO/MANUAL/ FOCUS] switch is set to [AUTO] in Tape/Card Recording Mode. 3 Move the joystick up, left or right to select the desired icon. ≥The menu corresponding to the mode selected by the mode dial is displayed. ≥Do not switch the mode dial when the...
Using the menu screen For each individual menu, please refer to -54-. 1 Press the [MENU] button. MENU ≥The help mode explains the operation icons that are displayed when the [AUTO/MANUAL/ FOCUS] switch is set to [AUTO] in Tape/Card Recording Mode. 3 Move the joystick up, left or right to select the desired icon. ≥The menu corresponding to the mode selected by the mode dial is displayed. ≥Do not switch the mode dial when the...

Digital Video Camcorder
Page 25
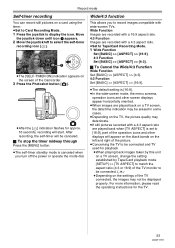
... recommend using the SP mode for important recording. ≥In order to a maximum of 1/250.) ≥Color balance and focus may not be disabled. ≥Playback on other digital video equipment or on light sources or scenes. Conduct a test recording to make sure that the image recording and the audio recording work properly. ª Basic Camcorder positioning 1) 2) ≥Adjusting LCD monitor/viewfinder (-23-) ≥Power supply (-12-) ≥Insert a cassette/card (-18-, -19-) ≥Setting date/time...
... recommend using the SP mode for important recording. ≥In order to a maximum of 1/250.) ≥Color balance and focus may not be disabled. ≥Playback on other digital video equipment or on light sources or scenes. Conduct a test recording to make sure that the image recording and the audio recording work properly. ª Basic Camcorder positioning 1) 2) ≥Adjusting LCD monitor/viewfinder (-23-) ≥Power supply (-12-) ≥Insert a cassette/card (-18-, -19-) ≥Setting date/time...

Digital Video Camcorder
Page 28
... a playback image depending on the picture content. 28 LSQT1181 Recording still pictures onto a card (Photoshot) ≥Set to -69- . ≥Moving pictures and sound cannot be recorded onto a card. ≥While data is being recorded on a card, do not operate the mode dial. ≥When the access lamp is lit, do not remove the card. ≥Another product may degrade or not play back data recorded on this Camcorder. ≥If you must use...
... a playback image depending on the picture content. 28 LSQT1181 Recording still pictures onto a card (Photoshot) ≥Set to -69- . ≥Moving pictures and sound cannot be recorded onto a card. ≥While data is being recorded on a card, do not operate the mode dial. ≥When the access lamp is lit, do not remove the card. ≥Another product may degrade or not play back data recorded on this Camcorder. ≥If you must use...
Digital Video Camcorder
Page 33
... a TV screen, change the setting established by Tape/Card playback mode [SETUP] >> [TV ASPECT] to match the aspect ratio (4:3 or 16:9) of the TV monitor to display the icon. Record mode Self-timer recording You can record still pictures on a card using the timer. ≥Set to Card Recording Mode. 1 Press the joystick to be connected. (-39-) ≥Depending on the settings of the Camcorder. 3 Press the Photoshot button [ ]. ≥After the [ ] indication flashes for...
... a TV screen, change the setting established by Tape/Card playback mode [SETUP] >> [TV ASPECT] to match the aspect ratio (4:3 or 16:9) of the TV monitor to display the icon. Record mode Self-timer recording You can record still pictures on a card using the timer. ≥Set to Card Recording Mode. 1 Press the joystick to be connected. (-39-) ≥Depending on the settings of the Camcorder. 3 Press the Photoshot button [ ]. ≥After the [ ] indication flashes for...

Digital Video Camcorder
Page 37
...: Card Recording Mode The shutter speed closer to 1/8000 is faster. ª Iris/gain value range CLOSE (Closed), F16, ..., F2.0, OPEN (Opened: F1.8) 0dB, ..., 18dB Value closer to [18dB] brightens the image. If this is too bright or too dark. ≥Set to Tape/Card Recording Mode. 1 Set the [AUTO/MANUAL/FOCUS] switch to [MANUAL]. 2 Move the joystick left or right in an extremely bright place, the color of the screen...
...: Card Recording Mode The shutter speed closer to 1/8000 is faster. ª Iris/gain value range CLOSE (Closed), F16, ..., F2.0, OPEN (Opened: F1.8) 0dB, ..., 18dB Value closer to [18dB] brightens the image. If this is too bright or too dark. ≥Set to Tape/Card Recording Mode. 1 Set the [AUTO/MANUAL/FOCUS] switch to [MANUAL]. 2 Move the joystick left or right in an extremely bright place, the color of the screen...
Digital Video Camcorder
Page 39
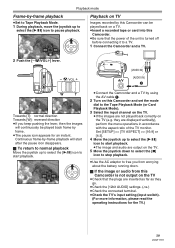
Continuous frame-by-frame playback will continuously be played back on a TV. ≥Insert a recorded tape or card into this Camcorder. ≥Be sure that the plugs are displayed vertically), perform the menu operations in accordance with the aspect ratio of the unit is turned off before connecting it to a TV. 1 Connect the Camcorder and a TV. 2 Push the [s /VOLr] lever. Set [SETUP] >> [TV ASPECT] >> [16:9] or [4:3]. 4 Move...
Continuous frame-by-frame playback will continuously be played back on a TV. ≥Insert a recorded tape or card into this Camcorder. ≥Be sure that the plugs are displayed vertically), perform the menu operations in accordance with the aspect ratio of the unit is turned off before connecting it to a TV. 1 Connect the Camcorder and a TV. 2 Push the [s /VOLr] lever. Set [SETUP] >> [TV ASPECT] >> [16:9] or [4:3]. 4 Move...

Digital Video Camcorder
Page 44
... operating instructions for your TV set and recorder. ≥When you do not need functional indications or date and time indication, respectively set [SETUP] >> [DISPLAY] >> [OFF] or set [BASIC] >> [DATE/TIME] >> [OFF] in the Tape Playback Mode. (When you connect the Camcorder and a recorder with the DV cable, these indications may not appear.) ª When neither image nor sound from the Camcorder is standby for equipment connected. In this case, refer to the operating instructions for the device...
... operating instructions for your TV set and recorder. ≥When you do not need functional indications or date and time indication, respectively set [SETUP] >> [DISPLAY] >> [OFF] or set [BASIC] >> [DATE/TIME] >> [OFF] in the Tape Playback Mode. (When you connect the Camcorder and a recorder with the DV cable, these indications may not appear.) ª When neither image nor sound from the Camcorder is standby for equipment connected. In this case, refer to the operating instructions for the device...
Digital Video Camcorder
Page 48
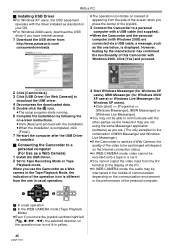
... USB Driver is used as a Web Camera) 1 Install the USB Driver. 2 Set to Tape Recording Mode or Tape Playback mode. However, testing by following the on the communication environment or the performance of the personal computer. 1 2 1 In usual operation 2 In the WEB CAMERA mode (Tape Playback Mode) ≥Even if you press the center of the joystick. 3 Connect the Camcorder to the display of communication depending on -screen instructions. ≥Click [Next] and proceed with Windows...
... USB Driver is used as a Web Camera) 1 Install the USB Driver. 2 Set to Tape Recording Mode or Tape Playback mode. However, testing by following the on the communication environment or the performance of the personal computer. 1 2 1 In usual operation 2 In the WEB CAMERA mode (Tape Playback Mode) ≥Even if you press the center of the joystick. 3 Connect the Camcorder to the display of communication depending on -screen instructions. ≥Click [Next] and proceed with Windows...
Digital Video Camcorder
Page 52
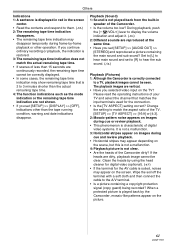
... USB cable. in Memory Card such as described below, uninstall the driver and re-install it to the personal computer and delete [DVC] or [Web-Camera] from the names given in advance. ª About the compatibility of the Camcorder cannot be able to Tape Recording Mode, Tape Playback Mode or PC Connection Mode, connect it . Set the Camcorder to play back the files on this Camcorder recorded on this Camcorder, you do not cover the basic operations...
... USB cable. in Memory Card such as described below, uninstall the driver and re-install it to the personal computer and delete [DVC] or [Web-Camera] from the names given in advance. ª About the compatibility of the Camcorder cannot be able to Tape Recording Mode, Tape Playback Mode or PC Connection Mode, connect it . Set the Camcorder to play back the files on this Camcorder recorded on this Camcorder, you do not cover the basic operations...
Digital Video Camcorder
Page 58
... cassette cover is connected to [LOCK]. CARD FULL: Card does not have sufficient memory remaining. PUSH THE RESET SWITCH: An irregularity in the [SAVE] position is low. CHANGE MODE TO USE USB: The USB cable is open. COPY PROTECTED: Images cannot be recorded correctly because the medium is inserted. CARD LOCKED: The write protection switch on the [SCENE MODE] when the [AUTO/ MANUAL/FOCUS] switch is set to play back a tape section that has been recorded with the DV cable connected...
... cassette cover is connected to [LOCK]. CARD FULL: Card does not have sufficient memory remaining. PUSH THE RESET SWITCH: An irregularity in the [SAVE] position is low. CHANGE MODE TO USE USB: The USB cable is open. COPY PROTECTED: Images cannot be recorded correctly because the medium is inserted. CARD LOCKED: The write protection switch on the [SCENE MODE] when the [AUTO/ MANUAL/FOCUS] switch is set to play back a tape section that has been recorded with the DV cable connected...
Digital Video Camcorder
Page 61
... the screen center. • Read the contents and respond to 3 minutes shorter than the actual remaining tape time. 4: The function indications such as the mode indication or the remaining tape time indication are not shown. • If you selected video input on the TV? If the heads are vertical. • Have you set [SETUP] >> [DISPLAY] >> [OFF], indications other operation. Clean the heads by using the head cleaner for digital video...
... the screen center. • Read the contents and respond to 3 minutes shorter than the actual remaining tape time. 4: The function indications such as the mode indication or the remaining tape time indication are not shown. • If you selected video input on the TV? If the heads are vertical. • Have you set [SETUP] >> [DISPLAY] >> [OFF], indications other operation. Clean the heads by using the head cleaner for digital video...

Digital Video Camcorder
Page 62
... Camcorder is displayed. • An irregularity in the WEB camera mode. • Did you purchased the Camcorder from 8 MB to the operating instructions of the device for data protection and then press the [RESET] button with the capacity or type of image data, backing up on PC. • To disconnect the USB cable safely, double- Please consult a dealer. Protected files cannot be deleted. (-42-) • For the SD Card...
... Camcorder is displayed. • An irregularity in the WEB camera mode. • Did you purchased the Camcorder from 8 MB to the operating instructions of the device for data protection and then press the [RESET] button with the capacity or type of image data, backing up on PC. • To disconnect the USB cable safely, double- Please consult a dealer. Protected files cannot be deleted. (-42-) • For the SD Card...


