Digital Video Camcorder
Page 8
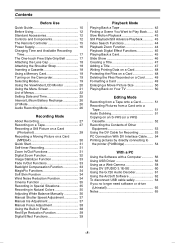
... Inserting a Cassette 18 Using a Memory Card 19 Turning on the Camcorder 19 Selecting Modes 19 Using the Viewfinder/LCD Monitor 20 Using the Menu Screen 21 List of Menus 22 Setting Date and Time 25 Internal Lithium Battery Recharge 26 LP Mode 26 Audio Recording Mode 26 Recording Mode About Recording 27 Recording on a Tape 27 Recording a Still Picture on a Card (Photoshot 28 Recording a Moving Picture on a Card (MPEG4 30 Quick Start 31 Self-timer Recording 31 Zoom In/Out Functions 31 Digital Zoom Function 32 Image Stabilizer Function 33 Fade...
... Inserting a Cassette 18 Using a Memory Card 19 Turning on the Camcorder 19 Selecting Modes 19 Using the Viewfinder/LCD Monitor 20 Using the Menu Screen 21 List of Menus 22 Setting Date and Time 25 Internal Lithium Battery Recharge 26 LP Mode 26 Audio Recording Mode 26 Recording Mode About Recording 27 Recording on a Tape 27 Recording a Still Picture on a Card (Photoshot 28 Recording a Moving Picture on a Card (MPEG4 30 Quick Start 31 Self-timer Recording 31 Zoom In/Out Functions 31 Digital Zoom Function 32 Image Stabilizer Function 33 Fade...
Digital Video Camcorder
Page 13
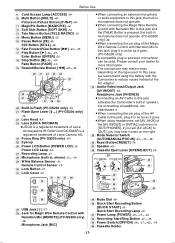
...- (38) Cassette Eject Lever [OPEN/EJECT] -18- Before Use (9) Card Access Lamp [ACCESS] -19(10) Multi Button [MULTI] -40- Picture-in , stereo) -32-, -34(29) White Balance Sensor -36- Still Button [STILL] -28(16) Fast Forward/Cue Button [5] -42-, -45(17) Play Button [1] -42-, -45- Remote Control Sensor -15(30) Lock Button -17(31) Lock Cover -17- (35) (36) (37) (38) (32) REMOTE/MIC (PLUG IN POWER) (33) ≥When connecting an external microphone or audio equipment...
...- (38) Cassette Eject Lever [OPEN/EJECT] -18- Before Use (9) Card Access Lamp [ACCESS] -19(10) Multi Button [MULTI] -40- Picture-in , stereo) -32-, -34(29) White Balance Sensor -36- Still Button [STILL] -28(16) Fast Forward/Cue Button [5] -42-, -45(17) Play Button [1] -42-, -45- Remote Control Sensor -15(30) Lock Button -17(31) Lock Cover -17- (35) (36) (37) (38) (32) REMOTE/MIC (PLUG IN POWER) (33) ≥When connecting an external microphone or audio equipment...
Digital Video Camcorder
Page 17
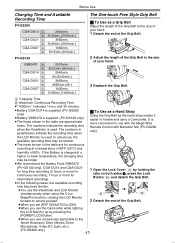
... a Camcorder. The numbers in parentheses indicate the recording time when ª To Use as a Hand Strap Using the Grip Belt as a Grip Belt Adjust the length of the Grip Belt to the size of your hand. 3 Reattach the Grip Belt. If the Battery is more for intermittent recording). 1 Open the Lock Cover (31) by pressing the [POWER LCD] Button. ≥When you set [EVF ON/AUTO...
... a Camcorder. The numbers in parentheses indicate the recording time when ª To Use as a Hand Strap Using the Grip Belt as a Grip Belt Adjust the length of the Grip Belt to the size of your hand. 3 Reattach the Grip Belt. If the Battery is more for intermittent recording). 1 Open the Lock Cover (31) by pressing the [POWER LCD] Button. ≥When you set [EVF ON/AUTO...
Digital Video Camcorder
Page 27
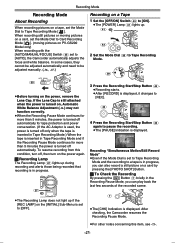
.../Stop Button (42) again to Card Recording Mode [ ]. (moving pictures on a card, set the Mode Dial to [AUTO], the Camcorder automatically adjusts the focus and white balance. PAUSE PAUSE Recording "Simultaneous Motion/Still Record Mode" ≥Even if the Mode Dial is displayed. When recording still pictures or moving pictures on a card by pressing the [PHOTO SHOT] Button. ª To Check the Recording By pressing the [S] Button (7) briefly in progress, you can also record a still picture on PV-GS200 Model only) When recording with the [AUTO/MANUAL/FOCUS] Switch (35) set to Tape...
.../Stop Button (42) again to Card Recording Mode [ ]. (moving pictures on a card, set the Mode Dial to [AUTO], the Camcorder automatically adjusts the focus and white balance. PAUSE PAUSE Recording "Simultaneous Motion/Still Record Mode" ≥Even if the Mode Dial is displayed. When recording still pictures or moving pictures on a card by pressing the [PHOTO SHOT] Button. ª To Check the Recording By pressing the [S] Button (7) briefly in progress, you can also record a still picture on PV-GS200 Model only) When recording with the [AUTO/MANUAL/FOCUS] Switch (35) set to Tape...

Digital Video Camcorder
Page 56
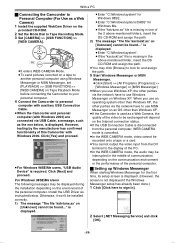
... where playback of personal computers. ≥A CD-ROM drive is required to install this program. When the "Run" Box is open, type in Windows Media Player, but ends with an error message after 3 to transfer images directly from the Memory Card into the personal computer's CD-ROM drive. ≥Quit all applications. ≥[Setup Menu] appears. 3 Click the [USB Driver]. ≥The set up Windows. OS: IBM PC/AT compatible personal computer with the USB Connection Cable. 1 Turn...
... where playback of personal computers. ≥A CD-ROM drive is required to install this program. When the "Run" Box is open, type in Windows Media Player, but ends with an error message after 3 to transfer images directly from the Memory Card into the personal computer's CD-ROM drive. ≥Quit all applications. ≥[Setup Menu] appears. 3 Click the [USB Driver]. ≥The set up Windows. OS: IBM PC/AT compatible personal computer with the USB Connection Cable. 1 Turn...
Digital Video Camcorder
Page 59
... CAMERA]. Install the USB Driver as instructed below , is displayed. Click [Next] and proceed. is displayed. ≥Enter "C:\Windows\system" for Windows 98SE. ≥Enter "C:\Windows\options\CABS" for Windows Me. ≥If the "kstvtune.ax" file is missing in one below . STILL s ENTER i FADE (14) MENU ≥It enters WEB CAMERA Mode. ≥To send pictures recorded on a tape to another personal computer using Windows Messenger or MSN Messenger, set [PLAYBACK] >> [USB FUNCTION...
... CAMERA]. Install the USB Driver as instructed below , is displayed. Click [Next] and proceed. is displayed. ≥Enter "C:\Windows\system" for Windows 98SE. ≥Enter "C:\Windows\options\CABS" for Windows Me. ≥If the "kstvtune.ax" file is missing in one below . STILL s ENTER i FADE (14) MENU ≥It enters WEB CAMERA Mode. ≥To send pictures recorded on a tape to another personal computer using Windows Messenger or MSN Messenger, set [PLAYBACK] >> [USB FUNCTION...
Digital Video Camcorder
Page 64
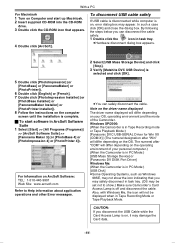
... USB Cable while the Card Access Lamp is in PC Mode:) [USB Mass Storage Device] or [Panasonic DV DISK Port Driver] Windows Me: (When the Camcorder is off and disconnect the cable. By following the steps below you can safely disconnect the cable. Note on the driver name displayed The driver name displayed will not be set not to Help information about application operations and other Error messages. ≥You can disconnect the cable...
... USB Cable while the Card Access Lamp is in PC Mode:) [USB Mass Storage Device] or [Panasonic DV DISK Port Driver] Windows Me: (When the Camcorder is off and disconnect the cable. By following the steps below you can safely disconnect the cable. Note on the driver name displayed The driver name displayed will not be set not to Help information about application operations and other Error messages. ≥You can disconnect the cable...

Digital Video Camcorder
Page 68
....0: When you adjust shutter speed manually, this indication appears. 1: -37White Balance Adjustment Mode -36- WIND CUT: Wind Noise Reduction -34- æ: Progressive Photoshot Mode -28- When the battery is indicated in minutes. (When it reaches less than 3 minutes, the indicator starts flashing.) : Tape Recording Mode -27- : Tape Playback Mode -42- : Card Recording Mode -29- : Picture Playback Mode -45- : MPEG4 Playback Mode (PV-GS200 only) -45- MOSAIC: Mosaic Mode -39- EIS: Image Stabilizer -33- MIC, AV IN: Audio Dubbing Input Display -51...
....0: When you adjust shutter speed manually, this indication appears. 1: -37White Balance Adjustment Mode -36- WIND CUT: Wind Noise Reduction -34- æ: Progressive Photoshot Mode -28- When the battery is indicated in minutes. (When it reaches less than 3 minutes, the indicator starts flashing.) : Tape Recording Mode -27- : Tape Playback Mode -42- : Card Recording Mode -29- : Picture Playback Mode -45- : MPEG4 Playback Mode (PV-GS200 only) -45- MOSAIC: Mosaic Mode -39- EIS: Image Stabilizer -33- MIC, AV IN: Audio Dubbing Input Display -51...

Digital Video Camcorder
Page 75
...; Playback Zoom Function ≥You cannot adjust the sound volume with backlight or other bright conditions may get red eye phenomenon depending on the recording condition. In the following operations is carried out, stored images will be erased, and Wipe and Mix Functions cannot be used. ≥Set another Digital Effect item. ≥Operate the [OFF/ON] switch or Mode Dial ≥Insert or eject a cassette ª Red Eye Reduction Function ª Playing...
...; Playback Zoom Function ≥You cannot adjust the sound volume with backlight or other bright conditions may get red eye phenomenon depending on the recording condition. In the following operations is carried out, stored images will be erased, and Wipe and Mix Functions cannot be used. ≥Set another Digital Effect item. ≥Operate the [OFF/ON] switch or Mode Dial ≥Insert or eject a cassette ª Red Eye Reduction Function ª Playing...
Digital Video Camcorder
Page 83
... played back from the AV signal output jack is capable of the [TAPE PLAYBACK MENU] set to [FINE]. (-29-) 2: Photoshot Playback images do not function, the screen has frozen or the indicator has disappeared. • Turn the Camcorder off after operating the [OFF/ON] switch, press the [RESET] Button (-13-) first. Others 1: The Magic Wire Remote Control with no audio dubbing, [12bit AUDIO] must be set to bring the subject into digital...
... played back from the AV signal output jack is capable of the [TAPE PLAYBACK MENU] set to [FINE]. (-29-) 2: Photoshot Playback images do not function, the screen has frozen or the indicator has disappeared. • Turn the Camcorder off after operating the [OFF/ON] switch, press the [RESET] Button (-13-) first. Others 1: The Magic Wire Remote Control with no audio dubbing, [12bit AUDIO] must be set to bring the subject into digital...
Digital Video Camcorder
Page 8
... Lens Cap 17 Attaching the Shoulder Strap 17 Inserting a Cassette 17 Using a Memory Card (For PV-GS12/PV-GS14/PV-GS15 18 Turning on the Camcorder 18 Easy to Use Mode Dial 18 Using the Viewfinder/LCD Monitor 19 Using the Menu Screen 19 List of Menus 20 Setting Date and Time 23 Internal Lithium Battery Recharge 23 LP Mode 23 Audio Recording Mode 23 Recording Mode About Recording 24 Recording on a Tape 24 Recording a Still Picture on a Tape (PV-GS9 Only 25 Recording a Still Picture on a Card...
... Lens Cap 17 Attaching the Shoulder Strap 17 Inserting a Cassette 17 Using a Memory Card (For PV-GS12/PV-GS14/PV-GS15 18 Turning on the Camcorder 18 Easy to Use Mode Dial 18 Using the Viewfinder/LCD Monitor 19 Using the Menu Screen 19 List of Menus 20 Setting Date and Time 23 Internal Lithium Battery Recharge 23 LP Mode 23 Audio Recording Mode 23 Recording Mode About Recording 24 Recording on a Tape 24 Recording a Still Picture on a Tape (PV-GS9 Only 25 Recording a Still Picture on a Card...
Digital Video Camcorder
Page 21
...-Menu [LCD/EVF SET] LCD and Viewfinder Adjustment (p. 19) [SELF REC] Recording Yourself (p. 26) [EVF ON/AUTO] Using the Viewfinder (p. 19) 7) [INITIAL] Initial Setup Sub-Menu [BLANK SEARCH] Blank Search (p. 24) [DEMO MODE] Demonstration Mode • If no operation takes place for introducing its functions. Before Use [SCENE INDEX] Scene Index Mode (p. 37) [WIND CUT] Wind Noise Reduction (p. 29) [ZOOM MIC] Zoom Microphone (p. 27) [CINEMA] Cinema-like Format Recording (p. 29) 5) [DISPLAY] Display Setup Sub-Menu [DISPLAY] Display Mode (p. 60) [DATE/TIME] Date...
...-Menu [LCD/EVF SET] LCD and Viewfinder Adjustment (p. 19) [SELF REC] Recording Yourself (p. 26) [EVF ON/AUTO] Using the Viewfinder (p. 19) 7) [INITIAL] Initial Setup Sub-Menu [BLANK SEARCH] Blank Search (p. 24) [DEMO MODE] Demonstration Mode • If no operation takes place for introducing its functions. Before Use [SCENE INDEX] Scene Index Mode (p. 37) [WIND CUT] Wind Noise Reduction (p. 29) [ZOOM MIC] Zoom Microphone (p. 27) [CINEMA] Cinema-like Format Recording (p. 29) 5) [DISPLAY] Display Setup Sub-Menu [DISPLAY] Display Mode (p. 60) [DATE/TIME] Date...
Digital Video Camcorder
Page 24
... [RECORD] is displayed, it changes to [REC]. 43 4 Press the Recording Start/Stop Button 43 again to a personal computer with the [AUTO/MANUAL/FOCUS] Switch 18 set the Mode Dial 40 to Card Recording Mode [ ] (For PV-GS12/PV-GS14/PV-GS15). If the Lens Cap is still attached when the power is turned on a card by pressing the [PHOTO SHOT] Button. Recording Mode Recording Mode About Recording When recording pictures on the power, remove the Lens Cap. Recording on the Cassette, the Camcorder stops at the end of the tape...
... [RECORD] is displayed, it changes to [REC]. 43 4 Press the Recording Start/Stop Button 43 again to a personal computer with the [AUTO/MANUAL/FOCUS] Switch 18 set the Mode Dial 40 to Card Recording Mode [ ] (For PV-GS12/PV-GS14/PV-GS15). If the Lens Cap is still attached when the power is turned on a card by pressing the [PHOTO SHOT] Button. Recording Mode Recording Mode About Recording When recording pictures on the power, remove the Lens Cap. Recording on the Cassette, the Camcorder stops at the end of the tape...
Digital Video Camcorder
Page 47
...-ROM drive. • Quit all applications. • The [Setup Menu] Screen appears. [PV-GS15: Supplied] [PV-GS9/PV-GS12/PV-GS14: Optional Software] 3 Click the [USB Driver]. • The set up Windows. 2 Insert the CD-ROM into the computer. ● WebCam Driver (pp. 50-53) : If the Camcorder is requires to your personal computer with preinstalled; Also, images viewed through the camera lens can be installed from [Setup Menu]. ● USB Driver (pp. 47-49) : Software for Windows XP) Free hard disk...
...-ROM drive. • Quit all applications. • The [Setup Menu] Screen appears. [PV-GS15: Supplied] [PV-GS9/PV-GS12/PV-GS14: Optional Software] 3 Click the [USB Driver]. • The set up Windows. 2 Insert the CD-ROM into the computer. ● WebCam Driver (pp. 50-53) : If the Camcorder is requires to your personal computer with preinstalled; Also, images viewed through the camera lens can be installed from [Setup Menu]. ● USB Driver (pp. 47-49) : Software for Windows XP) Free hard disk...
Digital Video Camcorder
Page 56
... no longer need software or driver (Uninstall) The screens may vary with the type of the OS. 1 Select [Start] (>> [Settings]) >> [Control Panel], select the software or the driver from [Add/Remove Programs] to uninstall. • Uninstalling steps may not be presented correctly. 5 When the component selection screen is displayed, check the software to be completed. (For Macintosh) 1 Turn on computer and start ArcSoft Software (For Windows) 1 Select...
... no longer need software or driver (Uninstall) The screens may vary with the type of the OS. 1 Select [Start] (>> [Settings]) >> [Control Panel], select the software or the driver from [Add/Remove Programs] to uninstall. • Uninstalling steps may not be presented correctly. 5 When the component selection screen is displayed, check the software to be completed. (For Macintosh) 1 Turn on computer and start ArcSoft Software (For Windows) 1 Select...
Digital Video Camcorder
Page 57
... the screens in these instructions are deleted. • When the Camcorder is a compact, lightweight and removable external memory card. • All other equipment or vice versa. For this information, refer to the Operating Instructions which accompany your personal computer. • Do not disconnect USB Cable while the operation light of Camcorder is referred to change modes, disconnect the USB cable, switch the Camcorder Mode Dial, then reconnect the USB cable. • When the Tape Recording Mode of...
... the screens in these instructions are deleted. • When the Camcorder is a compact, lightweight and removable external memory card. • All other equipment or vice versa. For this information, refer to the Operating Instructions which accompany your personal computer. • Do not disconnect USB Cable while the operation light of Camcorder is referred to change modes, disconnect the USB cable, switch the Camcorder Mode Dial, then reconnect the USB cable. • When the Tape Recording Mode of...

Digital Video Camcorder
Page 61
... set to [LOCK]. DISCONNECT USB CABLE: You are not recorded. Inserting/Removing the Cassette • In the case of the screen changes or blurs, adjust the shutter speed manually to 1/60 or 1/100. RapidFire Consecutive Photoshot • One more still picture may be used for a long time, the Camera body becomes warm, but this Camcorder. CANNOT OPERATE: You are attempting to play back data which is connected to the Camcorder in Card Recording Mode or Picture Playback Mode...
... set to [LOCK]. DISCONNECT USB CABLE: You are not recorded. Inserting/Removing the Cassette • In the case of the screen changes or blurs, adjust the shutter speed manually to 1/60 or 1/100. RapidFire Consecutive Photoshot • One more still picture may be used for a long time, the Camera body becomes warm, but this Camcorder. CANNOT OPERATE: You are attempting to play back data which is connected to the Camcorder in Card Recording Mode or Picture Playback Mode...

Digital Video Camcorder
Page 62
... Title Screen, or Digital Effect Modes in [EFFECT1] cannot be set . • In the following case: • Neither a card nor a tape has been inserted while the Tape/Card Recording Mode is set . • When recording with a Conversion lens attached, a slight vignetting (darkening around edges) effect occurs on the screen. • Using the MagicPix Function at the beginning of the Camcorder. • Using the LED Video Light reduces battery time. • Set the LED Video Light...
... Title Screen, or Digital Effect Modes in [EFFECT1] cannot be set . • In the following case: • Neither a card nor a tape has been inserted while the Tape/Card Recording Mode is set . • When recording with a Conversion lens attached, a slight vignetting (darkening around edges) effect occurs on the screen. • Using the MagicPix Function at the beginning of the Camcorder. • Using the LED Video Light reduces battery time. • Set the LED Video Light...

Digital Video Camcorder
Page 64
In this Camcorder and recording it onto a tape • Changing the picture size to 640 x 480 pixels with the Remote Control in Multi-Picture Mode • If the [MULTI] Button is pressed while self-recording Mirror Mode (p. 26) is used, the still picture is displayed from the upper right corner of tape. Playback Zoom Function • You cannot adjust the sound volume with DV STUDIO Slide Show • Playback time may not function properly if the interval...
In this Camcorder and recording it onto a tape • Changing the picture size to 640 x 480 pixels with the Remote Control in Multi-Picture Mode • If the [MULTI] Button is pressed while self-recording Mirror Mode (p. 26) is used, the still picture is displayed from the upper right corner of tape. Playback Zoom Function • You cannot adjust the sound volume with DV STUDIO Slide Show • Playback time may not function properly if the interval...

Digital Video Camcorder
Page 69
... charged. • If the DC Cable is turned off , then turn the Lens Hood counter-clockwise. Wait until the Condensation Indication disappears. (pp. 66-67) Auto Focus Function does not work. • Is Manual Focus Mode selected? Insert a new Cassette. (p. 17) • Is the Camcorder power turned on the Cassette open ? The Remaining Tape Time Indication does not match the actual remaining tape time. • If scenes of the image may show remaining tape time...
... charged. • If the DC Cable is turned off , then turn the Lens Hood counter-clockwise. Wait until the Condensation Indication disappears. (pp. 66-67) Auto Focus Function does not work. • Is Manual Focus Mode selected? Insert a new Cassette. (p. 17) • Is the Camcorder power turned on the Cassette open ? The Remaining Tape Time Indication does not match the actual remaining tape time. • If scenes of the image may show remaining tape time...


