Laser Fax
Page 6
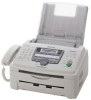
... for problems that smoke has stopped and contact an authorized service center. Do not touch or scratch the green drum surface. - We cannot be turned OFF immediately after printing. Improper operation L In the printing process, heat is normal. 2 1 2 Fuser unit Toner cartridge L Be careful of the following when you begin installation of 30 minutes after printing. Leave the power turned ON for a long time. Do not leave the toner cartridge...
... for problems that smoke has stopped and contact an authorized service center. Do not touch or scratch the green drum surface. - We cannot be turned OFF immediately after printing. Improper operation L In the printing process, heat is normal. 2 1 2 Fuser unit Toner cartridge L Be careful of the following when you begin installation of 30 minutes after printing. Leave the power turned ON for a long time. Do not leave the toner cartridge...
Laser Fax
Page 8
Preparation Connections and Setup 2.1 Connections 19 2.2 Dialing mode 20 Help Button 2.3 Help function 20 Volume 2.4 Adjusting volume 21 Initial Programming 2.5 Date and time 21 2.6 Your logo 22 2.7 Your fax number 24 3. Auto answer OFF 35 4.8 Using the unit with an answering machine 36 4.9 Junk fax prohibitor (preventing fax reception from your phone company 39 5.2 Using two or more phone numbers on a single telephone line 39 5.3 Using three or more phone numbers on a single telephone line 39 5.4 Programming the ring pattern assigned for...
Preparation Connections and Setup 2.1 Connections 19 2.2 Dialing mode 20 Help Button 2.3 Help function 20 Volume 2.4 Adjusting volume 21 Initial Programming 2.5 Date and time 21 2.6 Your logo 22 2.7 Your fax number 24 3. Auto answer OFF 35 4.8 Using the unit with an answering machine 36 4.9 Junk fax prohibitor (preventing fax reception from your phone company 39 5.2 Using two or more phone numbers on a single telephone line 39 5.3 Using three or more phone numbers on a single telephone line 39 5.4 Programming the ring pattern assigned for...
Laser Fax
Page 12
... by fax Fax: 1-800-237-9080 Include: - credit card type, number, expiration date and your line has rotary pulse service. A {TONE} L To change from pulse to resume the conversation. E {JUNK FAX PROHIBITOR} L To use the one-touch dial feature (page 25, 26, 32). J {REDIAL/PAUSE} L To redial the last number dialed. D {MANUAL BROAD} L To send a document to multiple parties (page 32, 33). P {MENU} L To initiate or exit programming. F {COLLATE} L To make a collated copy (page 41). Replacement toner cartridge (KX...
... by fax Fax: 1-800-237-9080 Include: - credit card type, number, expiration date and your line has rotary pulse service. A {TONE} L To change from pulse to resume the conversation. E {JUNK FAX PROHIBITOR} L To use the one-touch dial feature (page 25, 26, 32). J {REDIAL/PAUSE} L To redial the last number dialed. D {MANUAL BROAD} L To send a document to multiple parties (page 32, 33). P {MENU} L To initiate or exit programming. F {COLLATE} L To make a collated copy (page 41). Replacement toner cartridge (KX...
Laser Fax
Page 22
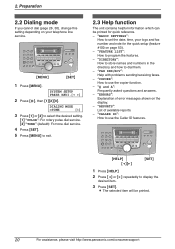
... program the features. - "ERRORS": Explanation of available reports. - "REPORTS": List of error messages shown on your logo and fax number and note for quick reference. - 2. DIALING MODE =TONE [±] 3 Press {1} or {2} to select the desired setting. {1} "PULSE": For rotary pulse dial service. {2} "TONE" (default): For tone dial service. 4 Press {SET}. 5 Press {MENU} to set the date, time, your telephone line service. {MENU} {SET} 1 Press {MENU}. "FAX SND/RCV": Help with problems sending/receiving faxes. - Help Button 2.3 Help function The unit contains helpful information...
... program the features. - "ERRORS": Explanation of available reports. - "REPORTS": List of error messages shown on your logo and fax number and note for quick reference. - 2. DIALING MODE =TONE [±] 3 Press {1} or {2} to select the desired setting. {1} "PULSE": For rotary pulse dial service. {2} "TONE" (default): For tone dial service. 4 Press {SET}. 5 Press {MENU} to set the date, time, your telephone line service. {MENU} {SET} 1 Press {MENU}. "FAX SND/RCV": Help with problems sending/receiving faxes. - Help Button 2.3 Help function The unit contains helpful information...
Laser Fax
Page 24
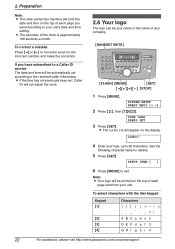
...://www.panasonic.com/consumersupport L The cursor (|) will print the date and time on the display. SETUP ITEM [ ] 6 Press {MENU} to the incorrect number, and make the correction. If you send according to your logo, up to 30 characters. See the following character table for details. 5 Press {SET}. Preparation Note: L The other party's fax machine will appear on the top of your unit. L If the time...
...://www.panasonic.com/consumersupport L The cursor (|) will print the date and time on the display. SETUP ITEM [ ] 6 Press {MENU} to the incorrect number, and make the correction. If you send according to your logo, up to 30 characters. See the following character table for details. 5 Press {SET}. Preparation Note: L The other party's fax machine will appear on the top of your unit. L If the time...
Laser Fax
Page 26
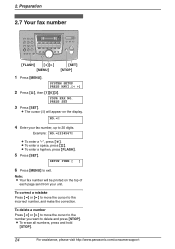
... delete a number Press {} to move the cursor to delete and press {STOP}. Preparation 2.7 Your fax number {FLASH} {} {MENU} {SET} {STOP} 1 Press {MENU}. YOUR FAX NO. L The cursor (|) will be printed on the display. To correct a mistake Press {} to move the cursor to the number you want to the incorrect number, and make the correction. SYSTEM SETUP PRESS NAVI.[( )] 2 Press {#}, then {1}{0}{3}. PRESS SET 3 Press {SET}. L To enter a space, press {#}. SETUP ITEM [ ] 6 Press {MENU...
... delete a number Press {} to move the cursor to delete and press {STOP}. Preparation 2.7 Your fax number {FLASH} {} {MENU} {SET} {STOP} 1 Press {MENU}. YOUR FAX NO. L The cursor (|) will be printed on the display. To correct a mistake Press {} to move the cursor to the number you want to the incorrect number, and make the correction. SYSTEM SETUP PRESS NAVI.[( )] 2 Press {#}, then {1}{0}{3}. PRESS SET 3 Press {SET}. L To enter a space, press {#}. SETUP ITEM [ ] 6 Press {MENU...

Laser Fax
Page 32
... {FAX START}. Enter the fax number. 2. Insert the document. 3. Fax 4SeFnadxing Faxes 4.1 Sending a fax manually 1 {MONITOR} {STOP} {SCAN} {FAX START} {REDIAL/PAUSE} {SET} {RESOLUTION} 1 Adjust the width of the document guides (1) to fit the actual size of the previously inserted pages while the last page is being fed into memory before inserting the document. Sending from memory. "SUPER FINE": For documents with very small print. Press {FAX START}. Reserving the fax transmission (Dual Access) You can scan the document into the unit. When the other pages...
... {FAX START}. Enter the fax number. 2. Insert the document. 3. Fax 4SeFnadxing Faxes 4.1 Sending a fax manually 1 {MONITOR} {STOP} {SCAN} {FAX START} {REDIAL/PAUSE} {SET} {RESOLUTION} 1 Adjust the width of the document guides (1) to fit the actual size of the previously inserted pages while the last page is being fed into memory before inserting the document. Sending from memory. "SUPER FINE": For documents with very small print. Press {FAX START}. Reserving the fax transmission (Dual Access) You can scan the document into the unit. When the other pages...
Laser Fax
Page 33
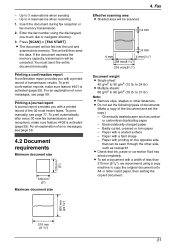
Enter the fax number using a copy machine to 21 lb.) Note: L Remove clips, staples or other side, such as carbon or carbonless duplicating paper - You must send the entire document manually. To print confirmation reports, make sure feature #402 is activated (page 55). Up to 90 g/m2 (12 lb. L The document will then send the data. Fax 4 mm 4 mm 4 mm 4 mm(5/32") 208 mm(8 3/16") 216 mm(8 1/2") Document weight L Single sheet: 45 g/m2 to...
Enter the fax number using a copy machine to 21 lb.) Note: L Remove clips, staples or other side, such as carbon or carbonless duplicating paper - You must send the entire document manually. To print confirmation reports, make sure feature #402 is activated (page 55). Up to 90 g/m2 (12 lb. L The document will then send the data. Fax 4 mm 4 mm 4 mm 4 mm(5/32") 208 mm(8 3/16") 216 mm(8 1/2") Document weight L Single sheet: 45 g/m2 to...
Laser Fax
Page 47
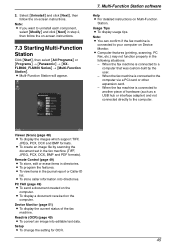
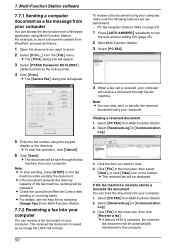
.... 7. L Computer features (printing, scanning, PC Fax, etc.) may not function properly in directories. Viewer (Scan) (page 48) L To display the images which support TIFF, JPEG, PCX, DCX and BMP formats. Remote Control (page 49) L To store, edit or erase items in the following situations: - PC FAX (page 49) L To send a document created on Multi-Function Station. Setup L To change the setting for OCR. 45 When the fax machine is connected to your computer on -screen instructions. L To...
.... 7. L Computer features (printing, scanning, PC Fax, etc.) may not function properly in directories. Viewer (Scan) (page 48) L To display the images which support TIFF, JPEG, PCX, DCX and BMP formats. Remote Control (page 49) L To store, edit or erase items in the following situations: - PC FAX (page 49) L To send a document created on Multi-Function Station. Setup L To change the setting for OCR. 45 When the fax machine is connected to your computer on -screen instructions. L To...
Laser Fax
Page 48
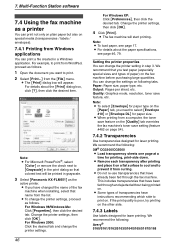
... you test paper (especially special sizes and types of the fax machine when installing, select that colored text will be printed in grayscale. 3 Select [Panasonic KX-FLM651] as a printer You can print a file created in step 3. Note: L To load paper, see page 46, 79. You can change the settings on . Note: L To select [Envelope] for paper type on the [Paper] tab, you want to print on following tabs. For details about the paper specifications, see page 17. Setting the printer...
... you test paper (especially special sizes and types of the fax machine when installing, select that colored text will be printed in grayscale. 3 Select [Panasonic KX-FLM651] as a printer You can print a file created in step 3. Note: L To load paper, see page 46, 79. You can change the settings on . Note: L To select [Envelope] for paper type on the [Paper] tab, you want to print on following tabs. For details about the paper specifications, see page 17. Setting the printer...
Laser Fax
Page 50
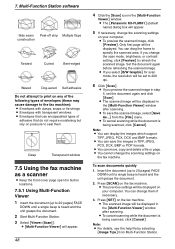
... the fax machine. L To cancel scanning while the document is being scanned, click [Cancel]. L The [Panasonic KX-FLM651] (default name) dialog box will be displayed. L If you change the scanning settings on your computer. L You can display the images which support TIFF, JPEG, PCX, DCX and BMP formats. Note: L For details, see the help file by selecting [Usage Tips] from the [File] menu. L [Multi-Function Viewer] will be displayed on your computer. To scan documents quickly 1. 7. Set the document...
... the fax machine. L To cancel scanning while the document is being scanned, click [Cancel]. L The [Panasonic KX-FLM651] (default name) dialog box will be displayed. L If you change the scanning settings on your computer. L You can display the images which support TIFF, JPEG, PCX, DCX and BMP formats. Note: L For details, see the help file by selecting [Usage Tips] from the [File] menu. L [Multi-Function Viewer] will be displayed on your computer. To scan documents quickly 1. 7. Set the document...
Laser Fax
Page 51
... can also scan using Multi-Function Station L Keep the front cover page open for scan type, the resolution will close. L If you can convert an image into directories (page 29) - Multi-Function Station software - L The [Multi-Function Remote Control] window will appear. 5 If necessary, change the scanning settings on the application used, the appearance may differ slightly. To use this software, click the [OCR] icon in directories (page 25, 32) 7. L The [Panasonic KX-FLM651] (default name) dialog...
... can also scan using Multi-Function Station L Keep the front cover page open for scan type, the resolution will close. L If you can convert an image into directories (page 29) - Multi-Function Station software - L The [Multi-Function Remote Control] window will appear. 5 If necessary, change the scanning settings on the application used, the appearance may differ slightly. To use this software, click the [OCR] icon in directories (page 25, 32) 7. L The [Panasonic KX-FLM651] (default name) dialog...
Laser Fax
Page 52
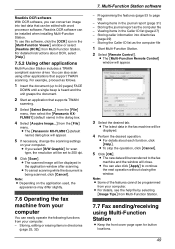
... [File] menu. For example, to view. 4. L The [Print] dialog box will be sent through the fax machine. Note: L To stop the operation, click [Cancel]. 6 Click [Send]. L If the document exceeds the memory capacity of the fax machine, sending will receive a document through the fax machine from Remote Control after sending or receiving faxes. The received fax document is activated, the received fax document will appear. 3 Select [PCFAX Panasonic KX-FLM651] (default name) as an image file (TIFF-G4 format). Note: L You can access the fax function from...
... [File] menu. For example, to view. 4. L The [Print] dialog box will be sent through the fax machine. Note: L To stop the operation, click [Cancel]. 6 Click [Send]. L If the document exceeds the memory capacity of the fax machine, sending will receive a document through the fax machine from Remote Control after sending or receiving faxes. The received fax document is activated, the received fax document will appear. 3 Select [PCFAX Panasonic KX-FLM651] (default name) as an image file (TIFF-G4 format). Note: L You can access the fax function from...
Laser Fax
Page 57
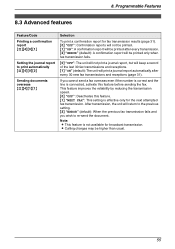
... previous setting. {2} "ERROR" (default): When the previous fax transmission fails and you cannot send a fax overseas even if the number is correct and the line is connected, activate this feature. {1} "NEXT FAX": This setting is not available for the next attempted fax transmission. 8. If you wish to print automatically {#}{4}{0}{2} Sending documents overseas {#}{4}{1}{1} Selection To print a confirmation report for fax transmission results (page 31). {0} "OFF": Confirmation reports will not be printed. {1} "ON": A confirmation report will be printed after...
... previous setting. {2} "ERROR" (default): When the previous fax transmission fails and you cannot send a fax overseas even if the number is correct and the line is connected, activate this feature. {1} "NEXT FAX": This setting is not available for the next attempted fax transmission. 8. If you wish to print automatically {#}{4}{0}{2} Sending documents overseas {#}{4}{1}{1} Selection To print a confirmation report for fax transmission results (page 31). {0} "OFF": Confirmation reports will not be printed. {1} "ON": A confirmation report will be printed after...
Laser Fax
Page 61
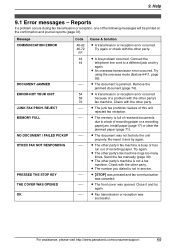
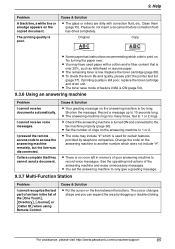
... cover was successful. L {STOP} was pressed and fax communication was not fed into the unit properly. Send the fax manually (page 30). Reports If a problem occurs during fax transmission or reception, one of received documents due to a different jack and try again. L The document was canceled. L A line problem occurred. L The memory is not a fax machine. Cause & Solution L A transmission or reception error occurred. Re-insert it and try again. Help 9 Help 9.1 Error messages - Message COMMUNICATION ERROR DOCUMENT JAMMED ERROR-NOT YOUR UNIT...
... cover was successful. L {STOP} was pressed and fax communication was not fed into the unit properly. Send the fax manually (page 30). Reports If a problem occurs during fax transmission or reception, one of received documents due to a different jack and try again. L The document was canceled. L A line problem occurred. L The memory is not a fax machine. Cause & Solution L A transmission or reception error occurred. Re-insert it and try again. Help 9 Help 9.1 Error messages - Message COMMUNICATION ERROR DOCUMENT JAMMED ERROR-NOT YOUR UNIT...
Laser Fax
Page 64
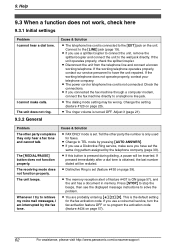
... http://www.panasonic.com/consumersupport L If you use a voice mail service, turn the fax activation feature OFF or re-program the activation code (feature #434 on the unit. If you have the unit repaired. Connect to TEL mode by pressing {AUTO ANSWER}. Adjust it (page 21). The unit beeps. Help Troubleshooting 9.3 When a function does not work, check here 9.3.1 Initial settings Problem I am interrupted by the telephone company (page 39). If the working telephone. L The dialing mode setting may...
... http://www.panasonic.com/consumersupport L If you use a voice mail service, turn the fax activation feature OFF or re-program the activation code (feature #434 on the unit. If you have the unit repaired. Connect to TEL mode by pressing {AUTO ANSWER}. Adjust it (page 21). The unit beeps. Help Troubleshooting 9.3 When a function does not work, check here 9.3.1 Initial settings Problem I am interrupted by the telephone company (page 39). If the working telephone. L The dialing mode setting may...

Laser Fax
Page 66
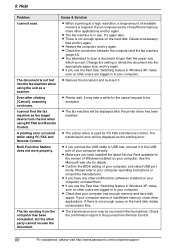
... toner is poor. L You must set remote fax activation to set TEL mode: - L The memory is installed. press {AUTO ANSWER} repeatedly to a lack of received documents due to turn ON the {AUTO ANSWER} light. L The document was not fed into the unit properly. Help Problem The printing quality is low. L The memory is connected, I cannot receive documents by pressing {*}{#}{9}. When an extension telephone is full of recording paper or a recording paper jam. Clean them to send a clearer copy of paper...
... toner is poor. L You must set remote fax activation to set TEL mode: - L The memory is installed. press {AUTO ANSWER} repeatedly to a lack of received documents due to turn ON the {AUTO ANSWER} light. L The document was not fed into the unit properly. Help Problem The printing quality is low. L The memory is connected, I cannot receive documents by pressing {*}{#}{9}. When an extension telephone is full of recording paper or a recording paper jam. Clean them to send a clearer copy of paper...
Laser Fax
Page 67
... resume paper. L To check the drum life and quality, please print the printer test list (page 77). L The code may have used for certain features provided by dragging or double-clicking. Shorten the message. Cause & Solution L Put the cursor on the answering machine is turned ON and connected to access the answering machine remotely, but the line was disconnected. L Set the number of the answering machine and erase unnecessary messages. L The toner save mode of...
... resume paper. L To check the drum life and quality, please print the printer test list (page 77). L The code may have used for certain features provided by dragging or double-clicking. Shorten the message. Cause & Solution L Put the cursor on the answering machine is turned ON and connected to access the answering machine remotely, but the line was disconnected. L Set the number of the answering machine and erase unnecessary messages. L The toner save mode of...
Laser Fax
Page 68
... USB cable to USB hub, connect it . L The fax machine will be displayed after clicking [Cancel], scanning continues. L If you use the Fast User Switching feature in to the USB port of Windows installed on the hard disk. L Confirm the BIOS setting of insufficient memory, close other users are logged in Windows XP, make sure no other multifunction softwares installed on the hard disk, delete unnecessary files. Please refer to your computer operating instructions or consult the manufacturer. A printing error occurred while using PC FAX...
... USB cable to USB hub, connect it . L The fax machine will be displayed after clicking [Cancel], scanning continues. L If you use the Fast User Switching feature in to the USB port of Windows installed on the hard disk. L Confirm the BIOS setting of insufficient memory, close other users are logged in Windows XP, make sure no other multifunction softwares installed on the hard disk, delete unnecessary files. Please refer to your computer operating instructions or consult the manufacturer. A printing error occurred while using PC FAX...

Laser Fax
Page 90
KX-FLM651 Proof of Purchase Panasonic FAX ADVANTAGE PROGRAM Free peace of -warranty repair costs, you will be delivery. Credit status will be completely refurbished, quality-tested by overnight service you do not wish to pay out-of mind, direct from Panasonic NO EXTRA COST FAX ADVANTAGE PROGRAM ■ 1-year limited warranty1: parts, labor, and toll-free help -line at no more than 10 days prior to your...
KX-FLM651 Proof of Purchase Panasonic FAX ADVANTAGE PROGRAM Free peace of -warranty repair costs, you will be delivery. Credit status will be completely refurbished, quality-tested by overnight service you do not wish to pay out-of mind, direct from Panasonic NO EXTRA COST FAX ADVANTAGE PROGRAM ■ 1-year limited warranty1: parts, labor, and toll-free help -line at no more than 10 days prior to your...


