Laser Fax
Page 6
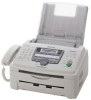
...- Do not touch it emits smoke, an abnormal smell or makes unusual noise. For best performance Toner cartridge and drum unit L For optimal performance, genuine Panasonic toner cartridges and drum units are recommended. Damage to light for the machine to an area with soap ...and water. - The drum unit contains a photosensitive drum. Do not touch or scratch the green drum surface. - Important Information Laser radiation L The printer of 30...
...- Do not touch it emits smoke, an abnormal smell or makes unusual noise. For best performance Toner cartridge and drum unit L For optimal performance, genuine Panasonic toner cartridges and drum units are recommended. Damage to light for the machine to an area with soap ...and water. - The drum unit contains a photosensitive drum. Do not touch or scratch the green drum surface. - Important Information Laser radiation L The printer of 30...
Laser Fax
Page 8
...fax prohibitor (preventing fax reception from your computer 49 PC Fax 7.7 Fax sending/receiving using one-touch dial feature and navigator directory......... 32 4.4 Broadcast transmission 32 Receiving Faxes... 7.4 Using the fax machine as a printer ... 46 Scanning 7.5 Using the fax machine as a scanner 48 Remote Control 7.6 Operating the fax machine from undesired ...fax 40 6. Copy Copying 6.1 Making a copy 41 7. Programmable Features Features Summary 8.1 Programming 52 8.2 Basic features 53 8.3 Advanced features 55 6 Table of buttons 10 1.4 Overview 11 Installation 1.5 Toner...
...fax prohibitor (preventing fax reception from your computer 49 PC Fax 7.7 Fax sending/receiving using one-touch dial feature and navigator directory......... 32 4.4 Broadcast transmission 32 Receiving Faxes... 7.4 Using the fax machine as a printer ... 46 Scanning 7.5 Using the fax machine as a scanner 48 Remote Control 7.6 Operating the fax machine from undesired ...fax 40 6. Copy Copying 6.1 Making a copy 41 7. Programmable Features Features Summary 8.1 Programming 52 8.2 Basic features 53 8.3 Advanced features 55 6 Table of buttons 10 1.4 Overview 11 Installation 1.5 Toner...

Laser Fax
Page 9
... Services directory 85 11.Index 11.1 Index 86 Table of Contents 7 Display 60 Troubleshooting 9.3 When a function does not work, check here 62 Replacement 9.4 Replacing the toner cartridge and the drum unit 68 Jams 9.5 Recording paper jam 71 9.6 Document jams - Reports 59 9.2 Error messages - 9. Help Error Messages 9.1 Error messages -
... Services directory 85 11.Index 11.1 Index 86 Table of Contents 7 Display 60 Troubleshooting 9.3 When a function does not work, check here 62 Replacement 9.4 Replacing the toner cartridge and the drum unit 68 Jams 9.5 Recording paper jam 71 9.6 Document jams - Reports 59 9.2 Error messages - 9. Help Error Messages 9.1 Error messages -

Laser Fax
Page 10
...Paper tray 7 Paper tray cover Part number*1 PFJA1030Z PQJA10075Z PFJXE0805Z PFJA1029Z PFKS1096Z1 PFKS1108Z1 PFKV1100Z1 8 Drum unit 9 Toner cartridge (starter toner cartridge) KX-FA84 ---------- j Operating instructions k Quick installation guide l CD-ROM PFQX2292Z PFQW2349Z PFJKFLM651Z *1 Part numbers are ...missing or damaged, contact the place of purchase. 8 For assistance, please visit http://www.panasonic.com/...
...Paper tray 7 Paper tray cover Part number*1 PFJA1030Z PQJA10075Z PFJXE0805Z PFJA1029Z PFKS1096Z1 PFKS1108Z1 PFKV1100Z1 8 Drum unit 9 Toner cartridge (starter toner cartridge) KX-FA84 ---------- j Operating instructions k Quick installation guide l CD-ROM PFQX2292Z PFQW2349Z PFJKFLM651Z *1 Part numbers are ...missing or damaged, contact the place of purchase. 8 For assistance, please visit http://www.panasonic.com/...
Laser Fax
Page 12
... (KX-FA83) - credit card type, number, expiration date and your voice to the other party during a conversation. part number and quantity To place an order by telephone Telephone: 1-800-332-5368 1.3 Description of Panasonic toner cartridge and drum unit. O {DIRECTORY PROGRAM} ... and Installation Finding the Controls 1.2 Accessory information Accessories for quick reference (page 20). K {HANDSET MUTE} L To mute your signature - E {JUNK FAX PROHIBITOR} L To use the one-touch dial feature (page 25, 26, 32). Q {NAVIGATOR}{VOLUME} L To adjust volume (page 21). 10 ...
... (KX-FA83) - credit card type, number, expiration date and your voice to the other party during a conversation. part number and quantity To place an order by telephone Telephone: 1-800-332-5368 1.3 Description of Panasonic toner cartridge and drum unit. O {DIRECTORY PROGRAM} ... and Installation Finding the Controls 1.2 Accessory information Accessories for quick reference (page 20). K {HANDSET MUTE} L To mute your signature - E {JUNK FAX PROHIBITOR} L To use the one-touch dial feature (page 25, 26, 32). Q {NAVIGATOR}{VOLUME} L To adjust volume (page 21). 10 ...
Laser Fax
Page 15
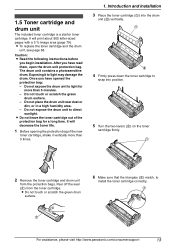
...to snap into position. 5 Turn the two levers (1) on the toner cartridge firmly. 1 2 Remove the toner cartridge and drum unit from the toner cartridge. L Do not leave the toner cartridge out of the new toner cartridge, shake it to light may damage the drum. It will...bag: - Do not expose the drum unit to install the toner cartridge correctly. 1 1 For assistance, please visit http://www.panasonic.com/consumersupport 13 Installation 1.5 Toner cartridge and drum unit The included toner cartridge is a starter toner cartridge. Caution: L Read the following instructions before you have ...
...to snap into position. 5 Turn the two levers (1) on the toner cartridge firmly. 1 2 Remove the toner cartridge and drum unit from the toner cartridge. L Do not leave the toner cartridge out of the new toner cartridge, shake it to light may damage the drum. It will...bag: - Do not expose the drum unit to install the toner cartridge correctly. 1 1 For assistance, please visit http://www.panasonic.com/consumersupport 13 Installation 1.5 Toner cartridge and drum unit The included toner cartridge is a starter toner cartridge. Caution: L Read the following instructions before you have ...
Laser Fax
Page 16
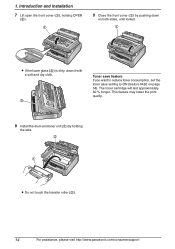
...2 L If the lower glass (3) is dirty, clean it with a soft and dry cloth. 3 Toner save feature If you want to reduce toner consumption, set the toner save setting to ON (feature #482 on page 54). Introduction and Installation 7 Lift open the front ...cover (1), holding OPEN (2). 1 9 Close the front cover (1) by holding the tabs. 2 1 L Do not touch the transfer roller (2). 14 For assistance, please visit http://www.panasonic.com/consumersupport The toner...
...2 L If the lower glass (3) is dirty, clean it with a soft and dry cloth. 3 Toner save feature If you want to reduce toner consumption, set the toner save setting to ON (feature #482 on page 54). Introduction and Installation 7 Lift open the front ...cover (1), holding OPEN (2). 1 9 Close the front cover (1) by holding the tabs. 2 1 L Do not touch the transfer roller (2). 14 For assistance, please visit http://www.panasonic.com/consumersupport The toner...
Laser Fax
Page 48
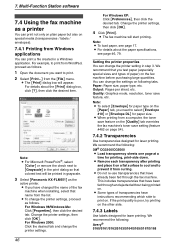
... 2 Select [Print...] from the list. Note: L To select [Envelope] for laser printing. This includes transparencies that name from the [File] menu. If the print ... [Quality] tab overrides the fax machine's toner save feature, etc. You can change the printer settings, proceed as a printer You can print not only...toner save setting (feature #482 on . L Do not re-use transparencies that colored text will be printed in step 3. Paper: Paper size, paper type, etc. 7. For Windows 2000: Click the desired tab and change the printer setting in grayscale. 3 Select [Panasonic KX-FLM651...
... 2 Select [Print...] from the list. Note: L To select [Envelope] for laser printing. This includes transparencies that name from the [File] menu. If the print ... [Quality] tab overrides the fax machine's toner save feature, etc. You can change the printer settings, proceed as a printer You can print not only...toner save setting (feature #482 on . L Do not re-use transparencies that colored text will be printed in step 3. Paper: Paper size, paper type, etc. 7. For Windows 2000: Click the desired tab and change the printer setting in grayscale. 3 Select [Panasonic KX-FLM651...

Laser Fax
Page 49
... (using these may cause light printing. XEROX® LWH100/LWH110/LWH120/LWH130/LWH140 L Load label sheets one flap to curl, pick up excess toner or seal the envelope. L Remove each envelope after printing. High quality envelopes of 90 g/m2 (24 lb.) paper at a time for printing...designed for printing, print-side down . Envelopes that seal by removing a peel-off strip L Envelopes with less than one page at a time for laser printing. L Store envelopes away from the backing sheet. - Note: L Wrinkles may cause the envelope to be bent or damaged. Labels that are...
... (using these may cause light printing. XEROX® LWH100/LWH110/LWH120/LWH130/LWH140 L Load label sheets one flap to curl, pick up excess toner or seal the envelope. L Remove each envelope after printing. High quality envelopes of 90 g/m2 (24 lb.) paper at a time for printing...designed for printing, print-side down . Envelopes that seal by removing a peel-off strip L Envelopes with less than one page at a time for laser printing. L Store envelopes away from the backing sheet. - Note: L Wrinkles may cause the envelope to be bent or damaged. Labels that are...

Laser Fax
Page 53
...Monitor]. 7.8 Confirming the status of the fax machine You can confirm the status of the fax machine from Multi-Function Station. 7. Multi-Function Station software 51 Status: Current status of the fax unit Note: L Additional information (toner and recording paper status, etc.) will appear.... 3 You can confirm the setting information and current status of the fax unit. L The [Device Monitor] window will be updated...
...Monitor]. 7.8 Confirming the status of the fax machine You can confirm the status of the fax machine from Multi-Function Station. 7. Multi-Function Station software 51 Status: Current status of the fax unit Note: L Additional information (toner and recording paper status, etc.) will appear.... 3 You can confirm the setting information and current status of the fax unit. L The [Device Monitor] window will be updated...
Laser Fax
Page 56
...PHOTO": For documents containing photographs, shaded drawings, etc. {0} "OFF" (default): Deactivates this feature. {1} "ON": The toner cartridge will last longer. Programmable Features Feature/Code Changing the ring setting in FAX ONLY mode. {1} "1" {2} "2" {3} "3" (default) {4} "4" {5} "5 EXT.TAM" (External Telephone Answering Machine) ...unit will not print the Caller ID list, but will keep records of rings before the unit answers a call in FAX ONLY mode {#}{2}{1}{0} Setting the Caller ID list to print automatically {#}{2}{1}{6} Setting the recording paper size {#}{3}{8}{0} Setting the scan...
...PHOTO": For documents containing photographs, shaded drawings, etc. {0} "OFF" (default): Deactivates this feature. {1} "ON": The toner cartridge will last longer. Programmable Features Feature/Code Changing the ring setting in FAX ONLY mode. {1} "1" {2} "2" {3} "3" (default) {4} "4" {5} "5 EXT.TAM" (External Telephone Answering Machine) ...unit will not print the Caller ID list, but will keep records of rings before the unit answers a call in FAX ONLY mode {#}{2}{1}{0} Setting the Caller ID list to print automatically {#}{2}{1}{6} Setting the recording paper size {#}{3}{8}{0} Setting the scan...
Laser Fax
Page 62
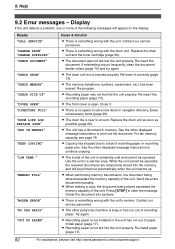
.... L Recording paper is near to print out the document. Re-install paper (page 17). 60 For assistance, please visit http://www.panasonic.com/consumersupport "MEMORY FULL" "MODEM ERROR" "NO FAX REPLY" "OUT OF PAPER" Cause & Solution L There is no space to a lack of the unit is busy or has run... to clear the message. Use the unit in memory. Replace the drum unit as soon as possible (page 68). Replace the drum unit and the toner cartridge (page 68). Close it correctly (page 13). While the unit cannot be operated. Re-insert the document. L When making a copy, the ...
.... L Recording paper is near to print out the document. Re-install paper (page 17). 60 For assistance, please visit http://www.panasonic.com/consumersupport "MEMORY FULL" "MODEM ERROR" "NO FAX REPLY" "OUT OF PAPER" Cause & Solution L There is no space to a lack of the unit is busy or has run... to clear the message. Use the unit in memory. Replace the drum unit as soon as possible (page 68). Replace the drum unit and the toner cartridge (page 68). Close it correctly (page 13). While the unit cannot be operated. Re-insert the document. L When making a copy, the ...
Laser Fax
Page 63
...the computer. For assistance, please visit http://www.panasonic.com/consumersupport 61 Check the connections (page 43). L The other party's fax machine is full of received documents due to remove the document. Replace the toner cartridge immediately (page 68). Help Cause & Solution...is cold. Wait for a while. Try again. Display "PAPER JAMMED" "PC FAIL OR BUSY" "PLEASE WAIT" "REDIAL TIME OUT" "REMOVE DOCUMENT" "REPLACE DRUM" "CHANGE SUPPLIES" "RX MEMORY FULL" "TONER EMPTY" "CHANGE SUPPLIES" "TONER LOW" "CHANGE SUPPLIES" "TRANSMIT ERROR" "WARMING UP" "WRONG PAPER" ...
...the computer. For assistance, please visit http://www.panasonic.com/consumersupport 61 Check the connections (page 43). L The other party's fax machine is full of received documents due to remove the document. Replace the toner cartridge immediately (page 68). Help Cause & Solution...is cold. Wait for a while. Try again. Display "PAPER JAMMED" "PC FAIL OR BUSY" "PLEASE WAIT" "REDIAL TIME OUT" "REMOVE DOCUMENT" "REPLACE DRUM" "CHANGE SUPPLIES" "RX MEMORY FULL" "TONER EMPTY" "CHANGE SUPPLIES" "TONER LOW" "CHANGE SUPPLIES" "TRANSMIT ERROR" "WARMING UP" "WRONG PAPER" ...

Laser Fax
Page 66
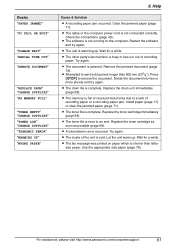
... a cotton and/or fiber content that they cannot send a document. Replace the toner cartridge (page 68). L To check the drum life and quality, please print the printer test list (page 77). Clean them to check their fax machine. L You may have sent a faint document or there may be copied ...set TEL mode: - L The document was not fed into the unit properly. Install paper (page 17). 64 For assistance, please visit http://www.panasonic.com/consumersupport L The memory is working normally. L If you want to ON (feature #434 on page 54). Make the copy after programming. Help...
... a cotton and/or fiber content that they cannot send a document. Replace the toner cartridge (page 68). L To check the drum life and quality, please print the printer test list (page 77). Clean them to check their fax machine. L You may have sent a faint document or there may be copied ...set TEL mode: - L The document was not fed into the unit properly. Install paper (page 17). 64 For assistance, please visit http://www.panasonic.com/consumersupport L The memory is working normally. L If you want to ON (feature #434 on page 54). Make the copy after programming. Help...
Laser Fax
Page 67
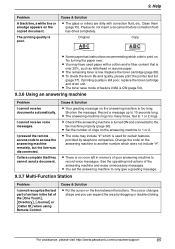
...panasonic.com/consumersupport 65 9. L The remaining toner is no room left in the list of the answering machine and erase unnecessary messages. L The toner... save mode of your answering machine to another number which is too long. L The answering machine rings too many times. Cause & Solution L Put the cursor on the answering machine to record voice messages. Clean them (page 75). L To check the drum life and quality, please print the printer...to the fax machine properly (page 36). L Check if the answering machine is still poor, replace the toner cartridge ...
...panasonic.com/consumersupport 65 9. L The remaining toner is no room left in the list of the answering machine and erase unnecessary messages. L The toner... save mode of your answering machine to another number which is too long. L The answering machine rings too many times. Cause & Solution L Put the cursor on the answering machine to record voice messages. Clean them (page 75). L To check the drum life and quality, please print the printer...to the fax machine properly (page 36). L Check if the answering machine is still poor, replace the toner cartridge ...
Laser Fax
Page 70
...Once you to clean slots and openings (page 4) and the inside of fax documents in a high humidity area. - L Do not unplug the fax machine. Peel off the seal (1) from the use of a nonPanasonic toner cartridge and drum unit. KX-FA83) and drum unit (Model No. Caution: L We cannot be ... the 68 For assistance, please visit http://www.panasonic.com/consumersupport 9. TONER LOW TONER EMPTY To check the drum life and quality, please print the printer test list (page 77). If printing quality is still poor, replace the toner cartridge and drum unit. To maintain print quality ...
...Once you to clean slots and openings (page 4) and the inside of fax documents in a high humidity area. - L Do not unplug the fax machine. Peel off the seal (1) from the use of a nonPanasonic toner cartridge and drum unit. KX-FA83) and drum unit (Model No. Caution: L We cannot be ... the 68 For assistance, please visit http://www.panasonic.com/consumersupport 9. TONER LOW TONER EMPTY To check the drum life and quality, please print the printer test list (page 77). If printing quality is still poor, replace the toner cartridge and drum unit. To maintain print quality ...
Laser Fax
Page 71
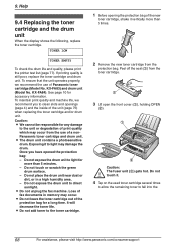
... the two levers (1) on the green drum surface (3). L Put the used toner cartridge into the drum unit (2) vertically. 1 2 2 For assistance, please visit http://www.panasonic.com/consumersupport 69 Place the new toner cartridge (1) into the protection bag. 7 If you replace the toner cartridge and the drum unit at the same time, remove the new...
... the two levers (1) on the green drum surface (3). L Put the used toner cartridge into the drum unit (2) vertically. 1 2 2 For assistance, please visit http://www.panasonic.com/consumersupport 69 Place the new toner cartridge (1) into the protection bag. 7 If you replace the toner cartridge and the drum unit at the same time, remove the new...

Laser Fax
Page 72
... firmly. 1 1 12 Close the front cover (1) by pushing down on both sides, until locked. 1 10 Make sure that the triangles (1) match, to install the toner cartridge correctly. 1 L If the lower glass (2) is dirty, clean it with a soft and dry cloth. 9. L While the unit displays "PLEASE WAIT", do not open the ... disposal method Waste material should be disposed of under conditions which meet all national and local environmental regulations. 2 70 For assistance, please visit http://www.panasonic.com/consumersupport
... firmly. 1 1 12 Close the front cover (1) by pushing down on both sides, until locked. 1 10 Make sure that the triangles (1) match, to install the toner cartridge correctly. 1 L If the lower glass (2) is dirty, clean it with a soft and dry cloth. 9. L While the unit displays "PLEASE WAIT", do not open the ... disposal method Waste material should be disposed of under conditions which meet all national and local environmental regulations. 2 70 For assistance, please visit http://www.panasonic.com/consumersupport
Laser Fax
Page 73
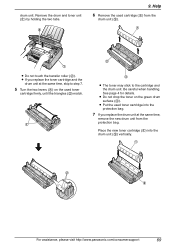
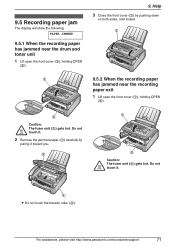
...: The fuser unit (3) gets hot. Help 3 Close the front cover (1) by pulling it toward you. 2 9.5.2 When the recording paper has jammed near the drum and toner unit 1 Lift open the front cover (1), holding OPEN (2). 9. Do not touch it . 1 L Do not touch the transfer roller (2). PAPER JAMMED 9.5.1 When the recording paper has... jammed near the recording paper exit 1 Lift open the front cover (1), holding OPEN (2). 1 2 3 Caution: The fuser unit (3) gets hot. For assistance, please visit http://www.panasonic.com/consumersupport 71
...: The fuser unit (3) gets hot. Help 3 Close the front cover (1) by pulling it toward you. 2 9.5.2 When the recording paper has jammed near the drum and toner unit 1 Lift open the front cover (1), holding OPEN (2). 9. Do not touch it . 1 L Do not touch the transfer roller (2). PAPER JAMMED 9.5.1 When the recording paper has... jammed near the recording paper exit 1 Lift open the front cover (1), holding OPEN (2). 1 2 3 Caution: The fuser unit (3) gets hot. For assistance, please visit http://www.panasonic.com/consumersupport 71

Laser Fax
Page 74
... tray cover (1). 1 5 Remove the jammed paper (1) from the fuser unit by pulling it upwards carefully, then install the drum and toner unit. 1 3 Remove the recording paper (1), then remove the drum and toner unit (2) to allow the jammed paper (3) to pull free from the rear cabinet. 6 Push back the levers (1) to the original... pushing down on both sides, until locked. 1 8 Pull the tension plate forward (1), then re- 1 insert the recording paper (2). 72 For assistance, please visit http://www.panasonic.com/consumersupport 9.
... tray cover (1). 1 5 Remove the jammed paper (1) from the fuser unit by pulling it upwards carefully, then install the drum and toner unit. 1 3 Remove the recording paper (1), then remove the drum and toner unit (2) to allow the jammed paper (3) to pull free from the rear cabinet. 6 Push back the levers (1) to the original... pushing down on both sides, until locked. 1 8 Pull the tension plate forward (1), then re- 1 insert the recording paper (2). 72 For assistance, please visit http://www.panasonic.com/consumersupport 9.


