
User's Manual
Page 1
...11 Connect to Video Sources 12 Powering the projector On / Off.........13 Powering On the Projector 13 Powering off the projector 14 Warning Indicator 14 Adjusting the Projected Image..........15 Adjusting the Projector's Height ........ 15 Adjusting the Projector's Focus.......... 16 Adjusting Projection Image Size......... 16 User Controls 18 Control Panel & Remote Control.......18 Control Panel 18 Remote Control 19 On-screen Display Menus 24 How to operate 24 Menu Tree 25 IMAGE 27 IMAGE | Advanced 29 DISPLAY 31 DISPLAY | 3D 34 SETUP 35 SETUP | Signal (RGB 38 SETUP | Security...
...11 Connect to Video Sources 12 Powering the projector On / Off.........13 Powering On the Projector 13 Powering off the projector 14 Warning Indicator 14 Adjusting the Projected Image..........15 Adjusting the Projector's Height ........ 15 Adjusting the Projector's Focus.......... 16 Adjusting Projection Image Size......... 16 User Controls 18 Control Panel & Remote Control.......18 Control Panel 18 Remote Control 19 On-screen Display Menus 24 How to operate 24 Menu Tree 25 IMAGE 27 IMAGE | Advanced 29 DISPLAY 31 DISPLAY | 3D 34 SETUP 35 SETUP | Signal (RGB 38 SETUP | Security...

User's Manual
Page 2
.../accessories specified by appropriate service personnel. Only use the projector near heat sources such as radiators, heaters, stoves or any ventilation openings. They may expose you send the unit for safety related markings. 9. Class B emissions limits This Class B digital apparatus meets all requirements of important operating and maintenance (servicing) instructions in a location that emits heat. 4. Opening or removing covers may touch dangerous voltage...
.../accessories specified by appropriate service personnel. Only use the projector near heat sources such as radiators, heaters, stoves or any ventilation openings. They may expose you send the unit for safety related markings. 9. Class B emissions limits This Class B digital apparatus meets all requirements of important operating and maintenance (servicing) instructions in a location that emits heat. 4. Opening or removing covers may touch dangerous voltage...
User's Manual
Page 3
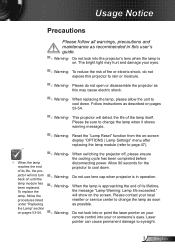
... the lamp disconnecting power. Do not use lens cap when projector is in this user's guide. ▀■ Warning- Please contact your local reseller or service center to eyesight. 3 English Laser pointer can cause permanent damage to change the lamp when it shows warning messages. ▀■ Warning- Do not look into or point the laser pointer on your remote control into the projector's lens when the lamp is...
... the lamp disconnecting power. Do not use lens cap when projector is in this user's guide. ▀■ Warning- Please contact your local reseller or service center to eyesight. 3 English Laser pointer can cause permanent damage to change the lamp when it shows warning messages. ▀■ Warning- Do not look into or point the laser pointer on your remote control into the projector's lens when the lamp is...
User's Manual
Page 13
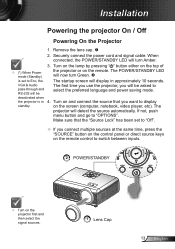
... connect the source that the "Source Lock" has been set to display standby. Securely connect the power cord and signal cable. If not, push menu button and go to pass-through and RS-232 will display in 4. deactivated when the projector is set to switch between inputs. on the remote control to "Off". If you connect multiple sources at the same time, press the "SOURCE" button on the control panel or direct source keys on the screen (computer, notebook, video...
... connect the source that the "Source Lock" has been set to display standby. Securely connect the power cord and signal cable. If not, push menu button and go to pass-through and RS-232 will display in 4. deactivated when the projector is set to switch between inputs. on the remote control to "Off". If you connect multiple sources at the same time, press the "SOURCE" button on the control panel or direct source keys on the screen (computer, notebook, video...
User's Manual
Page 14
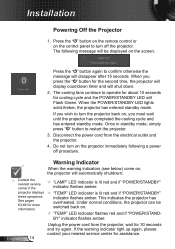
...; "LAMP" LED indicator is lit red and if "POWER/STANDBY" indicator flashes amber. Warning Indicator When the warning indicators (see below) come on , you press the " " button for 30 seconds and try again. Installation Powering off procedure. projector displays these symptoms. See pages 63-64 for assistance. Do not turn on the projector immediately following message will be switched back on the screen. The following a power off the projector 1. English 14 Unplug the power cord from...
...; "LAMP" LED indicator is lit red and if "POWER/STANDBY" indicator flashes amber. Warning Indicator When the warning indicators (see below) come on , you press the " " button for 30 seconds and try again. Installation Powering off procedure. projector displays these symptoms. See pages 63-64 for assistance. Do not turn on the projector immediately following message will be switched back on the screen. The following a power off the projector 1. English 14 Unplug the power cord from...

User's Manual
Page 25
...0 Türkçe / ViӋt 16:10 / 16:9 On / Off 0~31 -5~5 -5~5 -5~5 ʳ On / Off Month / Day / Hour ʳ 25 English Color Color Space Input Source Image AI Exit 3D #4 3D Sync. Position (VGA) V. User Controls Menu Tree Main Menu Image Sub Menu Display Mode Brightness Contrast Sharpness #1 Saturation #1 Tint Advanced Display Setup Format Overscan Zoom H Image Shift V Image Shift V Keystone Auto Keystone 3D Language Degamma BrilliantColor™ Color Temp. Invert Exit #3 Screen Type Projection Menu Location #5 Signal Security Automatic Phase (VGA) Frequency (VGA) H.
...0 Türkçe / ViӋt 16:10 / 16:9 On / Off 0~31 -5~5 -5~5 -5~5 ʳ On / Off Month / Day / Hour ʳ 25 English Color Color Space Input Source Image AI Exit 3D #4 3D Sync. Position (VGA) V. User Controls Menu Tree Main Menu Image Sub Menu Display Mode Brightness Contrast Sharpness #1 Saturation #1 Tint Advanced Display Setup Format Overscan Zoom H Image Shift V Image Shift V Keystone Auto Keystone 3D Language Degamma BrilliantColor™ Color Temp. Invert Exit #3 Screen Type Projection Menu Location #5 Signal Security Automatic Phase (VGA) Frequency (VGA) H.

User's Manual
Page 26
User Controls Main Menu Setup Sub Menu Projector ID Mute #6 Volume Audio Input Advanced RS232 Network Options Source Lock High Altitude Information Hide Keypad Lock Background Color Advanced Lamp Settings Reset Logo Logo Capture Closed Captioning Exit Network State DHCP IP Address Subnet mask Gateway DNS Apply Exit Direct Power On Auto Power Off (min.) Sleep Timer (min.) Power Mode (Standby) Exit Lamp Hours Lamp Reminder Brightness Mode Lamp Reset Exit Settings 0~99 On / Off 0~10 Default / Audio1(Phone jack) / Audio2 (RCA R/L) / MIC Optoma / User Off / CC1...
User Controls Main Menu Setup Sub Menu Projector ID Mute #6 Volume Audio Input Advanced RS232 Network Options Source Lock High Altitude Information Hide Keypad Lock Background Color Advanced Lamp Settings Reset Logo Logo Capture Closed Captioning Exit Network State DHCP IP Address Subnet mask Gateway DNS Apply Exit Direct Power On Auto Power Off (min.) Sleep Timer (min.) Power Mode (Standby) Exit Lamp Hours Lamp Reminder Brightness Mode Lamp Reset Exit Settings 0~99 On / Off 0~10 Default / Audio1(Phone jack) / Audio2 (RCA R/L) / MIC Optoma / User Off / CC1...
User's Manual
Page 33
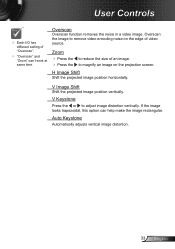
... the size of "Overscan". "Overscan" and "Zoom" can help make the image rectangular. V Image Shift Shift the projected image position vertically. V Keystone Press the or to remove video encoding noise on the projection screen. Auto Keystone Automatically adjusts vertical image distortion. 33 English Overscan Overscan function removes the noise in a video image. User Controls Each I/O has different setting of an image. Press the to magnify an image on the edge of video source...
... the size of "Overscan". "Overscan" and "Zoom" can help make the image rectangular. V Image Shift Shift the projected image position vertically. V Keystone Press the or to remove video encoding noise on the projection screen. Auto Keystone Automatically adjusts vertical image distortion. 33 English Overscan Overscan function removes the noise in a video image. User Controls Each I/O has different setting of an image. Press the to magnify an image on the edge of video source...
User's Manual
Page 35
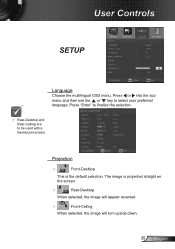
The image is the default selection. Press "Enter" to finalize the selection. Rear-Desktop and Rear-Ceiling are to select your preferred language. Press or into the sub menu and then use the or key to be used with a translucent screen. User Controls SETUP Language Choose the multilingual OSD menu. Projection Front-Desktop This is projected straight on the screen. Rear-Desktop When selected, the image will appear reversed. Front-Ceiling When selected, the image will turn upside down. 35 English
The image is the default selection. Press "Enter" to finalize the selection. Rear-Desktop and Rear-Ceiling are to select your preferred language. Press or into the sub menu and then use the or key to be used with a translucent screen. User Controls SETUP Language Choose the multilingual OSD menu. Projection Front-Desktop This is projected straight on the screen. Rear-Desktop When selected, the image will appear reversed. Front-Ceiling When selected, the image will turn upside down. 35 English
User's Manual
Page 39
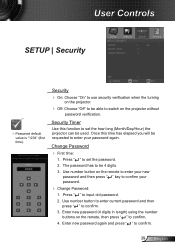
... the turning on the projector without password verification. Enter new password (4 digits in length) using the number buttons on the remote, then press " " to switch on the projector. Off: Choose "Off" to be requested to set the password. 2. Security Timer Use this time has elapsed you will be able to confirm. 4. Once this function to enter your password. Change Password: 1. Use number button to enter current password and then press " " to input old password...
... the turning on the projector without password verification. Enter new password (4 digits in length) using the number buttons on the remote, then press " " to switch on the projector. Off: Choose "Off" to be requested to set the password. 2. Security Timer Use this time has elapsed you will be able to confirm. 4. Once this function to enter your password. Change Password: 1. Use number button to enter current password and then press " " to input old password...

User's Manual
Page 47
... over 35°C in operating, the projector will switch to STD automatically. Brightness Mode STD: Choose "STD" to increase the brightness. The message will lower power consumption and extend the lamp life. BRIGHT: Choose "BRIGHT" to dim the projector lamp which will appear 30 hours before suggested replacement of lamp. When ambient temperature is displayed. Lamp Reset Reset the lamp hour counter after replacing the lamp. 47 English User Controls OPTIONS | Lamp Settings Lamp Hours Display the projection time.
... over 35°C in operating, the projector will switch to STD automatically. Brightness Mode STD: Choose "STD" to increase the brightness. The message will lower power consumption and extend the lamp life. BRIGHT: Choose "BRIGHT" to dim the projector lamp which will appear 30 hours before suggested replacement of lamp. When ambient temperature is displayed. Lamp Reset Reset the lamp hour counter after replacing the lamp. 47 English User Controls OPTIONS | Lamp Settings Lamp Hours Display the projection time.
User's Manual
Page 48
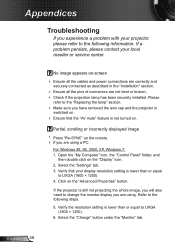
... Troubleshooting If you have removed the lens cap and the projector is switched on. Ensure that your display resolution setting is not turned on. If the projector is lower than or equal to UXGA (1600 × 1200). 4. Refer to change the monitor display you are using . Open the "My Computer" icon, the "Control Panel" folder, and then double click on the "Advanced Properties" button. Verify the resolution setting...
... Troubleshooting If you have removed the lens cap and the projector is switched on. Ensure that your display resolution setting is not turned on. If the projector is lower than or equal to UXGA (1600 × 1200). 4. Refer to change the monitor display you are using . Open the "My Computer" icon, the "Control Panel" folder, and then double click on the "Advanced Properties" button. Verify the resolution setting...

User's Manual
Page 51
... English To replace the lamp, follow the procedures in the "Replacing the Lamp" section on until the lamp module has been replaced. LED lighting message Message POWER/STANDBY LED (Green/Amber) Standby State (Input power cord) Amber Power on (Warming) Flashing Green Temp-LED (Red) Lamp-LED (Red) Lamp lighting Green Power off the projector, then unplug the power cord and wait at least 60 seconds before reconnecting power. Check that "Keypad Lock" is not activated by trying to all controls If possible, turn on pages 53...
... English To replace the lamp, follow the procedures in the "Replacing the Lamp" section on until the lamp module has been replaced. LED lighting message Message POWER/STANDBY LED (Green/Amber) Standby State (Input power cord) Amber Power on (Warming) Flashing Green Temp-LED (Red) Lamp-LED (Red) Lamp lighting Green Power off the projector, then unplug the power cord and wait at least 60 seconds before reconnecting power. Check that "Keypad Lock" is not activated by trying to all controls If possible, turn on pages 53...

User's Manual
Page 52
... batteries are inserted correctly. Replace batteries if they are not any obstructions between the remote control and the projector. Appendices On Screen Messages Temperature warning: Fan failed: Lamp warning: Out of display range: If the remote control does not work Check the operating angle of the remote control is within 7 m (±0°) of the IR receivers on the projector. Make sure there are...
... batteries are inserted correctly. Replace batteries if they are not any obstructions between the remote control and the projector. Appendices On Screen Messages Temperature warning: Fan failed: Lamp warning: Out of display range: If the remote control does not work Check the operating angle of the remote control is within 7 m (±0°) of the IR receivers on the projector. Make sure there are...

User's Manual
Page 54
... is replaced. Use a dry cloth to the projector by pressing the " " button. 2. Lift up the lamp handle and remove the lamp module slowly and carefully. 4 To replace the lamp module, reverse the previous steps. 8. Lamp Reset: (i) Press "Menu" (ii) Select "OPTIONS" (iii) Select "Lamp Settings" (iv) Select "Lamp Reset" (v) Select "Yes". Switch off the power to clean the lamp module if it was accidentally touched. 1 2 4 3 Lamp Replacement Procedure: 1. Turn...
... is replaced. Use a dry cloth to the projector by pressing the " " button. 2. Lift up the lamp handle and remove the lamp module slowly and carefully. 4 To replace the lamp module, reverse the previous steps. 8. Lamp Reset: (i) Press "Menu" (ii) Select "OPTIONS" (iii) Select "Lamp Settings" (iv) Select "Lamp Reset" (v) Select "Yes". Switch off the power to clean the lamp module if it was accidentally touched. 1 2 4 3 Lamp Replacement Procedure: 1. Turn...

User's Manual
Page 60
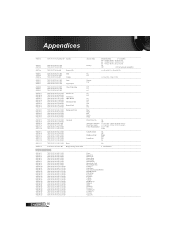
... compatible) ~XX79 n 7E 30 30 37 39 20 a 0D Projector ID n = 01 (a=30 31) ~ 99 (a=39 39) ...30 38 32 20 31 0D Logo Optoma ~XX82 2 7E 30 30 38 32 20 32 0D User ~XX83 1 7E 30 30 38 33...33 0D Next Source ~XX101 1 7E 30 30 31 30 31 20 31 0D High Altitude On ~XX101...Color Blue ~XX104 2 7E 30 30 31 30 34 20 32 0D Black ~XX104 3 7E 30 30 31 30 34 20 33 0D Red ~XX104 4 7E 30 30 31 30 34 20 34 0D Green ~XX104 5 7E 30 30 31 30 34 20 35 0D White...20 a 0D Auto Power Off (min) n = 0 (a=30) ~ 180 (a=31 38 30) , step=5 ~XX107 n 7E 30 30 31 30 37 20 a 0D Sleep Timer (min) n ...
... compatible) ~XX79 n 7E 30 30 37 39 20 a 0D Projector ID n = 01 (a=30 31) ~ 99 (a=39 39) ...30 38 32 20 31 0D Logo Optoma ~XX82 2 7E 30 30 38 32 20 32 0D User ~XX83 1 7E 30 30 38 33...33 0D Next Source ~XX101 1 7E 30 30 31 30 31 20 31 0D High Altitude On ~XX101...Color Blue ~XX104 2 7E 30 30 31 30 34 20 32 0D Black ~XX104 3 7E 30 30 31 30 34 20 33 0D Red ~XX104 4 7E 30 30 31 30 34 20 34 0D Green ~XX104 5 7E 30 30 31 30 34 20 35 0D White...20 a 0D Auto Power Off (min) n = 0 (a=30) ~ 180 (a=31 38 30) , step=5 ~XX107 n 7E 30 30 31 30 37 20 a 0D Sleep Timer (min) n ...

Datasheet
Page 1
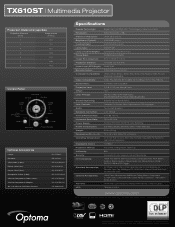
... many more information. built-in 10 watts speaker system 3D capable via on-screen menu User Controls Complete On-Screen Menu Adjustments in schools, colleges and businesses. TX610ST Larger 3D Image at just 3 feet Impressive brightness, colors and clarity keeps audience connected Powerful audio - TX610ST − Multimedia Projector Datasheet - With high brightness, contrast and sharpness, the TX610st produces a jaw dropping 3D image with a compatible 3D graphics card.
... many more information. built-in 10 watts speaker system 3D capable via on-screen menu User Controls Complete On-Screen Menu Adjustments in schools, colleges and businesses. TX610ST Larger 3D Image at just 3 feet Impressive brightness, colors and clarity keeps audience connected Powerful audio - TX610ST − Multimedia Projector Datasheet - With high brightness, contrast and sharpness, the TX610st produces a jaw dropping 3D image with a compatible 3D graphics card.

Brochure
Page 1
... RoomView® and many more information. TX610ST FEATURES J Projects 72" diagonal image at Short Distance Power/Standby RJ45 HDMI VGA1-In Composite Video Audio-In Audio-Out USB VGA-Out S-Video RS-232 12V-Out Source Keystone Correction Brightness HDMI S-Video Freeze VGA Re-Sync Select Volume 3D AV Mute Video Menu AC Power MIC VGA2-In RCA Security Audio-In Bar Kensington Lock The Optoma TX610st, a short throw projector, is connected to a computer with multitude of features...
... RoomView® and many more information. TX610ST FEATURES J Projects 72" diagonal image at Short Distance Power/Standby RJ45 HDMI VGA1-In Composite Video Audio-In Audio-Out USB VGA-Out S-Video RS-232 12V-Out Source Keystone Correction Brightness HDMI S-Video Freeze VGA Re-Sync Select Volume 3D AV Mute Video Menu AC Power MIC VGA2-In RCA Security Audio-In Bar Kensington Lock The Optoma TX610st, a short throw projector, is connected to a computer with multitude of features...
Brochure
Page 2
... Standby Modes) Enabled Via On-Screen Menu Complete On-Screen Menu Adjustments in 25 Languages Two 5-Watt Speakers ± 40° Vertical 24 to 85, 120 Hz 15.3 to 91.1 KHz AC Input 100-240V, 50-60 Hz, Auto-Switching 325 Watts (Bright), 250 Watts (STD) TX610ST | Multimedia Projector Projection Distance/Image Size Projection Distance (Feet) Diagonal Size (Inches) 2 48.0 3 72.0 4 96.0 5 120.0 6 144.0 7 168.0 8 192.0 Control Panel Keystone + Source Re-Sync Lamp LED Temp LED Four Directional Keys Help Keystone...
... Standby Modes) Enabled Via On-Screen Menu Complete On-Screen Menu Adjustments in 25 Languages Two 5-Watt Speakers ± 40° Vertical 24 to 85, 120 Hz 15.3 to 91.1 KHz AC Input 100-240V, 50-60 Hz, Auto-Switching 325 Watts (Bright), 250 Watts (STD) TX610ST | Multimedia Projector Projection Distance/Image Size Projection Distance (Feet) Diagonal Size (Inches) 2 48.0 3 72.0 4 96.0 5 120.0 6 144.0 7 168.0 8 192.0 Control Panel Keystone + Source Re-Sync Lamp LED Temp LED Four Directional Keys Help Keystone...
Protocol Function
Page 4
... compatible) ~XX79 n 7E 30 30 37 39 20 a 0D Projector ID n = 01 (a=30 31) ~ 99 (a=39 39) ...30 38 32 20 31 0D Logo Optoma ~XX82 2 7E 30 30 38 32 20 32 0D User ~XX83 1 7E 30 30 38 33...33 0D Next Source ~XX101 1 7E 30 30 31 30 31 20 31 0D High Altitude On ~XX101...Color Blue ~XX104 2 7E 30 30 31 30 34 20 32 0D Black ~XX104 3 7E 30 30 31 30 34 20 33 0D Red ~XX104 4 7E 30 30 31 30 34 20 34 0D Green ~XX104 5 7E 30 30 31 30 34 20 35 0D White...20 a 0D Auto Power Off (min) n = 0 (a=30) ~ 180 (a=31 38 30) , step=5 ~XX107 n 7E 30 30 31 30 37 20 a 0D Sleep Timer (min) n ...
... compatible) ~XX79 n 7E 30 30 37 39 20 a 0D Projector ID n = 01 (a=30 31) ~ 99 (a=39 39) ...30 38 32 20 31 0D Logo Optoma ~XX82 2 7E 30 30 38 32 20 32 0D User ~XX83 1 7E 30 30 38 33...33 0D Next Source ~XX101 1 7E 30 30 31 30 31 20 31 0D High Altitude On ~XX101...Color Blue ~XX104 2 7E 30 30 31 30 34 20 32 0D Black ~XX104 3 7E 30 30 31 30 34 20 33 0D Red ~XX104 4 7E 30 30 31 30 34 20 34 0D Green ~XX104 5 7E 30 30 31 30 34 20 35 0D White...20 a 0D Auto Power Off (min) n = 0 (a=30) ~ 180 (a=31 38 30) , step=5 ~XX107 n 7E 30 30 31 30 37 20 a 0D Sleep Timer (min) n ...


