
Optoma_TW615-3D_Datasheet
Page 1
... HDMI: 1080p, 1920x1080 VGA: UXGA (1600x1200) Brightness (Typical) 3500 ANSI Lumens Contrast Ratio 3000:1 (Full On/Full Off) Lamp Life and Type 4000/3000 Hours (STD/Bright) 230W P-VIP Throw Ratio 1.28 to 1.536:1 (Distance/Width) Projection Distance ... EDTV (480p), HDTV (720p, 1080i/p) 3D Compatibility** 120Hz Frame Sequential 3D for Resolutions Up to 720p, 60Hz Field Sequential 3D for nearly any installation. Projector Expert TW615-3D − Multimedia Projector Datasheet - TW615-3D Dazzle & Captivate Your Audience The Optoma TW615-3D delivers exceptional brightness to -read text -...
... HDMI: 1080p, 1920x1080 VGA: UXGA (1600x1200) Brightness (Typical) 3500 ANSI Lumens Contrast Ratio 3000:1 (Full On/Full Off) Lamp Life and Type 4000/3000 Hours (STD/Bright) 230W P-VIP Throw Ratio 1.28 to 1.536:1 (Distance/Width) Projection Distance ... EDTV (480p), HDTV (720p, 1080i/p) 3D Compatibility** 120Hz Frame Sequential 3D for Resolutions Up to 720p, 60Hz Field Sequential 3D for nearly any installation. Projector Expert TW615-3D − Multimedia Projector Datasheet - TW615-3D Dazzle & Captivate Your Audience The Optoma TW615-3D delivers exceptional brightness to -read text -...
User Manual
Page 1
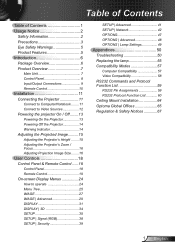
...19 On-screen Display Menus 24 How to operate 24 Menu Tree 25 IMAGE 27 IMAGE | Advanced 29 DISPLAY 31 DISPLAY | 3D 34 SETUP 35 SETUP | Signal (RGB 38 SETUP | Security 39 SETUP | Advanced 41 SETUP | Network 42 OPTIONS 47 OPTIONS | Advanced 48... OPTIONS | Lamp Settings 49 Appendices 50 Troubleshooting 50 Replacing the lamp 55 Compatibility Modes 57 Computer Compatibility 57 Video Compatibility 58 RS232 Commands and Protocol Function List 59 RS232 Pin Assignments 59...
...19 On-screen Display Menus 24 How to operate 24 Menu Tree 25 IMAGE 27 IMAGE | Advanced 29 DISPLAY 31 DISPLAY | 3D 34 SETUP 35 SETUP | Signal (RGB 38 SETUP | Security 39 SETUP | Advanced 41 SETUP | Network 42 OPTIONS 47 OPTIONS | Advanced 48... OPTIONS | Lamp Settings 49 Appendices 50 Troubleshooting 50 Replacing the lamp 55 Compatibility Modes 57 Computer Compatibility 57 Video Compatibility 58 RS232 Commands and Protocol Function List 59 RS232 Pin Assignments 59...

User Manual
Page 3
... for the projector to cool down . Do not use lens cap when projector is approaching the end of its lifetime, the message "Lamp Warning: Lamp life exceeded." will detect the life of fire or electric shock, do not open or disassemble the projector as recommended in operation. ▀...unit to cool down . ▀■ Warning- Laser pointer can cause permanent damage to eyesight. 3 English To reduce the risk of the lamp itself. Usage Notice Precautions Please follow all warnings, precautions and maintenance as this projector to rain or moisture. ▀■ Warning- Do not ...
... for the projector to cool down . Do not use lens cap when projector is approaching the end of its lifetime, the message "Lamp Warning: Lamp life exceeded." will detect the life of fire or electric shock, do not open or disassemble the projector as recommended in operation. ▀...unit to cool down . ▀■ Warning- Laser pointer can cause permanent damage to eyesight. 3 English To reduce the risk of the lamp itself. Usage Notice Precautions Please follow all warnings, precautions and maintenance as this projector to rain or moisture. ▀■ Warning- Do not ...

User Manual
Page 5
...;■ Built-in a classroom, adequately supervise students when they are asked to point out something on the screen. ▀■ In order to minimize the lamp power, use room blinds to reduce ambient light levels. Keep your back to the beam as much as possible. ▀■ When projector is used...
...;■ Built-in a classroom, adequately supervise students when they are asked to point out something on the screen. ▀■ In order to minimize the lamp power, use room blinds to reduce ambient light levels. Keep your back to the beam as much as possible. ▀■ When projector is used...

User Manual
Page 8
Help 2. Re-Sync 6. Lamp Fail LED 11. Source 4. Keystone Correction 8. Power 7. IR Receiver English 8 Menu 3. Temp LED 12. POWER 7 8 9 10 11 1. Enter 5. On/Standby LED 10. Four Directional Select Keys 9. Introduction Control Panel 1 2 12 3 45 6 ?
Help 2. Re-Sync 6. Lamp Fail LED 11. Source 4. Keystone Correction 8. Power 7. IR Receiver English 8 Menu 3. Temp LED 12. POWER 7 8 9 10 11 1. Enter 5. On/Standby LED 10. Four Directional Select Keys 9. Introduction Control Panel 1 2 12 3 45 6 ?

User Manual
Page 13
Remove the lens cap. 2. Turn on the lamp by pressing " " button either on the top of When Power mode (Standby) is set to Eco ( When connected, the POWER/STANDBY LED will turn Amber. 3. Securely connect the power cord and signal cable. Installation Powering the projector On / Off Powering On the Projector 1.
Remove the lens cap. 2. Turn on the lamp by pressing " " button either on the top of When Power mode (Standby) is set to Eco ( When connected, the POWER/STANDBY LED will turn Amber. 3. Securely connect the power cord and signal cable. Installation Powering the projector On / Off Powering On the Projector 1.

User Manual
Page 14
... the " " button for the second time, the projector will display countdown timer and will automatically shutdown: Contact the nearest service center if the "LAMP" LED indicator is lit red and if "POWER/STANDBY" indicator flashes amber. Disconnect the power cord from the projector, wait for cooling cycle and the...
... the " " button for the second time, the projector will display countdown timer and will automatically shutdown: Contact the nearest service center if the "LAMP" LED indicator is lit red and if "POWER/STANDBY" indicator flashes amber. Disconnect the power cord from the projector, wait for cooling cycle and the...

User Manual
Page 18
ments to your item selection. Indicate the projector's lamp status. POWER/ STANDBY LED Indicate the projector's status. English 18 SOURCE Press "SOURCE" to select items or make adjust- POWER Using the Control Panel POWER...LED Indicate the projector's temperature status. User Controls Control Panel & Remote Control Control Panel ? Automatically synchronize the projector to page 21). Enter Confirm your selection. Lamp LED Press "Menu" to the "Power On/Off the Projector" section on -screen display (OSD) menu. Use to adjust image distortion caused by tilting the...
ments to your item selection. Indicate the projector's lamp status. POWER/ STANDBY LED Indicate the projector's status. English 18 SOURCE Press "SOURCE" to select items or make adjust- POWER Using the Control Panel POWER...LED Indicate the projector's temperature status. User Controls Control Panel & Remote Control Control Panel ? Automatically synchronize the projector to page 21). Enter Confirm your selection. Lamp LED Press "Menu" to the "Power On/Off the Projector" section on -screen display (OSD) menu. Use to adjust image distortion caused by tilting the...
User Manual
Page 26
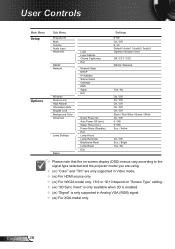
...Gateway DNS Apply Exit Direct Power On Auto Power Off (min.) Sleep Timer (min.) Power Mode (Standby) Exit Lamp Hours Lamp Reminder Brightness Mode Lamp Reset Exit Settings 0~99 On / Off 0~10 Default / Audio1 / Audio2 / Audio3 Optoma / Neutral / User Off / CC1 / CC2 RS232 / Network Yes / No On / Off On / Off...61558; (#2) For HDMI source only. (#3) For WXGA model only. 16:9 or 16:10 depend on "Screen Type" setting. (#4) "3D Sync Invert" is only available when 3D is enabled. (#5) "Signal" is only supported in Analog VGA (RGB) signal. (#6) For XGA model only.
...Gateway DNS Apply Exit Direct Power On Auto Power Off (min.) Sleep Timer (min.) Power Mode (Standby) Exit Lamp Hours Lamp Reminder Brightness Mode Lamp Reset Exit Settings 0~99 On / Off 0~10 Default / Audio1 / Audio2 / Audio3 Optoma / Neutral / User Off / CC1 / CC2 RS232 / Network Yes / No On / Off On / Off...61558; (#2) For HDMI source only. (#3) For WXGA model only. 16:9 or 16:10 depend on "Screen Type" setting. (#4) "3D Sync Invert" is only available when 3D is enabled. (#5) "Signal" is only supported in Analog VGA (RGB) signal. (#6) For XGA model only.
User Manual
Page 45
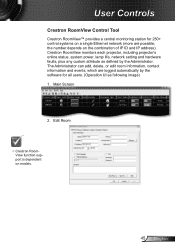
..., contact information and events, which are possible, the number depends on models. 45 English Crestron RoomView monitors each projector, including projector's online status, system power, lamp life, network setting and hardware faults, plus any custom attribute as following image) 1. User Controls Crestron RoomView Control Tool Crestron RoomView™ provides a central monitoring...
..., contact information and events, which are possible, the number depends on models. 45 English Crestron RoomView monitors each projector, including projector's online status, system power, lamp life, network setting and hardware faults, plus any custom attribute as following image) 1. User Controls Crestron RoomView Control Tool Crestron RoomView™ provides a central monitoring...

User Manual
Page 49
Brightness Mode Eco.: Choose "Eco." User Controls OPTIONS | Lamp Settings Lamp Hours Display the projection time. Lamp Reset Reset the lamp hour counter after replacing the lamp. 49 English to dim the projector lamp which will lower power consumption and extend the lamp life. BRIGHT: Choose "BRIGHT" to [Eco.] automatically. The message will switch to increase...
Brightness Mode Eco.: Choose "Eco." User Controls OPTIONS | Lamp Settings Lamp Hours Display the projection time. Lamp Reset Reset the lamp hour counter after replacing the lamp. 49 English to dim the projector lamp which will lower power consumption and extend the lamp life. BRIGHT: Choose "BRIGHT" to [Eco.] automatically. The message will switch to increase...
User Manual
Page 50
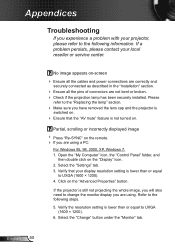
... Troubleshooting If you experience a problem with your local reseller or service center. If a problem persists, please contact your projector, please refer to the "Replacing the lamp" section. Make sure you have removed the lens cap and the projector is switched on. Ensure that your display resolution setting is still... securely connected as described in the "Installation" section. Ensure all the pins of connectors are not bent or broken. Check if the projection lamp has been securely installed. Select the "Change" button under the "Monitor" tab.
... Troubleshooting If you experience a problem with your local reseller or service center. If a problem persists, please contact your projector, please refer to the "Replacing the lamp" section. Make sure you have removed the lens cap and the projector is switched on. Ensure that your display resolution setting is still... securely connected as described in the "Installation" section. Ensure all the pins of connectors are not bent or broken. Check if the projection lamp has been securely installed. Select the "Change" button under the "Monitor" tab.

User Manual
Page 53
...popping sound. Appendices The projector stops responding to all controls If possible, turn on (Warming) Flashing Green Temp-LED (Red) Lamp-LED (Red) Lamp lighting Green Power off the projector, then unplug the power cord and wait at least 60 seconds before reconnecting power. Check that ...life, it will not turn off (Cooling) Error (Over Temp.) Steady light No light Error (Fan fail) Error (Lamp fail) Flashing Green Flashing Amber Flashing Amber Flashing Amber Flashing * POWER/STANDBY LED be ON when OSD appears, be OFF when OSD ...
...popping sound. Appendices The projector stops responding to all controls If possible, turn on (Warming) Flashing Green Temp-LED (Red) Lamp-LED (Red) Lamp lighting Green Power off the projector, then unplug the power cord and wait at least 60 seconds before reconnecting power. Check that ...life, it will not turn off (Cooling) Error (Over Temp.) Steady light No light Error (Fan fail) Error (Lamp fail) Flashing Green Flashing Amber Flashing Amber Flashing Amber Flashing * POWER/STANDBY LED be ON when OSD appears, be OFF when OSD ...

User Manual
Page 54
... batteries if they are not any obstructions between the remote control and the projector. Appendices On Screen Messages Temperature warning: Fan failed: Lamp warning: Out of display range: If the remote control does not work Check the operating angle of the remote control is within 7 m (±...
... batteries if they are not any obstructions between the remote control and the projector. Appendices On Screen Messages Temperature warning: Fan failed: Lamp warning: Out of display range: If the remote control does not work Check the operating angle of the remote control is within 7 m (±...

User Manual
Page 55
... may shatter and cause injury if it to prevent any loose parts from falling out of personal injury, do not drop the lamp module or touch the lamp bulb. Warning: If ceiling mounted, please use , you see this message, please contact your local reseller or service center to ...cool down for at least 30 minutes before changing the lamp! When you will receive a warning message. Appendices Replacing the lamp The projector automatically detects the lamp life. "Caution must be hot! When the lamp life is recommended to change the lamp as soon as possible. Make sure the projector has been...
... may shatter and cause injury if it to prevent any loose parts from falling out of personal injury, do not drop the lamp module or touch the lamp bulb. Warning: If ceiling mounted, please use , you see this message, please contact your local reseller or service center to ...cool down for at least 30 minutes before changing the lamp! When you will receive a warning message. Appendices Replacing the lamp The projector automatically detects the lamp life. "Caution must be hot! When the lamp life is recommended to change the lamp as soon as possible. Make sure the projector has been...

User Manual
Page 56
... replaced. Switch off the power to shatter. Lift up the lamp handle and remove the lamp module slowly and carefully. 4 To replace the lamp module, reverse the previous steps. 8. Lamp Reset: (i) Press "Menu" (ii) Select "OPTIONS" (iii) Select "Lamp Settings" (iv) Select "Lamp Reset" (v) Select "Yes". Disconnect the power cord. 4. Turn on...
... replaced. Switch off the power to shatter. Lift up the lamp handle and remove the lamp module slowly and carefully. 4 To replace the lamp module, reverse the previous steps. 8. Lamp Reset: (i) Press "Menu" (ii) Select "OPTIONS" (iii) Select "Lamp Settings" (iv) Select "Lamp Reset" (v) Select "Yes". Disconnect the power cord. 4. Turn on...

User Manual
Page 62
... backward compatible) ~XX81 n 7E 30 30 38 31 20 a 0D Volume n = 0 (a=30) ~ 10 (a=31 30) ~XX82 1 7E 30 30 38 32 20 31 0D Logo Optoma ~XX82 2 7E 30 30 38 32 20 32 0D User ~XX82 3 7E 30 30 38 32 20 33 0D Neutral ~XX83 1 7E 30 30 38...
... backward compatible) ~XX81 n 7E 30 30 38 31 20 a 0D Volume n = 0 (a=30) ~ 10 (a=31 30) ~XX82 1 7E 30 30 38 32 20 31 0D Logo Optoma ~XX82 2 7E 30 30 38 32 20 32 0D User ~XX82 3 7E 30 30 38 32 20 33 0D Neutral ~XX83 1 7E 30 30 38...

User Manual
Page 63
...Cooling/Out of Range/ System status INFOn n : 0/1/2/3/4/6/7/8/9 = Standby/Warming/Cooling/Out of Range/ Lamp fail/Fan Lock/Over Temperature/ Lamp fail/Fan Lock/Over Temperature/Lamp Hours Running Out/ Lamp Hours Running Out/Cover Open Cover Open READ from projector 232 ASCII Code HEX Code Function Projector Return...03/04/05 = None/VGA1/VGA2/S-Video/Video/HDMI dddd: FW version e : Display mode 0/1/2/3/4/5//7/8/9=None/Presentation/Bright/ Movie/sRGB/User/Blackboard/Classroom/3D ~XX151 1 7E 30 30 31 35 31 20 31 0D Model name OKn n:16/17 = EW615i/EX615i ~XX108 1 7E 30 30 ...
...Cooling/Out of Range/ System status INFOn n : 0/1/2/3/4/6/7/8/9 = Standby/Warming/Cooling/Out of Range/ Lamp fail/Fan Lock/Over Temperature/ Lamp fail/Fan Lock/Over Temperature/Lamp Hours Running Out/ Lamp Hours Running Out/Cover Open Cover Open READ from projector 232 ASCII Code HEX Code Function Projector Return...03/04/05 = None/VGA1/VGA2/S-Video/Video/HDMI dddd: FW version e : Display mode 0/1/2/3/4/5//7/8/9=None/Presentation/Bright/ Movie/sRGB/User/Blackboard/Classroom/3D ~XX151 1 7E 30 30 31 35 31 20 31 0D Model name OKn n:16/17 = EW615i/EX615i ~XX108 1 7E 30 30 ...


