

User Manual
Page 1
...Connection Ports 10 Remote Control...11 Installation 12 Connecting the Projector 12 Powering On/Off the Projector 13 Powering On the Projector 13 Powering Off the projector 14 Warning Indicator 14 Adjusting the Projected Image 15 Adjusting the Projector's Height 15 Adjusting the Projector's Zoom / Focus 16 Adjusting Projected Image Size 16......32 Appendices 34 Troubleshooting 34 Image Problems 34 Intermission Problems 37 LED Problems ...37 Remote Control Problems 38 Replacing the Lamp 39 Compatibility Modes 40 Ceiling Mount Installation 41 Optoma Global Office 42 1
...Connection Ports 10 Remote Control...11 Installation 12 Connecting the Projector 12 Powering On/Off the Projector 13 Powering On the Projector 13 Powering Off the projector 14 Warning Indicator 14 Adjusting the Projected Image 15 Adjusting the Projector's Height 15 Adjusting the Projector's Zoom / Focus 16 Adjusting Projected Image Size 16......32 Appendices 34 Troubleshooting 34 Image Problems 34 Intermission Problems 37 LED Problems ...37 Remote Control Problems 38 Replacing the Lamp 39 Compatibility Modes 40 Ceiling Mount Installation 41 Optoma Global Office 42 1

User Manual
Page 3
... all warnings, precautions and maintenance as possible. Allow 90 seconds for the projector to cool down . ▀■ Warning- When the lamp is on -screen display "Options|Lamp Settings" menu after replacing the lamp module (refer to the end of fire or electric shock, do... not open or disassemble the projector as this projector to change the lamp when it shows warning messages. ▀■ Warning- When switching the projector off, please ensure the cooling cycle has been completed before disconnecting power. This projector will not turn back on until show...
... all warnings, precautions and maintenance as possible. Allow 90 seconds for the projector to cool down . ▀■ Warning- When the lamp is on -screen display "Options|Lamp Settings" menu after replacing the lamp module (refer to the end of fire or electric shock, do... not open or disassemble the projector as this projector to change the lamp when it shows warning messages. ▀■ Warning- When switching the projector off, please ensure the cooling cycle has been completed before disconnecting power. This projector will not turn back on until show...

User Manual
Page 5
... they are located out of the line of sight from the screen to stare at all times. ▀■ Minimize standing facing into the projector beam at the projector lamp. Keep your back to the beam as much as possible. ▀■ A stick or laser pointer is used in a classroom, adequately ...supervise students when they do not also have to the audience; The best way to achieve this ensures that projectors are asked to point out ...
... they are located out of the line of sight from the screen to stare at all times. ▀■ Minimize standing facing into the projector beam at the projector lamp. Keep your back to the beam as much as possible. ▀■ A stick or laser pointer is used in a classroom, adequately ...supervise students when they do not also have to the audience; The best way to achieve this ensures that projectors are asked to point out ...

User Manual
Page 13
... the lens cap. 2. The Power LED will display in approximately 30 seconds. Turn on the lamp by pressing "Standby/On" button either on the top of the projector is turned on. The Power LED will detect your preferred language from quick menu after the startup screen display. 4. ...The startup screen will turn on your source (computer, notebook, video player, etc.). Ensure that the button on the back of the projector or on the projector first and then select the signal sources. 2 Main Power Switch 1 Lens Cap 13 The first time you use the...
... the lens cap. 2. The Power LED will display in approximately 30 seconds. Turn on the lamp by pressing "Standby/On" button either on the top of the projector is turned on. The Power LED will detect your preferred language from quick menu after the startup screen display. 4. ...The startup screen will turn on your source (computer, notebook, video player, etc.). Ensure that the button on the back of the projector or on the projector first and then select the signal sources. 2 Main Power Switch 1 Lens Cap 13 The first time you use the...

User Manual
Page 14
... and the Power LED will automatically shut itself down . The cooling fans continue to turn green. Under normal conditions, the projector can be switched on the projector immediately following a power off the projector lamp, you will automatically shut itself down . See page 42. 14 See page 42. When the "TEMP" indicator lights solid...
... and the Power LED will automatically shut itself down . The cooling fans continue to turn green. Under normal conditions, the projector can be switched on the projector immediately following a power off the projector lamp, you will automatically shut itself down . See page 42. 14 See page 42. When the "TEMP" indicator lights solid...

User Manual
Page 34
...equal to the following information. Verify the resolution setting is lower than or equal to the following steps. 5. If a problem persists, please contact your projector, please refer to SXGA+ (1400 x 1050) resolution. 34 Select the "Settings" tab. 3. Appendices Troubleshooting If you experience a problem with your ...1280 x 768) is still not projecting the whole image, you will also need to the "Replacing the lamp" section. Make sure you have removed the lens cap and the projector is switched on the remote control or control panel. If you are using a PC: For ...
...equal to the following information. Verify the resolution setting is lower than or equal to the following steps. 5. If a problem persists, please contact your projector, please refer to SXGA+ (1400 x 1050) resolution. 34 Select the "Settings" tab. 3. Appendices Troubleshooting If you experience a problem with your ...1280 x 768) is still not projecting the whole image, you will also need to the "Replacing the lamp" section. Make sure you have removed the lens cap and the projector is switched on the remote control or control panel. If you are using a PC: For ...
User Manual
Page 37
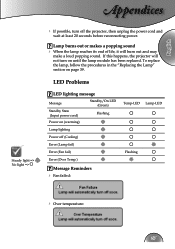
....) Message Reminders Fan failed: Temp-LED Lamp-LED Flashing Over temperature: 37 To replace the lamp, follow the procedures in the "Replacing the Lamp" section on page 39. English Appendices Steady light => No light => If possible, turn on (warming) Lamp lighting Power off the projector, then unplug the power cord and wait...
....) Message Reminders Fan failed: Temp-LED Lamp-LED Flashing Over temperature: 37 To replace the lamp, follow the procedures in the "Replacing the Lamp" section on page 39. English Appendices Steady light => No light => If possible, turn on (warming) Lamp lighting Power off the projector, then unplug the power cord and wait...
User Manual
Page 38
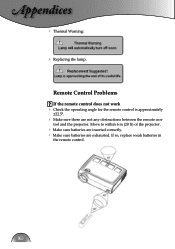
Appendices Thermal Warning: Replacing the lamp: Remote Control Problems If the remote control does not work Check the operating angle for the remote control is approximately ±22.5°. Make sure there are exhausted. Move to within 6 m (20 ft) of the projector. Make sure batteries are inserted correctly. Make sure batteries are not any obstructions between the remote con- If so, replace weak batteries in the remote control. 38 trol and the projector.
Appendices Thermal Warning: Replacing the lamp: Remote Control Problems If the remote control does not work Check the operating angle for the remote control is approximately ±22.5°. Make sure there are exhausted. Move to within 6 m (20 ft) of the projector. Make sure batteries are inserted correctly. Make sure batteries are not any obstructions between the remote con- If so, replace weak batteries in the remote control. 38 trol and the projector.

User Manual
Page 39
... your local reseller Allow it is hot! Lamp Replacing Procedure: 1. Allow the projector to cool down at least 30 minutes before changing lamp! Lamp Reset: (i)Press "Menu" -> (ii)Select "Options" -> (iii)Select "Lamp settings" ->(iv)Select "Lamp reset -> (v)Select "Yes". 39 English Appendices Replacing the lamp The projector automatically detects the lamp life. Disconnect the power cord. 4. Remove the...
... your local reseller Allow it is hot! Lamp Replacing Procedure: 1. Allow the projector to cool down at least 30 minutes before changing lamp! Lamp Reset: (i)Press "Menu" -> (ii)Select "Options" -> (iii)Select "Lamp settings" ->(iv)Select "Lamp reset -> (v)Select "Yes". 39 English Appendices Replacing the lamp The projector automatically detects the lamp life. Disconnect the power cord. 4. Remove the...


