

Brochure
Page 2
...Power Cord, VGA Cable, Composite Cable, Full Function Remote, Batteries x 2, USB Cable, Soft Carry Case, Quick Start Guide, CD User Manual, Warranty Card, WEEE Card Compliant 6 months or 1000 hours - When projecting a 16:9 image the image sizes, screen height and offset...90 1.00 1.10 EP774 is soonest Warranty may be trademarks or registered trademarks of Texas Instruments. For guide purposes only Optoma recommends Panoview screens www.panoview.eu Optoma Europe Ltd. 42 Caxton Way, Watford Business Park, Watford, Hertfordshire, UK. Digital DLP® Projector • Exceptionally long ...
...Power Cord, VGA Cable, Composite Cable, Full Function Remote, Batteries x 2, USB Cable, Soft Carry Case, Quick Start Guide, CD User Manual, Warranty Card, WEEE Card Compliant 6 months or 1000 hours - When projecting a 16:9 image the image sizes, screen height and offset...90 1.00 1.10 EP774 is soonest Warranty may be trademarks or registered trademarks of Texas Instruments. For guide purposes only Optoma recommends Panoview screens www.panoview.eu Optoma Europe Ltd. 42 Caxton Way, Watford Business Park, Watford, Hertfordshire, UK. Digital DLP® Projector • Exceptionally long ...

User Manual
Page 3
... denoted in the eyes. Caution: Alerts you read this manual to alert you of the projector. Follow all warnings and cautions in this manual and on the unit and in this manual for future reference. Do not place heavy objects such as in this manual, component parts and items in the OSD menus are used...: Provides additional information that should not be overlooked. Remote Control Some remote controls have a laser for choosing an Optoma DLP projector. DANGER: Do not point the laser in bold font as books or bags on the topic at hand. The projection lamp is on a screen. To ...
... denoted in the eyes. Caution: Alerts you read this manual to alert you of the projector. Follow all warnings and cautions in this manual and on the unit and in this manual for future reference. Do not place heavy objects such as in this manual, component parts and items in the OSD menus are used...: Provides additional information that should not be overlooked. Remote Control Some remote controls have a laser for choosing an Optoma DLP projector. DANGER: Do not point the laser in bold font as books or bags on the topic at hand. The projection lamp is on a screen. To ...
User Manual
Page 5
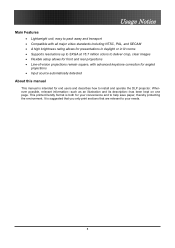
...8226; Line-of-vision projections remain square, with advanced keystone correction for angled projections • Input source automatically detected About this manual This manual is intended for your needs. 5 This printer-friendly format is suggested that you only print sections that are relevant to your ...convenience and to install and operate the DLP projector. It is both for end users and describes how to help save paper, thereby protecting...
...8226; Line-of-vision projections remain square, with advanced keystone correction for angled projections • Input source automatically detected About this manual This manual is intended for your needs. 5 This printer-friendly format is suggested that you only print sections that are relevant to your ...convenience and to install and operate the DLP projector. It is both for end users and describes how to help save paper, thereby protecting...
User Manual
Page 13
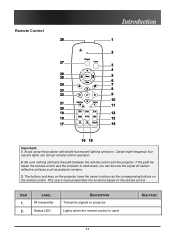
... disrupt remote control operation. 2. Remote Control Introduction Important: 1. This user's manual describes the functions based on . ITEM 1. 2. Avoid using the projector with bright fluorescent lighting turned on the remote control. The buttons and keys on the projector have the same functions as projector screens. 3. Certain high-frequency fluorescent lights can bounce the signal off...
... disrupt remote control operation. 2. Remote Control Introduction Important: 1. This user's manual describes the functions based on . ITEM 1. 2. Avoid using the projector with bright fluorescent lighting turned on the remote control. The buttons and keys on the projector have the same functions as projector screens. 3. Certain high-frequency fluorescent lights can bounce the signal off...

User Manual
Page 17
.... Setup and Operation Connecting Input Devices Setup and Operation A PC or notebook computer as well as movie camcorders and digital still cameras. Check the user manual of the connecting device to a monitor. ITEM A B C D E F G H I and DVI-D are supported. R Audio in - Video ...devices include DVD, VCD, and VHS players, as well as video devices can be connected to the projector at the same time. Connect the audio cable (not supplied) from remote control. Both DVI-I LABEL DESCRIPTION Rear IR Receiver for IR signal from an...
.... Setup and Operation Connecting Input Devices Setup and Operation A PC or notebook computer as well as movie camcorders and digital still cameras. Check the user manual of the connecting device to a monitor. ITEM A B C D E F G H I and DVI-D are supported. R Audio in - Video ...devices include DVD, VCD, and VHS players, as well as video devices can be connected to the projector at the same time. Connect the audio cable (not supplied) from remote control. Both DVI-I LABEL DESCRIPTION Rear IR Receiver for IR signal from an...

User Manual
Page 19
...to change display output.) See "Setting an Access Password (Security Lock)" on the computer keyboard to switch the display output to the projector. (Check the user manual of the PC to determine the appropriate Fn key combination to a wall outlet. To turn off (O) to switch among devices. (...21 if Security Lock is on a steady (not flashing) orange and then press the Power button to turn on the connected devices. 4. The projector splash screen displays and connected devices are supported through the VGA connector.) Setup and Operation 6. Turn on . Ensure the LAMP LED is enabled....
...to change display output.) See "Setting an Access Password (Security Lock)" on the computer keyboard to switch the display output to the projector. (Check the user manual of the PC to determine the appropriate Fn key combination to a wall outlet. To turn off (O) to switch among devices. (...21 if Security Lock is on a steady (not flashing) orange and then press the Power button to turn on the connected devices. 4. The projector splash screen displays and connected devices are supported through the VGA connector.) Setup and Operation 6. Turn on . Ensure the LAMP LED is enabled....


