Optoma HD8300 Support and Manuals
Get Help and Manuals for this Optoma item
View All Support Options Below
Free Optoma HD8300 manuals!
Problems with Optoma HD8300?
Ask a Question
Free Optoma HD8300 manuals!
Problems with Optoma HD8300?
Ask a Question
Popular Optoma HD8300 Manual Pages
Protocol Functions - Page 3

... n ~XX129 n
n=10 n=11 n=12 n=13 n=14 n=20 n=41
~XX140 n
English
Appendices
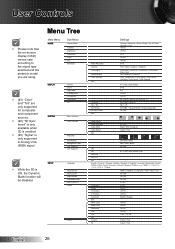
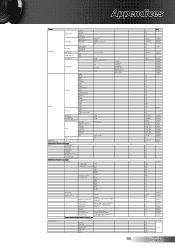
Function SYSTEM
SETUP Projector ID Reset System Alert
Menu Location
Lamp Setting
Projection Test Pattern Background Color 12v Trigger A
Top Left Top Right Centre Bottom Left Bottom Right Lamp Hour Lamp Reminder Lamp Mode
Lamp Reset
Front-Desktop Rear-Desktop Front-Ceiling Rear-Ceiling
Blue Black Gray
12v Trigger...
User's Manual - Page 1
... 37 SYSTEM | Lamp Settings 40 SETUP 41
Appendices 43
Troubleshooting 43 Image Problems 43 Other Problems 45 Remote Control Problems 45 LED Lighting Messages 46 On Screen Messages 47
Replacing the Lamp 48 Compatibility Modes 50 RS232 Commands and Protocol Function List 53
RS232 Pin Assignments 53 RS232 Protocol Function List 54 Ceiling Mount Installation 56 Optoma Global Offices 57...
User's Manual - Page 2
...maintenance (servicing) instructions in an enclosure such as amplifiers that restricts air flow.
2. Do not use the projector near...projector and to rain or moisture.
3. Unit has been dropped. - Do not attempt to rain or moisture. - Physical
damage/abuse would be of sufficient magnitude to the projector. -
Please call Optoma before you to ): - See projector enclosure for repair...
User's Manual - Page 3
...the "Lamp Reset" function from the onscreen display "System|Lamp Setting" menu after replacing the lamp module.
When switching the projector off, please ensure the cooling cycle has been completed before disconnecting power.
This projector will not turn back on until the lamp module has been replaced.
Usage Notice
Precautions
Please follow the procedures listed under "Replacing the Lamp...
User's Manual - Page 7
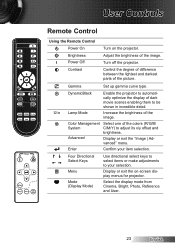
... Remote Battery
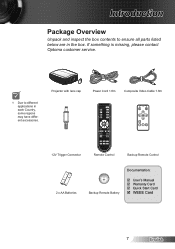
Documentation:
User's Manual Warranty Card Quick Start Card WEEE Card
7
English Introduction
Package Overview
Unpack and inspect the box contents to different applications in the box. If something is missing, please contact Optoma customer service.
NOTE
Due to ensure all parts listed below are in each Country...
User's Manual - Page 8
Introduction
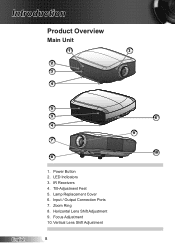
Product Overview
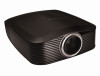
Main Unit
1
3
2 3
POWER LAMP TEMP
STANDBY
4
English
5 3 4
7
8
. Lamp Replacement Cover 6. Horizontal Lens Shift Adjustment 9. LED Indicators 3. Input / Output Connection Ports 7. Zoom Ring 8. Power Button 2. Vertical Lens Shift Adjustment
6 9
10 Tilt-Adjustment Feet 5. Focus Adjustment 0. IR Receivers 4.
User's Manual - Page 17
...Installation
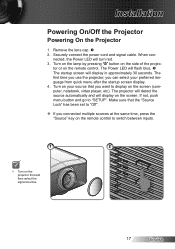
Powering On/Off the Projector
Powering On the Projector
. tor or on the screen. Make sure that you connected multiple sources at the same time, press the "Source" key on the remote control to "SETUP... set to "Off".
If you want to display on the
STANDBY
projector first and
then select the
signal sources.
2
POWER LAMP TEMP
STANDBY
7
English Remove the lens...
User's Manual - Page 18
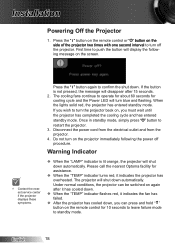
..., you must wait until the projector has completed the cooling cycle and has entered standby mode. Warning Indicator
When the "LAMP" indicator is not pressed, the...the projector. 4. The projector will turn off the projector
1. Once in standby mode, simply press " " button to turn blue and flashing. NOTE
Contact the nearest service center if the projector displays ...
User's Manual - Page 20
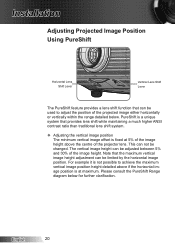
... position of the projected image either horizontally or vertically within the range detailed below for further clarification. Installation
Adjusting Projected Image Position Using PureShift
Horizontal Lens Shift Lever
Vertical Lens Shift Lever
The PureShift feature provides a lens shift function that can be adjusted between 5% and 30% of the image height. PureShift is a unique system that...
User's Manual - Page 23
... mode from Cinema, Bright, Photo, Reference and User.
23
English
Gamma
Set up gamma curve type. Lamp Mode
Increase the brightness of the colors (R/G/B/ C/M/Y) to your item selection.
Color Management System
Advanced
Select one of the image.
DynamicBlack
Enable the projector to be shown in incredible detail. Display or exit the on the...
User's Manual - Page 26
... Shift V Keystone SuperWide 3D
SYSTEM
Menu Location Lamp Settings
Projection
Test Pattern Background Color 12V Trigger A 12V Trigger B
NOTE
While the 3D is only supported in Analog VGA (RGB) signal.
User Controls
NOTE
Please note that the on-screen display (OSD) menus vary according to the signal type selected and the projector model you...
User's Manual - Page 43
... the "Replacing the Lamp" section. Make sure you will also need to adjust the
aspect ratio by referring to the following information.
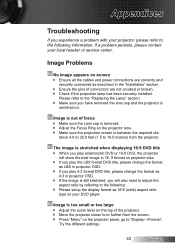
If a problem persists, please contact your local reseller or service center. I mage is between the required dis- Appendices
Troubleshooting
If you experience a problem with your projector, please refer to the following : Please setup the...
User's Manual - Page 49
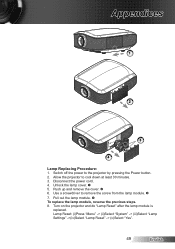
... the Power button. 2. Unlock the lamp cover. 5. Pull out the lamp module. To replace the lamp module, reverse the previous steps. 8. Turn on the projector and do "Lamp Reset" after the lamp module is
replaced. Disconnect the power cord. 4. Lamp Reset: (i)Press "Menu" -> (ii)Select "System" -> (iii)Select "Lamp Settings" ->(iv)Select "Lamp Reset" -> (v)Select "Yes".
49...
User's Manual - Page 55
...00 c=02 c=05 c=07 c=08 c=11 dddd e=0 e=1 e=2 e=3 e=4 e=5 e=6 e=7 e=8 e=9
a=0/1/2 n=1 a=?? Appendices
Function SYSTEM
SETUP Projector ID Reset System Alert
Menu Location
Lamp Setting
Projection Test Pattern Background Color 12v Trigger A
Top Left Top Right Centre Bottom Left Bottom Right Lamp Hour Lamp Reminder Lamp Mode
Lamp Reset
Front-Desktop Rear-Desktop Front-Ceiling Rear-Ceiling
Blue Black...
User's Manual - Page 56
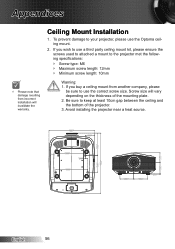
... warranty. If you buy a ceiling mount from incorrect installation will vary depending on the thickness of the projector. 3. Be sure to the projector met the following specifications: Screw type: M6 Maximum screw length: 2mm Minimum screw length: 0mm
Warning: . To prevent damage to use the Optoma ceiling mount.
2. Ceiling Mount Installation
. If you wish...
Optoma HD8300 Reviews
We have not received any reviews for Optoma yet.