User's Manual
Page 1
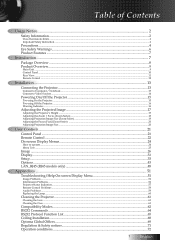
.../Help On-screen Display Menu 51 Image Problems...51 Intermission Problems...56 Projector Status Indication...57 Remote Control Problems...58 Audio Problems...59 Replacing the Lamp...60 Cleaning the Projector...61 Cleaning the Lens...61 Cleaning the Case...61 Compatibility Modes...62 RS232 Commands...64 RS232 Protocol Function List...65 Ceiling...
.../Help On-screen Display Menu 51 Image Problems...51 Intermission Problems...56 Projector Status Indication...57 Remote Control Problems...58 Audio Problems...59 Replacing the Lamp...60 Cleaning the Projector...61 Cleaning the Lens...61 Cleaning the Case...61 Compatibility Modes...62 RS232 Commands...64 RS232 Protocol Function List...65 Ceiling...
User's Manual
Page 4
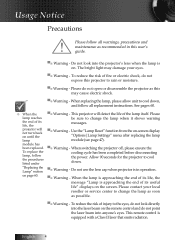
... contact your eyes. ▀■ Warning - When replacing the lamp, please allow unit to cool down , and follow the procedures listed under "Replacing the Lamp" section on until the lamp module has been replaced. Use the "Lamp Reset" function from the on the remote control and do not ...9600;■ Warning - When switching the projector off, please ensure the cooling cycle has been completed before disconnecting the power. When the lamp is approaching the end of fire or electric shock, do not open or disassemble the projector as recommended in operation. ▀■ ...
... contact your eyes. ▀■ Warning - When replacing the lamp, please allow unit to cool down , and follow the procedures listed under "Replacing the Lamp" section on until the lamp module has been replaced. Use the "Lamp Reset" function from the on the remote control and do not ...9600;■ Warning - When switching the projector off, please ensure the cooling cycle has been completed before disconnecting the power. When the lamp is approaching the end of fire or electric shock, do not open or disassemble the projector as recommended in operation. ▀■ ...
User's Manual
Page 6
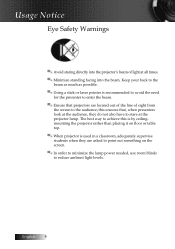
...; When projector is recommended to avoid the need for the presenter to enter the beam. ▀■ Ensure that , when presenters look at the projector lamp. Keep your back to the beam as much as possible. ▀■ Using a stick or laser pointer is used in a classroom, adequately supervise students... The best way to achieve this ensures that projectors are asked to point out something on the screen. ▀■ In order to minimize the lamp power needed, use room blinds to stare at the audience, they are located out of the line of light at all times. ▀■ ...
...; When projector is recommended to avoid the need for the presenter to enter the beam. ▀■ Ensure that , when presenters look at the projector lamp. Keep your back to the beam as much as possible. ▀■ Using a stick or laser pointer is used in a classroom, adequately supervise students... The best way to achieve this ensures that projectors are asked to point out something on the screen. ▀■ In order to minimize the lamp power needed, use room blinds to stare at the audience, they are located out of the line of light at all times. ▀■ ...
User's Manual
Page 16
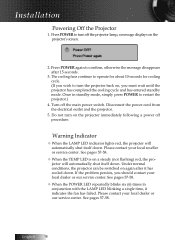
...the projector back on, you must wait until the projector has completed the cooling cycle and has entered standby mode. Turn off the projector lamp, a message displays on a steady (not flashing) red, the projector will automatically shut itself down. Please contact your local dealer or our...standby mode, simply press POWER to turn on again after 15 seconds. 3. Press POWER to restart the projector.) 4. Once in conjunction with the LAMP LED blinking a single time, it has cooled down . If the problem persists, you wish to confirm, otherwise the message disappears after it ...
...the projector back on, you must wait until the projector has completed the cooling cycle and has entered standby mode. Turn off the projector lamp, a message displays on a steady (not flashing) red, the projector will automatically shut itself down. Please contact your local dealer or our...standby mode, simply press POWER to turn on again after 15 seconds. 3. Press POWER to restart the projector.) 4. Once in conjunction with the LAMP LED blinking a single time, it has cooled down . If the problem persists, you wish to confirm, otherwise the message disappears after it ...
User's Manual
Page 18
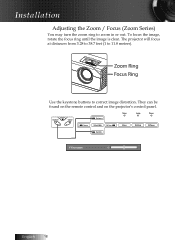
Use the keystone buttons to zoom in or out. Menu AV-Mute Power . Keystone - To focus the image, rotate the focus ring until the image is clear. English 18 They can be found on the remote control and on the projector's control panel. . Keystone + Temp Lamp Power . Source Enter/Help Re-Sync . Installation Adjusting the Zoom / Focus (Zoom Series) You may turn the zoom ring to correct image distortion. The projector will focus at distances from 3.28 to 38.7 feet (1 to 11.8 meters).
Use the keystone buttons to zoom in or out. Menu AV-Mute Power . Keystone - To focus the image, rotate the focus ring until the image is clear. English 18 They can be found on the remote control and on the projector's control panel. . Keystone + Temp Lamp Power . Source Enter/Help Re-Sync . Installation Adjusting the Zoom / Focus (Zoom Series) You may turn the zoom ring to correct image distortion. The projector will focus at distances from 3.28 to 38.7 feet (1 to 11.8 meters).
User's Manual
Page 21
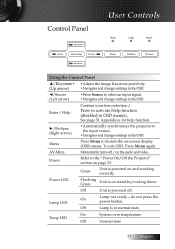
...;/Source (Left arrow) •Press Source to launch the on-screen display (OSD) menu. To exit OSD, Press Menu again. On Lamp LED Lamp not ready-do not press the power button. Power LED Flashing Green Unit is in OSD menus). Menu Press Menu to select an input ...►/Re-Sync (Right arrow) •Automatically synchronizes the projector to the "Power On/Off the Projector" section on and working correctly. Source . Off Lamp is on the audio and video. Control Panel . Keystone + Enter/Help Re-Sync . . Green Unit is powered off / on stand-by/cooling down...
...;/Source (Left arrow) •Press Source to launch the on-screen display (OSD) menu. To exit OSD, Press Menu again. On Lamp LED Lamp not ready-do not press the power button. Power LED Flashing Green Unit is in OSD menus). Menu Press Menu to select an input ...►/Re-Sync (Right arrow) •Automatically synchronizes the projector to the "Power On/Off the Projector" section on and working correctly. Source . Off Lamp is on the audio and video. Control Panel . Keystone + Enter/Help Re-Sync . . Green Unit is powered off / on stand-by/cooling down...

User's Manual
Page 44
Lamp Setting Enter the Lamp Setting menu. Background Color Select the desired background color for more details. See page 45 for more details. Reset Reset all Options to confirm keypad lock. 4 Off-projector keypad functions as normal. See pages 46-47 for the projected image when no source is detected. Advanced Enter the Advanced menu. User Controls Options Keypad Lock Lock the buttons on the projector top panel. 4 On-a warning message displays to default factory settings. English 44
Lamp Setting Enter the Lamp Setting menu. Background Color Select the desired background color for more details. See page 45 for more details. Reset Reset all Options to confirm keypad lock. 4 Off-projector keypad functions as normal. See pages 46-47 for the projected image when no source is detected. Advanced Enter the Advanced menu. User Controls Options Keypad Lock Lock the buttons on the projector top panel. 4 On-a warning message displays to default factory settings. English 44
User's Manual
Page 45
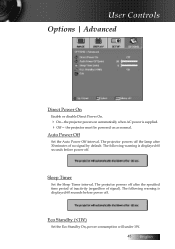
.... 4 On-the projector powers on as normal. Sleep Timer Set the Sleep Timer interval. The following warning is supplied. 4 Off- The projector powers off the lamp after the specified time period of inactivity (regardless of no signal by default. Eco Standby ( Auto Power Off Set the Auto Power Off interval. The...
.... 4 On-the projector powers on as normal. Sleep Timer Set the Sleep Timer interval. The following warning is supplied. 4 Off- The projector powers off the lamp after the specified time period of inactivity (regardless of no signal by default. Eco Standby ( Auto Power Off Set the Auto Power Off interval. The...
User's Manual
Page 46
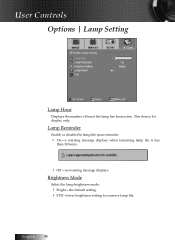
Lamp Reminder Enable or disable the lamp life span reminder. 4 On-a warning message displays when remaining lamp life is for display only. English 46 Brightness Mode Select the lamp brightness mode. 4 Bright-the default setting. 4 STD-lower brightness setting to conserve lamp life. This item is less than 30 hours. 4 Off-no warning message displays. User Controls Options | Lamp Setting Lamp Hour Displays the number of hours the lamp has been active.
Lamp Reminder Enable or disable the lamp life span reminder. 4 On-a warning message displays when remaining lamp life is for display only. English 46 Brightness Mode Select the lamp brightness mode. 4 Bright-the default setting. 4 STD-lower brightness setting to conserve lamp life. This item is less than 30 hours. 4 Off-no warning message displays. User Controls Options | Lamp Setting Lamp Hour Displays the number of hours the lamp has been active.
User's Manual
Page 47
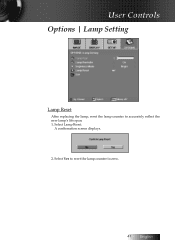
Select Yes to reset the lamp counter to accurately reflect the new lamp's life span. 1. User Controls Options | Lamp Setting Lamp Reset After replacing the lamp, reset the lamp counter to zero. 47 English A confirmation screen displays. 2. Select Lamp Reset.
Select Yes to reset the lamp counter to accurately reflect the new lamp's life span. 1. User Controls Options | Lamp Setting Lamp Reset After replacing the lamp, reset the lamp counter to zero. 47 English A confirmation screen displays. 2. Select Lamp Reset.

User's Manual
Page 52
... types under the Monitor tab. 7. Verify that your display resolution setting is lower than or equal to UXGA (1600 x 1200). 6. Appendices 4 Check if the projection lamp has been securely installed. Click on the Advanced Properties button. Select the Settings tab. 3. Refer to the Replacing the... lamp section. 4 Make sure you are using a PC: For Windows 95, 98, 2000, XP: 1. Click on Show all devices. Select the Change button under the SP ...
... types under the Monitor tab. 7. Verify that your display resolution setting is lower than or equal to UXGA (1600 x 1200). 6. Appendices 4 Check if the projection lamp has been securely installed. Click on the Advanced Properties button. Select the Settings tab. 3. Refer to the Replacing the... lamp section. 4 Make sure you are using a PC: For Windows 95, 98, 2000, XP: 1. Click on Show all devices. Select the Change button under the SP ...
User's Manual
Page 56
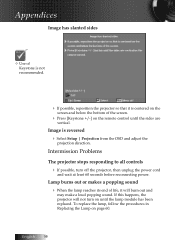
... its end of the screen. 4 Press [Keystone +/-] on page 60. To replace the lamp, follow the procedures in Replacing the Lamp on the remote control until the lamp module has been replaced. Image is centered on the screen and below the bottom of life, it is reversed 4 Select Setup | Projection from the OSD...
... its end of the screen. 4 Press [Keystone +/-] on page 60. To replace the lamp, follow the procedures in Replacing the Lamp on the remote control until the lamp module has been replaced. Image is centered on the screen and below the bottom of life, it is reversed 4 Select Setup | Projection from the OSD...
User's Manual
Page 57
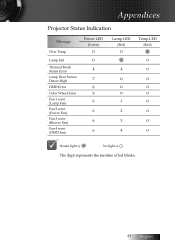
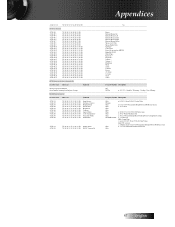
Appendices Projector Status Indication Message Over Temp Lamp Fail Thermal Break Status Error Lamp Door Sensor Detect High DMD Error Color Wheel Error Fan 1 error (Lamp Fan) Fan 2 error (Power Fan) Fan 3 error (Blower Fan) Fan 4 error (DMD Fan) Power LED (Green) O O 4 7 8 9 6 6 6 6 Lamp LED (Red) O 4 O O O 1 2 3 4 Temp LED (Red) O O O O O O O O O Steady light � No light � The digit represents the number of led blinks. 57 English
Appendices Projector Status Indication Message Over Temp Lamp Fail Thermal Break Status Error Lamp Door Sensor Detect High DMD Error Color Wheel Error Fan 1 error (Lamp Fan) Fan 2 error (Power Fan) Fan 3 error (Blower Fan) Fan 4 error (DMD Fan) Power LED (Green) O O 4 7 8 9 6 6 6 6 Lamp LED (Red) O 4 O O O 1 2 3 4 Temp LED (Red) O O O O O O O O O Steady light � No light � The digit represents the number of led blinks. 57 English
User's Manual
Page 58
English 58 Appendices Message Reminders 4 Replacing the lamp: 4 Out of the projector. 4 Make sure the batteries are no obstructions between the remote control and the projector. Move to within 7m (23 ft) of range: (see the following for more information) Remote Control Problems If the remote control does not work 4 Check the operating angle for the remote control is approximately ±15°. 4 Make sure there are inserted correctly. 4 Replace weak batteries in the remote control.
English 58 Appendices Message Reminders 4 Replacing the lamp: 4 Out of the projector. 4 Make sure the batteries are no obstructions between the remote control and the projector. Move to within 7m (23 ft) of range: (see the following for more information) Remote Control Problems If the remote control does not work 4 Check the operating angle for the remote control is approximately ±15°. 4 Make sure there are inserted correctly. 4 Replace weak batteries in the remote control.
User's Manual
Page 60
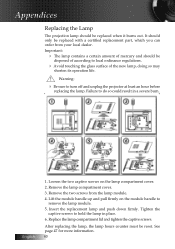
... captive screws on the module handle to remove the lamp module. 5. Insert the replacement lamp and push down firmly. Lift the module handle up and pull firmly on the lamp compartment cover. 2. After replacing the lamp, the lamp hours counter must be disposed of according to turn off... and unplug the projector at least an hour before replacing the lamp. English 1. Replace the lamp compartment lid and tighten the captive screws. Important: 4 The lamp contains a certain amount of the new lamp, doing so may shorten its operation life. Warning: 4 Be sure to local...
... captive screws on the module handle to remove the lamp module. 5. Insert the replacement lamp and push down firmly. Lift the module handle up and pull firmly on the lamp compartment cover. 2. After replacing the lamp, the lamp hours counter must be disposed of according to turn off... and unplug the projector at least an hour before replacing the lamp. English 1. Replace the lamp compartment lid and tighten the captive screws. Important: 4 The lamp contains a certain amount of the new lamp, doing so may shorten its operation life. Warning: 4 Be sure to local...
User's Manual
Page 66
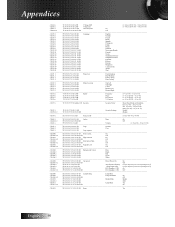
... 0D Off ~XX81 n 7E 30 30 38 31 20 a 0D Volume n= 0 (a=30) - 10 (a=31 30) ~XX82 1 7E 30 30 38 32 20 31 0D Logo Optoma ~XX82 2 7E 30 30 38 32 20 32 0D User ~XX83 1 7E 30 30 38 33 20 31 0D Logo capture ~XX100 1 7E 30 30...
... 0D Off ~XX81 n 7E 30 30 38 31 20 a 0D Volume n= 0 (a=30) - 10 (a=31 30) ~XX82 1 7E 30 30 38 32 20 31 0D Logo Optoma ~XX82 2 7E 30 30 38 32 20 32 0D User ~XX83 1 7E 30 30 38 33 20 31 0D Logo capture ~XX100 1 7E 30 30...
User's Manual
Page 67
... Mode OKn n: 0/1/2/3=Front-Desktop/Rear-Desktop/Front-Ceiling/Rear-Ceiling ~XX150 1 7E 30 30 31 35 30 20 31 0D Information OKabbbbcdddde a : 1/0=On/Off bbbb: Lamp Hour c: source 0/2/4/5= None/VGA/S-Video/Video dddd: FW version e : Display mode 0/1/2/3/4/5=Presentation/Bright/Movie/sRGB/user1/user2 ~XX151 1 7E 30 30 31 35 31 20...
... Mode OKn n: 0/1/2/3=Front-Desktop/Rear-Desktop/Front-Ceiling/Rear-Ceiling ~XX150 1 7E 30 30 31 35 30 20 31 0D Information OKabbbbcdddde a : 1/0=On/Off bbbb: Lamp Hour c: source 0/2/4/5= None/VGA/S-Video/Video dddd: FW version e : Display mode 0/1/2/3/4/5=Presentation/Bright/Movie/sRGB/user1/user2 ~XX151 1 7E 30 30 31 35 31 20...
Protocol Function
Page 3
... 0D Off ~XX81 n 7E 30 30 38 31 20 a 0D Volume n= 0 (a=30) - 10 (a=31 30) ~XX82 1 7E 30 30 38 32 20 31 0D Logo Optoma ~XX82 2 7E 30 30 38 32 20 32 0D User ~XX83 1 7E 30 30 38 33 20 31 0D Logo capture ~XX100 1 7E 30 30...
... 0D Off ~XX81 n 7E 30 30 38 31 20 a 0D Volume n= 0 (a=30) - 10 (a=31 30) ~XX82 1 7E 30 30 38 32 20 31 0D Logo Optoma ~XX82 2 7E 30 30 38 32 20 32 0D User ~XX83 1 7E 30 30 38 33 20 31 0D Logo capture ~XX100 1 7E 30 30...
Protocol Function
Page 4
... Mode OKn n: 0/1/2/3=Front-Desktop/Rear-Desktop/Front-Ceiling/Rear-Ceiling ~XX150 1 7E 30 30 31 35 30 20 31 0D Information OKabbbbcdddde a : 1/0=On/Off bbbb: Lamp Hour c: source 0/2/4/5= None/VGA/S-Video/Video dddd: FW version e : Display mode 0/1/2/3/4/5=Presentation/Bright/Movie/sRGB/user1/user2 ~XX151 1 7E 30 30 31 35 31 20...
... Mode OKn n: 0/1/2/3=Front-Desktop/Rear-Desktop/Front-Ceiling/Rear-Ceiling ~XX150 1 7E 30 30 31 35 30 20 31 0D Information OKabbbbcdddde a : 1/0=On/Off bbbb: Lamp Hour c: source 0/2/4/5= None/VGA/S-Video/Video dddd: FW version e : Display mode 0/1/2/3/4/5=Presentation/Bright/Movie/sRGB/user1/user2 ~XX151 1 7E 30 30 31 35 31 20...
Brochure
Page 1
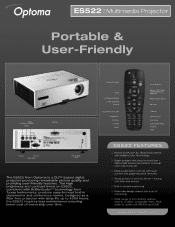
...Multimedia Projector PortaDIL & User-Friendly 04,/ 1,44%44' b,l 1i 444* %44 41041. 4. Optoma ES522 I pi- The high brightness and contrast levels on /full off) u Ideal presentation remote with lamp life up to -read text 2800 ANSI lumens and 3000:1 contrast ratio (full on ES522, combined ...with BrilliantcolorTM technology from Optoma is a DLP®-based digital projector producing remarkable picture quality and ...
...Multimedia Projector PortaDIL & User-Friendly 04,/ 1,44%44' b,l 1i 444* %44 41041. 4. Optoma ES522 I pi- The high brightness and contrast levels on /full off) u Ideal presentation remote with lamp life up to -read text 2800 ANSI lumens and 3000:1 contrast ratio (full on ES522, combined ...with BrilliantcolorTM technology from Optoma is a DLP®-based digital projector producing remarkable picture quality and ...


