
User Manual
Page 2
...injury. 11. Opening the case will be necessary to minimize swaying forces at : http://www.OptomaUSA.com User's Manual | 2 The Optoma motorized sled will ramp up and down at the beginning and end of the vents or holes in case of heater vents or projector exhaust ports. ...Disconnect the power when installing, working on or repositioning the lens. User's Manual BX-AL133 Safety 1. Do not block any object into the enclosure. 6. Do not service the motor drive or electronics. Pushing or forcing the sled by hand, make sure it is heavy, and requires a secure and stable ...
...injury. 11. Opening the case will be necessary to minimize swaying forces at : http://www.OptomaUSA.com User's Manual | 2 The Optoma motorized sled will ramp up and down at the beginning and end of the vents or holes in case of heater vents or projector exhaust ports. ...Disconnect the power when installing, working on or repositioning the lens. User's Manual BX-AL133 Safety 1. Do not block any object into the enclosure. 6. Do not service the motor drive or electronics. Pushing or forcing the sled by hand, make sure it is heavy, and requires a secure and stable ...
User Manual
Page 3
...stop sensors Dry operating precision linear bearings Heavy-duty, high-precision NEMA 23 stepper motor Custom built, low noise stepper drive circuitry and firmware Endurance tested to more ...motorized sled is built and tested in a home theater environment. User's Manual BX-AL133 Introduction Thank you for use in the USA with the strictest quality standards and certifications. Both lens and drive will provide years of optical components. The Optoma system is outfitted with a custom mechanism designed exclusively for purchasing the Optoma BX-AL133...
...stop sensors Dry operating precision linear bearings Heavy-duty, high-precision NEMA 23 stepper motor Custom built, low noise stepper drive circuitry and firmware Endurance tested to more ...motorized sled is built and tested in a home theater environment. User's Manual BX-AL133 Introduction Thank you for use in the USA with the strictest quality standards and certifications. Both lens and drive will provide years of optical components. The Optoma system is outfitted with a custom mechanism designed exclusively for purchasing the Optoma BX-AL133...
User Manual
Page 4
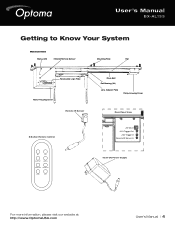
User's Manual BX-AL133 Getting to Know Your System Motorized Sled Status LED Infrared Remote Sensor Mounting Plate Rail Reversable Logo Plate Motor Housing Cover Remote IR Sensor 8-Button Remote Control OFF ON LENS OUT LENS IN PANEL OFF PANEL ON SLOW FAST Drive Belt Rail Bearing (X4) Lens Adaptor Plate Pulley Housing Cover Rear Panel View +9V DC In +12V Trigger Out +12V Trigger In Remote IR Sensor In 16.5V DC Power Supply For more information, please visit our website at: http://www.OptomaUSA.com User's Manual | 4
User's Manual BX-AL133 Getting to Know Your System Motorized Sled Status LED Infrared Remote Sensor Mounting Plate Rail Reversable Logo Plate Motor Housing Cover Remote IR Sensor 8-Button Remote Control OFF ON LENS OUT LENS IN PANEL OFF PANEL ON SLOW FAST Drive Belt Rail Bearing (X4) Lens Adaptor Plate Pulley Housing Cover Rear Panel View +9V DC In +12V Trigger Out +12V Trigger In Remote IR Sensor In 16.5V DC Power Supply For more information, please visit our website at: http://www.OptomaUSA.com User's Manual | 4
User Manual
Page 5
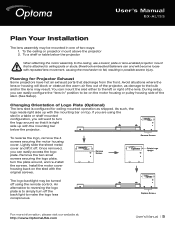
User's Manual BX-AL133 Plan Your Installation The lens assembly may be mounted in one of the lens. You can and will block or obstruct the warm air flow out of the projector, as shipped. As such, the logo reads right side up with the mounting bar on the sled with repeated ... | 5 Planning for ceiling mounted operation as damage to the bulb and/or the lens may be on the motor housing or pulley housing side of Logo Plate (Optional) The lens sled is configured for Projector Exhaust Some projectors have hot air exhaust ports that discharge from the front. Once removed, you...
User's Manual BX-AL133 Plan Your Installation The lens assembly may be mounted in one of the lens. You can and will block or obstruct the warm air flow out of the projector, as shipped. As such, the logo reads right side up with the mounting bar on the sled with repeated ... | 5 Planning for ceiling mounted operation as damage to the bulb and/or the lens may be on the motor housing or pulley housing side of Logo Plate (Optional) The lens sled is configured for Projector Exhaust Some projectors have hot air exhaust ports that discharge from the front. Once removed, you...
User Manual
Page 6
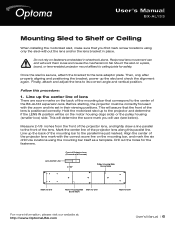
.... Line up to the front of the BX-AL133 expansion lens. Reciprocal lens movement can and will be correctly focused with the correct score line on the motor housing (logo side) or the pulley housing (smaller box) side. Hold the motorized sled up the center line of lens There are... the holes for Drill For more information, please visit our website at: http://www.OptomaUSA.com User's Manual | 6 User's Manual BX-AL133 Mounting Sled to ceiling joists for safety. This will assure that you will determine the score mark you first mark screw locations using the mounting bar...
.... Line up to the front of the BX-AL133 expansion lens. Reciprocal lens movement can and will be correctly focused with the correct score line on the motor housing (logo side) or the pulley housing (smaller box) side. Hold the motorized sled up the center line of lens There are... the holes for Drill For more information, please visit our website at: http://www.OptomaUSA.com User's Manual | 6 User's Manual BX-AL133 Mounting Sled to ceiling joists for safety. This will assure that you will determine the score mark you first mark screw locations using the mounting bar...

User Manual
Page 7
...or lens-enabled projector mount that is securely affixed to attach the lens bracket supplied with the Optoma BX-AL133 anamorphic lens system. Do not attach the lens or power up the sled yet! Sheetrock anchors alone are much easier at : http://www.OptomaUSA.com User's Manual |... plate and use . User's Manual BX-AL133 2. Adjustment and alignment are insufficient. Attaching the lens bracket to the adaptor plate Remove the bracket mounting screws from the motor and reciprocal lens movement will loosen any fasteners that the sled motor will be starting and stopping a heavy...
...or lens-enabled projector mount that is securely affixed to attach the lens bracket supplied with the Optoma BX-AL133 anamorphic lens system. Do not attach the lens or power up the sled yet! Sheetrock anchors alone are much easier at : http://www.OptomaUSA.com User's Manual |... plate and use . User's Manual BX-AL133 2. Adjustment and alignment are insufficient. Attaching the lens bracket to the adaptor plate Remove the bracket mounting screws from the motor and reciprocal lens movement will loosen any fasteners that the sled motor will be starting and stopping a heavy...
User Manual
Page 8
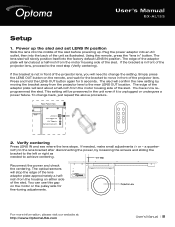
... the screws and sliding the bracket to the next step (Verify centering). User's Manual BX-AL133 Setup 1. Using the remote, press the "lens in front of the unit as needed , make small adjustments (+ or - The sled will need to achieve centering. 0.5" Gap Reconnect the power and check the centering. If...back, just repeat the above procedure. The edge of the adaptor plate will land about a half-inch from the motor housing side of the sled before powering up the sled and set LENS IN position Slide the lens into the factory default LENS IN position. Rear Panel View +9V DC...
... the screws and sliding the bracket to the next step (Verify centering). User's Manual BX-AL133 Setup 1. Using the remote, press the "lens in front of the unit as needed , make small adjustments (+ or - The sled will need to achieve centering. 0.5" Gap Reconnect the power and check the centering. If...back, just repeat the above procedure. The edge of the adaptor plate will land about a half-inch from the motor housing side of the sled before powering up the sled and set LENS IN position Slide the lens into the factory default LENS IN position. Rear Panel View +9V DC...
User Manual
Page 10
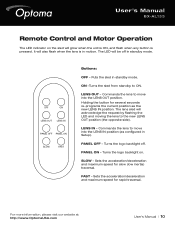
... into the LENS OUT position. Turns the logo backlight off in Setup). Turns the logo backlight on the sled will also flash when the lens is pressed. FAST - User's Manual BX-AL133 Remote Control and Motor Operation The LED indicator on . Holding the button for slow (low inertia) traversal. For more information, please visit...
... into the LENS OUT position. Turns the logo backlight off in Setup). Turns the logo backlight on the sled will also flash when the lens is pressed. FAST - User's Manual BX-AL133 Remote Control and Motor Operation The LED indicator on . Holding the button for slow (low inertia) traversal. For more information, please visit...
User Manual
Page 13
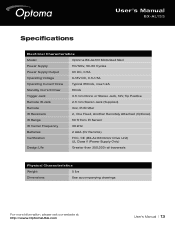
User's Manual BX-AL133 Specifications Electrical Characteristics Model Optoma BX-AL133 Motorized Sled Power Supply 110/120v, 50-60 Cycles Power Supply Output 9V DC, 0.5A Operating Voltage 9-18V DC, 0.5-1.5A Operating Current Draw Typical ...Another Remotely Attached (Optional) IR Range 50 ft from IR Sensor IR Carrier Frequency 38 kHz Batteries 2 AAA (for Remote) Certification FCC, CE (BX-AL133 Motor Drive Unit) UL Class II (Power Supply Only) Design Life Greater than 250,000 rail traversals Physical Characteristics Weight 5 lbs Dimensions See accompanying drawings ...
User's Manual BX-AL133 Specifications Electrical Characteristics Model Optoma BX-AL133 Motorized Sled Power Supply 110/120v, 50-60 Cycles Power Supply Output 9V DC, 0.5A Operating Voltage 9-18V DC, 0.5-1.5A Operating Current Draw Typical ...Another Remotely Attached (Optional) IR Range 50 ft from IR Sensor IR Carrier Frequency 38 kHz Batteries 2 AAA (for Remote) Certification FCC, CE (BX-AL133 Motor Drive Unit) UL Class II (Power Supply Only) Design Life Greater than 250,000 rail traversals Physical Characteristics Weight 5 lbs Dimensions See accompanying drawings ...

User Manual
Page 16
...longest metric M4 screws without exceeding the depth of Scissors or Wire Cutters Front Holes For: Projector and Ceiling Mount Hooks Lens Only Motorized Sled 1. Contents 1 Lens Plate 1 (Bag) Projector Attachment Parts 1 Assembly Kit (Includes) 2 Plate Hook Assemblies 1 Chain (6 ft) 4 Chain Ends 4... the attachment parts bag. MOUNT PROJECTOR ASSEMBLY. Position the ceiling mount adapter plate over the lens plate and the projector. User's Manual BX-AL133 Addendum: Adapter Plate This attachment plate is in the center of the threaded hook shaft. 2. Line up the holes of the lens ...
...longest metric M4 screws without exceeding the depth of Scissors or Wire Cutters Front Holes For: Projector and Ceiling Mount Hooks Lens Only Motorized Sled 1. Contents 1 Lens Plate 1 (Bag) Projector Attachment Parts 1 Assembly Kit (Includes) 2 Plate Hook Assemblies 1 Chain (6 ft) 4 Chain Ends 4... the attachment parts bag. MOUNT PROJECTOR ASSEMBLY. Position the ceiling mount adapter plate over the lens plate and the projector. User's Manual BX-AL133 Addendum: Adapter Plate This attachment plate is in the center of the threaded hook shaft. 2. Line up the holes of the lens ...
User Manual
Page 17
...key to compress the lock washer in the elongated lens bracket holes. Tighten the lens knobs. Insert the sled safety assemblies through the four small holes of the motorized mount. Mark the ceiling location and repeat for the lens in the lens plate line up with white ...project a full, yet still 16:9 image from its lens bracket. INSTALLATION WITH MOTORIZED MOUNT: a. Turn the projector on the type of your equipment becoming unstable and possibly causing injures. INSTALL CHAINS. b. User's Manual BX-AL133 4. Orient the lens bracket to an increased risk of ceiling you have not ...
...key to compress the lock washer in the elongated lens bracket holes. Tighten the lens knobs. Insert the sled safety assemblies through the four small holes of the motorized mount. Mark the ceiling location and repeat for the lens in the lens plate line up with white ...project a full, yet still 16:9 image from its lens bracket. INSTALLATION WITH MOTORIZED MOUNT: a. Turn the projector on the type of your equipment becoming unstable and possibly causing injures. INSTALL CHAINS. b. User's Manual BX-AL133 4. Orient the lens bracket to an increased risk of ceiling you have not ...
