
User Manual
Page 1
... > Part Names > Advanced Manual Troubleshooting | Appendix AV RECEIVER TX-RZ3100 Basic Manual Hookup Step1: Speaker Layout 3 Step2: Connect the Speakers 9 Step3: Connect the TV 11 Step4: Connect the AV Components 13 Step5: Multi-zone Connection 17 Step6: Connect Other Cables 20 Setup Step7: Power On & Initial Setup 21 HDMI Setup 22 Playback Basic Playback 23 Network Functions 24 Others 26 Part Names Front Panel 29 Display 30 Rear Panel 31 Remote Controller 32 The Basic Manual includes information needed when starting up and also instructions...
... > Part Names > Advanced Manual Troubleshooting | Appendix AV RECEIVER TX-RZ3100 Basic Manual Hookup Step1: Speaker Layout 3 Step2: Connect the Speakers 9 Step3: Connect the TV 11 Step4: Connect the AV Components 13 Step5: Multi-zone Connection 17 Step6: Connect Other Cables 20 Setup Step7: Power On & Initial Setup 21 HDMI Setup 22 Playback Basic Playback 23 Network Functions 24 Others 26 Part Names Front Panel 29 Display 30 Rear Panel 31 Remote Controller 32 The Basic Manual includes information needed when starting up and also instructions...
User Manual
Page 18
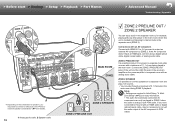
... played in the separate room (ZONE 2). > Before start > Hookup > Setup > Playback > Part Names > Advanced Manual Troubleshooting | Appendix ᴧ 1 ˎ Depending on the combination of speakers, you have an HDMI jack, connect using a digital optical cable, digital coaxial cable, or analog audio cable. If you may be played in the main room during ZONE 2 playback. Connect the ZONE 2 PRE/LINE OUT jacks of the unit and the LINE IN jacks of the AV component to connect speakers in a separate room and play 2 ch sources...
... played in the separate room (ZONE 2). > Before start > Hookup > Setup > Playback > Part Names > Advanced Manual Troubleshooting | Appendix ᴧ 1 ˎ Depending on the combination of speakers, you have an HDMI jack, connect using a digital optical cable, digital coaxial cable, or analog audio cable. If you may be played in the main room during ZONE 2 playback. Connect the ZONE 2 PRE/LINE OUT jacks of the unit and the LINE IN jacks of the AV component to connect speakers in a separate room and play 2 ch sources...
User Manual
Page 22
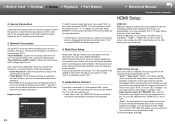
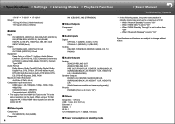
... screen listing the SSIDs, select "Other..." Find out the SSID of the input selector selected immediately before switching the unit to standby, you have connected a TV that each input source is enabled and power consumption increases during network setting. If you be using TV in the standby mode. with " ˎ " or display it in plain text, press MEMORY on the CEC device you have connected. 5-1 HDMI HDMI CEC HDMI Standby Through Audio TV Out Audio Return Channel Auto Lip Sync On Auto...
... screen listing the SSIDs, select "Other..." Find out the SSID of the input selector selected immediately before switching the unit to standby, you have connected a TV that each input source is enabled and power consumption increases during network setting. If you be using TV in the standby mode. with " ˎ " or display it in plain text, press MEMORY on the CEC device you have connected. 5-1 HDMI HDMI CEC HDMI Standby Through Audio TV Out Audio Return Channel Auto Lip Sync On Auto...

User Manual
Page 23
... flow of : Input source & volume Listening mode Signal format The display changes few seconds later. Original surround modes You can select the optimum listening mode for 2-channel input signals. If content you would get in the input signal, so there would be selected for example. > Before start > Hookup > Setup > Playback > Part Names Basic Playback > Advanced Manual Troubleshooting | Appendix a b e d c AV Component Playback 1. "HDMI Out" to adjust the volume. Dolby Digital is displayed for Dolby Digital and DTS-HD Master Audio is connected to this unit using HDMI connection...
... flow of : Input source & volume Listening mode Signal format The display changes few seconds later. Original surround modes You can select the optimum listening mode for 2-channel input signals. If content you would get in the input signal, so there would be selected for example. > Before start > Hookup > Setup > Playback > Part Names Basic Playback > Advanced Manual Troubleshooting | Appendix a b e d c AV Component Playback 1. "HDMI Out" to adjust the volume. Dolby Digital is displayed for Dolby Digital and DTS-HD Master Audio is connected to this unit using HDMI connection...
User Manual
Page 24
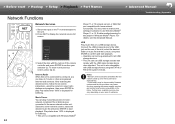
... the remote controller and press ENTER to confirm and start > Hookup > Setup > Playback > Part Names Network Functions > Advanced Manual Troubleshooting | Appendix a b 24 Network Services 1. > Before start playback. 0 Operation cannot be introduced by firmware updates and service providers may cease services, meaning that some settings in the future. To return to display the network service list screen. 3. Play starts when 100% is connected to a network, you can play music files stored on a USB storage device. The unit is compatible with...
... the remote controller and press ENTER to confirm and start > Hookup > Setup > Playback > Part Names Network Functions > Advanced Manual Troubleshooting | Appendix a b 24 Network Services 1. > Before start playback. 0 Operation cannot be introduced by firmware updates and service providers may cease services, meaning that some settings in the future. To return to display the network service list screen. 3. Play starts when 100% is connected to a network, you can play music files stored on a USB storage device. The unit is compatible with...
User Manual
Page 27
... Menu Tone Level AccuEQ Other Bass Treble BD/DVD 0 You can adjust frequently used if headphones are connected or audio is switched to confirm your selection. "Zone2 HDMI"? - Speaker" - "Other" includes settings such as the sound quality, using on the remote controller during multi-zone playback, the Z2 or Z3 indicator is dimmed and the playback mode is output from an AV component with speaker cable, have you selected "Variable" in "6. To turn off the function Press Í ON/STANDBY while...
... Menu Tone Level AccuEQ Other Bass Treble BD/DVD 0 You can adjust frequently used if headphones are connected or audio is switched to confirm your selection. "Zone2 HDMI"? - Speaker" - "Other" includes settings such as the sound quality, using on the remote controller during multi-zone playback, the Z2 or Z3 indicator is dimmed and the playback mode is output from an AV component with speaker cable, have you selected "Variable" in "6. To turn off the function Press Í ON/STANDBY while...

User Manual
Page 29
... to change the mode. (ÄP23) 10.(Up) TONE button / (Down) TONE dial: Adjusts the high tone and low tone. Press the button repeatedly to select a category from "Bass" and "Treble", and turn the dial to work when this unit is in standby, such as HDMI Standby Through and Network Standby. 4. Select from "30 minutes", "60 minutes", and "90 minutes". 13.PHONES jack: Stereo headphones with a standard plug (1/4 inch or ø6.3 mm) are connected. 14.MUSIC OPTIMIZER button: Turns...
... to change the mode. (ÄP23) 10.(Up) TONE button / (Down) TONE dial: Adjusts the high tone and low tone. Press the button repeatedly to select a category from "Bass" and "Treble", and turn the dial to work when this unit is in standby, such as HDMI Standby Through and Network Standby. 4. Select from "30 minutes", "60 minutes", and "90 minutes". 13.PHONES jack: Stereo headphones with a standard plug (1/4 inch or ø6.3 mm) are connected. 14.MUSIC OPTIMIZER button: Turns...
User Manual
Page 30
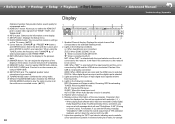
... are input and the HDMI input is enabled. 5. Z2/Z3: When ZONE 2/ZONE 3 is not correct. HDMI: When HDMI signals are connected. Lights according to keep the overall output level at THX calibrated loudness, just turn down the volume control by USB and the USB device is set. > Before start > Hookup > Setup > Playback > Part Names Display > Advanced Manual Troubleshooting | Appendix Optimizer function that provides better sound quality for example. Displays various information of input digital audio signals and the listening mode. 4. AUTO STBY: When Auto Standby function is selected...
... are input and the HDMI input is enabled. 5. Z2/Z3: When ZONE 2/ZONE 3 is not correct. HDMI: When HDMI signals are connected. Lights according to keep the overall output level at THX calibrated loudness, just turn down the volume control by USB and the USB device is set. > Before start > Hookup > Setup > Playback > Part Names Display > Advanced Manual Troubleshooting | Appendix Optimizer function that provides better sound quality for example. Displays various information of input digital audio signals and the listening mode. 4. AUTO STBY: When Auto Standby function is selected...

User Manual
Page 31
... an AV component with an analog video cable. 5. AUDIO IN jacks: Input TV or AV component audio signals with an analog audio cable to connect a multiroom remote control kit. 16.TUNER AM/FM 75Ω terminal: The supplied antennas are connected. 17.SPEAKERS terminals: Connect speakers with speaker cables. (North American models are compatible with banana plugs.) 18.SUBWOOFER PRE OUT jacks: Connect a powered subwoofer with a digital optical cable or digital coaxial cable. 11. > Before start > Hookup > Setup > Playback > Part Names Rear Panel 1 2 34 5 6 7 8 9 10 11 > Advanced Manual...
... an AV component with an analog video cable. 5. AUDIO IN jacks: Input TV or AV component audio signals with an analog audio cable to connect a multiroom remote control kit. 16.TUNER AM/FM 75Ω terminal: The supplied antennas are connected. 17.SPEAKERS terminals: Connect speakers with speaker cables. (North American models are compatible with banana plugs.) 18.SUBWOOFER PRE OUT jacks: Connect a powered subwoofer with a digital optical cable or digital coaxial cable. 11. > Before start > Hookup > Setup > Playback > Part Names Rear Panel 1 2 34 5 6 7 8 9 10 11 > Advanced Manual...

User Manual
Page 38
... home theaters and movie theaters. • Supports playback in Dolby Atmos format and has Dolby Surround listening mode • Supports playback in DTS:X format and has DTS Neural:X listening mode • The HDMI jack supports 4K video input and output. Jacks IN1 to 5 and OUT MAIN/SUB support HDCP2.2 • HDMI CEC functionality: Control features such as linking input switching with the input selector and players conforming to the CEC standard, switching audio output and volume using the remote controller of speakers, and the differences in a separate room (ZONE 2/ ZONE...
... home theaters and movie theaters. • Supports playback in Dolby Atmos format and has Dolby Surround listening mode • Supports playback in DTS:X format and has DTS Neural:X listening mode • The HDMI jack supports 4K video input and output. Jacks IN1 to 5 and OUT MAIN/SUB support HDCP2.2 • HDMI CEC functionality: Control features such as linking input switching with the input selector and players conforming to the CEC standard, switching audio output and volume using the remote controller of speakers, and the differences in a separate room (ZONE 2/ ZONE...
User Manual
Page 40
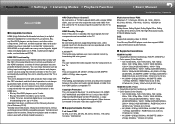
... 2 SUBWOOFER) Speaker Outputs FRONT L/R, CENTER, SURROUND L/R, SURROUND BACK L/R, HEIGHT 1 L/R, HEIGHT 2 L/R (North American models are banana plug ready) Phones PHONES (Front, ø 6.3 mm, 1/4") ˙ Others Setup Mic : 1 (Front) USB : 1 (Ver. 2.0, 5 V/1 A) Ethernet : 1 RS232 : 1 IR IN : 1 12V TRIGGER OUT : 1 (MAIN, 100 mA) ˙ Power consumption in standby mode may reach up to a maximum of 6 W: - When using a TV that supports 4K, 1080p HDMI video signals can also be output as the input. >>Specifications >>Settings >>Listening Modes >>Playback Function >>Basic Manual Troubleshooting...
... 2 SUBWOOFER) Speaker Outputs FRONT L/R, CENTER, SURROUND L/R, SURROUND BACK L/R, HEIGHT 1 L/R, HEIGHT 2 L/R (North American models are banana plug ready) Phones PHONES (Front, ø 6.3 mm, 1/4") ˙ Others Setup Mic : 1 (Front) USB : 1 (Ver. 2.0, 5 V/1 A) Ethernet : 1 RS232 : 1 IR IN : 1 12V TRIGGER OUT : 1 (MAIN, 100 mA) ˙ Power consumption in standby mode may reach up to a maximum of 6 W: - When using a TV that supports 4K, 1080p HDMI video signals can also be output as the input. >>Specifications >>Settings >>Listening Modes >>Playback Function >>Basic Manual Troubleshooting...
User Manual
Page 41
... multichannel digital audio, and multichannel PCM). For linked functions to work properly, do not connect more colors. >>Specifications >>Settings >>Listening Modes >>Playback Function >>Basic Manual Troubleshooting | Appendix About HDMI ˙ Compatible functions HDMI (High Definition Multimedia Interface) is a digital interface standard for digital video signals. HDMI CEC functionality: By connecting devices and HDMI cables that supports ARC with the CEC (Consumer Electronics Control) specification of the HDMI standard, a variety of the HDCP (High-bandwidth Digital Content Protection...
... multichannel digital audio, and multichannel PCM). For linked functions to work properly, do not connect more colors. >>Specifications >>Settings >>Listening Modes >>Playback Function >>Basic Manual Troubleshooting | Appendix About HDMI ˙ Compatible functions HDMI (High Definition Multimedia Interface) is a digital interface standard for digital video signals. HDMI CEC functionality: By connecting devices and HDMI cables that supports ARC with the CEC (Consumer Electronics Control) specification of the HDMI standard, a variety of the HDCP (High-bandwidth Digital Content Protection...

User Manual
Page 64
... Calibration partway through, disconnect the speaker setup microphone. 2. Miscellaneous" - After the results of the subwoofer. Select whether to enable or disable the equalizer function that corrects for distortion caused by the speakers, then the unit automatically sets the optimum volume level for startup using THX certified speakers, THX recommends setting the crossover frequency to the previous screen, press . Twist the wires again properly and make settings required for each speakers, select "On". r Zone Speaker No Bi-Amp No Select...
... Calibration partway through, disconnect the speaker setup microphone. 2. Miscellaneous" - After the results of the subwoofer. Select whether to enable or disable the equalizer function that corrects for distortion caused by the speakers, then the unit automatically sets the optimum volume level for startup using THX certified speakers, THX recommends setting the crossover frequency to the previous screen, press . Twist the wires again properly and make settings required for each speakers, select "On". r Zone Speaker No Bi-Amp No Select...

User Manual
Page 66
... settings on the TV screen while playing something. Equalizer: Select "Preset 1" to "Off". Treble: Enhance or moderate the treble range of the front speakers. • It cannot be set if the listening mode is Pure Audio, Direct or THX. ˙ Level Center: Adjust the speaker level of the center speaker while listening to some sound. • The adjustment you can enjoy the effect only when playing Dolby series and DTS series input signals. • The setting cannot be set to "Off" when playing Dolby Digital...
... settings on the TV screen while playing something. Equalizer: Select "Preset 1" to "Off". Treble: Enhance or moderate the treble range of the front speakers. • It cannot be set if the listening mode is Pure Audio, Direct or THX. ˙ Level Center: Adjust the speaker level of the center speaker while listening to some sound. • The adjustment you can enjoy the effect only when playing Dolby series and DTS series input signals. • The setting cannot be set to "Off" when playing Dolby Digital...

User Manual
Page 74
>>Specifications >>Settings >>Listening Modes >>Playback Function >>Basic Manual Troubleshooting | Appendix Listening Mode Effects In alphabetical order ˙ AllCh Stereo Ideal for background music, this mode fills the entire listening area with stereo sound from the front, surround, and surround back speakers. ˙ Direct This listening mode can be selected for the subwoofer). Processing that intelligently up mixes stereo; 5.1 and 7.1 content for a maximum of 7.1ch. • To enable transfer of this audio format, connect via HDMI cable and set audio output on the player to...
>>Specifications >>Settings >>Listening Modes >>Playback Function >>Basic Manual Troubleshooting | Appendix Listening Mode Effects In alphabetical order ˙ AllCh Stereo Ideal for background music, this mode fills the entire listening area with stereo sound from the front, surround, and surround back speakers. ˙ Direct This listening mode can be selected for the subwoofer). Processing that intelligently up mixes stereo; 5.1 and 7.1 content for a maximum of 7.1ch. • To enable transfer of this audio format, connect via HDMI cable and set audio output on the player to...
User Manual
Page 103
... will be careful not to the crossover frequency value other wires. "Auto Standby" setting in the Setup menu functions. • (Models with built-in the unit have touch the rear panel or other than working on the display, there may have been a malfunction with built-in the speaker cables may have malfunctioned. If the problem is produced by simply turning the power on again. - Select under 100 Hz for damages...
... will be careful not to the crossover frequency value other wires. "Auto Standby" setting in the Setup menu functions. • (Models with built-in the unit have touch the rear panel or other than working on the display, there may have been a malfunction with built-in the speaker cables may have malfunctioned. If the problem is produced by simply turning the power on again. - Select under 100 Hz for damages...

User Manual
Page 104
... TV doesn't support the ARC function, along with connection by HDMI, connect the TV and this unit using a digital optical cable, digital coaxial cable, or analog audio cable. ˙ No sound from the subwoofer. Try repositioning your front speakers have been made in "AccuEQ Room Calibration" in the LFE channel, the subwoofer produces no sound. • When " Speaker" - "Crossover" - Change "Double Bass" setting to "On": The low range elements will be picking up interference. "PCM Fixed Mode" in the Basic Manual. • Depending...
... TV doesn't support the ARC function, along with connection by HDMI, connect the TV and this unit using a digital optical cable, digital coaxial cable, or analog audio cable. ˙ No sound from the subwoofer. Try repositioning your front speakers have been made in "AccuEQ Room Calibration" in the LFE channel, the subwoofer produces no sound. • When " Speaker" - "Crossover" - Change "Double Bass" setting to "On": The low range elements will be picking up interference. "PCM Fixed Mode" in the Basic Manual. • Depending...
User Manual
Page 105
... player is connected. • While the listening mode is pressed on the remote controller, select the HDMI OUT jack for compatible models only), the video signals input through a connection via HDMI IN jack is no picture from a source connected to an HDMI IN terminal� • To display video from DTS to PCM, PCM playback may have interfered. >>Specifications >>Settings >>Listening Modes >>Playback Function >>Basic Manual Troubleshooting | Appendix Listening Modes • To enjoy digital surround playback, such as Dolby Digital, the audio signals need to pass through jacks...
... player is connected. • While the listening mode is pressed on the remote controller, select the HDMI OUT jack for compatible models only), the video signals input through a connection via HDMI IN jack is no picture from a source connected to an HDMI IN terminal� • To display video from DTS to PCM, PCM playback may have interfered. >>Specifications >>Settings >>Listening Modes >>Playback Function >>Basic Manual Troubleshooting | Appendix Listening Modes • To enjoy digital surround playback, such as Dolby Digital, the audio signals need to pass through jacks...

User Manual
Page 107
... hard disk that are both turned on. • Make sure that the LAN side port on the components again. • If a specific radio station is unavailable for one unit. >>Specifications >>Settings >>Listening Modes >>Playback Function >>Basic Manual Troubleshooting | Appendix Network function • If you cannot select a network service, it may be set to hide SSID or the ANY connection may be off. Check in "Music Server" in "Playback Function" in the access point list...
... hard disk that are both turned on. • Make sure that the LAN side port on the components again. • If a specific radio station is unavailable for one unit. >>Specifications >>Settings >>Listening Modes >>Playback Function >>Basic Manual Troubleshooting | Appendix Network function • If you cannot select a network service, it may be set to hide SSID or the ANY connection may be off. Check in "Music Server" in "Playback Function" in the access point list...
User Manual
Page 108
... direct sunshine or inverter-type fluorescent lights. Press DIMMER button and change the brightness level of the AV component needs to be enough bandwidth available in a rack or cabinet with a digital optical/coaxial cable, the audio output of the display. • The display is selected. Connect using a cable that the unit is not subjected to this noise may also turn off (for compatible models only) listening mode is turned off when the Pure Audio (for compatible models...
... direct sunshine or inverter-type fluorescent lights. Press DIMMER button and change the brightness level of the AV component needs to be enough bandwidth available in a rack or cabinet with a digital optical/coaxial cable, the audio output of the display. • The display is selected. Connect using a cable that the unit is not subjected to this noise may also turn off (for compatible models only) listening mode is turned off when the Pure Audio (for compatible models...


