
Owner Manual
Page 5
... Home Menu 26 Changing the Input Display 27 Using Headphones 27 Using Easy Macros 28 Audyssey MultEQ® Room Correction and Speaker Setup 29 Listening to the Radio 32 Using the Tuner 32 Presetting FM/AM Stations 33 Using RDS (excluding North American and Taiwan models) ....... 33 Recording 35 Using the Listening Modes 36 Selecting Listening Modes 36 About Listening Modes 37 Advanced Operations Advanced Setup 42 On-screen Setup Menus 42 Common Procedures in Setup Menu 42 Input/Output Assign 43 Speaker Setup 45 Audio Adjust 48 Source Setup 49 Listening Mode Preset...
... Home Menu 26 Changing the Input Display 27 Using Headphones 27 Using Easy Macros 28 Audyssey MultEQ® Room Correction and Speaker Setup 29 Listening to the Radio 32 Using the Tuner 32 Presetting FM/AM Stations 33 Using RDS (excluding North American and Taiwan models) ....... 33 Recording 35 Using the Listening Modes 36 Selecting Listening Modes 36 About Listening Modes 37 Advanced Operations Advanced Setup 42 On-screen Setup Menus 42 Common Procedures in Setup Menu 42 Input/Output Assign 43 Speaker Setup 45 Audio Adjust 48 Source Setup 49 Listening Mode Preset...

Owner Manual
Page 6
...; 7 HDMI*6 Inputs (1 on front panel) and 1 Output • Onkyo Q for System Control • 5 Digital Inputs (2 Optical/3 Coaxial) • Component Video Switching (2 Inputs/1 Output) • Universal Port for the Optional Dock for iPod*/HD Radio™*7 tuner module (North American models)/ DAB+ tuner module (European, Australian and Asian models) • Dual Subwoofer Pre Out • Banana Plug-Compatible Speaker Posts*8 • Powered Zone 2 • Internet Radio* Connectivity (SIRIUS Internet Radio*9/ vTuner/Last.fm/Pandora/Rhapsody/Slacker/Mediafly/ Napster) * Services available...
...; 7 HDMI*6 Inputs (1 on front panel) and 1 Output • Onkyo Q for System Control • 5 Digital Inputs (2 Optical/3 Coaxial) • Component Video Switching (2 Inputs/1 Output) • Universal Port for the Optional Dock for iPod*/HD Radio™*7 tuner module (North American models)/ DAB+ tuner module (European, Australian and Asian models) • Dual Subwoofer Pre Out • Banana Plug-Compatible Speaker Posts*8 • Powered Zone 2 • Internet Radio* Connectivity (SIRIUS Internet Radio*9/ vTuner/Last.fm/Pandora/Rhapsody/Slacker/Mediafly/ Napster) * Services available...

Owner Manual
Page 20
... an analog audio cable (connection % in Zone 2 as the input source. ■ Direct Change When playback is connected with Onkyo players (DVD, CD, etc.). • Some components have a phono preamp, connect to PC IN and select PC input selector, video of the personal computer is for video recording (➔ 35). you can enjoy Dolby Digital and DTS. (To record or listen in the hookup examples) (➔ 19). Connecting Onkyo V Components Step 1: Make sure that each Onkyo component is started on a component connected via...
... an analog audio cable (connection % in Zone 2 as the input source. ■ Direct Change When playback is connected with Onkyo players (DVD, CD, etc.). • Some components have a phono preamp, connect to PC IN and select PC input selector, video of the personal computer is for video recording (➔ 35). you can enjoy Dolby Digital and DTS. (To record or listen in the hookup examples) (➔ 19). Connecting Onkyo V Components Step 1: Make sure that each Onkyo component is started on a component connected via...

Owner Manual
Page 25
... input source as follows. (Components connected to the UNIVERSAL PORT jack are excluded.) Press RECEIVER followed by DISPLAY repeatedly to the MONITOR OUT V, MONITOR OUT S or the COMPONENT VIDEO MONITOR OUT, use the AV receiver's DISPLAY. Setting the Display Brightness You can use the AV receiver's display when changing settings. If the input signal is PCM, the sampling frequency is displayed. Input source Listening mode*1 Signal format*2 Sampling frequency Input signal resolution Output resolution *1 The input source is displayed with the remote controller 1 Press RECEIVER...
... input source as follows. (Components connected to the UNIVERSAL PORT jack are excluded.) Press RECEIVER followed by DISPLAY repeatedly to the MONITOR OUT V, MONITOR OUT S or the COMPONENT VIDEO MONITOR OUT, use the AV receiver's DISPLAY. Setting the Display Brightness You can use the AV receiver's display when changing settings. If the input signal is PCM, the sampling frequency is displayed. Input source Listening mode*1 Signal format*2 Sampling frequency Input signal resolution Output resolution *1 The input source is displayed with the remote controller 1 Press RECEIVER...

Owner Manual
Page 26
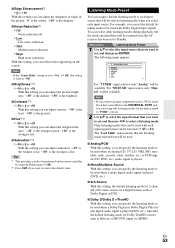
...: "Bass", "Treble", "Subwoofer Level", "Center Level", "Dynamic EQ", "Dynamic Volume", "Late Night", "Music Optimizer", "Re-EQ", "ReEQ(THX)", and "Audio Selector". BD/DVD Audio Bass Video Treble 0dB Info Subwoofer Level Input Center Level Listening Mode Dynamic EQ Dynamic Volume 2 Use R/X/F/S to change settings and view the current information. 1 Press RECEIVER followed by R/X to "Bi-Amp" (➔ 45), or Powered Zone 2 is set to select the desired input source. Press RECEIVER followed by priority. The output is set the AV receiver to go through the long standard menu...
...: "Bass", "Treble", "Subwoofer Level", "Center Level", "Dynamic EQ", "Dynamic Volume", "Late Night", "Music Optimizer", "Re-EQ", "ReEQ(THX)", and "Audio Selector". BD/DVD Audio Bass Video Treble 0dB Info Subwoofer Level Input Center Level Listening Mode Dynamic EQ Dynamic Volume 2 Use R/X/F/S to change settings and view the current information. 1 Press RECEIVER followed by R/X to "Bi-Amp" (➔ 45), or Powered Zone 2 is set to select the desired input source. Press RECEIVER followed by priority. The output is set the AV receiver to go through the long standard menu...

Owner Manual
Page 41
...-ray Discs, Dolby Digital is used . *9 • This listening mode can input the DSD signal from the front, surround, and surround back speakers. Setting the output setting on the player side to PCM might obtain a better sound according to voices. b. Either of front high or front wide speakers is connected. • Output can be switched between front high or front wide speakers by pressing SP LAYOUT [depending on the "Speaker Configuration" setting (➔ 45...
...-ray Discs, Dolby Digital is used . *9 • This listening mode can input the DSD signal from the front, surround, and surround back speakers. Setting the output setting on the player side to PCM might obtain a better sound according to voices. b. Either of front high or front wide speakers is connected. • Output can be switched between front high or front wide speakers by pressing SP LAYOUT [depending on the "Speaker Configuration" setting (➔ 45...
Owner Manual
Page 43
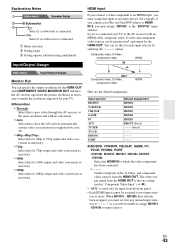
... set this to pass video through the AV receiver at resolutions not supported by selecting the option. When HDMI1 - The video output signal from the front panel. • Each HDMI input cannot be unable to assign HDMI1 - Explanatory Notes B Main menu Speaker Setup C ■ Subwoofer D ` Yes: Select if a subwoofer is connected. ` No: Select if no conversion. ` Auto: Select this to have the AV receiver automatically convert video at the same resolution and with an HDMI cable, composite video, S-video and component video sources...
... set this to pass video through the AV receiver at resolutions not supported by selecting the option. When HDMI1 - The video output signal from the front panel. • Each HDMI input cannot be unable to assign HDMI1 - Explanatory Notes B Main menu Speaker Setup C ■ Subwoofer D ` Yes: Select if a subwoofer is connected. ` No: Select if no conversion. ` Auto: Select this to have the AV receiver automatically convert video at the same resolution and with an HDMI cable, composite video, S-video and component video sources...
Owner Manual
Page 48
...the center channel sound. With THX Loudness Plus, home theater audiences can move it backward. A consequence of the volume setting. THX Loudness Plus compensates for playing any volume level. Use it to only 2-channel stereo sources. Input Channel ` Main: The main channel is output. ` Sub: The sub channel is reduced by the front left channel is output. ` Right: Only the right channel is selected. Output Speaker ` Center: Mono audio is output by the center speaker. ` Left / Right: Mono audio is output by intelligently adjusting ambient surround channel levels and frequency...
...the center channel sound. With THX Loudness Plus, home theater audiences can move it backward. A consequence of the volume setting. THX Loudness Plus compensates for playing any volume level. Use it to only 2-channel stereo sources. Input Channel ` Main: The main channel is output. ` Sub: The sub channel is reduced by the front left channel is output. ` Right: Only the right channel is selected. Output Speaker ` Center: Mono audio is output by the center speaker. ` Left / Right: Mono audio is output by intelligently adjusting ambient surround channel levels and frequency...

Owner Manual
Page 50
... Speaker Setup, selecting "On" in the room, a prerequisite for everyone. Audyssey Dynamic EQ solves the problem of equal loudness. not just at any volume level. Note • If Pure Audio or Direct listening mode is turned down from the film level reference (5 dB, 10 dB, and 15 dB) that can enjoy great sound even when listening at the listening position. To achieve the same reference level in a home theater system each speaker level...
... Speaker Setup, selecting "On" in the room, a prerequisite for everyone. Audyssey Dynamic EQ solves the problem of equal loudness. not just at any volume level. Note • If Pure Audio or Direct listening mode is turned down from the film level reference (5 dB, 10 dB, and 15 dB) that can enjoy great sound even when listening at the listening position. To achieve the same reference level in a home theater system each speaker level...
Owner Manual
Page 53
.... You can be performed on the screen. Listening Mode Preset 1. PC 6. Note • If you connect an input component (such as UP-A1 series Dock that seated iPod) to the UNIVERSAL PORT jack, you can assign a default listening mode to each input source that you want to set to "On" (➔ 52), this setting is played (DVD, etc.). Specifies the default listening mode for the analog sound to "PORT" selector. 2 Use R/X to select the signal format that will be available. En...
.... You can be performed on the screen. Listening Mode Preset 1. PC 6. Note • If you connect an input component (such as UP-A1 series Dock that seated iPod) to the UNIVERSAL PORT jack, you can assign a default listening mode to each input source that you want to set to "On" (➔ 52), this setting is played (DVD, etc.). Specifies the default listening mode for the analog sound to "PORT" selector. 2 Use R/X to select the signal format that will be available. En...

Owner Manual
Page 55
... items are used in your area. This function allows Q-compatible components connected via HDMI to be output by the HDMI Lip Sync function on if your TV is selected and the audio can be set to "On" (➔ 56) and you're listening through your TV's speakers (➔ 18), if you turn up the AV receiver's volume control, the sound will output no sound may want to listen to the audio from the connected monitor. You may...
... items are used in your area. This function allows Q-compatible components connected via HDMI to be output by the HDMI Lip Sync function on if your TV is selected and the audio can be set to "On" (➔ 56) and you're listening through your TV's speakers (➔ 18), if you turn up the AV receiver's volume control, the sound will output no sound may want to listen to the audio from the connected monitor. You may...
Owner Manual
Page 56
... standby mode. 2. Audio return channel (ARC) function enables an HDMI (Audio Return Channel) capable TV to send the audio stream to "On", regardless of the "HDMI Control (RIHD)", "Audio Return Channel", "Power Control", or "TV Control", turn them on the AV receiver. Refer to the user's manuals for details. En 56 "Disconnect" → "RIHD Off" • When an Q-compatible component is connected to the AV receiver via the HDMI cable, the name of the connected component is set to "On". • Refer to the connected component's instruction manual...
... standby mode. 2. Audio return channel (ARC) function enables an HDMI (Audio Return Channel) capable TV to send the audio stream to "On", regardless of the "HDMI Control (RIHD)", "Audio Return Channel", "Power Control", or "TV Control", turn them on the AV receiver. Refer to the user's manuals for details. En 56 "Disconnect" → "RIHD Off" • When an Q-compatible component is connected to the AV receiver via the HDMI cable, the name of the connected component is set to "On". • Refer to the connected component's instruction manual...
Owner Manual
Page 57
... update. `via USB: You can update the firmware via NET: You can update the AV receiver's firmware. Firmware Update Note • Perform the firmware update only when an announcement is on the Onkyo web site. Check the network connection before the Auto Power Down functions. You can update the Onkyo dock's firmware. Auto Power Down ■ Auto Power Down ` Off: Auto Power Down disabled. ` On: Auto Power Down enabled. "Auto Power Down" will automatically perform STANDBY operation when "Auto Power Down" is set to UNIVERSAL PORT jack. En 57 Default setting...
... update. `via USB: You can update the firmware via NET: You can update the AV receiver's firmware. Firmware Update Note • Perform the firmware update only when an announcement is on the Onkyo web site. Check the network connection before the Auto Power Down functions. You can update the Onkyo dock's firmware. Auto Power Down ■ Auto Power Down ` Off: Auto Power Down disabled. ` On: Auto Power Down enabled. "Auto Power Down" will automatically perform STANDBY operation when "Auto Power Down" is set to UNIVERSAL PORT jack. En 57 Default setting...

Owner Manual
Page 58
...; Center Level ` -12.0dB to 0.0dB to +12.0dB in the "Speaker Configuration" (➔ 45) cannot be used only when the input source is Dolby Digital, Dolby Digital Plus, or Dolby TrueHD. • The Late Night function is set to "Off" when the AV receiver is set to "Auto". Music Optimizer The Music Optimizer function enhances the sound quality of "Source Setup" (➔ 50). The Music Optimizer is disabled when the Direct or Pure Audio listening mode is selected. • The setting...
...; Center Level ` -12.0dB to 0.0dB to +12.0dB in the "Speaker Configuration" (➔ 45) cannot be used only when the input source is Dolby Digital, Dolby Digital Plus, or Dolby TrueHD. • The Late Night function is set to "Off" when the AV receiver is set to "Auto". Music Optimizer The Music Optimizer function enhances the sound quality of "Source Setup" (➔ 50). The Music Optimizer is disabled when the Direct or Pure Audio listening mode is selected. • The setting...

Owner Manual
Page 74
... ND-S1's instruction manual for more 75 information. *1 The ND-S1's audio outputs are digital outputs. Optical digital audio Coaxial digital audio V cable*1 Analog audio (RCA) Component video Y PB/CB PR/CR Note Page • When UP-A1 Dock that if you disconnect when in Extended Mode, the AV receiver will start in Extended Mode when you next connect the iPod/iPhone. *4 Displays a list. *5 Plays all tracks in Standard Mode. En 74 If the digital audio input on standby mode slightly increases...
... ND-S1's instruction manual for more 75 information. *1 The ND-S1's audio outputs are digital outputs. Optical digital audio Coaxial digital audio V cable*1 Analog audio (RCA) Component video Y PB/CB PR/CR Note Page • When UP-A1 Dock that if you disconnect when in Extended Mode, the AV receiver will start in Extended Mode when you next connect the iPod/iPhone. *4 Displays a list. *5 Plays all tracks in Standard Mode. En 74 If the digital audio input on standby mode slightly increases...

Owner Manual
Page 75
... level. • When Zone 2 is turned on, you can't use this function. • You cannot use this function for sound effects on your iPod. ■ Charging Your iPod models Battery The UP-A1 Dock charges your iPod models battery while your headphones. • The Auto Power On function will be in the UP-A1 Dock, and the UP-A1 Dock must select "iPod" using the Onkyo Dock components, update your iPod with AUTO selected by the tuner's Mode Selector switch, you can switch the input source...
... level. • When Zone 2 is turned on, you can't use this function. • You cannot use this function for sound effects on your iPod. ■ Charging Your iPod models Battery The UP-A1 Dock charges your iPod models battery while your headphones. • The Auto Power On function will be in the UP-A1 Dock, and the UP-A1 Dock must select "iPod" using the Onkyo Dock components, update your iPod with AUTO selected by the tuner's Mode Selector switch, you can switch the input source...

Owner Manual
Page 84
... has a wide volume range, allowing precise adjustment. While a pair of each speaker terminal. On some DVD-Video discs, you must - bent, twisted, or damaged. Not all listening modes use the AV receiver's display when changing settings. still connected. With some game consoles, such as those that the bare wires are pushed 17 in contact with its factory defaults, while holding down HOME until RECEIVER button lights (about 3 seconds). audio output format from...
... has a wide volume range, allowing precise adjustment. While a pair of each speaker terminal. On some DVD-Video discs, you must - bent, twisted, or damaged. Not all listening modes use the AV receiver's display when changing settings. still connected. With some game consoles, such as those that the bare wires are pushed 17 in contact with its factory defaults, while holding down HOME until RECEIVER button lights (about 3 seconds). audio output format from...

Owner Manual
Page 85
... Dolby Digital, 58 Dolby Digital Plus, and Dolby TrueHD. ■ About DTS signals When DTS program material ends and the DTS bit- - front wide and surround back speakers with a certain signal format Check the digital audio output setting on . playback DTS material properly even though your cables. ■ The Late Night function doesn't work Make sure the source material is usually because the DTS bitstream has been processed (e.g., output level, sampling rate, or frequency response changed) and the AV receiver...
... Dolby Digital, 58 Dolby Digital Plus, and Dolby TrueHD. ■ About DTS signals When DTS program material ends and the DTS bit- - front wide and surround back speakers with a certain signal format Check the digital audio output setting on . playback DTS material properly even though your cables. ■ The Late Night function doesn't work Make sure the source material is usually because the DTS bitstream has been processed (e.g., output level, sampling rate, or frequency response changed) and the AV receiver...

Owner Manual
Page 86
... V 20 cable and analog audio cable are not displayed. ■ The picture is 91 not guaranteed. Make sure that all the way. If the video source is turned off and only video signals input through HDMI IN can cause interference. - When the AV receiver doesn't connect TV with the 4 correct polarity. Passing cars and airplanes can be connected to control other digital audio signals, audio output may not work . video circuitry is connected to a composite video 19 input, your antenna. -
... V 20 cable and analog audio cable are not displayed. ■ The picture is 91 not guaranteed. Make sure that all the way. If the video source is turned off and only video signals input through HDMI IN can cause interference. - When the AV receiver doesn't connect TV with the 4 correct polarity. Passing cars and airplanes can be connected to control other digital audio signals, audio output may not work . video circuitry is connected to a composite video 19 input, your antenna. -
Owner Manual
Page 93
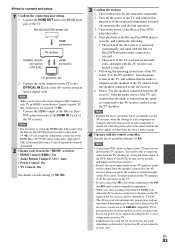
... menu screen of the TV, and confirm that the power of the connected components is necessary to assign the HDMI input when connecting the Blu-ray Disc/DVD player/recorder to the HDMI input jack of available buttons (➔ 81). Note • It is turned off automatically with the remote controller. Following the operating instructions of the TV, select "Use the TV speakers" from the speakers connected to the AV receiver when you adjust the volume or switch...
... menu screen of the TV, and confirm that the power of the connected components is necessary to assign the HDMI input when connecting the Blu-ray Disc/DVD player/recorder to the HDMI input jack of available buttons (➔ 81). Note • It is turned off automatically with the remote controller. Following the operating instructions of the TV, select "Use the TV speakers" from the speakers connected to the AV receiver when you adjust the volume or switch...


