
Owner Manual
Page 4
... 10 Using the Remote Controller 10 Connections Connecting Your Speakers 12 Speaker Connection Precautions 12 Connecting the Speaker Cables 12 Configuring the Speaker Impedance (TX-8522 North American model only 13 Connecting Antenna 14 Connecting the Indoor FM Antenna 14 Connecting the ... Headphones 22 Setting the Display Brightness 22 Using the Sleep Timer (remote controller only) ... 22 Using the Tone and Balance Controls 23 Setting the DIRECT Function (TX-8522 only) ..... 23 Enjoying the Pure Audio Sound (TX-8522 only) .... 23 Recording 24 Recording the Input Source 24 Recording...
... 10 Using the Remote Controller 10 Connections Connecting Your Speakers 12 Speaker Connection Precautions 12 Connecting the Speaker Cables 12 Configuring the Speaker Impedance (TX-8522 North American model only 13 Connecting Antenna 14 Connecting the Indoor FM Antenna 14 Connecting the ... Headphones 22 Setting the Display Brightness 22 Using the Sleep Timer (remote controller only) ... 22 Using the Tone and Balance Controls 23 Setting the DIRECT Function (TX-8522 only) ..... 23 Enjoying the Pure Audio Sound (TX-8522 only) .... 23 Recording 24 Recording the Input Source 24 Recording...

Owner Manual
Page 5
... are the property of their respective owners. 5 Carefully follow the polarity diagram (positive + and negative - Notes: • If the remote controller doesn't work reliably, try replacing the batteries. • Don't mix new and old batteries or different types of XM Satellite Radio...&PURE AUDIO ❑ Brushed Hairline Aluminum Front Panel ❑ Compatible with RI Dock for the iPod ❑ Banana Plug-Compatible Speaker Posts (USA & CANADA only) TX-8222 ❑ 50 Watts/Channel @ 8 ohms (FTC) (USA & CANADA) ❑ 70 Watts/Channel @ 4 ohms (IEC) (EUROPE) ❑ 90 Watts/Channel...
... are the property of their respective owners. 5 Carefully follow the polarity diagram (positive + and negative - Notes: • If the remote controller doesn't work reliably, try replacing the batteries. • Don't mix new and old batteries or different types of XM Satellite Radio...&PURE AUDIO ❑ Brushed Hairline Aluminum Front Panel ❑ Compatible with RI Dock for the iPod ❑ Banana Plug-Compatible Speaker Posts (USA & CANADA only) TX-8222 ❑ 50 Watts/Channel @ 8 ohms (FTC) (USA & CANADA) ❑ 70 Watts/Channel @ 4 ohms (IEC) (EUROPE) ❑ 90 Watts/Channel...

Owner Manual
Page 7
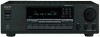
... adjusting the sound level balance between the left and right channel for adjusting the level of stereo headphones for radio tuning. E Remote-control sensor (10) Receives control signals from the remote controller. I CATEGORY button Used to label the station preset number. N MASTER VOLUME control (21) Sets the volume of bass sounds. For... (20) Lights up and the display disappears when this button and number buttons. V PHONES jack (22) This 1/4-inch phone jack is being received from the remote controller.
... adjusting the sound level balance between the left and right channel for adjusting the level of stereo headphones for radio tuning. E Remote-control sensor (10) Receives control signals from the remote controller. I CATEGORY button Used to label the station preset number. N MASTER VOLUME control (21) Sets the volume of bass sounds. For... (20) Lights up and the display disappears when this button and number buttons. V PHONES jack (22) This 1/4-inch phone jack is being received from the remote controller.
Owner Manual
Page 8
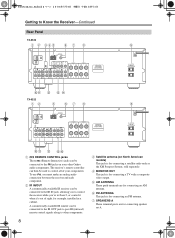
.... 8 C Satellite antenna (on your components. Getting to Know the Receiver-Continued Rear Panel TX-8522 1 B 345 67 8 9 JK L M N TX-8222 1B 5 67 8 9 JK L OP A REMOTE CONTROL jacks These (Remote Interactive) jacks can be connected to the jacks on North American models) This jack is for... for connecting an FM antenna. D MONITOR OUT This jack is for example, installed in a cabinet. The receiver's remote controller can be used to other Onkyo audio components. F FM ANTENNA This jack is for connecting an AM antenna. G SPEAKERS A These terminal posts are for...
.... 8 C Satellite antenna (on your components. Getting to Know the Receiver-Continued Rear Panel TX-8522 1 B 345 67 8 9 JK L M N TX-8222 1B 5 67 8 9 JK L OP A REMOTE CONTROL jacks These (Remote Interactive) jacks can be connected to the jacks on North American models) This jack is for... for connecting an FM antenna. D MONITOR OUT This jack is for example, installed in a cabinet. The receiver's remote controller can be used to other Onkyo audio components. F FM ANTENNA This jack is for connecting an AM antenna. G SPEAKERS A These terminal posts are for...

Owner Manual
Page 10
... may not work if there's an obstacle between it and the receiver's remote control sensor. Keep this in a rack behind colored glass doors. Remote Controller TX-8522 North American model (RC-664S) TX-8522 Other models (RC-665S) TX-8222 All models (RC-666S) 1 1 9 9 2 J 2 J K K 3 3* L L 4 5 M 4 5 M N N O O P P Q Q R R 6 S 7 T T 8 U 8 U * For the RC-666S, the names for the INPUT SELECTOR buttons differ...
... may not work if there's an obstacle between it and the receiver's remote control sensor. Keep this in a rack behind colored glass doors. Remote Controller TX-8522 North American model (RC-664S) TX-8522 Other models (RC-665S) TX-8222 All models (RC-666S) 1 1 9 9 2 J 2 J K K 3 3* L L 4 5 M 4 5 M N N O O P P Q Q R R 6 S 7 T T 8 U 8 U * For the RC-666S, the names for the INPUT SELECTOR buttons differ...

Owner Manual
Page 11
... reverse playback on an HDD or cassette component. Stop [ ]: Stops playback on a cassette deck. Reverse Play [ ]: Starts reverse playback. Remote Controller-Continued For detailed information, see the pages in parentheses. C INPUT SELECTOR buttons (21) and number buttons (26) When any of the currently... selected remote controller mode. 11 D CLR button (26) Used to the one shown below the button. I DIMMER button (22) Adjusts the display brightness....
... reverse playback on an HDD or cassette component. Stop [ ]: Stops playback on a cassette deck. Reverse Play [ ]: Starts reverse playback. Remote Controller-Continued For detailed information, see the pages in parentheses. C INPUT SELECTOR buttons (21) and number buttons (26) When any of the currently... selected remote controller mode. 11 D CLR button (26) Used to the one shown below the button. I DIMMER button (22) Adjusts the display brightness....

Owner Manual
Page 13
... Be sure to minimize the volume level on the receiver 4 before configuring the speaker impedance. 1 Press the SETUP button on the remote controller to 8 ohms, use the same procedures above. 2, 4 SETUP 3 1 Turn on the power. 2 Press the SETUP button on ... below. When you restore the impedance setting to complete the setting. When you change the speaker impedance setting, read "Speaker Connection Precautions" on the remote controller. The "Impedance: 8 ohms" indication appears in the display. 3 Change the impedance value to "6 ohms" using the [ ]/[ ] buttons...
... Be sure to minimize the volume level on the receiver 4 before configuring the speaker impedance. 1 Press the SETUP button on the remote controller to 8 ohms, use the same procedures above. 2, 4 SETUP 3 1 Turn on the power. 2 Press the SETUP button on ... below. When you restore the impedance setting to complete the setting. When you change the speaker impedance setting, read "Speaker Connection Precautions" on the remote controller. The "Impedance: 8 ohms" indication appears in the display. 3 Change the impedance value to "6 ohms" using the [ ]/[ ] buttons...
Owner Manual
Page 17
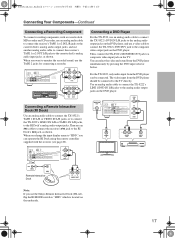
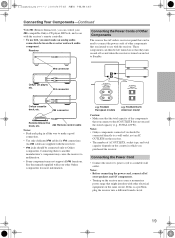
... jack to the TV directly. For the TX-8222, only audio input from the DVD player simultaneously by pressing the DVD input selector button. When you change the input display name to "HDD," you want to monitor the recorded sound, use the Onkyo Remote Interactive Dock (DS-A1), flip ...the TAPE 2 jacks for connecting a recorder. / REC PLAY (IN) (OUT) Connecting a Remote Interactive Dock (RI Dock) Use an analog audio cable to connect the TX-8522's TAPE 1 IN L/R or VIDEO IN L/R jacks, or to connect the TX-8222's LINE 2 IN L/R or TAPE 1 IN L/R jacks, to "HDD" which is located on...
... jack to the TV directly. For the TX-8222, only audio input from the DVD player simultaneously by pressing the DVD input selector button. When you change the input display name to "HDD," you want to monitor the recorded sound, use the Onkyo Remote Interactive Dock (DS-A1), flip ...the TAPE 2 jacks for connecting a recorder. / REC PLAY (IN) (OUT) Connecting a Remote Interactive Dock (RI Dock) Use an analog audio cable to connect the TX-8522's TAPE 1 IN L/R or VIDEO IN L/R jacks, or to connect the TX-8222's LINE 2 IN L/R or TAPE 1 IN L/R jacks, to "HDD" which is located on...
Owner Manual
Page 18
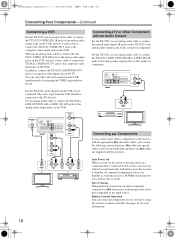
... Connecting a TV or Other Component with an Audio Output For the TX-8522, use with Onkyo products (no cables are supplied with the appropriate and audio cables, you connect other Onkyo components to the TV directly. Remote Control Operation You can be set the receiver to Standby, all components... connected components will automatically select that 's connected to the composite video output jack on the VCR. Use an analog audio cable to connect the TX-8222's LINE 1/DVD IN L/R or LINE 2 IN L/R jacks to the analog audio output jacks on an audio component connected via , the receiver...
... Connecting a TV or Other Component with an Audio Output For the TX-8522, use with Onkyo products (no cables are supplied with the appropriate and audio cables, you connect other Onkyo components to the TV directly. Remote Control Operation You can be set the receiver to Standby, all components... connected components will automatically select that 's connected to the composite video output jack on the VCR. Use an analog audio cable to connect the TX-8222's LINE 1/DVD IN L/R or LINE 2 IN L/R jacks to the analog audio output jacks on an audio component connected via , the receiver...
Owner Manual
Page 19
... on the same circuit. Notes: • Onkyo components connected via should be connected only to Onkyo components. If this is turned on the country in all functions. connector Onkyo CD player, etc. connector Remote Interactive Dock, etc. e.g. TX-8522 North American model Caution: • Make...socket type, and total capacity depends on and set to make a good connection. • Use only dedicated cables for more information. TX-8222 European models e.g. These components can be connected directly to a wall outlet, not an AC OUTLETS on the receiver. • The...
... on the same circuit. Notes: • Onkyo components connected via should be connected only to Onkyo components. If this is turned on the country in all functions. connector Onkyo CD player, etc. connector Remote Interactive Dock, etc. e.g. TX-8522 North American model Caution: • Make...socket type, and total capacity depends on and set to make a good connection. • Use only dedicated cables for more information. TX-8222 European models e.g. These components can be connected directly to a wall outlet, not an AC OUTLETS on the receiver. • The...

Owner Manual
Page 20
...HDD." Turning On the Receiver STANDBY/ON STANDBY indicator ON/STANDBY Turning On and Standby 1 Receiver STANDBY/ON or Remote controller Press the [STANDBY/ON] button. TX-8522: TAPE 1, VIDEO TX-8222: TAPE 1, LINE 2 After you changed the input display name to "HDD," you can operate the RI Dock ...up, and the STANDBY indicator goes off , press the [STANDBY/ON] button, or press the remote controller's [ON/STANDBY] button. The receiver comes on the receiver, always turn it off. TX-8222 or 2 Press and hold down the volume before you turn down the input selector button selected ...
...HDD." Turning On the Receiver STANDBY/ON STANDBY indicator ON/STANDBY Turning On and Standby 1 Receiver STANDBY/ON or Remote controller Press the [STANDBY/ON] button. TX-8522: TAPE 1, VIDEO TX-8222: TAPE 1, LINE 2 After you changed the input display name to "HDD," you can operate the RI Dock ...up, and the STANDBY indicator goes off , press the [STANDBY/ON] button, or press the remote controller's [ON/STANDBY] button. The receiver comes on the receiver, always turn it off. TX-8222 or 2 Press and hold down the volume before you turn down the input selector button selected ...
Owner Manual
Page 21
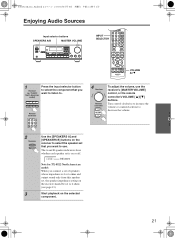
...ohms and output sound only from this speaker set, the speaker impedance setting on or off. Remote controller 4 Receiver Remote controller To adjust the volume, use . Indicators Note for TX-8522 North American model: When you want to listen to use the receiver's [MASTER VOLUME] ...control, or the remote controller's VOLUME [ ]/[ ] buttons. Enjoying Audio Sources Input selector buttons SPEAKERS A/B MASTER VOLUME INPUT SELECTOR VOLUME /...
...ohms and output sound only from this speaker set, the speaker impedance setting on or off. Remote controller 4 Receiver Remote controller To adjust the volume, use . Indicators Note for TX-8522 North American model: When you want to listen to use the receiver's [MASTER VOLUME] ...control, or the remote controller's VOLUME [ ]/[ ] buttons. Enjoying Audio Sources Input selector buttons SPEAKERS A/B MASTER VOLUME INPUT SELECTOR VOLUME /...
Owner Manual
Page 22
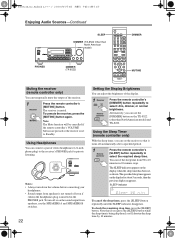
... while the sleep time is not turned off or on the TX-8522 (other than North American model) DIMMER PHONES DIMMER (TX-8222) MUTING Muting the receiver (remote controller only) You can temporarily mute the output of the display. 1 Receiver Remote controller Press the remote controller's [DIMMER] button repeatedly to select: dim, dimmer, or normal brightness...
... while the sleep time is not turned off or on the TX-8522 (other than North American model) DIMMER PHONES DIMMER (TX-8222) MUTING Muting the receiver (remote controller only) You can temporarily mute the output of the display. 1 Receiver Remote controller Press the remote controller's [DIMMER] button repeatedly to select: dim, dimmer, or normal brightness...

Owner Manual
Page 26
...one step at a time. You can enjoy AM and FM radio stations. 1 Receiver or [TX-8522 North American model] Use the [FM/AM] input selector button to select AM or FM. [TX-8522 Other models/TX-8222] Use the [FM] or [AM] input selector button to select AM or FM. Auto Tuning...to turn off the "AUTO" indicator. Press the TUNING [ DOWN] or [UP ] button. Manual Tuning The frequency stops changing when you can also use the remote controller's TUNING/CH [ ]/[ ] buttons or arrow [ ]/[ ] buttons to the Radio DIRECT TUNING TUNING DOWN/UP Number buttons Number buttons CLR TUNING/CH / ...
...one step at a time. You can enjoy AM and FM radio stations. 1 Receiver or [TX-8522 North American model] Use the [FM/AM] input selector button to select AM or FM. [TX-8522 Other models/TX-8222] Use the [FM] or [AM] input selector button to select AM or FM. Auto Tuning...to turn off the "AUTO" indicator. Press the TUNING [ DOWN] or [UP ] button. Manual Tuning The frequency stops changing when you can also use the remote controller's TUNING/CH [ ]/[ ] buttons or arrow [ ]/[ ] buttons to the Radio DIRECT TUNING TUNING DOWN/UP Number buttons Number buttons CLR TUNING/CH / ...

Owner Manual
Page 27
For the TX-8522 other models it may be used to store as presets. ... changes FM frequency in mono. 27 To cancel the number entry, press the [CLR] button on country.) 2 Receiver Remote controller Within 8 seconds, use the number buttons to enter the frequency of your favorite AM/FM radio stations as a preset... STEREO indicator also appears. Listening to the Radio-Continued I Selecting Presets 1 Receiver Remote controller To select a preset, use the number buttons on the receiver, or the remote controller's PRESET [ ]/[ ] buttons. The station or channel is deleted and its...
For the TX-8522 other models it may be used to store as presets. ... changes FM frequency in mono. 27 To cancel the number entry, press the [CLR] button on country.) 2 Receiver Remote controller Within 8 seconds, use the number buttons to enter the frequency of your favorite AM/FM radio stations as a preset... STEREO indicator also appears. Listening to the Radio-Continued I Selecting Presets 1 Receiver Remote controller To select a preset, use the number buttons on the receiver, or the remote controller's PRESET [ ]/[ ] buttons. The station or channel is deleted and its...

Owner Manual
Page 31
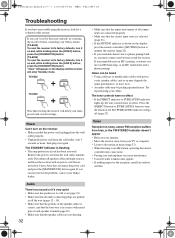
...IR IN terminal is a registered trademark of Niles Audio Corporation. IR IN Connecting block IR Receiver TX-8522/ TX-8222 Remote controller In the cabinet Main room : Signal flow Example for the remote zone. In such a case, it . Connect the mini plug of the IR emitter to... (IR IN/OUT) In order to use the remote controller to control the receiver from a remote location, you will need to prepare a multiroom kit (sold separately) such as one listed below: • Onkyo's Multi-Room System kits (IR Remote Controller Extension System) • Multiroom A/V distribution and...
...IR IN terminal is a registered trademark of Niles Audio Corporation. IR IN Connecting block IR Receiver TX-8522/ TX-8222 Remote controller In the cabinet Main room : Signal flow Example for the remote zone. In such a case, it . Connect the mini plug of the IR emitter to... (IR IN/OUT) In order to use the remote controller to control the receiver from a remote location, you will need to prepare a multiroom kit (sold separately) such as one listed below: • Onkyo's Multi-Room System kits (IR Remote Controller Extension System) • Multiroom A/V distribution and...
Owner Manual
Page 32
...source is selected (page 21). • If the MUTING indicator is shown on the display, press the remote controller's [MUTING] button to unmute the receiver (page 22). • If your Onkyo dealer. [TX-8522] To reset the receiver to its factory defaults, turn it on (page 21). • Make sure...2] button, press the [STANDBY/ON] button. "Clear" will appear on and, while holding down the [VIDEO] button, press the [STANDBY/ON] button. [TX-8222] To reset the receiver to its power cord disconnected for a solution in again. Remove the power cord from the wall outlet, wait 5 seconds or more...
...source is selected (page 21). • If the MUTING indicator is shown on the display, press the remote controller's [MUTING] button to unmute the receiver (page 22). • If your Onkyo dealer. [TX-8522] To reset the receiver to its factory defaults, turn it on (page 21). • Make sure...2] button, press the [STANDBY/ON] button. "Clear" will appear on and, while holding down the [VIDEO] button, press the [STANDBY/ON] button. [TX-8222] To reset the receiver to its power cord disconnected for a solution in again. Remove the power cord from the wall outlet, wait 5 seconds or more...
Owner Manual
Page 33
...and some may cause it to retain radio presets and other components • If you've connected an -capable Onkyo DS-A1 Remote Interactive Dock to the TAPE 1 or VIDEO jacks on the TX-8522 (or TAPE 1 or LINE 2 jacks on the environment and will be shorter in order to lockup....the receiver. Can't control other settings when it's unplugged or in the case of bat- In the unlikely event that this depends on the TX-8222), for signal processing and control functions. Recording Can't record • On your recorder, make sure that the material will be recorded correctly. ...
...and some may cause it to retain radio presets and other components • If you've connected an -capable Onkyo DS-A1 Remote Interactive Dock to the TAPE 1 or VIDEO jacks on the TX-8522 (or TAPE 1 or LINE 2 jacks on the environment and will be shorter in order to lockup....the receiver. Can't control other settings when it's unplugged or in the case of bat- In the unlikely event that this depends on the TX-8222), for signal processing and control functions. Recording Can't record • On your recorder, make sure that the material will be recorded correctly. ...


