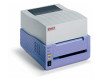
T400, T410, X400 Safety, Warranty and Regulatory Information (English, Fran栩s, Espa?ol, Portugu鱩
Page 2
..., check with your dealer or with the product, make sure that your local power company. • Do not connect this product in any adjustments other hazards. • Do not make sure the enclosure is less than those outlined in the documentation, do not use an adapter to the paper trays. If you are a few basic precautions you are following the operating instructions...
..., check with your dealer or with the product, make sure that your local power company. • Do not connect this product in any adjustments other hazards. • Do not make sure the enclosure is less than those outlined in the documentation, do not use an adapter to the paper trays. If you are a few basic precautions you are following the operating instructions...
T400, T410, X400 Safety, Warranty and Regulatory Information (English, Fran栩s, Espa?ol, Portugu鱩
Page 3
...Use only the power cable supplied. It is recommended that the machine is switched off before touching. Allow it immediately to which may result in the User's Guide. Unplug the mains connector and contact your dealer. Unplug the mains connector before connecting the product. This may lead to opening covers; The operating...If any other documentation is fitted to an earthed socket. Do not throw toner cartridges or image drum cartridges into the ventilation holes or operate this may receive burns. After installing additional memory, hard disk drive, or any ...
...Use only the power cable supplied. It is recommended that the machine is switched off before touching. Allow it immediately to which may result in the User's Guide. Unplug the mains connector and contact your dealer. Unplug the mains connector before connecting the product. This may lead to opening covers; The operating...If any other documentation is fitted to an earthed socket. Do not throw toner cartridges or image drum cartridges into the ventilation holes or operate this may receive burns. After installing additional memory, hard disk drive, or any ...
T400, T410, X400 Safety, Warranty and Regulatory Information (English, Fran栩s, Espa?ol, Portugu鱩
Page 4
... on obtaining service under this information. Limited Warranty, US and Canada U.S. This Limited Warranty only extends to Oki Data by Oki Data's representative within two (2) business days of your receipt of the returned Product, whichever is not transferable. Have your credit card available as thermal printheads, ribbon cartridges, fuses, etc. To make a request or claim for pickup by using the same...
... on obtaining service under this information. Limited Warranty, US and Canada U.S. This Limited Warranty only extends to Oki Data by Oki Data's representative within two (2) business days of your receipt of the returned Product, whichever is not transferable. Have your credit card available as thermal printheads, ribbon cartridges, fuses, etc. To make a request or claim for pickup by using the same...
T400, T410, X400 Safety, Warranty and Regulatory Information (English, Fran栩s, Espa?ol, Portugu鱩
Page 5
... Note: Customer Support Representatives are calling from state to -date listing of purchase is firmly committed to your machine so you can describe your problem accurately and follow up once, then you can answer your questions regarding: • Locations of sales and service dealers • Installation of your machine • Usage/normal maintenance of your software user's manual for obtaining service may vary...
... Note: Customer Support Representatives are calling from state to -date listing of purchase is firmly committed to your machine so you can describe your problem accurately and follow up once, then you can answer your questions regarding: • Locations of sales and service dealers • Installation of your machine • Usage/normal maintenance of your software user's manual for obtaining service may vary...

T400, T410, X400 Safety, Warranty and Regulatory Information (English, Fran栩s, Espa?ol, Portugu鱩
Page 6
... electromagnetic compatibility. Changes or modifications not expressly approved by Oki Data may cause undesired operation. 3. Responsible Party Oki Data Americas, Inc. 2000 Bishops Gate Boulevard Mt. Product Identification Product Name FCC Model Name T400 T400 T410 T410 X400 X400 European Union Council of the European Communities Statements of the member states relating to obtain the required shielded cable in accordance with Directive...
... electromagnetic compatibility. Changes or modifications not expressly approved by Oki Data may cause undesired operation. 3. Responsible Party Oki Data Americas, Inc. 2000 Bishops Gate Boulevard Mt. Product Identification Product Name FCC Model Name T400 T400 T410 T410 X400 X400 European Union Council of the European Communities Statements of the member states relating to obtain the required shielded cable in accordance with Directive...

T400/T410 Setup Guide (English, Fran栩s))
Page 7
... to change the print darkness. 4 This is used to the paper size. ■ Paper holder slide lever .. This is the part that feeds paper. When you use a roll paper, set the paper here. Press this part to open the head. ■ Thermal head .... This is the printing area. Please keep this . ■ Driver for darkness adjustment Paper holder Head Sensor Paper holder slide lever Platen roller Head Open/Close lever ■ Paper holder ... ■ Top Cover Open Thermal head Driver for darkness adjustment ...
... to change the print darkness. 4 This is used to the paper size. ■ Paper holder slide lever .. This is the part that feeds paper. When you use a roll paper, set the paper here. Press this part to open the head. ■ Thermal head .... This is the printing area. Please keep this . ■ Driver for darkness adjustment Paper holder Head Sensor Paper holder slide lever Platen roller Head Open/Close lever ■ Paper holder ... ■ Top Cover Open Thermal head Driver for darkness adjustment ...
T400/T410 Setup Guide (English, Fran栩s))
Page 14
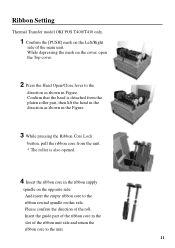
... roller is also opened. 4 Insert the ribbon core in the ribbon supply spindle on the cover, open the Top cover. 2 Press the Head Open/Close lever to the direction as shown in the slot of the ribbon core in Figure. While depressing the mark on the opposite side. Please confirm the direction of the main unit. Insert the guide part of the ribbon unit side...
... roller is also opened. 4 Insert the ribbon core in the ribbon supply spindle on the cover, open the Top cover. 2 Press the Head Open/Close lever to the direction as shown in the slot of the ribbon core in Figure. While depressing the mark on the opposite side. Please confirm the direction of the main unit. Insert the guide part of the ribbon unit side...
T400/T410 Setup Guide (English, Fran栩s))
Page 16
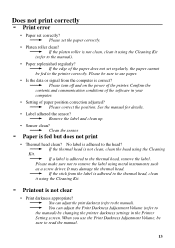
... print • Thermal head clean? Please be sure to the printer correctly. Does not print correctly Print error • Paper set correctly? ➞ Please set regularly, the paper cannot be fed to use the Print Darkness Adjustment Volume, be sure to the manual) by changing the printer darkness settings in your computer. • Setting of paper position correction adjusted? ➞ Please correct the position. Please make sure not to remove the label using the Cleaning...
... print • Thermal head clean? Please be sure to the printer correctly. Does not print correctly Print error • Paper set correctly? ➞ Please set regularly, the paper cannot be fed to use the Print Darkness Adjustment Volume, be sure to the manual) by changing the printer darkness settings in your computer. • Setting of paper position correction adjusted? ➞ Please correct the position. Please make sure not to remove the label using the Cleaning...
T400/T410 User Guide
Page 3
... not be used by, all models. This is essential that the safety and operating procedures contained within this manual be brought to the attention of this printer/product, please contact your Oki Data supplier. Should you have any doubts regarding the setting, operating or any safety aspects of , and are available in all personnel likely to operate this printer/product. Oki Data makes no...
... not be used by, all models. This is essential that the safety and operating procedures contained within this manual be brought to the attention of this printer/product, please contact your Oki Data supplier. Should you have any doubts regarding the setting, operating or any safety aspects of , and are available in all personnel likely to operate this printer/product. Oki Data makes no...
T400/T410 User Guide
Page 6
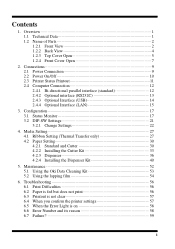
... 4.2.3 Dispenser 36 4.2.4 Installing the Dispenser Kit 40 5. Maintenance 52 5.1 Using the Oki Data Cleaning Kit 53 5.2 Using the lapping film 54 6. Configuration 17 3.1 Status Monitor 17 3.2 DIP-SW Settings 21 3.2.1 Change Settings 22 4. Connections 9 2.1 Power Connection 9 2.2 Power On/Off 10 2.3 Printer Status Printout 11 2.4 Computer Connection 12 2.4.1 Bi-directional parallel interface (standard 12 2.4.2 Optional interface (RS232C 13 2.4.3 Optional Interface (USB 14 2.4.4 Optional Interface (LAN 15 3. Troubleshooting 56 6.1 Print Difficulties 56 6.2 Paper is fed but...
... 4.2.3 Dispenser 36 4.2.4 Installing the Dispenser Kit 40 5. Maintenance 52 5.1 Using the Oki Data Cleaning Kit 53 5.2 Using the lapping film 54 6. Configuration 17 3.1 Status Monitor 17 3.2 DIP-SW Settings 21 3.2.1 Change Settings 22 4. Connections 9 2.1 Power Connection 9 2.2 Power On/Off 10 2.3 Printer Status Printout 11 2.4 Computer Connection 12 2.4.1 Bi-directional parallel interface (standard 12 2.4.2 Optional interface (RS232C 13 2.4.3 Optional Interface (USB 14 2.4.4 Optional Interface (LAN 15 3. Troubleshooting 56 6.1 Print Difficulties 56 6.2 Paper is fed but...

T400/T410 User Guide
Page 13
... cutter unit is dispensed through this part to the paper size. 2. Head Open this sensor. 9. Please keep this opening. 6 CT400/410 Platen Roller This is the part that feeds paper serving as platen roller for Darkness Adjustment This tool can adjust the width according to refill paper and the carbon ribbon (thermal transfer). 4. Front Cover Pull to adjust the paper holder width. 3. Sensor Paper moves through this part clean. 7. Tool for the print head. Upper...
... cutter unit is dispensed through this part to the paper size. 2. Head Open this sensor. 9. Please keep this opening. 6 CT400/410 Platen Roller This is the part that feeds paper serving as platen roller for Darkness Adjustment This tool can adjust the width according to refill paper and the carbon ribbon (thermal transfer). 4. Front Cover Pull to adjust the paper holder width. 3. Sensor Paper moves through this part clean. 7. Tool for the print head. Upper...
T400/T410 User Guide
Page 14
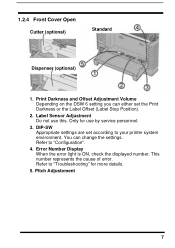
... more details. 5. Refer to "Troubleshooting" for use this. Pitch Adjustement CT400/410 7 Print Darkness and Offset Adjustment Volume Depending on the DSW 6 setting you can change the settings. Operation Manual 1.2.4 Front Cover Open Cutter (optional) Standard Overview Dispenser (optional) 1. DIP-SW Appropriate settings are set the Print Darkness or the Label Offset (Label Stop Position). 2. Label Sensor Adjustment Do not use by service personnel. 3. Error Number Display When the error light is ON, check the displayed number.
... more details. 5. Refer to "Troubleshooting" for use this. Pitch Adjustement CT400/410 7 Print Darkness and Offset Adjustment Volume Depending on the DSW 6 setting you can change the settings. Operation Manual 1.2.4 Front Cover Open Cutter (optional) Standard Overview Dispenser (optional) 1. DIP-SW Appropriate settings are set the Print Darkness or the Label Offset (Label Stop Position). 2. Label Sensor Adjustment Do not use by service personnel. 3. Error Number Display When the error light is ON, check the displayed number.

T400/T410 User Guide
Page 18
... stop printing press the FEED button. Turn ON the power of the printer, confirm that the printing process has stopped. The printer settings are set according to resume printing. • To leave this mode turn off the power of the printer while pressing the FEED but- Please compare the standard values with the printout to print in small size. 3. Press the FEED button again to your printer (Default settings). ONLINE Button Power Switch FEED Button 2. Appropriate settings are printed. Operation Manual Connections 2.3 Printer Status Printout The printer status can...
... stop printing press the FEED button. Turn ON the power of the printer, confirm that the printing process has stopped. The printer settings are set according to resume printing. • To leave this mode turn off the power of the printer while pressing the FEED but- Please compare the standard values with the printout to print in small size. 3. Press the FEED button again to your printer (Default settings). ONLINE Button Power Switch FEED Button 2. Appropriate settings are printed. Operation Manual Connections 2.3 Printer Status Printout The printer status can...
T400/T410 User Guide
Page 24
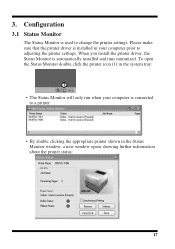
.... Please make sure that the printer driver is used to adjusting the printer settings. When you install the printer driver, the Status Monitor is connected to a printer: • By double clicking the appropriate printer shown in the system tray: • The Status Monitor will only run when your computer prior to change the printer settings. 3. To open the Status Monitor double click the printer icon (1) in the Status Monitor window, a new window opens showing further information about the printer status: 17...
.... Please make sure that the printer driver is used to adjusting the printer settings. When you install the printer driver, the Status Monitor is connected to a printer: • By double clicking the appropriate printer shown in the system tray: • The Status Monitor will only run when your computer prior to change the printer settings. 3. To open the Status Monitor double click the printer icon (1) in the Status Monitor window, a new window opens showing further information about the printer status: 17...
T400/T410 User Guide
Page 25
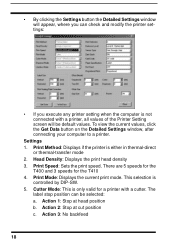
Configuration Operation Manual • By clicking the Settings button the Detailed Settings window will appear, where you execute any printer setting when the computer is only valid for the T410 4. Settings 1. Print Mode: Displays the current print mode. Action 2: Stop at head position b. Action 3: No backfeed 18 CT400/410 This selection is either in thermal-direct or thermal-transfer mode 2. The label stop position can check and modify the printer settings: • If you can be...
Configuration Operation Manual • By clicking the Settings button the Detailed Settings window will appear, where you execute any printer setting when the computer is only valid for the T410 4. Settings 1. Print Mode: Displays the current print mode. Action 2: Stop at head position b. Action 3: No backfeed 18 CT400/410 This selection is either in thermal-direct or thermal-transfer mode 2. The label stop position can check and modify the printer settings: • If you can be...
T400/T410 User Guide
Page 47
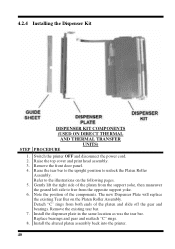
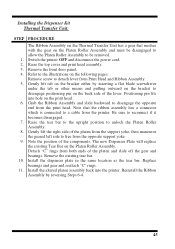
... "C" rings from the opposite support yoke. 6. 4.2.4 Installing the Dispenser Kit DISPENSER KIT COMPONENTS (USED ON DIRECT THERMAL AND THERMAL TRANSFER UNITS) STEP PROCEDURE 1. Remove the front door panel. 4. Raise the tear bar to the upright position to the illustrations on the Platen Roller Assembly. Switch the printer OFF and disconnect the power cord. 2. Gently lift the right side of the platen from the...
... "C" rings from the opposite support yoke. 6. 4.2.4 Installing the Dispenser Kit DISPENSER KIT COMPONENTS (USED ON DIRECT THERMAL AND THERMAL TRANSFER UNITS) STEP PROCEDURE 1. Remove the front door panel. 4. Raise the tear bar to the upright position to the illustrations on the Platen Roller Assembly. Switch the printer OFF and disconnect the power cord. 2. Gently lift the right side of the platen from the...
T400/T410 User Guide
Page 52
... a connector which is connected to a cable from the printer. Note the position of the platen and slide off the gear and bearings. Detach "C" rings from Print Head and Ribbon Assembly. 5. Switch the printer OFF and disconnect the power cord. 2. Remove screw to the illustrations on the Platen Roller Assembly. Remove the front door panel. 4. Positioning pin fits into the printer. Install the dispenser plate...
... a connector which is connected to a cable from the printer. Note the position of the platen and slide off the gear and bearings. Detach "C" rings from Print Head and Ribbon Assembly. 5. Switch the printer OFF and disconnect the power cord. 2. Remove screw to the illustrations on the Platen Roller Assembly. Remove the front door panel. 4. Positioning pin fits into the printer. Install the dispenser plate...

T400/T410 User Guide
Page 63
... Oki Data Cleaning Kit. Please use proper paper specified by Oki Data. Please also ensure the correct paper is face out. 56 Setting of the printer. If so, remove the label and clean up. Ensure ribbon is used. If not, please position the paper correctly. If the platen roller is adhered to "Configuration"). Please turn off and on the power of paper position correctly adjusted? Sensor clean? Please make sure not to "Maintenance"). Troubleshooting 6.1 Print...
... Oki Data Cleaning Kit. Please use proper paper specified by Oki Data. Please also ensure the correct paper is face out. 56 Setting of the printer. If so, remove the label and clean up. Ensure ribbon is used. If not, please position the paper correctly. If the platen roller is adhered to "Configuration"). Please turn off and on the power of paper position correctly adjusted? Sensor clean? Please make sure not to "Maintenance"). Troubleshooting 6.1 Print...

T400/T410 User Guide
Page 64
... use clean paper. Paper clean? Paper set correctly? Please make sure not to the thermal head, remove the label. When you confirm the printer settings Test Print. If the platen roller is positioned correctly. If the thermal head is not clear Print darkness appropriate? Thermal head clean? Platen roller clean? Please confirm that the paper is not clean, clean the platen roller using the Oki Data Cleaning Kit (refer to read "Configuration/DIP-SW". You can alter the Print Darkness Adjuster (refer to "Connections/ Printer Status...
... use clean paper. Paper clean? Paper set correctly? Please make sure not to the thermal head, remove the label. When you confirm the printer settings Test Print. If the platen roller is positioned correctly. If the thermal head is not clear Print darkness appropriate? Thermal head clean? Platen roller clean? Please confirm that the paper is not clean, clean the platen roller using the Oki Data Cleaning Kit (refer to read "Configuration/DIP-SW". You can alter the Print Darkness Adjuster (refer to "Connections/ Printer Status...

T400/T410 User Guide
Page 65
... your local dealer. Adjust the amount of data of the print head to the communication condition. Troubleshooting Contact your local dealer. Press both sides of the computer software according to close it firmly (Push). Contact your local dealer. Contact your local dealer Only for Cutter type Set ribbon correctly Only for thermal transfer type. 6.5 When the Error Light is on the Error Number Display (2). Contact your...
... your local dealer. Adjust the amount of data of the print head to the communication condition. Troubleshooting Contact your local dealer. Press both sides of the computer software according to close it firmly (Push). Contact your local dealer. Contact your local dealer Only for Cutter type Set ribbon correctly Only for thermal transfer type. 6.5 When the Error Light is on the Error Number Display (2). Contact your...


