
English:OKIPAGE 14e Setup Guide
Page 6
...of 20-80% • No direct sunlight Visit the Oki Data Web Site Register your printer and create your own personalized support center with my.okidata.com. Simply click on Product Registration. SeOttvienrgviUepwYour Printer Selecting a Location for Your Printer • A firm surface such as a table or ...• Room temperature of 50° to 90°F (10° to your printer. You can also register your printer • By filling out the enclosed registration form and mailing it or faxing it in. | E-6 OKIPAGE 14e To register: • Visit our website at http://www.okidata.com.
...of 20-80% • No direct sunlight Visit the Oki Data Web Site Register your printer and create your own personalized support center with my.okidata.com. Simply click on Product Registration. SeOttvienrgviUepwYour Printer Selecting a Location for Your Printer • A firm surface such as a table or ...• Room temperature of 50° to 90°F (10° to your printer. You can also register your printer • By filling out the enclosed registration form and mailing it or faxing it in. | E-6 OKIPAGE 14e To register: • Visit our website at http://www.okidata.com.
English:OKIPAGE 14e Setup Guide
Page 7
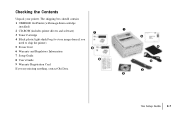
The shipping box should contain: 1 OKIPAGE 14e Printer (with image drum cartridge installed) 2 CD-ROM (includes printer drivers and software) 3 Toner Cartridge 4 Black plastic light-shield bag (to store image drum if you need to ship the printer) 5 Power Cord 6 Warranty and Regulatory Information 7 Setup Guide 8 User's Guide 9 Warranty Registration Card If you are missing anything, contact Oki Data. | 14e Setup Guide E-7 Checking the Contents Unpack your printer.
The shipping box should contain: 1 OKIPAGE 14e Printer (with image drum cartridge installed) 2 CD-ROM (includes printer drivers and software) 3 Toner Cartridge 4 Black plastic light-shield bag (to store image drum if you need to ship the printer) 5 Power Cord 6 Warranty and Regulatory Information 7 Setup Guide 8 User's Guide 9 Warranty Registration Card If you are missing anything, contact Oki Data. | 14e Setup Guide E-7 Checking the Contents Unpack your printer.

English:OKIPAGE 14e Setup Guide
Page 8
... 8 Image Drum will fit in this unit (Part# 41331601). | E-8 OKIPAGE 14e OTHER ENV ! Do not touch the drum's green surface or remove the sponge. 4 Reinstall the cartridge into the printer. Remove the Image Drum Protective Paper 1 Press the cover release button and lift the cover READY MAN FEED ATTENTION DATA LETTER LEGAL A4...
... 8 Image Drum will fit in this unit (Part# 41331601). | E-8 OKIPAGE 14e OTHER ENV ! Do not touch the drum's green surface or remove the sponge. 4 Reinstall the cartridge into the printer. Remove the Image Drum Protective Paper 1 Press the cover release button and lift the cover READY MAN FEED ATTENTION DATA LETTER LEGAL A4...
English:OKIPAGE 14e Setup Guide
Page 10
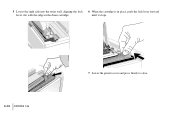
until it stops. 5 Lower the right side into the toner well, aligning the lock 6 When the cartridge is in place, push the lock lever forward lever slot with the ridge in the drum cartridge. PUSH | E-10 OKIPAGE 14e 7 Lower the printer cover and press firmly to close.
until it stops. 5 Lower the right side into the toner well, aligning the lock 6 When the cartridge is in place, push the lock lever forward lever slot with the ridge in the drum cartridge. PUSH | E-10 OKIPAGE 14e 7 Lower the printer cover and press firmly to close.
English:OKIPAGE 14e Setup Guide
Page 14
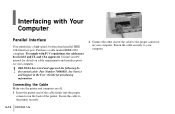
... and UL and CSA approved. OKI DATA has tested and approved the following bidirectional cable: Part Number 70000803. Purchase a cable marked IEEE 1284 compliant. Consult your PC manual for purchasing information. 2 Connect the other end of the printer. Fasten the cable securely to the printer securely. | E-14 OKIPAGE 14e See Service and Support in the...
... and UL and CSA approved. OKI DATA has tested and approved the following bidirectional cable: Part Number 70000803. Purchase a cable marked IEEE 1284 compliant. Consult your PC manual for purchasing information. 2 Connect the other end of the printer. Fasten the cable securely to the printer securely. | E-14 OKIPAGE 14e See Service and Support in the...

English:OKIPAGE 14e Setup Guide
Page 16
...; Windows 2000 • Windows 98 • Windows NT 4.0 • Windows 95 | E-16 OKIPAGE 14e PrOinvteerrviSeowftware The CD-ROM provided with your computer system. Printer Drivers Printer drivers must be installed so your software application can communicate with your printer includes printer drivers and the on-screen printer status monitor and operator panel required to install the appropriate...
...; Windows 2000 • Windows 98 • Windows NT 4.0 • Windows 95 | E-16 OKIPAGE 14e PrOinvteerrviSeowftware The CD-ROM provided with your computer system. Printer Drivers Printer drivers must be installed so your software application can communicate with your printer includes printer drivers and the on-screen printer status monitor and operator panel required to install the appropriate...

English:OKIPAGE 14e Setup Guide
Page 17
... page 21 | 14e Setup Guide E-17 See page 22 for instructions to the printer's operator panel. Then proceed to the page listed for information on using the Status Monitor. Installing Printer Software Determine your computer's interface connection and operating system. Status Monitor The status monitor program allows you to monitor and configure an OKIPAGE 14e.
... page 21 | 14e Setup Guide E-17 See page 22 for instructions to the printer's operator panel. Then proceed to the page listed for information on using the Status Monitor. Installing Printer Software Determine your computer's interface connection and operating system. Status Monitor The status monitor program allows you to monitor and configure an OKIPAGE 14e.

English:OKIPAGE 14e Setup Guide
Page 18
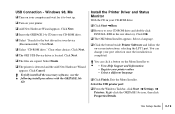
...-click INSTALL.EXE in the root directory, click OK. Parallel Connection - G Select a language. G Click the button beside Printer Software and follow the on the Menu Installer to boot up. G Insert the OKIPAGE 14e CD into your printer. G Found New Hardware Wizard appears. G Browse to complete the installation. ! You can click a button on -screen instructions...
...-click INSTALL.EXE in the root directory, click OK. Parallel Connection - G Select a language. G Click the button beside Printer Software and follow the on the Menu Installer to boot up. G Insert the OKIPAGE 14e CD into your printer. G Found New Hardware Wizard appears. G Browse to complete the installation. ! You can click a button on -screen instructions...
English:OKIPAGE 14e Setup Guide
Page 19
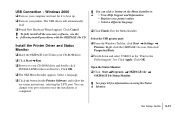
...: G From the Windows Taskbar, click Start → Settings → Printers. G Insert the OKIPAGE 14e CD into your device (Recommended)." USB Connection - G Turn on -screen instructions, selecting the LPT1 port. Clear other choices. Click Cancel. ! G The OKI Menu Installer appears. Install the Printer Driver and Status Monitor With the CD in the root directory. Click OK...
...: G From the Windows Taskbar, click Start → Settings → Printers. G Insert the OKIPAGE 14e CD into your device (Recommended)." USB Connection - G Turn on -screen instructions, selecting the LPT1 port. Clear other choices. Click Cancel. ! G The OKI Menu Installer appears. Install the Printer Driver and Status Monitor With the CD in the root directory. Click OK...
English:OKIPAGE 14e Setup Guide
Page 21
... : • View Help Support and Information • Register your printer. G Browse to boot up. You can change your CD-ROM drive. G The OKI Menu Installer appears. Right-click the OKIPAGE 14e icon, then click Properties\Ports. Open the Status Monitor: G Click Start →Programs → OKIPAGE 14e → OKIPAGE 14e Status Monitor. ! Click Apply. Click Cancel. ! To fully...
... : • View Help Support and Information • Register your printer. G Browse to boot up. You can change your CD-ROM drive. G The OKI Menu Installer appears. Right-click the OKIPAGE 14e icon, then click Properties\Ports. Open the Status Monitor: G Click Start →Programs → OKIPAGE 14e → OKIPAGE 14e Status Monitor. ! Click Apply. Click Cancel. ! To fully...

English:OKIPAGE 14e Setup Guide
Page 22
... on -screen operator panel. ! Three tabs include the following information: • Printer State - (shown here) shows the printer status and current job status. • Printer Setup - Click the Help button for information on status monitor troubleshooting. | E-22 OKIPAGE 14e Refer to the Printer Setup dialog (printer driver control). • Preferences - Using the Status Monitor With the status...
... on -screen operator panel. ! Three tabs include the following information: • Printer State - (shown here) shows the printer status and current job status. • Printer Setup - Click the Help button for information on status monitor troubleshooting. | E-22 OKIPAGE 14e Refer to the Printer Setup dialog (printer driver control). • Preferences - Using the Status Monitor With the status...

English:OKIPAGE 14e Setup Guide
Page 24
... Save 1 Open the Status Monitor. 2 Select the Printer Setup tab. 3 Click the Printer Menu button. 4 Select the Maintenance 2 tab. 5 Under Setting Power Save, click the Setting button. 6 Clear in the Printer Menu Setup: 1 From the Windows Taskbar, open the Windows Programs list. 2 Choose OKIPAGE 14e and click OKIPAGE 14e Status Monitor. Using Power Save to delay power...
... Save 1 Open the Status Monitor. 2 Select the Printer Setup tab. 3 Click the Printer Menu button. 4 Select the Maintenance 2 tab. 5 Under Setting Power Save, click the Setting button. 6 Clear in the Printer Menu Setup: 1 From the Windows Taskbar, open the Windows Programs list. 2 Choose OKIPAGE 14e and click OKIPAGE 14e Status Monitor. Using Power Save to delay power...
English:OKIPAGE 14e Setup Guide
Page 25
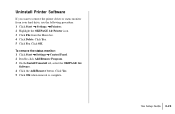
... Yes. 5 Click OK when removal is complete. | 14e Setup Guide E-25 Click Yes. 5 Click Yes. Click OK. Uninstall Printer Software If you want to remove the printer driver or status monitor from your hard drive, use the following procedure: 1 Click Start → Settings → Printers 2 Highlight the OKIPAGE 14e Printer icon. 3 Click File from the Menu bar...
... Yes. 5 Click OK when removal is complete. | 14e Setup Guide E-25 Click Yes. 5 Click Yes. Click OK. Uninstall Printer Software If you want to remove the printer driver or status monitor from your hard drive, use the following procedure: 1 Click Start → Settings → Printers 2 Highlight the OKIPAGE 14e Printer icon. 3 Click File from the Menu bar...
English:OKIPAGE 14e Setup Guide
Page 27
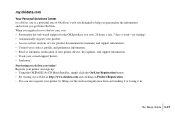
... filling out the enclosed registration form and mailing it or faxing it in. | 14e Setup Guide E-27 Register your printer and sign up: • Using the OKIPAGE 14e CD Menu Installer, simply click the On-Line Registration button. • By visiting our website at http://www.okidata.com and clicking on -line versions ... also register your e-mail support history. • And more... When you register for my.okidata.com, you: • Personalize the web-based support for the OKI products you get from Oki Data. Start using my.okidata.com today!
... filling out the enclosed registration form and mailing it or faxing it in. | 14e Setup Guide E-27 Register your printer and sign up: • Using the OKIPAGE 14e CD Menu Installer, simply click the On-Line Registration button. • By visiting our website at http://www.okidata.com and clicking on -line versions ... also register your e-mail support history. • And more... When you register for my.okidata.com, you: • Personalize the web-based support for the OKI products you get from Oki Data. Start using my.okidata.com today!
English:OKIPAGE 14e User's Guide
Page 3
Contents Features 5 Consumables 5 Options 6 Operating Your Printer 7 Using the Front Operator Panel 7 OKIPAGE 14e Front Operator Panel Reference .......... 8 OKIPAGE 14e Function Reference 12 Changing the Menu Settings 14 Using the Printer Menu Setup 14 Resetting the Menu 15 Using Power Save to Minimize Warm-up ...Envelopes 19 Printing Transparencies and Adhesive Labels ..... 19 Guidelines for Transparencies and Labels 20 Using Recycled Print Media 20 Printer Maintenance 22 Replacing The Toner Cartridge 22 Toner Cartridge Life 23 Replacing the Image Drum Cartridge 23 Reset the ...
Contents Features 5 Consumables 5 Options 6 Operating Your Printer 7 Using the Front Operator Panel 7 OKIPAGE 14e Front Operator Panel Reference .......... 8 OKIPAGE 14e Function Reference 12 Changing the Menu Settings 14 Using the Printer Menu Setup 14 Resetting the Menu 15 Using Power Save to Minimize Warm-up ...Envelopes 19 Printing Transparencies and Adhesive Labels ..... 19 Guidelines for Transparencies and Labels 20 Using Recycled Print Media 20 Printer Maintenance 22 Replacing The Toner Cartridge 22 Toner Cartridge Life 23 Replacing the Image Drum Cartridge 23 Reset the ...

English:OKIPAGE 14e User's Guide
Page 8
OKIPAGE 14e Front Operator Panel Reference Ready (Green) Manual Feed (Amber) Error (Red) Meaning User Options/Switch Function on off off Ready off off off Off line blink off off Processing/receiving data slow blink: one blink every 4 seconds blink: one blink per second fast blink: several blinks per second • Quick press: takes printer off line • Quick press: ready • 2 second press: print demo page and menu page • 5 second press: print cleaning page • Quick press: pause printing (off line) | E-8 OKIPAGE 14e
OKIPAGE 14e Front Operator Panel Reference Ready (Green) Manual Feed (Amber) Error (Red) Meaning User Options/Switch Function on off off Ready off off off Off line blink off off Processing/receiving data slow blink: one blink every 4 seconds blink: one blink per second fast blink: several blinks per second • Quick press: takes printer off line • Quick press: ready • 2 second press: print demo page and menu page • 5 second press: print cleaning page • Quick press: pause printing (off line) | E-8 OKIPAGE 14e
English:OKIPAGE 14e User's Guide
Page 10
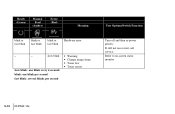
Ready (Green) Manual Feed (Amber) Error (Red) Meaning blink or fast blink blink or fast blink blink or fast blink Hardware error − − slow blink slow blink: one blink every 4 seconds blink: one blink per second fast blink: several blinks per second • Warning • Change image drum • Toner low • Toner sensor User Options/Switch Function Turn off and then re-power printer. Refer to on-screen status monitor | E-10 OKIPAGE 14e If still not recovered, call service.
Ready (Green) Manual Feed (Amber) Error (Red) Meaning blink or fast blink blink or fast blink blink or fast blink Hardware error − − slow blink slow blink: one blink every 4 seconds blink: one blink per second fast blink: several blinks per second • Warning • Change image drum • Toner low • Toner sensor User Options/Switch Function Turn off and then re-power printer. Refer to on-screen status monitor | E-10 OKIPAGE 14e If still not recovered, call service.

English:OKIPAGE 14e User's Guide
Page 14
... set in your computer. Operations and features set in your application software, will override printer menu settings. | E-14 OKIPAGE 14e Click the Help button for accessing the printer's menu from your application software will override Menu settings. Changing the Menu Settings The Menu provides a way to perform as an interactive software "front panel" ...
... set in your computer. Operations and features set in your application software, will override printer menu settings. | E-14 OKIPAGE 14e Click the Help button for accessing the printer's menu from your application software will override Menu settings. Changing the Menu Settings The Menu provides a way to perform as an interactive software "front panel" ...

English:OKIPAGE 14e User's Guide
Page 16
... print: • Envelopes • Labels • Transparencies • A special document not loaded in your software. 2 Pull down the manual feed tray. | E-16 OKIPAGE 14e Maintenance Menu The Maintenance Menu includes printer maintenance and operating functions. The menu prints. Using Special Print Media Use manual feed to print one letterhead page or special document...
... print: • Envelopes • Labels • Transparencies • A special document not loaded in your software. 2 Pull down the manual feed tray. | E-16 OKIPAGE 14e Maintenance Menu The Maintenance Menu includes printer maintenance and operating functions. The menu prints. Using Special Print Media Use manual feed to print one letterhead page or special document...

English:OKIPAGE 14e User's Guide
Page 18
3 Lift out the support bar. 4 Pull the manual feed tray down. | E-18 OKIPAGE 14e 5 Adjust the paper guides to the width of the media. 6 Insert the envelope − flap down and to the left − until the printer grips it. 7 Issue the print command in your software.
3 Lift out the support bar. 4 Pull the manual feed tray down. | E-18 OKIPAGE 14e 5 Adjust the paper guides to the width of the media. 6 Insert the envelope − flap down and to the left − until the printer grips it. 7 Issue the print command in your software.


