ML8810/8810n Setup Guide
Page 7
... a letter size or larger sheet of paper on the second line of available fonts. 1. F5-11a.jpg The sheet feeds in. Maximum Thickness: 0.0189" (0.48 mm) 7 Release them when RELEASE SW appears on the platform anywhere within the "Paper range when Auto Align is set at the factory for • single sheets/forms (Manual Feed) • Auto Align mode • automatic printhead gap (Auto Gap) Paper Specifications, for Use with Auto Align Mode Minimum Print Margins 1/4-inch (6.4 mm) on the printer. Maximum Length: 16...
... a letter size or larger sheet of paper on the second line of available fonts. 1. F5-11a.jpg The sheet feeds in. Maximum Thickness: 0.0189" (0.48 mm) 7 Release them when RELEASE SW appears on the platform anywhere within the "Paper range when Auto Align is set at the factory for • single sheets/forms (Manual Feed) • Auto Align mode • automatic printhead gap (Auto Gap) Paper Specifications, for Use with Auto Align Mode Minimum Print Margins 1/4-inch (6.4 mm) on the printer. Maximum Length: 16...

ML8810 Safety, Warranty, and Regulatory Information
Page 1
... or frayed, replace it has been printing for having your printer on the extension is well ventilated. • Do not use your printer from the routine maintenance described in the documentation. Do not touch the printhead until it has had a chance to avoid hurting yourself or damaging the printer. • Carefully read the provided setup and operating instructions. • Save all provided...
... or frayed, replace it has been printing for having your printer on the extension is well ventilated. • Do not use your printer from the routine maintenance described in the documentation. Do not touch the printhead until it has had a chance to avoid hurting yourself or damaging the printer. • Carefully read the provided setup and operating instructions. • Save all provided...
ML8810 Safety, Warranty, and Regulatory Information
Page 3
.... Customer's exclusive remedy under this printer to be free from date of the printer for work to solve your Oki Data Authorized service center or Oki Data at 1-800-OKI-DATA (1-800-654-3282) or at an authorized service center or authorized third party service organization. This warranty gives you specific legal rights, and you choose to use our Overnight Exchange service, call 1-800-654-3282 (1-800-OKI-DATA): our...
.... Customer's exclusive remedy under this printer to be free from date of the printer for work to solve your Oki Data Authorized service center or Oki Data at 1-800-OKI-DATA (1-800-654-3282) or at an authorized service center or authorized third party service organization. This warranty gives you specific legal rights, and you choose to use our Overnight Exchange service, call 1-800-654-3282 (1-800-OKI-DATA): our...

ML8810 Safety, Warranty, and Regulatory Information
Page 4
... use of their support. You can check your product, including: • Product news • Manuals • Drivers and utilities • Material Safety Data Sheets • Searchable knowledge base • and much more! Oki Data Authorized Service Providers For the most comprehensive, up on the suggestions of your own Personal Solutions Center providing up once, then you have the model number and serial number for service or support...
... use of their support. You can check your product, including: • Product news • Manuals • Drivers and utilities • Material Safety Data Sheets • Searchable knowledge base • and much more! Oki Data Authorized Service Providers For the most comprehensive, up on the suggestions of your own Personal Solutions Center providing up once, then you have the model number and serial number for service or support...
ML8810 User's Guide - English
Page 3
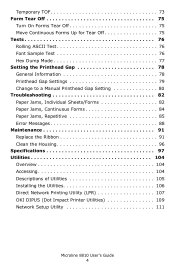
... (2 7 Rear View 8 Control Panel 9 Quick Reference: Control Panel Functions 15 Print Modes 16 Change Print Mode 16 Loading Print Media 17 Individual Sheets/Forms ("MANUAL 17 Continuous Forms ("FRONT 20 Switch between Single Sheets and Continuous Forms 23 The Printer Menu 25 Print the Menu 25 Navigating the Menu 26 Reset to Factory Defaults 29 Print the Menu 30 Menu Summary 33 Explanation of Menu Items 49 Auto Align 69 Disabling Auto Align 69 Set Top of Form (TOF 70 General Information 70 Use the Printer Menu 70 Use 1Chr Set Pos 71 Manual Feed (Single Sheets/Forms...
... (2 7 Rear View 8 Control Panel 9 Quick Reference: Control Panel Functions 15 Print Modes 16 Change Print Mode 16 Loading Print Media 17 Individual Sheets/Forms ("MANUAL 17 Continuous Forms ("FRONT 20 Switch between Single Sheets and Continuous Forms 23 The Printer Menu 25 Print the Menu 25 Navigating the Menu 26 Reset to Factory Defaults 29 Print the Menu 30 Menu Summary 33 Explanation of Menu Items 49 Auto Align 69 Disabling Auto Align 69 Set Top of Form (TOF 70 General Information 70 Use the Printer Menu 70 Use 1Chr Set Pos 71 Manual Feed (Single Sheets/Forms...
ML8810 User's Guide - English
Page 4
...Mode 77 Setting the Printhead Gap 78 General Information 78 Printhead Gap Settings 79 Change to a Manual Printhead Gap Setting 80 Troubleshooting 82 Paper Jams, Individual Sheets/Forms 82 Paper Jams, Continuous Forms 84 Paper Jams, Repetitive 85 Error Messages 88 Maintenance 91 Replace the Ribbon 91 Clean the Housing 96 Specifications 97 Utilities 104 Overview 104 Accessing 104 Descriptions of Utilities 105 Installing the Utilities 106 Direct Network Printing Utility (LPR 107 OKI DIPUS (Dot Impact Printer Utilities 109 Network Setup Utility 111 Microline 8810 User's Guide...
...Mode 77 Setting the Printhead Gap 78 General Information 78 Printhead Gap Settings 79 Change to a Manual Printhead Gap Setting 80 Troubleshooting 82 Paper Jams, Individual Sheets/Forms 82 Paper Jams, Continuous Forms 84 Paper Jams, Repetitive 85 Error Messages 88 Maintenance 91 Replace the Ribbon 91 Clean the Housing 96 Specifications 97 Utilities 104 Overview 104 Accessing 104 Descriptions of Utilities 105 Installing the Utilities 106 Direct Network Printing Utility (LPR 107 OKI DIPUS (Dot Impact Printer Utilities 109 Network Setup Utility 111 Microline 8810 User's Guide...

ML8810 User's Guide - English
Page 6
Front View, Outside Front_View with sheet supports.JPG 1 Sheet Guide 2 Cover, Top Assembly 3 Platform for Manual Feed 4 Display Panel 5 On/Off Switch 6 Platen Knob 7 Control Panel 8 Sheet Supports Microline 8810 User's Guide 6
Front View, Outside Front_View with sheet supports.JPG 1 Sheet Guide 2 Cover, Top Assembly 3 Platform for Manual Feed 4 Display Panel 5 On/Off Switch 6 Platen Knob 7 Control Panel 8 Sheet Supports Microline 8810 User's Guide 6
ML8810 User's Guide - English
Page 13
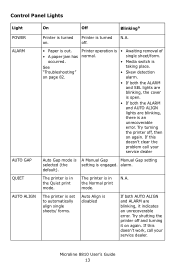
... ALARM are blinking, the cover is an unrecoverable error. single sheet/form. Try turning the printer off, then on page 82. N.A. Try shutting the printer off . If this doesn't clear the problem call your service dealer Auto Gap mode is A Manual Gap Manual Gap setting selected (the setting is out. Printer is See taking place. occurred. • Media switch is turned off and turning it indicates an unrecoverable error. alarm. The printer is • Awaiting removal of • A paper jam has normal. Printer operation...
... ALARM are blinking, the cover is an unrecoverable error. single sheet/form. Try turning the printer off, then on page 82. N.A. Try shutting the printer off . If this doesn't clear the problem call your service dealer Auto Gap mode is A Manual Gap Manual Gap setting selected (the setting is out. Printer is See taking place. occurred. • Media switch is turned off and turning it indicates an unrecoverable error. alarm. The printer is • Awaiting removal of • A paper jam has normal. Printer operation...
ML8810 User's Guide - English
Page 15
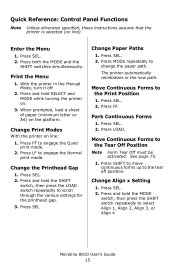
... the Manual Mode, turn it off position. Press SEL. 2. Move Continuous Forms to the Print Position 1. Press and hold the SHIFT switch, then press the LOAD switch repeatedly to select Align 1, Align 2, Align 3, or Align 4 Microline 8810 User's Guide 15 Enter the Menu 1. With the printer in the new path. Change Print Modes With the printer on line). Press LF to the tear off . 2. Press LOAD. Press SHIFT to move continuous forms up to engage the Normal print mode. Change Align x Setting 1. Quick Reference: Control Panel...
... the Manual Mode, turn it off position. Press SEL. 2. Move Continuous Forms to the Print Position 1. Press and hold the SHIFT switch, then press the LOAD switch repeatedly to select Align 1, Align 2, Align 3, or Align 4 Microline 8810 User's Guide 15 Enter the Menu 1. With the printer in the new path. Change Print Modes With the printer on line). Press LF to the tear off . 2. Press LOAD. Press SHIFT to move continuous forms up to engage the Normal print mode. Change Align x Setting 1. Quick Reference: Control Panel...
ML8810 User's Guide - English
Page 17
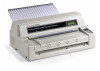
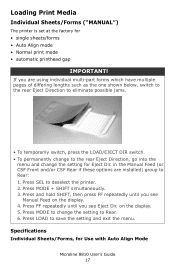
... menu and change the setting to change the setting for Eject Dir. Loading Print Media Individual Sheets/Forms ("MANUAL") The printer is set at the factory for Use with Auto Align Mode Microline 8810 User's Guide 17 Press FF repeatedly until you see Manual Feed on the display. 5. Press and hold SHIFT, then press FF repeatedly until you see Eject Dir. Press MODE to Rear. 6. Specifications Individual Sheets/Forms, for • single sheets/forms • Auto Align mode • Normal print mode • automatic printhead gap...
... menu and change the setting to change the setting for Eject Dir. Loading Print Media Individual Sheets/Forms ("MANUAL") The printer is set at the factory for Use with Auto Align Mode Microline 8810 User's Guide 17 Press FF repeatedly until you see Manual Feed on the display. 5. Press and hold SHIFT, then press FF repeatedly until you see Eject Dir. Press MODE to Rear. 6. Specifications Individual Sheets/Forms, for • single sheets/forms • Auto Align mode • Normal print mode • automatic printhead gap...

ML8810 User's Guide - English
Page 30
... Length set in the menu matches the paper you reset or change the settings. Press SEL to print the menu. b. Print the Menu Note Always print the Menu before you are using to place the printer off-line. Single Sheet (Manual Feed) Before Starting 1. If manual feed is selected. Have a sheet of letter size or larger paper ready to the manual path and returns on the second line of the settings. Front_View.JPG 3. See page 38. 4. Microline 8810 User's Guide 30 Press MODE...
... Length set in the menu matches the paper you reset or change the settings. Press SEL to print the menu. b. Print the Menu Note Always print the Menu before you are using to place the printer off-line. Single Sheet (Manual Feed) Before Starting 1. If manual feed is selected. Have a sheet of letter size or larger paper ready to the manual path and returns on the second line of the settings. Front_View.JPG 3. See page 38. 4. Microline 8810 User's Guide 30 Press MODE...

ML8810 User's Guide - English
Page 36
Setup Note The default setting is installed.) Print Suppress Auto LF Auto CR Print DEL Code SI Pitch (10) SI Pitch (12) Reset Inhibit Settings Bi-directional, Uni-directional Bi-directional, Uni-directional 8 Bits, 7 Bits 128, 0 K 8 Bits, 7 Bits Full, Limited Not Tear Off, Tear Off Valid, Invalid Invalid, Valid 1, Valid 2 Yes, No Bottom Detect, FF Code Manual, CSF CSF Front, CSF Rear No, Yes No, Yes No, Yes No, Yes 15 CPI, 17.1 CPI 12...
Setup Note The default setting is installed.) Print Suppress Auto LF Auto CR Print DEL Code SI Pitch (10) SI Pitch (12) Reset Inhibit Settings Bi-directional, Uni-directional Bi-directional, Uni-directional 8 Bits, 7 Bits 128, 0 K 8 Bits, 7 Bits Full, Limited Not Tear Off, Tear Off Valid, Invalid Invalid, Valid 1, Valid 2 Yes, No Bottom Detect, FF Code Manual, CSF CSF Front, CSF Rear No, Yes No, Yes No, Yes No, Yes 15 CPI, 17.1 CPI 12...
ML8810 User's Guide - English
Page 54
... Serial Interface is received. To run the diagnostic test, enter the menu and select Yes. DRAFT Mode Choose HSD (High Speed Draft) [the default] or SSD (Super Speed Draft). Sets the character code and graphics data for paper curl when feeding in a form manually through the platform. Microline 8810 User's Guide 54 CSF Select Applies only when two optional CSFs are installed. Data Word ML emulation only. Available settings: Valid [the default] or Invalid. Change the setting...
... Serial Interface is received. To run the diagnostic test, enter the menu and select Yes. DRAFT Mode Choose HSD (High Speed Draft) [the default] or SSD (Super Speed Draft). Sets the character code and graphics data for paper curl when feeding in a form manually through the platform. Microline 8810 User's Guide 54 CSF Select Applies only when two optional CSFs are installed. Data Word ML emulation only. Available settings: Valid [the default] or Invalid. Change the setting...

ML8810 User's Guide - English
Page 55
... a printed continuous form page to On. Eject Dir. Form Tear-Off The default is received. Choose where the paper is Power Up. ESC SI Pitch IBM emulation only. The default is ejected when you want the printer to eject a cut sheet when it receives the FF command. Settable from -40 to +40 in increments of Form (TOF) location when using manual feed from the platform. Change the setting to FF Code if...
... a printed continuous form page to On. Eject Dir. Form Tear-Off The default is received. Choose where the paper is Power Up. ESC SI Pitch IBM emulation only. The default is ejected when you want the printer to eject a cut sheet when it receives the FF command. Settable from -40 to +40 in increments of Form (TOF) location when using manual feed from the platform. Change the setting to FF Code if...

ML8810 User's Guide - English
Page 58
... printer from the left edge of the form the gap detection begins: 2 inches (51 mm) [the default] or 4 inches (102 mm). Graphics The default is Yes. This enables the low-vibration mode, which reduces printer vibration during printing. Choose the amount of data it feeds to the printer, choose a longer time interval value to ignore the I /F. Changing to print 7 Bits [the default] or 8 Bits. Microline 8810 User's Guide 58 Host Interface Choose the interface mode: Auto Interface [the default], Parallel, USB...
... printer from the left edge of the form the gap detection begins: 2 inches (51 mm) [the default] or 4 inches (102 mm). Graphics The default is Yes. This enables the low-vibration mode, which reduces printer vibration during printing. Choose the amount of data it feeds to the printer, choose a longer time interval value to ignore the I /F. Changing to print 7 Bits [the default] or 8 Bits. Microline 8810 User's Guide 58 Host Interface Choose the interface mode: Auto Interface [the default], Parallel, USB...

ML8810 User's Guide - English
Page 63
... optional RS-232C Serial Interface is Valid: the printer will recognize a command for print suppress mode, change the setting to recognize uni-directional printing commands. Print DEL Code IBM emulation only. Change he setting to Yes if you do not wish the printer to Yes. The default is installed. Spacing The default is No. Microline 8810 User's Guide 63 Print Mode Choose the print quality and speed: Utility [the default], NLQ Courier, NLQ Gothic, or DRAFT. Power Saving Sets whether or not...
... optional RS-232C Serial Interface is Valid: the printer will recognize a command for print suppress mode, change the setting to recognize uni-directional printing commands. Print DEL Code IBM emulation only. Change he setting to Yes if you do not wish the printer to Yes. The default is installed. Spacing The default is No. Microline 8810 User's Guide 63 Print Mode Choose the print quality and speed: Utility [the default], NLQ Courier, NLQ Gothic, or DRAFT. Power Saving Sets whether or not...
ML8810 User's Guide - English
Page 65
... printer control panel is set for double width and height printing. Sheet Feed Mode Applies only when the optional CSF is Single. SI Pitch (12) IBM emulation only. Size The default is installed. The printer will ignore an INITIAL command. Skew Detect Detects and corrects paper skew when manual feed through the platform-or the optional CSF mounted on the front-is No. Reset Inhibit The default is being used with Microline 8810 User's Guide...
... printer control panel is set for double width and height printing. Sheet Feed Mode Applies only when the optional CSF is Single. SI Pitch (12) IBM emulation only. Size The default is installed. The printer will ignore an INITIAL command. Skew Detect Detects and corrects paper skew when manual feed through the platform-or the optional CSF mounted on the front-is No. Reset Inhibit The default is being used with Microline 8810 User's Guide...
ML8810 User's Guide - English
Page 72
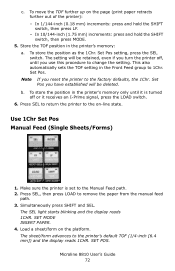
... SHIFT switch, then press LF. - Set Pos setting, press the SEL switch. b. Use 1Chr Set Pos Manual Feed (Single Sheets/Forms) 8810_3_crop.jpg 1. Load a sheet/form on the page (print paper retracts further out of the printer): - Microline 8810 User's Guide 72 c. The SEL light starts blinking and the display reads 1CHR. SET POS. Make sure the printer is turned off , until it is set to the printer's default TOF (1/4-inch [6.4 mm]) and the display reads 1CHR. The sheet/form advances to the Manual Feed path...
... SHIFT switch, then press LF. - Set Pos setting, press the SEL switch. b. Use 1Chr Set Pos Manual Feed (Single Sheets/Forms) 8810_3_crop.jpg 1. Load a sheet/form on the page (print paper retracts further out of the printer): - Microline 8810 User's Guide 72 c. The SEL light starts blinking and the display reads 1CHR. SET POS. Make sure the printer is turned off , until it is set to the printer's default TOF (1/4-inch [6.4 mm]) and the display reads 1CHR. The sheet/form advances to the Manual Feed path...

ML8810 User's Guide - English
Page 77
... always uses a left margin of the paper. Exiting Hex Dump Mode Turn the printer off . 3. Microline 8810 User's Guide 77 Turn the printer off , then on , until RELEASE SW displays. Be sure paper is running a test, it is in the Hex Dump Mode, all non-printable characters will be represented by a period. Note In the ASCII format, all data received, including text and printer commands, will be printed in the Hex Dump Mode. Hex Dump Mode Note When the printer is loaded. 2.
... always uses a left margin of the paper. Exiting Hex Dump Mode Turn the printer off . 3. Microline 8810 User's Guide 77 Turn the printer off , then on , until RELEASE SW displays. Be sure paper is running a test, it is in the Hex Dump Mode, all non-printable characters will be represented by a period. Note In the ASCII format, all data received, including text and printer commands, will be printed in the Hex Dump Mode. Hex Dump Mode Note When the printer is loaded. 2.

OkiLAN 7120e Installation Instructions Directives d' installation Instrucciones de Instalaci?n Instru败s de in
Page 1
... printer. 6. Connect your Ethernet cable to the print server, then to the network. 1: English OKI, OkiLAN ® Oki Electric Industry Company, Ltd. Insert the bracket/card into place. 3. Ethernet ® Xerox Corp. Use an Ethernet cable with two twisted wire pairs and an RJ45 plug. 1. Turn off the printer and unplug the power cord. 2. The test pages print. 10. Press the SW button (1) on the bracket. 9. Push in firmly. OkiLAN® 7120e Installation Instructions...
... printer. 6. Connect your Ethernet cable to the print server, then to the network. 1: English OKI, OkiLAN ® Oki Electric Industry Company, Ltd. Insert the bracket/card into place. 3. Ethernet ® Xerox Corp. Use an Ethernet cable with two twisted wire pairs and an RJ45 plug. 1. Turn off the printer and unplug the power cord. 2. The test pages print. 10. Press the SW button (1) on the bracket. 9. Push in firmly. OkiLAN® 7120e Installation Instructions...


