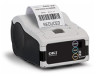
LP440 LP441 User's Guide (English)
Page 2
... Printing using the Bluetooth Interface 43 The LCD screen (Wireless LAN Model Only 43 General Printing Procedure 46 Adjusting Printing for Non-Separate Labels 47 The Label Dispensing mode 49 Status LEDs for Printing Modes 50 Status LEDs for the Test Print Mode 50 Status LEDs for the Head Check Setting Mode 51 Status LEDs for the Online Command Compatibility Mode. .51 Interface Specifications 53 Cleaning and Maintenance 59 Cleaning the Print Head 59 Cleaning the Platen and Peel Roller 61 Troubleshooting 63 Specifications...
LP440 LP441 User's Guide (English)
Page 21
... printer DIP switch Sets the operation mode of the printer. (See page 4-1.) Cover for Protects the DC input DC input terminal and DIP switch fro jack dust and damage Dispenser Moved to select unit Dispense mode FEED key Press to feed label POWER key Allows the user to turns ON/OFF the printer PRINT key Takes the printer Online or Offline Battery cover Cover for special battery pack Status LED Indicates the status of the printer...
LP440 LP441 User's Guide (English)
Page 42
... printer's DIP switches are factory set up. The next step is ON. • If you need to reset other switches, refer to the full DIP- Setup a connection to the Wireless Network • Ensure that your MIS personnel for WLAN operation. • Check that Dip switch 1 is OFF and Dip switch 2 is to configure the printer to have a properly configured wireless LAN set for details of the connected devices. 42 WLAN mode - Security settings...
LP440 LP441 User's Guide (English)
Page 43
... how to set for Bluetooth operation. The LCD screen (Wireless LAN Model Only) The Wireless LAN version of the printer has a Liquid Crystal Display (LCD). Note: When printing with the same PIN code and Authentication mode settings. The screen can display the following information: 1 Dispense Mode Status: Manual/Auto 2 Test Print 3 Signal Strength 4 Battery Strength 43 In case you need to reset other switches, refer to the full DIP-Switch table in...
LP440 LP441 User's Guide (English)
Page 46
... data, and ensure that the STATUS LED is finished, pinch either the left or right corner of the printed roll of label(s) and tear it off in the diagram below. Make sure the host computer is ready to print. 1. Note: The number of the arrow in the direction of sheets you can print is determined by the printer's mode (continuous or peel mode...
LP440 LP441 User's Guide (English)
Page 50
... OFFLINE. Status LEDs for the Test Print Mode Enter Test Print mode by using the FEED and POWER buttons. Status LEDs for Printing Modes Available modes include Normal, Test Print, Head Check Setting and Online Command Setting mode. When setting the dispense mode, the STATUS LED blinks green, and turns into a steady green signal upon sensing any incoming data or pressing of setting. During the Standby state, the printer resumes normal operational status upon completion of the buttons. 4. Close the cover. Press and hold the FEED button while turning...
LP440 LP441 User's Guide (English)
Page 51
... LP440- Status LEDs for the Online Command Compatibility Mode The printer can be left open): H.Check setting DSW-1 DSW-2 DSW-3 DSW-4 Other keys Normal Print OFF ON Area OFF ON hold down FEED button You can check the current setting with a test printout as described in the table below (cover must be set for the Head Check Setting Mode Head checking can check the current setting with the older MB200 commands. Turn off the printer ONLY...
LP440 LP441 User's Guide (English)
Page 53
... Switch Settings 1234 ON ON ON ON Function Procedure Switch to MB200 emulation command compatibility With printer turned off : • Open the cover. • Press and hold PRINT button. • Press the POWER button to turn the printer on . Warning: Never connect or disconnect interface cables (or use a switch box) with certain buttons held down, you can enable or disable special functions and features. Interface Specifications Through a combination of DIP switch settings and turning the printer...
LP440 LP441 User's Guide (English)
Page 56
... the printer turned off : • Open the Cover. • Press and hold the PRINT button. • Press the POWER button. ON OFF OFF ON Cancel IrDA Head Check With the printer turned off : • Change the setting for dips switch 3 to ON. • Press the POWER to turn the printer on the printer. 56 ON OFF OFF OFF IrDA User Test Print Mode With the printer off : • Press the POWER button. IrDA Settings ON OFF DIP Switch Settings...
LP440 LP441 User's Guide (English)
Page 63
Print head is dirty. Replace the print head. Roller is faulty. Dip Switch setting is dirty. Check the connection of the RS-232C cable connector (see "Interface Specifications" on page 41 ). Double-check Dip Switch settings (see page 40). Print Fault Smudged printing Vertical streaking in printouts Slanted text characters No printing Cause Remedy Print head is incorrect. Clean the print head. Clean the platen and dispense roller (see page 61). Paper guide is faulty. RS-232C cable connection is positioned incorrectly. Print head is dirty...
LP440 LP441 User's Guide (English)
Page 64
... connect or disconnect interface cables (or use a switch box) with power applied to the interface circuitry and the damageis not covered by warranty. 64 Head error Head wiring is low. Retry downloading program. Replace the board,. Interface module error (Bluetooth, wireless LAN). Replace the head. Replace Flash ROM. This may cause damage to either the printer or the host. Error Indicators STATUS (LED) Mode Light (Red) All modes Blink (Red) Online every 2s Light (Red) After Power On Blink...
LP440, LP441 Quick Guide (English, Fran栩s, Espa?ol, Portugu鱩
Page 32
... PRINT key or FEED key, when the printer receives data, or when you do not operate for 5 seconds, the printer enters the Sleep mode (Standby state). Operating state At the start of 4 seconds. In offline state, STATUS (LED) goes off. Battery indicator is lit even in offline state. Normal Operation Power On POWER Online PRINT PRINT key key Online LED indication in offline state. When you open and close the Open cover, the printer...
LP440, LP441 Quick Guide (English, Fran栩s, Espa?ol, Portugu鱩
Page 34
... label to be printed. After printing the specified number of DSW and key at the printer power on. Prints one label after turning the printer off. ➊ Auto dispense mode designation DSW-1, 2, 3, 4 = (OFF, OFF, OFF, ON) + Cover open + PRINT Key + POWER ➋ M anual dispense mode designation DSW-1, 2, 3, 4 = (OFF, OFF, OFF, ON) + Cover open + FEED key + POWER Dispense mode setting in process (STATUS LED is pressed. Default Manual print Dispense mode designation change Change of dispense mode setting is available with...
LP440, LP441, LP470, LP480 Safety, Warranty and Regulatory Information (English, Fran栩s, Espa?ol, Portugu鱩
Page 6
... replacement during the life of the product. • Do not throw toner cartridges or image drum cartridges into a fire as you may receive burns from a dust explosion. • After installing additional memory, hard disk drive, or any other internally fitted option, any covers removed or doors opened must be free from the date of purchase. Oki Data will remedy any defective component(s) of the Product for use...
LP440, LP441, LP470, LP480 Safety, Warranty and Regulatory Information (English, Fran栩s, Espa?ol, Portugu鱩
Page 10
... Locations United States Oki Data Americas, Inc. 2000 Bishops Gate Blvd. Automated Services for Your Convenience Quick Referrals To get quick referrals for a local Sales and Service Authorized Reseller, including products, parts and consumable supplies, contact us at any time: • 1-800-654-3282 (1-800-OKI-DATA) • www.okiprintingsolutions.com Your Own Personal Solutions Center You can easily create your purchase documents...
LP440, LP441, LP470, LP480 Safety, Warranty and Regulatory Information (English, Fran栩s, Espa?ol, Portugu鱩
Page 11
... consult your problem accurately and follow up once, then you can answer your questions regarding locations of sales and service dealersm installation of your machine , usage/normal maintenance of your machine, error message interpretation/solutions, parts and supplies identification, consumer relations Note: Customer Support Representatives are not trained to provide assistance with the use of commercial software packages. They can describe your software user's manual for...
LP440, LP441, LP470, LP480 Font Download Utility Manual (English)
Page 7
Input character directly Read character from text file Description Check "Register 1byte character by specific code", and ASCII code can be specified by number. Display registered name in compatible mode. 1-32 Byte Item True type font Font size Style Preview Table 3.2.2 Font Setting Description Select TrueType font Set font size. Please use 31-99 in the printer. Explanations for each item of text file must be less than 55KB...
LP440, LP441, LP470, LP480 Printer Configuration Manual (English)
Page 10
... menu, and printer setting information (except Wireless LAN security information). • Other printer's setting files are not supported. • Operation by edited setting files is not warranted. • Running setting files on the printer configuration tool is described. basic setting information of the main screen, communication system with the printer, tool setting information (except selecting RS-232C COM port) in "File" menu. *When file has been already opened and the value has been changed...
LP440, LP441, LP470, LP480 Printer Configuration Manual (English)
Page 15
Printer configuration tool 6.4 Protocol setting Before starting communication with the printer, the printer setting tool needs to be set for enabling communication with the printer. 1. Select "Protocol (P)" in printer data are specified as protocol code, printer operation is active. FF HEX setting Restrictions Only effective when printer uses wireless LAN or Bluetooth is not warranted. 13 Fig. 6-4-2 Tool setting (Protocol setting) screen Table6-4-2 Tool item setting (Protocol setting) list Item CRC check setting Setting range ON, OFF Control code setting ON...
LP440, LP441, LP470, LP480 Printer Configuration Manual (English)
Page 18
... when wireless LAN module is IEEE802.11 b/g and operation mode is infrastructure. *3 When the gateway address is set, make sure to IP address 16 Printer configuration tool Table7-2-2-1 Printer setting item list Item Initial value Setting range Operation mode SSID Channel *1 Power save mode *2 DHCP Infrastructure OKI 11 Disable (2) IP address Subnet mask Gateway address Port number Set only time out setting FTP time out LPD time out Socket connection time out 192.168.1.1 255.255.255.0 0.0.0.0 *3 1024 No check 30sec...