
LE840D/LE850D Safety/Warranty/Regulatory Guide
Page 3
... as a safety feature and will only connect to prevent any risk of shock. Do not use the power cable supplied with your dealer. This may receive burns from the product, there is already supplied with any covers open , do not use liquid or aerosol cleaners. After installing additional memory, hard disk drive, or any other cables only as this can cause fraying...
... as a safety feature and will only connect to prevent any risk of shock. Do not use the power cable supplied with your dealer. This may receive burns from the product, there is already supplied with any covers open , do not use liquid or aerosol cleaners. After installing additional memory, hard disk drive, or any other cables only as this can cause fraying...
LE840D/LE850D Safety/Warranty/Regulatory Guide
Page 5
... minutes setting it up -to state. Service and Support, US and Canada U.S. go to this Product. Please have a problem that you are available 24 hours a day, 7 days a week. Sales and Service Dealers Consult the store location where you have the model number and serial number for the latest information at any time. English However, the procedure for warranty work. Oki Data Contact Locations United States Oki Data Americas...
... minutes setting it up -to state. Service and Support, US and Canada U.S. go to this Product. Please have a problem that you are available 24 hours a day, 7 days a week. Sales and Service Dealers Consult the store location where you have the model number and serial number for the latest information at any time. English However, the procedure for warranty work. Oki Data Contact Locations United States Oki Data Americas...
LE840/LE850 Users Guide
Page 4
...Low Voltage Directives including their amendments. Microsoft is a trademark of Microsoft Corporation. Windows is a registered trademark of Microsoft Corporation. This equipment generates, uses, and can radiate radio frequency energy and, if not installed and set in which case the user will be required to correct the interference at his own expense. (for USA only) Changes... reasonable protection against harmful interference when the equipment is operated in der Nähe des Gerätes und leicht zugänglich sein. Operations of this equipment in a residential area is a ...
...Low Voltage Directives including their amendments. Microsoft is a trademark of Microsoft Corporation. Windows is a registered trademark of Microsoft Corporation. This equipment generates, uses, and can radiate radio frequency energy and, if not installed and set in which case the user will be required to correct the interference at his own expense. (for USA only) Changes... reasonable protection against harmful interference when the equipment is operated in der Nähe des Gerätes und leicht zugänglich sein. Operations of this equipment in a residential area is a ...
LE840/LE850 Users Guide
Page 6
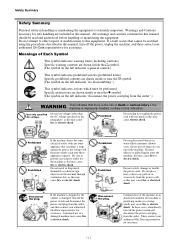
... each time these cases, immediately turn off the power switch and disconnect the power cord plug from the outlet, and then contact your authorised Oki Data representative for assistance. Specific instructions are included in an abnormal condition (the machine is producing smoke or a strange smell) may cause fire or electric shock. Prohibited Do not plug in this manual, turn off the power switch and...
... each time these cases, immediately turn off the power switch and disconnect the power cord plug from the outlet, and then contact your authorised Oki Data representative for assistance. Specific instructions are included in an abnormal condition (the machine is producing smoke or a strange smell) may cause fire or electric shock. Prohibited Do not plug in this manual, turn off the power switch and...

LE840/LE850 Users Guide
Page 7
... the printer is operated on you are blinking as this will cause heat to this indication. DISPOSE OF USED BATTERIES ACCORDING TO THE INSTRUCTIONS. Cleaning is not used for a long period of time. • Place the machine on a stable and level surface. • Do not turn off the power switch and disconnect the power cord plug from the outlet, and then contact your authorised Oki Data...
... the printer is operated on you are blinking as this will cause heat to this indication. DISPOSE OF USED BATTERIES ACCORDING TO THE INSTRUCTIONS. Cleaning is not used for a long period of time. • Place the machine on a stable and level surface. • Do not turn off the power switch and disconnect the power cord plug from the outlet, and then contact your authorised Oki Data...
LE840/LE850 Users Guide
Page 8
... Program Setting E2-24 2.6.5 Enabling Z-Mode ...E2-25 2.6.6 Automatic Calibration E2-26 2.6.7 Dump Mode Setting E2-27 2.6.8 Logging...E2-29 2.6.9 System Mode ...E2-30 2.6.10 Interface Setting ...E2-31 2.6.11 Real Time Clock (RTC E2-38 2.6.12 Copying Data to/from USB Memory E2-39 2.7 Installing the Printer Drivers E2-41 2.7.1 Introduction...E2-41 2.7.2 General Description E2-41 2.7.3 Installing the Printer Driver E2-42 2.7.4 Installation under Windows XP/Server 2003/Vista/ Server...
... Program Setting E2-24 2.6.5 Enabling Z-Mode ...E2-25 2.6.6 Automatic Calibration E2-26 2.6.7 Dump Mode Setting E2-27 2.6.8 Logging...E2-29 2.6.9 System Mode ...E2-30 2.6.10 Interface Setting ...E2-31 2.6.11 Real Time Clock (RTC E2-38 2.6.12 Copying Data to/from USB Memory E2-39 2.7 Installing the Printer Drivers E2-41 2.7.1 Introduction...E2-41 2.7.2 General Description E2-41 2.7.3 Installing the Printer Driver E2-42 2.7.4 Installation under Windows XP/Server 2003/Vista/ Server...

LE840/LE850 Users Guide
Page 9
... ...E7- 6 7.2 Ribbon ...E7- 8 7.3 Recommended Media and Ribbon Types E7- 10 7.4 Care/Handling of this manual. 2.8 Print Test ...E2-49 2.9 Position and Print Tone Fine Adjustment E2-51 2.9.1 Fine Adjustment ...E2-51 2.10 Threshold Setting ...E2-58 2.11 Sensor Setting ...E2-61 3. ONLINE MODE...E3- 1 3.1 Key Functions...E3- 1 3.2 LCD ...E3- 2 3.2 Operation Example ...E3- 3 4. MAINTENANCE ...E4- 1 4.1 Cleaning ...E4- 1 4.1.1 Print Head/Platen/Sensors E4- 1 4.1.2 Covers and Panels E4- 2 4.1.3 Optional Cutter Module E4- 3 5.
... ...E7- 6 7.2 Ribbon ...E7- 8 7.3 Recommended Media and Ribbon Types E7- 10 7.4 Care/Handling of this manual. 2.8 Print Test ...E2-49 2.9 Position and Print Tone Fine Adjustment E2-51 2.9.1 Fine Adjustment ...E2-51 2.10 Threshold Setting ...E2-58 2.11 Sensor Setting ...E2-61 3. ONLINE MODE...E3- 1 3.1 Key Functions...E3- 1 3.2 LCD ...E3- 2 3.2 Operation Example ...E3- 3 4. MAINTENANCE ...E4- 1 4.1 Cleaning ...E4- 1 4.1.1 Print Head/Platen/Sensors E4- 1 4.1.2 Covers and Panels E4- 2 4.1.3 Optional Cutter Module E4- 3 5.
LE840/LE850 Users Guide
Page 15
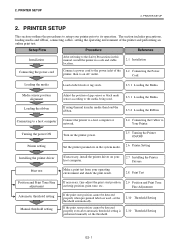
... Turn on your host computer. 2.7 Installing the Printer Drivers Make a print test from your printer prior to an AC outlet. Fine Adjustment If the print start position cannot be detected properly even after automatic threshold setting is performed manually set the threshold. 2.10 Threshold Setting E2- 1 2. The section includes precautions, loading media and ribbon, connecting cables, setting the operating environment of gap sensor or black mark sensor according to the media being used , set...
... Turn on your host computer. 2.7 Installing the Printer Drivers Make a print test from your printer prior to an AC outlet. Fine Adjustment If the print start position cannot be detected properly even after automatic threshold setting is performed manually set the threshold. 2.10 Threshold Setting E2- 1 2. The section includes precautions, loading media and ribbon, connecting cables, setting the operating environment of gap sensor or black mark sensor according to the media being used , set...

LE840/LE850 Users Guide
Page 28
... adjustment Test print Sensor adjustment RAM clear Interface setting (Section 2.6.10) BASIC mode RFID setting Real Time Clock (Section 2.6.11) Z-MODE USB memory (Section 2.6.12) Reset E2-14 For the settings this manual does not cover, please contact your host computer or the interface being used it may be necessary to your nearest Oki Data service representative. PRINTER SETUP 2.6 Printer Setting 2.6 Printer Setting...
... adjustment Test print Sensor adjustment RAM clear Interface setting (Section 2.6.10) BASIC mode RFID setting Real Time Clock (Section 2.6.11) Z-MODE USB memory (Section 2.6.12) Reset E2-14 For the settings this manual does not cover, please contact your host computer or the interface being used it may be necessary to your nearest Oki Data service representative. PRINTER SETUP 2.6 Printer Setting 2.6 Printer Setting...

LE840/LE850 Users Guide
Page 30
... Setting USER SYSTEM MODE RESET PARAMETER SET ADJUST SET LAN/WLAN 2.6 Printer Setting The Parameter Set menu allows the printer parameter settings to be modified. The following table shows the contents of the Parameter Set Menu Menu Parameter set Sub menu Printer Set (Section 2.6.2.1) Software Set (Section 2.6.2.2) Panel (Section 2.6.2.3) Password (Section 2.6.2.4) Parameter MEDIA LOAD FORWARD WAIT FW/BK ACT HU CUT/RWD RBN SAVE PRE PEEL OFF BACK SPEED TYPE OF RIBBON FONT CODE ZERO FONT CODE PEEL OFF STATUS USB I/F STATUS FEED...
... Setting USER SYSTEM MODE RESET PARAMETER SET ADJUST SET LAN/WLAN 2.6 Printer Setting The Parameter Set menu allows the printer parameter settings to be modified. The following table shows the contents of the Parameter Set Menu Menu Parameter set Sub menu Printer Set (Section 2.6.2.1) Software Set (Section 2.6.2.2) Panel (Section 2.6.2.3) Password (Section 2.6.2.4) Parameter MEDIA LOAD FORWARD WAIT FW/BK ACT HU CUT/RWD RBN SAVE PRE PEEL OFF BACK SPEED TYPE OF RIBBON FONT CODE ZERO FONT CODE PEEL OFF STATUS USB I/F STATUS FEED...
LE840/LE850 Users Guide
Page 35
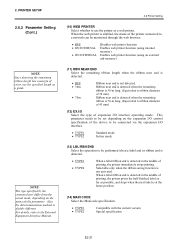
... the middle of this parameter. NOTE: The type specified by the command may differ from the actual mode, depending on the expansion I/O control specification of the device to be monitored through the web browser. OFF ON INTERNAL ON EXTERNAL Disables web printer function Enables web printer function (using internal memory) Enables web printer function (using an external usb memory) (11) RBN NEAR END Select the remaining...
... the middle of this parameter. NOTE: The type specified by the command may differ from the actual mode, depending on the expansion I/O control specification of the device to be monitored through the web browser. OFF ON INTERNAL ON EXTERNAL Disables web printer function Enables web printer function (using internal memory) Enables web printer function (using an external usb memory) (11) RBN NEAR END Select the remaining...

LE840/LE850 Users Guide
Page 41
...-27 If an error occurs while using the USB memory, the error message is pressed. ALL Prints all data in the following format based on the printer model and saved date. /ATA0/DUMP/LE840_DUMP_1209271030.DAT / (e.g. Subsequent data is printed when the [ENTER] key is displayed. PRINTER SETUP 2.6 Printer Setting 2.6.7 Dump Mode Setting USER SYSTEM MODE BASIC Z-MODE AUTO CALIB DUMP MODE In Dump Mode, the data in the USB memory, it will be output. 3. LE840(203dpi model), 10:30...
...-27 If an error occurs while using the USB memory, the error message is pressed. ALL Prints all data in the following format based on the printer model and saved date. /ATA0/DUMP/LE840_DUMP_1209271030.DAT / (e.g. Subsequent data is printed when the [ENTER] key is displayed. PRINTER SETUP 2.6 Printer Setting 2.6.7 Dump Mode Setting USER SYSTEM MODE BASIC Z-MODE AUTO CALIB DUMP MODE In Dump Mode, the data in the USB memory, it will be output. 3. LE840(203dpi model), 10:30...

LE840/LE850 Users Guide
Page 44
... copy data to check and print the printer system information and maintenance counter status. E2-30 Used to /from USB memory. RFID Used to enter the System Mode Power OFF Power ON while holding down [FEED]&[PAUSE] Power ON while holding down [MODE] System Mode The System Mode consists of the real time clock, enable or disable the low battery check, and choose a real time renewal timing. PRINTER SETUP 2.6.9 System Mode 2.6 Printer Setting How to set the parameters for an in each printer function. ADJUST SET...
... copy data to check and print the printer system information and maintenance counter status. E2-30 Used to /from USB memory. RFID Used to enter the System Mode Power OFF Power ON while holding down [FEED]&[PAUSE] Power ON while holding down [MODE] System Mode The System Mode consists of the real time clock, enable or disable the low battery check, and choose a real time renewal timing. PRINTER SETUP 2.6.9 System Mode 2.6 Printer Setting How to set the parameters for an in each printer function. ADJUST SET...
LE840/LE850 Users Guide
Page 55
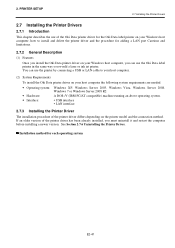
... Interface: Windows XP, Windows Server 2003, Windows Vista, Windows Server 2008, Windows 7 or Windows Server 2008 R2 A DOS-/V (IBM PC/AT compatible) machine running an above operating system. • USB interface • LAN interface 2.7.3 Installing the Printer Driver The installation procedure of the Oki Data printer driver for each operating system E2-41 PRINTER SETUP 2.7 Installing the Printer Drivers 2.7 Installing the Printer Drivers 2.7.1 Introduction This chapter describes the use the Oki Data label printer in the same way you would a laser or ink jet printer. See Section...
... Interface: Windows XP, Windows Server 2003, Windows Vista, Windows Server 2008, Windows 7 or Windows Server 2008 R2 A DOS-/V (IBM PC/AT compatible) machine running an above operating system. • USB interface • LAN interface 2.7.3 Installing the Printer Driver The installation procedure of the Oki Data printer driver for each operating system E2-41 PRINTER SETUP 2.7 Installing the Printer Drivers 2.7 Installing the Printer Drivers 2.7.1 Introduction This chapter describes the use the Oki Data label printer in the same way you would a laser or ink jet printer. See Section...
LE840/LE850 Users Guide
Page 57
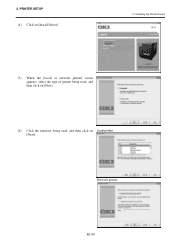
Network printer E2-43 2. PRINTER SETUP (4) Click on [Install Driver]. 2.7 Installing the Printer Drivers (5) When the [Local or network printer] screen appears, select the type of printer being used, and then click on [Next]. (6) Click the interface being used, and then click on Local printer [Next].
Network printer E2-43 2. PRINTER SETUP (4) Click on [Install Driver]. 2.7 Installing the Printer Drivers (5) When the [Local or network printer] screen appears, select the type of printer being used, and then click on [Next]. (6) Click the interface being used, and then click on Local printer [Next].
LE840/LE850 Users Guide
Page 60
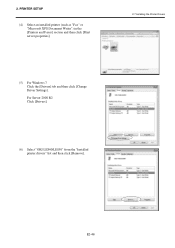
For Server 2008 R2 Click [Drivers]. (6) Select "OKI LE840/LE850" from the "Installed printer drivers" list and then click [Remove]. E2-46 PRINTER SETUP (4) Select an installed printer (such as "Fax" or "Microsoft XPS Document Writer") in the [Printers and Faxes] section and then click [Print server properties]. 2.7 Installing the Printer Drivers (5) For Windows 7 Click the [Drivers] tab and then click [Change Driver Settings]. 2.
For Server 2008 R2 Click [Drivers]. (6) Select "OKI LE840/LE850" from the "Installed printer drivers" list and then click [Remove]. E2-46 PRINTER SETUP (4) Select an installed printer (such as "Fax" or "Microsoft XPS Document Writer") in the [Printers and Faxes] section and then click [Print server properties]. 2.7 Installing the Printer Drivers (5) For Windows 7 Click the [Drivers] tab and then click [Change Driver Settings]. 2.

LE840/LE850 Users Guide
Page 65
... (⇒Section 2.6.8) 2.9.1 Fine Adjustment USER SYSTEM MODE RESET PARAMETER SET ADJUST SET LAN/WLAN Contents of the Fine Adjustment Menu Menu Adjust set Parameter FEED ADJ. NOTE: The printer driver's properties screen also has Parameter Fine Adjustment menu. PRINTER SETUP 2.9 Position and Print Tone Fine Adjustment 2.9 Position and Print Tone Fine Adjustment This section describes how to the print start position, cut or strip position. Adjusts the print position in X coordinate (horizontal direction) Adjusts the print tone for the...
... (⇒Section 2.6.8) 2.9.1 Fine Adjustment USER SYSTEM MODE RESET PARAMETER SET ADJUST SET LAN/WLAN Contents of the Fine Adjustment Menu Menu Adjust set Parameter FEED ADJ. NOTE: The printer driver's properties screen also has Parameter Fine Adjustment menu. PRINTER SETUP 2.9 Position and Print Tone Fine Adjustment 2.9 Position and Print Tone Fine Adjustment This section describes how to the print start position, cut or strip position. Adjusts the print position in X coordinate (horizontal direction) Adjusts the print tone for the...

LE840/LE850 Users Guide
Page 83
... clean the printer regularly, or whenever the media or ribbon is replaced. 4.1.1 Print Head/Platen/ Sensors CAUTION! 1. For low usage it should be careful not to touch the print head edge. Open the Top Cover. 3. When cleaning the print head, be done on a daily basis. MAINTENANCE 4.1 Cleaning 4. The print head becomes hot immediately after printing. Allow it carefully and do this may damage the Print Head. 1. Do not touch any moving parts...
... clean the printer regularly, or whenever the media or ribbon is replaced. 4.1.1 Print Head/Platen/ Sensors CAUTION! 1. For low usage it should be careful not to touch the print head edge. Open the Top Cover. 3. When cleaning the print head, be done on a daily basis. MAINTENANCE 4.1 Cleaning 4. The print head becomes hot immediately after printing. Allow it carefully and do this may damage the Print Head. 1. Do not touch any moving parts...

LE840/LE850 Users Guide
Page 86
... to repair the printer. TROUBLESHOOTING This chapter lists the error messages, possible problems, and their solutions. Make sure the interface cable is not cleared by taking the actions described in the media path. Refer to Section 2.10 to the printer and the host and the host is different from the programmed size. 4. Feeding or printing has been attempted with the Print Head Block open. Size of the loaded media is turned on...
... to repair the printer. TROUBLESHOOTING This chapter lists the error messages, possible problems, and their solutions. Make sure the interface cable is not cleared by taking the actions described in the media path. Refer to Section 2.10 to the printer and the host and the host is different from the programmed size. 4. Feeding or printing has been attempted with the Print Head Block open. Size of the loaded media is turned on...

LE840/LE850 Users Guide
Page 89
.... 1. Clear the error state by using the printer driver or a print command so that may occur when using the Print Head Cleaner or a cotton swab slightly moistened with a power cord from sticky. Load the ribbon properly. ⇒ Section 2.3.2. 3. Clean the print head using the printer, and their causes and solutions. Attach the Cutter Cover properly. 2. The AC outlet is not attached properly. 2. The media is not clean. Pressing the [FEED...
.... 1. Clear the error state by using the printer driver or a print command so that may occur when using the Print Head Cleaner or a cotton swab slightly moistened with a power cord from sticky. Load the ribbon properly. ⇒ Section 2.3.2. 3. Clean the print head using the printer, and their causes and solutions. Attach the Cutter Cover properly. 2. The AC outlet is not attached properly. 2. The media is not clean. Pressing the [FEED...


