PrintSuperVision Configuration Guide
Page 7
...-user "Easy Configuration" option that does not require a server and can be installed on a centrally located Windows server accessible from the Single-user Easy Configuration Option to the network. • The Enterprise Edition is designed for small and mid-size organizations with just a few or several thousand print/copy devices within large organizations with features and functionality required by sophisticated IT organizations. Each edition supports...
...-user "Easy Configuration" option that does not require a server and can be installed on a centrally located Windows server accessible from the Single-user Easy Configuration Option to the network. • The Enterprise Edition is designed for small and mid-size organizations with just a few or several thousand print/copy devices within large organizations with features and functionality required by sophisticated IT organizations. Each edition supports...
PrintSuperVision Configuration Guide
Page 15
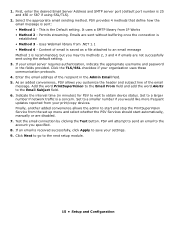
... the set up menu and select whether the PSV Services should start and stop the PrintSuperVision Service from IP Works • Method 2 - Content of email is saved as a file attached to a larger number if network traffic is 25 and 456 or 587 if using the default setting. 3. Test the email connection by clicking the Test button. PSV will attempt to send an email to obtain device status. Enter the email address of the email message...
... the set up menu and select whether the PSV Services should start and stop the PrintSuperVision Service from IP Works • Method 2 - Content of email is saved as a file attached to a larger number if network traffic is 25 and 456 or 587 if using the default setting. 3. Test the email connection by clicking the Test button. PSV will attempt to send an email to obtain device status. Enter the email address of the email message...
C330/C530/C610/C711 DIMM Install Sheet
Page 5
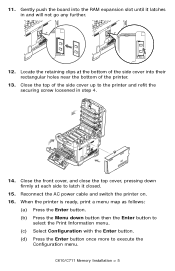
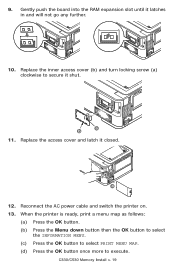
... AC power cable and switch the printer on. 16. Locate the retaining clips at each side to execute the Configuration menu. Close the top of the side cover into the RAM expansion slot until it closed. 15. When the printer is ready, print a menu map as follows: (a) Press the Enter button. (b) Press the Menu down firmly at the bottom of the side cover up to the printer and...
... AC power cable and switch the printer on. 16. Locate the retaining clips at each side to execute the Configuration menu. Close the top of the side cover into the RAM expansion slot until it closed. 15. When the printer is ready, print a menu map as follows: (a) Press the Enter button. (b) Press the Menu down firmly at the bottom of the side cover up to the printer and...
C330/C530/C610/C711 DIMM Install Sheet
Page 19
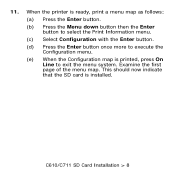
... the OK button. (b) Press the Menu down button then the OK button to select the INFORMATION MENU. (c) Press the OK button to select PRINT MENU MAP. (d) Press the OK button once more to secure it closed. Replace the inner access cover (b) and turn locking screw (a) clockwise to execute. a b 11. Reconnect the AC power cable and switch the printer on. 13. b a 12. C330/C530 Memory Install > 19 9. Replace the access cover and latch...
... the OK button. (b) Press the Menu down button then the OK button to select the INFORMATION MENU. (c) Press the OK button to select PRINT MENU MAP. (d) Press the OK button once more to secure it closed. Replace the inner access cover (b) and turn locking screw (a) clockwise to execute. a b 11. Reconnect the AC power cable and switch the printer on. 13. b a 12. C330/C530 Memory Install > 19 9. Replace the access cover and latch...
SD Card Install
Page 8
When the printer is ready, print a menu map as follows: (a) Press the Enter button. (b) Press the Menu down button then the Enter button to select the Print Information menu. (c) Select Configuration with the Enter button. (d) Press the Enter button once more to execute the Configuration menu. (e) When the Configuration map is installed. C610/C711 SD Card Installation > 8 11. Examine the first page of the menu map. This should now indicate that the SD card is printed, press On Line to exit the menu system.
When the printer is ready, print a menu map as follows: (a) Press the Enter button. (b) Press the Menu down button then the Enter button to select the Print Information menu. (c) Select Configuration with the Enter button. (d) Press the Enter button once more to execute the Configuration menu. (e) When the Configuration map is installed. C610/C711 SD Card Installation > 8 11. Examine the first page of the menu map. This should now indicate that the SD card is printed, press On Line to exit the menu system.

SD Card Install
Page 32
11. C530 SD Card Installation > 32 Examine the first page of the menu map. This should now indicate that the SD card is printed, press On Line to exit the menu system. When the printer is ready, print a menu map as follows: (a) Press the Enter button. (b) Press the Menu down button then the Enter button to select the Print Information menu. (c) Select Configuration with the Enter button. (d) Press the Enter button once more to execute the Configuration menu. (e) When the Configuration map is installed.
11. C530 SD Card Installation > 32 Examine the first page of the menu map. This should now indicate that the SD card is printed, press On Line to exit the menu system. When the printer is ready, print a menu map as follows: (a) Press the Enter button. (b) Press the Menu down button then the Enter button to select the Print Information menu. (c) Select Configuration with the Enter button. (d) Press the Enter button once more to execute the Configuration menu. (e) When the Configuration map is installed.

Duplex Installation Instructions
Page 1
... computers, the driver must have administrator privileges. Switch the printer on line. 3 Engage Duplex Printing in the Printer Menu Note: To do this you push the unit in. 1. Print Information displays. 4. Press Enter. 2. Press Enter. 6. Windows XP, Server 2003: Click Start > Settings > Printers and Faxes. USB and AppleTalk connections are normally configured automatically. Installation Instructions Optional Duplex Unit English 1 Français 3 Español 5 Português 7 To print the report: 1 Install the Duplex Unit The duplex unit slides straight into...
... computers, the driver must have administrator privileges. Switch the printer on line. 3 Engage Duplex Printing in the Printer Menu Note: To do this you push the unit in. 1. Print Information displays. 4. Press Enter. 2. Press Enter. 6. Windows XP, Server 2003: Click Start > Settings > Printers and Faxes. USB and AppleTalk connections are normally configured automatically. Installation Instructions Optional Duplex Unit English 1 Français 3 Español 5 Português 7 To print the report: 1 Install the Duplex Unit The duplex unit slides straight into...
C610, C711 User's Guide (English)
Page 7
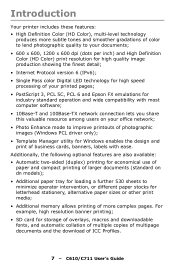
... your printed pages; • PostScript 3, PCL 5C, PCL 6 and Epson FX emulations for industry standard operation and wide compatibility with most computer software; • 10Base-T and 100Base-TX network connection lets you share this valuable resource among users on dn models); • Additional paper tray for loading a further 530 sheets to improve printouts of photographic images (Windows PCL driver only); • Template Manager utility for Windows enables the...
... your printed pages; • PostScript 3, PCL 5C, PCL 6 and Epson FX emulations for industry standard operation and wide compatibility with most computer software; • 10Base-T and 100Base-TX network connection lets you share this valuable resource among users on dn models); • Additional paper tray for loading a further 530 sheets to improve printouts of photographic images (Windows PCL driver only); • Template Manager utility for Windows enables the...
C610, C711 User's Guide (English)
Page 12
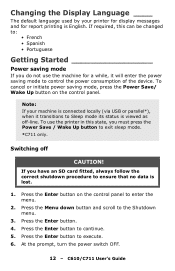
... the control panel to the Shutdown menu. 3. Press the Enter button to continue. 5. If required, this state, you have an SD card fitted, always follow the correct shutdown procedure to ensure that no data is lost. 1. If you must press the Power Save / Wake Up button to exit sleep mode. *C711 only. Changing the Display Language ____ The default language used by your machine is connected locally (via USB...
... the control panel to the Shutdown menu. 3. Press the Enter button to continue. 5. If required, this state, you have an SD card fitted, always follow the correct shutdown procedure to ensure that no data is lost. 1. If you must press the Power Save / Wake Up button to exit sleep mode. *C711 only. Changing the Display Language ____ The default language used by your machine is connected locally (via USB...
C610, C711 User's Guide (English)
Page 24
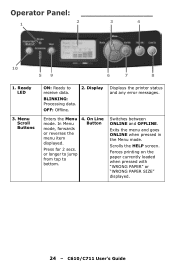
... ONLINE when pressed in the Menu mode. Scrolls the HELP screen. Ready LED 3. Display Displays the printer status and any error messages. or longer to jump from top to receive data. Forces printing on the paper currently loaded when pressed with "WRONG PAPER" or "WRONG PAPER SIZE" displayed. 24 - Enters the Menu mode. Press for 2 secs. In Menu mode, forwards or reverses the menu item displayed. On Line Button Switches between ONLINE and OFFLINE. Operator Panel 2 3 4 1 10 59 6 7 8 1. C610/C711 User's Guide Menu Scroll Buttons...
... ONLINE when pressed in the Menu mode. Scrolls the HELP screen. Ready LED 3. Display Displays the printer status and any error messages. or longer to jump from top to receive data. Forces printing on the paper currently loaded when pressed with "WRONG PAPER" or "WRONG PAPER SIZE" displayed. 24 - Enters the Menu mode. Press for 2 secs. In Menu mode, forwards or reverses the menu item displayed. On Line Button Switches between ONLINE and OFFLINE. Operator Panel 2 3 4 1 10 59 6 7 8 1. C610/C711 User's Guide Menu Scroll Buttons...

C610, C711 User's Guide (English)
Page 56
... printer performs AutoAdjust Registration. It can become invalid if executed in TRC compensation. This adjustment must be reflected as offset values (addition) to the recommended levels through the Adjust Density/TRC Compensation function. 56 - Prints the pattern for the user to adjust TRC. If Execute is idling. C610/C711 User's Guide Calibration ITEM Auto Density Mode Adjust Density Adjust Registration Print Tuning Pattern SETTINGS EXPLANATION...
... printer performs AutoAdjust Registration. It can become invalid if executed in TRC compensation. This adjustment must be reflected as offset values (addition) to the recommended levels through the Adjust Density/TRC Compensation function. 56 - Prints the pattern for the user to adjust TRC. If Execute is idling. C610/C711 User's Guide Calibration ITEM Auto Density Mode Adjust Density Adjust Registration Print Tuning Pattern SETTINGS EXPLANATION...
C610, C711 User's Guide (English)
Page 61
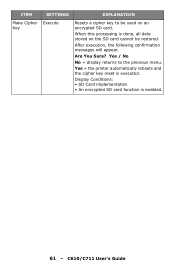
Yes / No No = display returns to be restored. Are You Sure? C610/C711 User's Guide Display Conditions: • SD Card implementation • An encrypted SD card function is executed. After execution, the following confirmation messages will appear. ITEM SETTINGS EXPLANATION Make Cipher Execute Key Resets a cipher key to the previous menu. Yes = the printer automatically reboots and the cipher key reset is enabled. 61 - When this processing is done, all data stored on the SD card cannot be used on an encrypted SD card.
Yes / No No = display returns to be restored. Are You Sure? C610/C711 User's Guide Display Conditions: • SD Card implementation • An encrypted SD card function is executed. After execution, the following confirmation messages will appear. ITEM SETTINGS EXPLANATION Make Cipher Execute Key Resets a cipher key to the previous menu. Yes = the printer automatically reboots and the cipher key reset is enabled. 61 - When this processing is done, all data stored on the SD card cannot be used on an encrypted SD card.
C610, C711 User's Guide (English)
Page 62
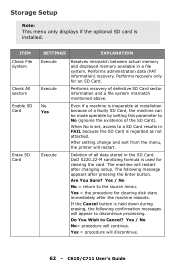
... Card). Even if a machine is set, access to the source menu. ITEM Check File System Check All Sectors Enable SD Card Erase SD Card SETTINGS EXPLANATION Execute Execute No Yes Execute Resolves mismatch between actual memory and displayed memory available in the SD Card. The following confirmation messages will appear to discontinue processing. Deletion of a faulty SD Card, the machine can be made operable by setting this parameter to Cancel? Performs administration data...
... Card). Even if a machine is set, access to the source menu. ITEM Check File System Check All Sectors Enable SD Card Erase SD Card SETTINGS EXPLANATION Execute Execute No Yes Execute Resolves mismatch between actual memory and displayed memory available in the SD Card. The following confirmation messages will appear to discontinue processing. Deletion of a faulty SD Card, the machine can be made operable by setting this parameter to Cancel? Performs administration data...
C610/C711 Software Setup Guide (English, Fran栩s, Espa?ol, Portugu鱩
Page 3
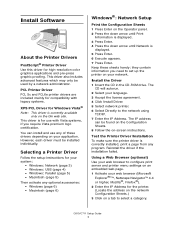
... compatibility with Vista systems, if you need to set up the printer on a tab to the network using TCP/IP. 7 Enter the IP Address. However, each driver must be found on the Configuration Sheets. 8 Follow the on your web browser to configure print server and printer menu settings on the Oki web site. Keep these drivers depending on -screen instructions. Install Software About the Printer Drivers PostScript® Printer Driver Use this driver for Windows Vista® Note: This driver is correctly installed, print a page...
... compatibility with Vista systems, if you need to set up the printer on a tab to the network using TCP/IP. 7 Enter the IP Address. However, each driver must be found on the Configuration Sheets. 8 Follow the on your web browser to configure print server and printer menu settings on the Oki web site. Keep these drivers depending on -screen instructions. Install Software About the Printer Drivers PostScript® Printer Driver Use this driver for Windows Vista® Note: This driver is correctly installed, print a page...

C610/C711 Software Setup Guide (English, Fran栩s, Espa?ol, Portugu鱩
Page 4
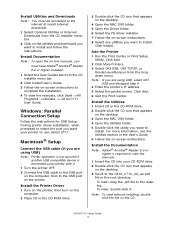
... -> Control Panel -> Print- C610/C711 Setup Guide 4 Activate Printer Options You can configure the options manually or, for TCP/IP network connections, you can configure the options automatically using the Two-Way Communications feature. in the PCL driver select the appropriate check box in Available Options. 5 Click OK to install and follow the instructions. Install Utilities and Downloads Note: You must have a TCP/IP enabled network, you can automatically update your printer driver...
... -> Control Panel -> Print- C610/C711 Setup Guide 4 Activate Printer Options You can configure the options manually or, for TCP/IP network connections, you can configure the options automatically using the Two-Way Communications feature. in the PCL driver select the appropriate check box in Available Options. 5 Click OK to install and follow the instructions. Install Utilities and Downloads Note: You must have a TCP/IP enabled network, you can automatically update your printer driver...
C610/C711 Software Setup Guide (English, Fran栩s, Espa?ol, Portugu鱩
Page 5
... printer driver installation, when prompted to select the port you want to install and follow the instructions. Add the Printer 1 Run the Print Center or Print Setup Utility. C610/C711 Setup Guide 5 Install the Printer Driver 1 Turn on the printer, then turn on the computer. 2 Place CD in the CD-ROM drive. 2 Double-click the CD icon that appears on -line manuals, you are using USB, select OKI USB and disregard step 4. 4 Enter the printer's IP address. 5 Select the printer model. Install...
... printer driver installation, when prompted to select the port you want to install and follow the instructions. Add the Printer 1 Run the Print Center or Print Setup Utility. C610/C711 Setup Guide 5 Install the Printer Driver 1 Turn on the printer, then turn on the computer. 2 Place CD in the CD-ROM drive. 2 Double-click the CD icon that appears on -line manuals, you are using USB, select OKI USB and disregard step 4. 4 Enter the printer's IP address. 5 Select the printer model. Install...
C610/C711 Software Setup Guide (English, Fran栩s, Espa?ol, Portugu鱩
Page 6
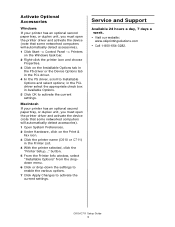
... optional second paper tray, or duplex unit, you must open the printer driver and activate the device (note that some networked computers will automatically detect accessories). 1 Click Start -> Control Panel -> Printers on the Windows task bar. 2 Right-click the printer icon and choose Properties. 3 Click on the Print & Fax icon. 3 Click the printer name (C610 or C711) in the Printer List. 4 With the printer selected, click the "Printer Setup..." Service and Support Available...
... optional second paper tray, or duplex unit, you must open the printer driver and activate the device (note that some networked computers will automatically detect accessories). 1 Click Start -> Control Panel -> Printers on the Windows task bar. 2 Right-click the printer icon and choose Properties. 3 Click on the Print & Fax icon. 3 Click the printer name (C610 or C711) in the Printer List. 4 With the printer selected, click the "Printer Setup..." Service and Support Available...

C711 Handy Reference (English, Fran栩s, Espa?ol, Portugu鱩
Page 14
Power Save Mode Power Save sets how long the printer waits before going into standby mode. This saves energy, but the printer requires time to warm up when it receives a print job or if you want to enter the menu and change settings. For more information, see your on-line User's Guide. 14 • C711 • English The default is 1 minute.
Power Save Mode Power Save sets how long the printer waits before going into standby mode. This saves energy, but the printer requires time to warm up when it receives a print job or if you want to enter the menu and change settings. For more information, see your on-line User's Guide. 14 • C711 • English The default is 1 minute.

C711 Safety/Warranty/Regulatory Guide
Page 4
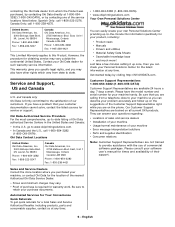
...this Limited Warranty. Overnight Exchange of the printer for a printhead failure is warranted for the Product, showing the date of purchase, dealer's name, and both the model and serial numbers of this Product must be free from date of the exchange unit. A written receipt for a period ...of purchase except for the printhead (LED imaging array), which is limited to one (1) year from defects in the U.S. Call 1-800654-3282 (1-800-OKI-DATA) for authorized service locations or if you would like to you ship the Product, remove the image drums and toner cartridges to prevent damage to the ...
...this Limited Warranty. Overnight Exchange of the printer for a printhead failure is warranted for the Product, showing the date of purchase, dealer's name, and both the model and serial numbers of this Product must be free from date of the exchange unit. A written receipt for a period ...of purchase except for the printhead (LED imaging array), which is limited to one (1) year from defects in the U.S. Call 1-800654-3282 (1-800-OKI-DATA) for authorized service locations or if you would like to you ship the Product, remove the image drums and toner cartridges to prevent damage to the ...
C711 Safety/Warranty/Regulatory Guide
Page 5
... • Manuals • Drivers and utilities • Material Safety Data Sheets • Searchable knowledge base • and much more! Mt. If you have the model number and serial number for your machine • Usage/normal maintenance of the nearest Authorized Oki Data Service Dealer. • Prices and minimum charges may vary outside the continental United States. Mt. Service and Support, US and Canada U.S. Oki Data Authorized Service Providers For...
... • Manuals • Drivers and utilities • Material Safety Data Sheets • Searchable knowledge base • and much more! Mt. If you have the model number and serial number for your machine • Usage/normal maintenance of the nearest Authorized Oki Data Service Dealer. • Prices and minimum charges may vary outside the continental United States. Mt. Service and Support, US and Canada U.S. Oki Data Authorized Service Providers For...


