C330/C530/C610/C711 DIMM Install Sheet
Page 3
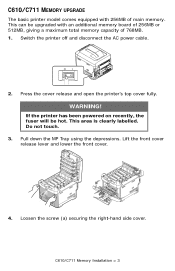
Switch the printer off and disconnect the AC power cable. WARNING! Pull down the MP Tray using the depressions. This area is clearly labelled. Loosen the screw (a) securing the right-hand side cover. Press the cover release and open the printer's top cover fully. Lift the front cover release lever and lower the front cover. 4. Do not touch. 3. OI 2. C610/C711 Memory Installation > 3 C610/C711 MEMORY UPGRADE The basic printer model comes...
Switch the printer off and disconnect the AC power cable. WARNING! Pull down the MP Tray using the depressions. This area is clearly labelled. Loosen the screw (a) securing the right-hand side cover. Press the cover release and open the printer's top cover fully. Lift the front cover release lever and lower the front cover. 4. Do not touch. 3. OI 2. C610/C711 Memory Installation > 3 C610/C711 MEMORY UPGRADE The basic printer model comes...
C330/C530/C610/C711 DIMM Install Sheet
Page 4
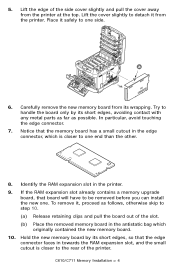
Carefully remove the new memory board from the printer at the top. If the RAM expansion slot already contains a memory upgrade board, that board will have to one side. C610/C711 Memory Installation > 4 a 6. Identify the RAM expansion slot in the edge connector, which originally contained the new memory board. 10. Hold the new memory board by its wrapping. Lift the cover slightly to detach it...
Carefully remove the new memory board from the printer at the top. If the RAM expansion slot already contains a memory upgrade board, that board will have to one side. C610/C711 Memory Installation > 4 a 6. Identify the RAM expansion slot in the edge connector, which originally contained the new memory board. 10. Hold the new memory board by its wrapping. Lift the cover slightly to detach it...
C330/C530/C610/C711 DIMM Install Sheet
Page 5
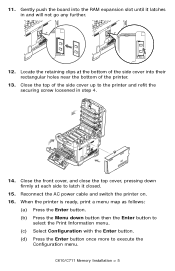
... Enter button to select the Print Information menu. (c) Select Configuration with the Enter button. (d) Press the Enter button once more to latch it latches in step 4. 14. Reconnect the AC power cable and switch the printer on. 16. C610/C711 Memory Installation > 5 When the printer is ready, print a menu map as follows: (a) Press the Enter button. (b) Press the Menu down firmly at the bottom of the side cover into...
... Enter button to select the Print Information menu. (c) Select Configuration with the Enter button. (d) Press the Enter button once more to latch it latches in step 4. 14. Reconnect the AC power cable and switch the printer on. 16. C610/C711 Memory Installation > 5 When the printer is ready, print a menu map as follows: (a) Press the Enter button. (b) Press the Menu down firmly at the bottom of the side cover into...
C330/C530/C610/C711 DIMM Install Sheet
Page 6
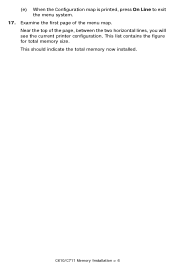
This should indicate the total memory now installed. (e) When the Configuration map is printed, press On Line to exit the menu system. 17. Near the top of the menu map. C610/C711 Memory Installation > 6 This list contains the figure for total memory size. Examine the first page of the page, between the two horizontal lines, you will see the current printer configuration.
This should indicate the total memory now installed. (e) When the Configuration map is printed, press On Line to exit the menu system. 17. Near the top of the menu map. C610/C711 Memory Installation > 6 This list contains the figure for total memory size. Examine the first page of the page, between the two horizontal lines, you will see the current printer configuration.
C330/C530/C610/C711 DIMM Install Sheet
Page 17
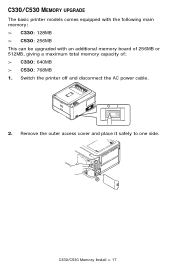
a b C330/C530 Memory Install > 17 Switch the printer off and disconnect the AC power cable. 2. Remove the outer access cover and place it safely to one side. C330/C530 MEMORY UPGRADE The basic printer models comes equipped with the following main memory: > C330: 128MB > C530: 256MB This can be upgraded with an additional memory board of 256MB or 512MB, giving a maximum total memory capacity of: > C330: 640MB > C530: 768MB 1.
a b C330/C530 Memory Install > 17 Switch the printer off and disconnect the AC power cable. 2. Remove the outer access cover and place it safely to one side. C330/C530 MEMORY UPGRADE The basic printer models comes equipped with the following main memory: > C330: 128MB > C530: 256MB This can be upgraded with an additional memory board of 256MB or 512MB, giving a maximum total memory capacity of: > C330: 640MB > C530: 768MB 1.
C330/C530/C610/C711 DIMM Install Sheet
Page 18
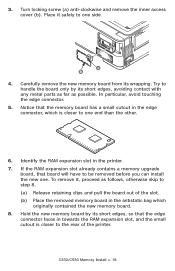
... of the printer. Identify the RAM expansion slot in the edge connector, which originally contained the new memory board. 8. Hold the new memory board by its wrapping. Turn locking screw (a) anti-clockwise and remove the inner access cover (b). Carefully remove the new memory board from its short edges, avoiding contact with any metal parts as far as follows, otherwise skip to one side. In...
... of the printer. Identify the RAM expansion slot in the edge connector, which originally contained the new memory board. 8. Hold the new memory board by its wrapping. Turn locking screw (a) anti-clockwise and remove the inner access cover (b). Carefully remove the new memory board from its short edges, avoiding contact with any metal parts as far as follows, otherwise skip to one side. In...
C330/C530/C610/C711 DIMM Install Sheet
Page 19
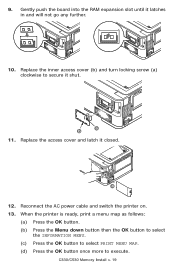
... OK button. (b) Press the Menu down button then the OK button to select the INFORMATION MENU. (c) Press the OK button to select PRINT MENU MAP. (d) Press the OK button once more to secure it closed. b a 12. Replace the inner access cover (b) and turn locking screw (a) clockwise to execute. Replace the access cover and latch it shut. Reconnect the AC power cable and switch the printer on. 13. a b 11. 9. C330/C530 Memory Install...
... OK button. (b) Press the Menu down button then the OK button to select the INFORMATION MENU. (c) Press the OK button to select PRINT MENU MAP. (d) Press the OK button once more to secure it closed. b a 12. Replace the inner access cover (b) and turn locking screw (a) clockwise to execute. Replace the access cover and latch it shut. Reconnect the AC power cable and switch the printer on. 13. a b 11. 9. C330/C530 Memory Install...

SD Card Install
Page 3
Press the cover release and open the printer's top cover fully. WARNING! SD CARD INSTALLATION (C610/C711) The optional SD card enables collating of printed pages and can be used to store overlays and macros, fonts, and secure or proof documents waiting to be hot. OI 2. This area is clearly labelled. C610/C711 SD Card Installation > 3 Switch the printer off and disconnect the AC power cable. Do not touch. If the printer has been powered on recently, the fuser will be printed. 1.
Press the cover release and open the printer's top cover fully. WARNING! SD CARD INSTALLATION (C610/C711) The optional SD card enables collating of printed pages and can be used to store overlays and macros, fonts, and secure or proof documents waiting to be hot. OI 2. This area is clearly labelled. C610/C711 SD Card Installation > 3 Switch the printer off and disconnect the AC power cable. Do not touch. If the printer has been powered on recently, the fuser will be printed. 1.

SD Card Install
Page 4
Pull down the MP Tray using the depressions. 3. Lift the front cover release lever and lower the front cover. C610/C711 SD Card Installation > 4
Pull down the MP Tray using the depressions. 3. Lift the front cover release lever and lower the front cover. C610/C711 SD Card Installation > 4
SD Card Install
Page 5
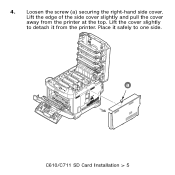
Place it safely to detach it from the printer at the top. 4. a C610/C711 SD Card Installation > 5 Lift the edge of the side cover slightly and pull the cover away from the printer. Lift the cover slightly to one side. Loosen the screw (a) securing the right-hand side cover.
Place it safely to detach it from the printer at the top. 4. a C610/C711 SD Card Installation > 5 Lift the edge of the side cover slightly and pull the cover away from the printer. Lift the cover slightly to one side. Loosen the screw (a) securing the right-hand side cover.

SD Card Install
Page 6
5. C610/C711 SD Card Installation > 6 Locate the retaining clips at the bottom of the side cover into the slot as shown. 7. Notice that the SD card has one chamfered corner. 6. Gently push the SD card into their rectangular holes near the bottom of the printer.
5. C610/C711 SD Card Installation > 6 Locate the retaining clips at the bottom of the side cover into the slot as shown. 7. Notice that the SD card has one chamfered corner. 6. Gently push the SD card into their rectangular holes near the bottom of the printer.

SD Card Install
Page 7
Close the front cover and the top cover, pressing down firmly at each side to the printer and refit the securing screw loosened in step 4. 9. 8. Close the top of the side cover up to latch it closed. 10. Reconnect the AC power cable and switch the printer on. C610/C711 SD Card Installation > 7
Close the front cover and the top cover, pressing down firmly at each side to the printer and refit the securing screw loosened in step 4. 9. 8. Close the top of the side cover up to latch it closed. 10. Reconnect the AC power cable and switch the printer on. C610/C711 SD Card Installation > 7
SD Card Install
Page 8
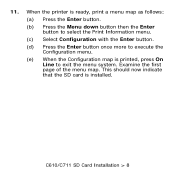
C610/C711 SD Card Installation > 8 This should now indicate that the SD card is printed, press On Line to execute the Configuration menu. (e) When the Configuration map is installed. 11. Examine the first page of the menu map. When the printer is ready, print a menu map as follows: (a) Press the Enter button. (b) Press the Menu down button then the Enter button to select the Print Information menu. (c) Select Configuration with the Enter button. (d) Press the Enter button once more to exit the menu system.
C610/C711 SD Card Installation > 8 This should now indicate that the SD card is printed, press On Line to execute the Configuration menu. (e) When the Configuration map is installed. 11. Examine the first page of the menu map. When the printer is ready, print a menu map as follows: (a) Press the Enter button. (b) Press the Menu down button then the Enter button to select the Print Information menu. (c) Select Configuration with the Enter button. (d) Press the Enter button once more to exit the menu system.
SD Card Install
Page 27
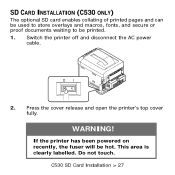
This area is clearly labelled. OI 2. WARNING! Switch the printer off and disconnect the AC power cable. Press the cover release and open the printer's top cover fully. If the printer has been powered on recently, the fuser will be printed. 1. SD CARD INSTALLATION (C530 ONLY) The optional SD card enables collating of printed pages and can be used to store overlays and macros, fonts, and secure or proof documents waiting to be hot. Do not touch. C530 SD Card Installation > 27
This area is clearly labelled. OI 2. WARNING! Switch the printer off and disconnect the AC power cable. Press the cover release and open the printer's top cover fully. If the printer has been powered on recently, the fuser will be printed. 1. SD CARD INSTALLATION (C530 ONLY) The optional SD card enables collating of printed pages and can be used to store overlays and macros, fonts, and secure or proof documents waiting to be hot. Do not touch. C530 SD Card Installation > 27

SD Card Install
Page 29
Place it from the printer at the top. 4. Lift the cover slightly to detach it safely to one side. Loosen the screw (a) securing the right-hand side cover. a C530 SD Card Installation > 29 Lift the edge of the side cover slightly and pull the cover away from the printer.
Place it from the printer at the top. 4. Lift the cover slightly to detach it safely to one side. Loosen the screw (a) securing the right-hand side cover. a C530 SD Card Installation > 29 Lift the edge of the side cover slightly and pull the cover away from the printer.
SD Card Install
Page 30
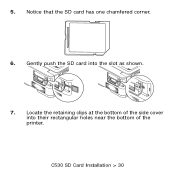
Gently push the SD card into their rectangular holes near the bottom of the printer. Locate the retaining clips at the bottom of the side cover into the slot as shown. 7. Notice that the SD card has one chamfered corner. 6. C530 SD Card Installation > 30 5.
Gently push the SD card into their rectangular holes near the bottom of the printer. Locate the retaining clips at the bottom of the side cover into the slot as shown. 7. Notice that the SD card has one chamfered corner. 6. C530 SD Card Installation > 30 5.
SD Card Install
Page 31
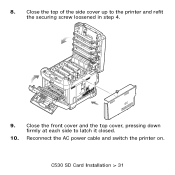
Close the front cover and the top cover, pressing down firmly at each side to the printer and refit the securing screw loosened in step 4. 9. Reconnect the AC power cable and switch the printer on. C530 SD Card Installation > 31 Close the top of the side cover up to latch it closed. 10. 8.
Close the front cover and the top cover, pressing down firmly at each side to the printer and refit the securing screw loosened in step 4. 9. Reconnect the AC power cable and switch the printer on. C530 SD Card Installation > 31 Close the top of the side cover up to latch it closed. 10. 8.

SD Card Install
Page 32
C530 SD Card Installation > 32 When the printer is ready, print a menu map as follows: (a) Press the Enter button. (b) Press the Menu down button then the Enter button to select the Print Information menu. (c) Select Configuration with the Enter button. (d) Press the Enter button once more to exit the menu system. 11. Examine the first page of the menu map. This should now indicate that the SD card is printed, press On Line to execute the Configuration menu. (e) When the Configuration map is installed.
C530 SD Card Installation > 32 When the printer is ready, print a menu map as follows: (a) Press the Enter button. (b) Press the Menu down button then the Enter button to select the Print Information menu. (c) Select Configuration with the Enter button. (d) Press the Enter button once more to exit the menu system. 11. Examine the first page of the menu map. This should now indicate that the SD card is printed, press On Line to execute the Configuration menu. (e) When the Configuration map is installed.

Duplex Installation Instructions
Page 1
.... The report prints and the printer goes back on line. 3 Engage Duplex Printing in the Printer Driver Windows® Note: Remember that if your printer is aaaaaa). 5. Enter the password (default password is shared between users on different computers, the driver must have administrator privileges. Press Enter. 10.Press the down arrow key to change the setting to push the unit all the way in until Print Setup displays. 7. Windows Vista, Windows 7: Click Start > Control Panel > Printers...
.... The report prints and the printer goes back on line. 3 Engage Duplex Printing in the Printer Driver Windows® Note: Remember that if your printer is aaaaaa). 5. Enter the password (default password is shared between users on different computers, the driver must have administrator privileges. Press Enter. 10.Press the down arrow key to change the setting to push the unit all the way in until Print Setup displays. 7. Windows Vista, Windows 7: Click Start > Control Panel > Printers...

Duplex Installation Instructions
Page 2
... menu. 7. Open the Mac OS X Print & Fax Preferences. 2. Highlight the printer name. 3. Macintosh OS X 10.3 (Panther) 1. Select Set Up Printers. 4. Select Driver. 5. Open the Mac OS X Print & Fax Preferences. 2. Select Duplex. 6. Select Duplex. 6. Highlight the printer name. 5. Macintosh OS X 10.4 (Tiger) 1. Select Printing. 3. Select Show Info. 6. Click Apply Changes. 2 English Choose Installable Options in the drop-down menu. 5. Macintosh OS X 10.6 (Snow Leopard) and 10.5 (Leopard) 1. Select Options & Supplies. 4. Select Printer Setup...
... menu. 7. Open the Mac OS X Print & Fax Preferences. 2. Highlight the printer name. 3. Macintosh OS X 10.3 (Panther) 1. Select Set Up Printers. 4. Select Driver. 5. Open the Mac OS X Print & Fax Preferences. 2. Select Duplex. 6. Select Duplex. 6. Highlight the printer name. 5. Macintosh OS X 10.4 (Tiger) 1. Select Printing. 3. Select Show Info. 6. Click Apply Changes. 2 English Choose Installable Options in the drop-down menu. 5. Macintosh OS X 10.6 (Snow Leopard) and 10.5 (Leopard) 1. Select Options & Supplies. 4. Select Printer Setup...


