
PrintSuperVision Configuration Guide
Page 56
... on historic usage) when a supply item will run out and when a maintenance item needs to be reminded of both supplies and maintenance items (such as fusers and transfer belts). 5. Select Show expected Empty from the drop down menu. 2. Select the Picture radio button if you wish to display and/or print...
... on historic usage) when a supply item will run out and when a maintenance item needs to be reminded of both supplies and maintenance items (such as fusers and transfer belts). 5. Select Show expected Empty from the drop down menu. 2. Select the Picture radio button if you wish to display and/or print...
PrintSuperVision Configuration Guide
Page 61
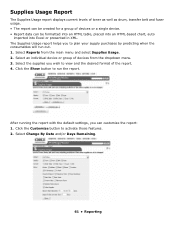
.... 1. Select Reports from the dropdown menu. 3. Supplies Usage Report The Supplies Usage report displays current levels of toner as well as drum, transfer belt and fuser usage. • The report can be created for a group of devices or a single device. • Report data can customize the report: 1. After running the report...
.... 1. Select Reports from the dropdown menu. 3. Supplies Usage Report The Supplies Usage report displays current levels of toner as well as drum, transfer belt and fuser usage. • The report can be created for a group of devices or a single device. • Report data can customize the report: 1. After running the report...

Handy Reference Guide
Page 25
Fuser may be HOT! Clearing Media Jams Jam 382 OPEN TOP COVER 382: PAPER JAM 1 2 4 CAUTION! To remove the sheet if it is trapped in the fuser, reach inside the printer and push the fuser pressure release lever (1) towards the front and down, and pull out the sheet. Then let go of the fuser pressure release lever. • If the sheet does not come out easily, go to step 3. • If the sheet does come out easily, close the cover. 3 24
Fuser may be HOT! Clearing Media Jams Jam 382 OPEN TOP COVER 382: PAPER JAM 1 2 4 CAUTION! To remove the sheet if it is trapped in the fuser, reach inside the printer and push the fuser pressure release lever (1) towards the front and down, and pull out the sheet. Then let go of the fuser pressure release lever. • If the sheet does not come out easily, go to step 3. • If the sheet does come out easily, close the cover. 3 24
Handy Reference Guide
Page 27
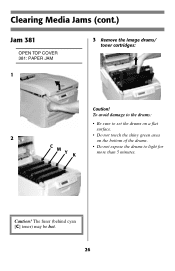
Clearing Media Jams (cont.) Jam 381 OPEN TOP COVER 381: PAPER JAM 1 3 Remove the image drums/ toner cartridges: Caution! To avoid damage to the drums: • Be sure to set the drums on a flat surface. 2 • Do not touch the shiny green area on the bottom of the drums. CMY K • Do not expose the drums to light for more than 5 minutes. Caution! The fuser (behind cyan [C] toner) may be hot. 26
Clearing Media Jams (cont.) Jam 381 OPEN TOP COVER 381: PAPER JAM 1 3 Remove the image drums/ toner cartridges: Caution! To avoid damage to the drums: • Be sure to set the drums on a flat surface. 2 • Do not touch the shiny green area on the bottom of the drums. CMY K • Do not expose the drums to light for more than 5 minutes. Caution! The fuser (behind cyan [C] toner) may be hot. 26

Handy Reference Guide
Page 28
If the printer has been printing, the fuser will be HOT! To remove a sheet trapped in the fuser, grasp the edge of the fuser pressure release lever. 7 CMY K If the sheet is well advanced into the fuser, see step 4 under "Jam 382." 27 Clearing Media Jams (cont.) 4 5 6 Warning! Then let go of the sheet, push the fuser pressure release lever (1) towards the front and down, and lift out the sheet.
If the printer has been printing, the fuser will be HOT! To remove a sheet trapped in the fuser, grasp the edge of the fuser pressure release lever. 7 CMY K If the sheet is well advanced into the fuser, see step 4 under "Jam 382." 27 Clearing Media Jams (cont.) 4 5 6 Warning! Then let go of the sheet, push the fuser pressure release lever (1) towards the front and down, and lift out the sheet.

Handy Reference Guide
Page 31
Then let go of the fuser pressure release lever. 3 30 If the sheet is trapped in the fuser, lift the top cover, reach in and push the fuser pressure release lever (1) towards the front and down, and pull out the sheet. Clearing Media Jams (cont.) CAUTION! Fuser may be HOT!
Then let go of the fuser pressure release lever. 3 30 If the sheet is trapped in the fuser, lift the top cover, reach in and push the fuser pressure release lever (1) towards the front and down, and pull out the sheet. Clearing Media Jams (cont.) CAUTION! Fuser may be HOT!

Handy Reference Guide
Page 40
... into the printer, pushing it is firmly locked in place. What to be changed. 39 What to Do Turn the printer off, then on the fuser to Do The user should disappear. PRESS ONLINE SW INVALID DATA The hard disk drive is not properly installed. CANCELLING JOB (USER DENIED) The Job... the color xxx toner sensor. What to indicate that there is either end of the display to Do Open the top cover and check the fuser: 1. You should feel the latches at either • not authorized to print or • trying to print a color job and only authorized to Do Press...
... into the printer, pushing it is firmly locked in place. What to be changed. 39 What to Do Turn the printer off, then on the fuser to Do The user should disappear. PRESS ONLINE SW INVALID DATA The hard disk drive is not properly installed. CANCELLING JOB (USER DENIED) The Job... the color xxx toner sensor. What to indicate that there is either end of the display to Do Open the top cover and check the fuser: 1. You should feel the latches at either • not authorized to print or • trying to print a color job and only authorized to Do Press...
OKI C5100 User's Guide
Page 4
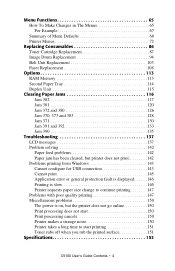
... Example 67 Summary of Menu Defaults 68 Printer Menus 72 Replacing Consumables 86 Toner Cartridge Replacement 87 Image Drum Replacement 94 Belt Unit Replacement 103 Fuser Replacement 108 Options 113 RAM Memory 113 Second Paper Tray 114 Duplex Unit 115 Clearing Paper Jams 116 Jam 382 117 Jam 381 120 Jam...
... Example 67 Summary of Menu Defaults 68 Printer Menus 72 Replacing Consumables 86 Toner Cartridge Replacement 87 Image Drum Replacement 94 Belt Unit Replacement 103 Fuser Replacement 108 Options 113 RAM Memory 113 Second Paper Tray 114 Duplex Unit 115 Clearing Paper Jams 116 Jam 382 117 Jam 381 120 Jam...
OKI C5100 User's Guide
Page 13
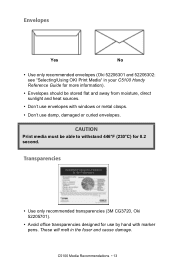
...). • Avoid office transparencies designed for 0.2 second. Envelopes Yes No • Use only recommended envelopes (Oki 52206301 and 52206302: see "Selecting/Using OKI Print Media" in the fuser and cause damage. C5100 Media Recommendations • 13 These will melt in your C5100 Handy Reference Guide for more information). • Envelopes should be able...
...). • Avoid office transparencies designed for 0.2 second. Envelopes Yes No • Use only recommended envelopes (Oki 52206301 and 52206302: see "Selecting/Using OKI Print Media" in the fuser and cause damage. C5100 Media Recommendations • 13 These will melt in your C5100 Handy Reference Guide for more information). • Envelopes should be able...
OKI C5100 User's Guide
Page 71
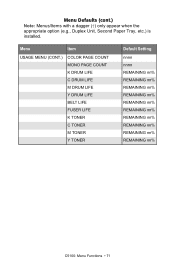
Menu Defaults (cont.) Note: Menus/Items with a dagger (†) only appear when the appropriate option (e.g., Duplex Unit, Second Paper Tray, etc.) is installed. Menu Item USAGE MENU (CONT.) COLOR PAGE COUNT MONO PAGE COUNT K DRUM LIFE C DRUM LIFE M DRUM LIFE Y DRUM LIFE BELT LIFE FUSER LIFE K TONER C TONER M TONER Y TONER Default Setting nnnn nnnn REMAINING nn% REMAINING nn% REMAINING nn% REMAINING nn% REMAINING nn% REMAINING nn% REMAINING nn% REMAINING nn% REMAINING nn% REMAINING nn% C5100: Menu Functions • 71
Menu Defaults (cont.) Note: Menus/Items with a dagger (†) only appear when the appropriate option (e.g., Duplex Unit, Second Paper Tray, etc.) is installed. Menu Item USAGE MENU (CONT.) COLOR PAGE COUNT MONO PAGE COUNT K DRUM LIFE C DRUM LIFE M DRUM LIFE Y DRUM LIFE BELT LIFE FUSER LIFE K TONER C TONER M TONER Y TONER Default Setting nnnn nnnn REMAINING nn% REMAINING nn% REMAINING nn% REMAINING nn% REMAINING nn% REMAINING nn% REMAINING nn% REMAINING nn% REMAINING nn% REMAINING nn% C5100: Menu Functions • 71
OKI C5100 User's Guide
Page 86
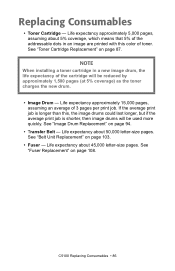
... the cartridge will be reduced by approximately 1,500 pages (at 5% coverage) as the toner charges the new drum. • Image Drum - See "Fuser Replacement" on page 103. • Fuser - Life expectancy approximately 15,000 pages, assuming an average of toner. See "Belt Unit Replacement" on page 108. Life expectancy about 45,000...
... the cartridge will be reduced by approximately 1,500 pages (at 5% coverage) as the toner charges the new drum. • Image Drum - See "Fuser Replacement" on page 103. • Fuser - Life expectancy approximately 15,000 pages, assuming an average of toner. See "Belt Unit Replacement" on page 108. Life expectancy about 45,000...

OKI C5100 User's Guide
Page 88
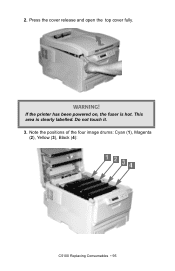
If the printer has been powered on, the fuser is clearly labelled. This area is hot. Note the positions of the four cartridges: Cyan (1), Magenta (2), Yellow (3), Black (4): C5100 Replacing Consumables • 88 Press the cover release and open the printer's top cover fully. 1. WARNING! Do not touch. 2.
If the printer has been powered on, the fuser is clearly labelled. This area is hot. Note the positions of the four cartridges: Cyan (1), Magenta (2), Yellow (3), Black (4): C5100 Replacing Consumables • 88 Press the cover release and open the printer's top cover fully. 1. WARNING! Do not touch. 2.
OKI C5100 User's Guide
Page 95
This area is hot. If the printer has been powered on, the fuser is clearly labelled. Do not touch it. 3. Press the cover release and open the top cover fully. Note the positions of the four image drums: Cyan (1), Magenta (2), Yellow (3), Black (4): C5100 Replacing Consumables • 95 2. WARNING!
This area is hot. If the printer has been powered on, the fuser is clearly labelled. Do not touch it. 3. Press the cover release and open the top cover fully. Note the positions of the four image drums: Cyan (1), Magenta (2), Yellow (3), Black (4): C5100 Replacing Consumables • 95 2. WARNING!
OKI C5100 User's Guide
Page 103
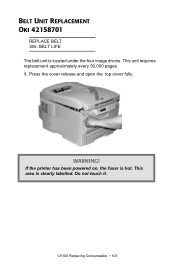
If the printer has been powered on, the fuser is clearly labelled. C5100 Replacing Consumables • 103 Press the cover release and open the top cover fully. Do not touch it. This area is hot. WARNING! BELT UNIT REPLACEMENT OKI 42158701 REPLACE BELT 355: BELT LIFE The belt unit is located under the four image drums. This unit requires replacement approximately every 50,000 pages. 1.
If the printer has been powered on, the fuser is clearly labelled. C5100 Replacing Consumables • 103 Press the cover release and open the top cover fully. Do not touch it. This area is hot. WARNING! BELT UNIT REPLACEMENT OKI 42158701 REPLACE BELT 355: BELT LIFE The belt unit is located under the four image drums. This unit requires replacement approximately every 50,000 pages. 1.
OKI C5100 User's Guide
Page 108
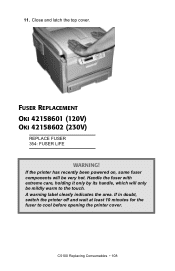
If the printer has recently been powered on, some fuser components will only be very hot. FUSER REPLACEMENT OKI 42158601 (120V) OKI 42158602 (230V) REPLACE FUSER 354: FUSER LIFE WARNING! 11. C5100 Replacing Consumables • 108 Handle the fuser with extreme care, holding it only by its handle, which will be mildly warm to cool before opening the printer cover. A warning label clearly indicates the area. If in doubt, switch the printer off and wait at least 10 minutes for the fuser to the touch. Close and latch the top cover.
If the printer has recently been powered on, some fuser components will only be very hot. FUSER REPLACEMENT OKI 42158601 (120V) OKI 42158602 (230V) REPLACE FUSER 354: FUSER LIFE WARNING! 11. C5100 Replacing Consumables • 108 Handle the fuser with extreme care, holding it only by its handle, which will be mildly warm to cool before opening the printer cover. A warning label clearly indicates the area. If in doubt, switch the printer off and wait at least 10 minutes for the fuser to the touch. Close and latch the top cover.
OKI C5100 User's Guide
Page 109
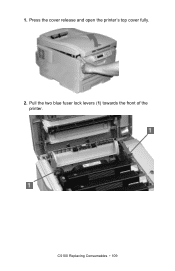
C5100 Replacing Consumables • 109 1. Pull the two blue fuser lock levers (1) towards the front of the printer. Press the cover release and open the printer's top cover fully. 2.
C5100 Replacing Consumables • 109 1. Pull the two blue fuser lock levers (1) towards the front of the printer. Press the cover release and open the printer's top cover fully. 2.
OKI C5100 User's Guide
Page 110
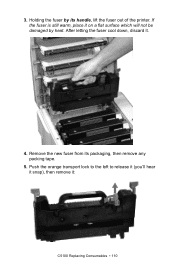
Remove the new fuser from its handle, lift the fuser out of the printer. Push the orange transport lock to the left to release it (you'll hear it snap), then remove it . 4. Holding the fuser by heat. 3. If the fuser is still warm, place it on a flat surface which will not be damaged by its packaging, then remove any packing tape. 5. After letting the fuser cool down, discard it : C5100 Replacing Consumables • 110
Remove the new fuser from its handle, lift the fuser out of the printer. Push the orange transport lock to the left to release it (you'll hear it snap), then remove it . 4. Holding the fuser by heat. 3. If the fuser is still warm, place it on a flat surface which will not be damaged by its packaging, then remove any packing tape. 5. After letting the fuser cool down, discard it : C5100 Replacing Consumables • 110
OKI C5100 User's Guide
Page 111
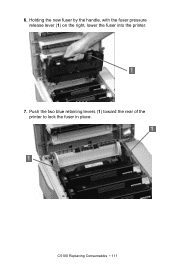
Holding the new fuser by the handle, with the fuser pressure release lever (1) on the right, lower the fuser into the printer. 7. 6. C5100 Replacing Consumables • 111 Push the two blue retaining levers (1) toward the rear of the printer to lock the fuser in place.
Holding the new fuser by the handle, with the fuser pressure release lever (1) on the right, lower the fuser into the printer. 7. 6. C5100 Replacing Consumables • 111 Push the two blue retaining levers (1) toward the rear of the printer to lock the fuser in place.

OKI C5100 User's Guide
Page 118
Pull out the jammed sheet. If the sheet is partially jammed in the fuser. Then let go of the fuser pressure release lever. WARNING! The fuser may be HOT! C5100 Clearing Paper Jams • 118 To get it is difficult to remove, it out, reach around the top cover and press down on the fuser pressure release lever (1) before pulling the sheet out. Important! 4.
Pull out the jammed sheet. If the sheet is partially jammed in the fuser. Then let go of the fuser pressure release lever. WARNING! The fuser may be HOT! C5100 Clearing Paper Jams • 118 To get it is difficult to remove, it out, reach around the top cover and press down on the fuser pressure release lever (1) before pulling the sheet out. Important! 4.
OKI C5100 User's Guide
Page 121
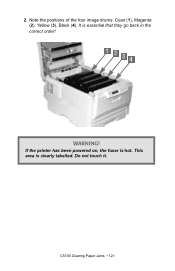
C5100 Clearing Paper Jams • 121 If the printer has been powered on, the fuser is essential that they go back in the correct order! It is hot. WARNING! Do not touch it. This area is clearly labelled. 2. Note the positions of the four image drums: Cyan (1), Magenta (2), Yellow (3), Black (4).
C5100 Clearing Paper Jams • 121 If the printer has been powered on, the fuser is essential that they go back in the correct order! It is hot. WARNING! Do not touch it. This area is clearly labelled. 2. Note the positions of the four image drums: Cyan (1), Magenta (2), Yellow (3), Black (4).


