PrintSuperVision Configuration Guide
Page 7
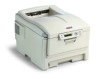
... to monitor and manage several hundred print/copy devices. New Names/New Editions PSV Version 3.6 introduces two new editions that better support various size organizations. • The Professional Edition is generally installed on a XP or Vista class Windows laptop or desktop that does not require a server and can be installed on a centrally located Windows server accessible from any browser-enabled device. It is designed for small...
... to monitor and manage several hundred print/copy devices. New Names/New Editions PSV Version 3.6 introduces two new editions that better support various size organizations. • The Professional Edition is generally installed on a XP or Vista class Windows laptop or desktop that does not require a server and can be installed on a centrally located Windows server accessible from any browser-enabled device. It is designed for small...
PrintSuperVision Configuration Guide
Page 15
... the desired Email Server Address and SMTP server port (default port number is recommended, but you would like more frequent updates reported from the set up menu and select whether the PSV Services should start and stop the PrintSuperVision Service from your settings. 9. If your organization uses these communication protocols. 4. Set to obtain device status. Permits streaming. Indicate the interval time (in the fields provided. Test the email connection by clicking the Test button. PSV...
... the desired Email Server Address and SMTP server port (default port number is recommended, but you would like more frequent updates reported from the set up menu and select whether the PSV Services should start and stop the PrintSuperVision Service from your settings. 9. If your organization uses these communication protocols. 4. Set to obtain device status. Permits streaming. Indicate the interval time (in the fields provided. Test the email connection by clicking the Test button. PSV...
OkiLAN 8100 SoftNIC User's Guide
Page 13
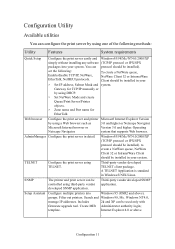
... be controlled using DHCP. > Set NetWare Mode and create Queue/Print Server/Printer objects. > Zone name and Port name for EtherTalk. set the following methods: Utility Features System requirements Quick Setup Configure the print server easily and Windows95/98/Me/NT4.0/2000/XP simply without installing any software (TCP/IP protocol or IPX/SPX packages into groups. AdminManager Configure the print server in Windows/UNIX/Linux. Setup Assistant Configure multiple printers into your > Set IP address...
... be controlled using DHCP. > Set NetWare Mode and create Queue/Print Server/Printer objects. > Zone name and Port name for EtherTalk. set the following methods: Utility Features System requirements Quick Setup Configure the print server easily and Windows95/98/Me/NT4.0/2000/XP simply without installing any software (TCP/IP protocol or IPX/SPX packages into groups. AdminManager Configure the print server in Windows/UNIX/Linux. Setup Assistant Configure multiple printers into your > Set IP address...
OkiLAN 8100 SoftNIC User's Guide
Page 28
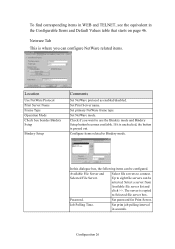
... file server list and click >>. Job Polling Time. Netware Tab This is where you want to use the Bindery mode and Bindery Setup button becomes available. Set NetWare mode. Select file servers to Bindery mode. To find corresponding items in WEB and TELNET, see the equivalent in seconds. Set Print Server name. If it is unchecked, the button is copied to eight file servers can configure NetWare related items. Location Use NetWare Protocol Print Server Name Frame Type Operation Mode Check...
... file server list and click >>. Job Polling Time. Netware Tab This is where you want to use the Bindery mode and Bindery Setup button becomes available. Set NetWare mode. Select file servers to Bindery mode. To find corresponding items in WEB and TELNET, see the equivalent in seconds. Set Print Server name. If it is unchecked, the button is copied to eight file servers can configure NetWare related items. Location Use NetWare Protocol Print Server Name Frame Type Operation Mode Check...
OkiLAN 8100 SoftNIC User's Guide
Page 31
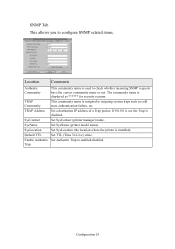
... outgoing system traps such as ****** for security reasons. Enable Authentic Set Authentic Trap to enabled/disabled. Trap Configuration 29 SysLocation Set SysLocation (the location where the printer is disabled. If 0.0.0.0 is set, the Trap is installed). Default TTL Set TTL (Time To Live) value. TRAP Address Set a destination IP address of a Trap packet. The community name is used to check whether incoming SNMP requests have the correct community name...
... outgoing system traps such as ****** for security reasons. Enable Authentic Set Authentic Trap to enabled/disabled. Trap Configuration 29 SysLocation Set SysLocation (the location where the printer is disabled. If 0.0.0.0 is set, the Trap is installed). Default TTL Set TTL (Time To Live) value. TRAP Address Set a destination IP address of a Trap packet. The community name is used to check whether incoming SNMP requests have the correct community name...
OkiLAN 8100 SoftNIC User's Guide
Page 51
...OKI Device Setup][NetWare][RPRINTER Setup][Selected print server] [Network Configuration][NetWare]-[Remote Printer Mode][NetWare Print Server Names] NetWare-12 [OKI Device Setup][NetWare][RPRINTER Setup]-[Time Out] [Network Configuration][NetWare]-[Remote Printer Mode]- [Job Timeout] EtherTalk-1 [OKI Device [Network Setup]- Configuration]- [EtherTalk]- [General Settings]- [Use EtherTalk [Protocol Options]- Admin Manager Web browser NetWare-6 NetWare-7 NetWare-8 [OKI Device Setup][NetWare][Bindery Setup][Password] [OKI Device Setup][NetWare][Bindery Setup]-[Job Polling Time...
...OKI Device Setup][NetWare][RPRINTER Setup][Selected print server] [Network Configuration][NetWare]-[Remote Printer Mode][NetWare Print Server Names] NetWare-12 [OKI Device Setup][NetWare][RPRINTER Setup]-[Time Out] [Network Configuration][NetWare]-[Remote Printer Mode]- [Job Timeout] EtherTalk-1 [OKI Device [Network Setup]- Configuration]- [EtherTalk]- [General Settings]- [Use EtherTalk [Protocol Options]- Admin Manager Web browser NetWare-6 NetWare-7 NetWare-8 [OKI Device Setup][NetWare][Bindery Setup][Password] [OKI Device Setup][NetWare][Bindery Setup]-[Job Polling Time...
OkiLAN 8100 SoftNIC User's Guide
Page 62
... Password] [Network Configuration][Email Settings][Email Receive Settings][APOP Support] [Network Configuration][Email Settings][Email Receive Settings][POP Receive Interval] TELNET/ Diagnostic test print [Setup POP (E-Mail)]-[POP3 port number] [Setup POP (E-Mail)]-[POP3 server UserID] [Setup POP (E-Mail)]-[POP3 server Password] [Setup POP (E-Mail)][User APOP] [Setup POP (E-Mail)][Retrieve every(min.)] [Setup]-[Reset] [Network Configuration][General Settings][Restore Factory Defaults] Reset to factory set [Network Configuration][General Settings][System Information]- [Printer Serial Number...
... Password] [Network Configuration][Email Settings][Email Receive Settings][APOP Support] [Network Configuration][Email Settings][Email Receive Settings][POP Receive Interval] TELNET/ Diagnostic test print [Setup POP (E-Mail)]-[POP3 port number] [Setup POP (E-Mail)]-[POP3 server UserID] [Setup POP (E-Mail)]-[POP3 server Password] [Setup POP (E-Mail)][User APOP] [Setup POP (E-Mail)][Retrieve every(min.)] [Setup]-[Reset] [Network Configuration][General Settings][Restore Factory Defaults] Reset to factory set [Network Configuration][General Settings][System Information]- [Printer Serial Number...
OkiLAN 8100 SoftNIC User's Guide
Page 69
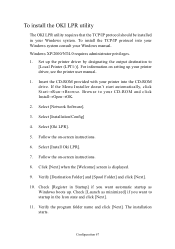
... [Oki LPR]. 5. Windows XP/2000/NT4.0 requires administrator privileges. 1. Select [Network Software]. 3. Click [Next] when the [Welcome] screen is displayed. 9. Verify the program folder name and click [Next]. For information on -screen instructions. 6. Browse to [Local Printer (LPT1:)]. The installation starts. Select [Install Oki LPR]. 7. Select [Installation/Config] 4. Check [Register in the Icon state and click [Next]. 11. Configuration 67 Set up your printer driver, see the printer user manual. 1. To install...
... [Oki LPR]. 5. Windows XP/2000/NT4.0 requires administrator privileges. 1. Select [Network Software]. 3. Click [Next] when the [Welcome] screen is displayed. 9. Verify the program folder name and click [Next]. For information on -screen instructions. 6. Browse to [Local Printer (LPT1:)]. The installation starts. Select [Install Oki LPR]. 7. Select [Installation/Config] 4. Check [Register in the Icon state and click [Next]. 11. Configuration 67 Set up your printer driver, see the printer user manual. 1. To install...
OkiLAN 8100 SoftNIC User's Guide
Page 72
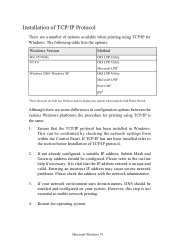
... address with the network administrator. 3. Microsoft Windows 70 Although there are some differences in Windows. It is not essential to the on your network environment uses domain names, DNS should be configured. If not already configured, a suitable IP address, Subnet Mask and Gateway address should be confirmed by checking the network settings from within the Control Panel. Restart the operating system. Installation of TCP/IP Protocol There are a number...
... address with the network administrator. 3. Microsoft Windows 70 Although there are some differences in Windows. It is not essential to the on your network environment uses domain names, DNS should be configured. If not already configured, a suitable IP address, Subnet Mask and Gateway address should be confirmed by checking the network settings from within the Control Panel. Restart the operating system. Installation of TCP/IP Protocol There are a number...
OkiLAN 8100 SoftNIC User's Guide
Page 79
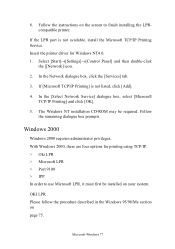
8. If the LPR port is not listed, click [Add]. 4. Windows 2000 Windows 2000 requires administrator privileges. Select [Start]→[Settings]→[Control Panel] and then double-click the [[Network] icon. 2. Microsoft Windows 77 The Windows NT installation CD-ROM may be installed on your system. OKI LPR Please follow the procedure described in the Windows 95/98/Me section on the screen to use Microsoft LPR, it must first...
8. If the LPR port is not listed, click [Add]. 4. Windows 2000 Windows 2000 requires administrator privileges. Select [Start]→[Settings]→[Control Panel] and then double-click the [[Network] icon. 2. Microsoft Windows 77 The Windows NT installation CD-ROM may be installed on your system. OKI LPR Please follow the procedure described in the Windows 95/98/Me section on the screen to use Microsoft LPR, it must first...

OkiLAN 8100 SoftNIC User's Guide
Page 117
.... Turn the printer off and on again. Check the printer driver has been mapped to the File Server. Check the Machine name is the same as the Print Server name set in the client's printer settings. PostScript error occurs if a Banner Page is connected to the correct netware queue. Print Server mode Check the File Server name set in NetWare 3.12 Remote Printer mode. Check the network cable is displayed. If a PostScript printer is used and a Banner Page is printed, PostScript error is correctly connected. EtherTalk...
.... Turn the printer off and on again. Check the printer driver has been mapped to the File Server. Check the Machine name is the same as the Print Server name set in the client's printer settings. PostScript error occurs if a Banner Page is connected to the correct netware queue. Print Server mode Check the File Server name set in NetWare 3.12 Remote Printer mode. Check the network cable is displayed. If a PostScript printer is used and a Banner Page is printed, PostScript error is correctly connected. EtherTalk...

Handy Reference Guide
Page 12
...-sided printing: load face up to 148 mm], max. 8.5" x 14" [216 x 356 mm] (Non-standard sizes must be fed one sheet at a time. Index, 75 to 203 g/m2 metric) Size Range: Min. 3.94" x 5.83" [100 to 47.25'' [1.2 m] long. paper, 50 transparencies, 10 envelopes Labels: max. Takes: 100 sheets of 20-lb. US Bond (42 to 54 lb. Loading Media Multi-Purpose Tray...
...-sided printing: load face up to 148 mm], max. 8.5" x 14" [216 x 356 mm] (Non-standard sizes must be fed one sheet at a time. Index, 75 to 203 g/m2 metric) Size Range: Min. 3.94" x 5.83" [100 to 47.25'' [1.2 m] long. paper, 50 transparencies, 10 envelopes Labels: max. Takes: 100 sheets of 20-lb. US Bond (42 to 54 lb. Loading Media Multi-Purpose Tray...
Handy Reference Guide
Page 16
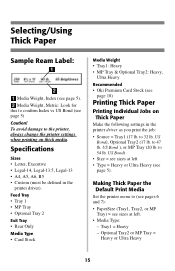
.... Making Thick Paper the Default Print Media Set the printer menu to the printer, always change the printer settings when printing on Thick Paper Make the following settings in the printer driver). to 47 lb. Feed Tray • Tray 1 • MP Tray • Optional Tray 2 Exit Tray • Rear Only Media Type • Card Stock Media Weight • Tray1: Heavy • MP Tray & Optional Tray2: Heavy, Ultra Heavy Recommended • Oki Premium Card Stock (see page 18) Printing Thick Paper Printing Individual Jobs on thick media. Media Weight...
.... Making Thick Paper the Default Print Media Set the printer menu to the printer, always change the printer settings when printing on Thick Paper Make the following settings in the printer driver). to 47 lb. Feed Tray • Tray 1 • MP Tray • Optional Tray 2 Exit Tray • Rear Only Media Type • Card Stock Media Weight • Tray1: Heavy • MP Tray & Optional Tray2: Heavy, Ultra Heavy Recommended • Oki Premium Card Stock (see page 18) Printing Thick Paper Printing Individual Jobs on thick media. Media Weight...
OKI C5100 User's Guide
Page 4
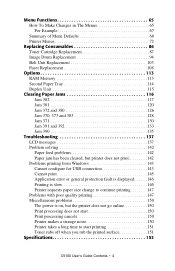
... Menu Defaults 68 Printer Menus 72 Replacing Consumables 86 Toner Cartridge Replacement 87 Image Drum Replacement 94 Belt Unit Replacement 103 Fuser Replacement 108 Options 113 RAM Memory 113 Second Paper Tray 114 Duplex Unit 115 Clearing Paper Jams 116 Jam 382 117 Jam 381 120 Jam 372 and 380 126 Jam 370, 373 and 383 128 Jam 371 130 Jam 391 and 392 133 Jam 390 135 Troubleshooting 137 LCD messages 137 Problem solving 142 Paper feed problems 142 Paper jam has been cleared, but printer does not print...
... Menu Defaults 68 Printer Menus 72 Replacing Consumables 86 Toner Cartridge Replacement 87 Image Drum Replacement 94 Belt Unit Replacement 103 Fuser Replacement 108 Options 113 RAM Memory 113 Second Paper Tray 114 Duplex Unit 115 Clearing Paper Jams 116 Jam 382 117 Jam 381 120 Jam 372 and 380 126 Jam 370, 373 and 383 128 Jam 371 130 Jam 391 and 392 133 Jam 390 135 Troubleshooting 137 LCD messages 137 Problem solving 142 Paper feed problems 142 Paper jam has been cleared, but printer does not print...

OKI C5100 User's Guide
Page 78
... many seconds the printer will attempt to print again any pages lost due to print the error details when an error occurs. Items POW SAVE TIME CLEARABLE WARNING MANUAL TIMEOUT WAIT TIMEOUT LOW TONER JAM RECOVERY ERROR REPORT Settings 5 15 30 60 240 ON JOB OFF 30 60 5 to 1 minute before cancelling the job. System Configuration Menu Note: Factory default settings are only cleared when the print job resumes. In this mode power consumption is reduced...
... many seconds the printer will attempt to print again any pages lost due to print the error details when an error occurs. Items POW SAVE TIME CLEARABLE WARNING MANUAL TIMEOUT WAIT TIMEOUT LOW TONER JAM RECOVERY ERROR REPORT Settings 5 15 30 60 240 ON JOB OFF 30 60 5 to 1 minute before cancelling the job. System Configuration Menu Note: Factory default settings are only cleared when the print job resumes. In this mode power consumption is reduced...
OKI C5100 User's Guide
Page 142
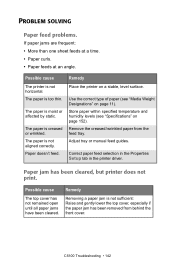
.... Use the correct type of paper (see "Specifications" on page 152). Possible cause The top cover has not remained open until all paper jams have been cleared. Adjust tray or manual feed guides. Correct paper feed selection in the Properties Setup tab in the printer driver. The paper is not sufficient: Raise and gently lower the top cover, especially if the paper jam has been removed from the feed tray. Paper jam has been cleared, but printer does not print. C5100 Troubleshooting •...
.... Use the correct type of paper (see "Specifications" on page 152). Possible cause The top cover has not remained open until all paper jams have been cleared. Adjust tray or manual feed guides. Correct paper feed selection in the Properties Setup tab in the printer driver. The paper is not sufficient: Raise and gently lower the top cover, especially if the paper jam has been removed from the feed tray. Paper jam has been cleared, but printer does not print. C5100 Troubleshooting •...
OKI C5100 User's Guide
Page 145
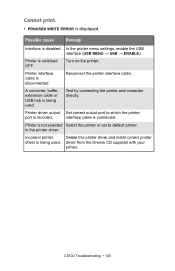
In the printer menu settings, enable the USB interface (USB MENU → USB → ENABLE). Incorrect printer Delete this printer driver and install correct printer driver is disabled. Turn on the printer. Printer is not selected Select the printer or set to which the printer port is being used . Possible cause Remedy Interface is being used . Printer is connected. interface cable is switched OFF. Cannot print. • PRNUSBX WRITE ERROR is disconnected. Test by connecting the printer and computer directly. driver from the Drivers CD ...
In the printer menu settings, enable the USB interface (USB MENU → USB → ENABLE). Incorrect printer Delete this printer driver and install correct printer driver is disabled. Turn on the printer. Printer is not selected Select the printer or set to which the printer port is being used . Possible cause Remedy Interface is being used . Printer is connected. interface cable is switched OFF. Cannot print. • PRNUSBX WRITE ERROR is disconnected. Test by connecting the printer and computer directly. driver from the Drivers CD ...

OKI C5100 User's Guide
Page 150
... the left and right sides of the printer and remove any paper or other foreign such objects. Reset time out in the menu to a higher value (SYS CONFIG MENU → WAIT TIMEOUT). MISCELLANEOUS PROBLEMS The power is on . Possible cause Bad connection Remedy Switch off the printer and disconnect the power cable. Possible cause Printer error Remedy Check the control panel. Place the printer on a stable, level surface. If an error message is displayed, correct the...
... the left and right sides of the printer and remove any paper or other foreign such objects. Reset time out in the menu to a higher value (SYS CONFIG MENU → WAIT TIMEOUT). MISCELLANEOUS PROBLEMS The power is on . Possible cause Bad connection Remedy Switch off the printer and disconnect the power cable. Possible cause Printer error Remedy Check the control panel. Place the printer on a stable, level surface. If an error message is displayed, correct the...
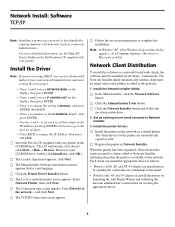
C5100 Software Installation Guide
Page 5
... Next. □ The Menu Installer Software Installation window appears. Set up existing server email accounts in the CD-ROM drive. When the printer has been registered, Network Installer sends an email to clients added to your language. □ Click the Printer Driver Installer button. □ The Local or network printer screen appears. The CD will autorun. (If it using the front panel: • Press + until you see NETWORK MENU on the display, then press ENTER. •...
... Next. □ The Menu Installer Software Installation window appears. Set up existing server email accounts in the CD-ROM drive. When the printer has been registered, Network Installer sends an email to clients added to your language. □ Click the Printer Driver Installer button. □ The Local or network printer screen appears. The CD will autorun. (If it using the front panel: • Press + until you see NETWORK MENU on the display, then press ENTER. •...
C5100/C5300 Duplex Option Installation Instructions
Page 1
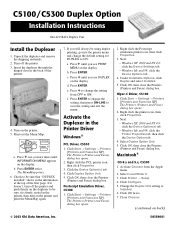
... using duplex printing, go into the printer menu and change the setting from the Apple menu. 2. Close Chooser. (continued on the display. Press ENTER twice. Select LaserWriter 8. 3. Press + to change the default setting for XP]. Press ENTER to engage the setting, then press ON-LINE to Installed. 6. Click Duplex Option Unit. 5. b. Change the Duplex Unit setting to save the setting and exit the menu. The Printers (Printers and Faxes) dialog box opens. 2. C5100/C5300 Duplex Option Installation Instructions Oki 42158401 Duplex Unit Install the Duplexer...
... using duplex printing, go into the printer menu and change the setting from the Apple menu. 2. Close Chooser. (continued on the display. Press ENTER twice. Select LaserWriter 8. 3. Press + to change the default setting for XP]. Press ENTER to engage the setting, then press ON-LINE to Installed. 6. Click Duplex Option Unit. 5. b. Change the Duplex Unit setting to save the setting and exit the menu. The Printers (Printers and Faxes) dialog box opens. 2. C5100/C5300 Duplex Option Installation Instructions Oki 42158401 Duplex Unit Install the Duplexer...


