
User Guide
Page 5
... lock (Keyguard) ...28 Changing the front and back cover...30 3. Writing text 36 Setting predictive text input on... replying to a message or a SMS e-mail 52 Inbox and outbox folders ...53 Templates...53 Copyright © 2004 Nokia. Using the menu 41 Accessing a menu function ...41 List of menu functions...43 Messages (Menu 1)...48 Text messages...writing text ...38 5. All rights reserved. 5 Basic functions 32 Making a call ...32 Speed dialling a phone number ...33 Making a conference call ...33 Answering or rejecting an incoming call 34 Call waiting...34 Options during a call ...
... lock (Keyguard) ...28 Changing the front and back cover...30 3. Writing text 36 Setting predictive text input on... replying to a message or a SMS e-mail 52 Inbox and outbox folders ...53 Templates...53 Copyright © 2004 Nokia. Using the menu 41 Accessing a menu function ...41 List of menu functions...43 Messages (Menu 1)...48 Text messages...writing text ...38 5. All rights reserved. 5 Basic functions 32 Making a call ...32 Speed dialling a phone number ...33 Making a conference call ...33 Answering or rejecting an incoming call 34 Call waiting...34 Options during a call ...

User Guide
Page 16
...See Multimedia messages on page 58, or download them via multimedia service, see Changing the front and back cover on page 30. ■ Multimedia messaging service (MMS) The phone is able to a multimedia message on page 56. ■ Polyphonic sound (MIDI) Polyphonic sound consists of... sounds. You can be used in the phone The Nokia 3120 phone provides many more. Your phone has sound components from over 40 instruments that can receive polyphonic ringing tones via the gallery Copyright © 2004 Nokia. To change the cover, see Reading and replying to send multimedia messages...
...See Multimedia messages on page 58, or download them via multimedia service, see Changing the front and back cover on page 30. ■ Multimedia messaging service (MMS) The phone is able to a multimedia message on page 56. ■ Polyphonic sound (MIDI) Polyphonic sound consists of... sounds. You can be used in the phone The Nokia 3120 phone provides many more. Your phone has sound components from over 40 instruments that can receive polyphonic ringing tones via the gallery Copyright © 2004 Nokia. To change the cover, see Reading and replying to send multimedia messages...

User Guide
Page 24
...; Before installing the SIM card, always make sure that the phone is switched off and disconnected from the phone: With the back of the phone facing you, push the back cover release button (1) and slide the back cover off (2). Getting started ■ Installing the SIM card and ...the battery Keep all miniature SIM cards out of the reach of small children. • The SIM card and its contacts can easily be damaged by lifting it with the finger grip (3). Copyright © 2004 Nokia...
...; Before installing the SIM card, always make sure that the phone is switched off and disconnected from the phone: With the back of the phone facing you, push the back cover release button (1) and slide the back cover off (2). Getting started ■ Installing the SIM card and ...the battery Keep all miniature SIM cards out of the reach of small children. • The SIM card and its contacts can easily be damaged by lifting it with the finger grip (3). Copyright © 2004 Nokia...
User Guide
Page 26
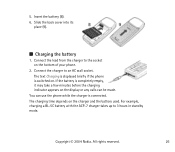
... example, charging a BL-5C battery with the ACP-7 charger takes up to an AC wall socket. Copyright © 2004 Nokia. Insert the battery (8). 6. The text Charging is displayed briefly if the phone is switched on the charger and the battery used. If the battery is connected. Connect the lead from the charger... to the socket on the display or any calls can use the phone while the charger is completely empty, it may take a few minutes before the charging indicator appears on the bottom of your...
... example, charging a BL-5C battery with the ACP-7 charger takes up to an AC wall socket. Copyright © 2004 Nokia. Insert the battery (8). 6. The text Charging is displayed briefly if the phone is switched on the charger and the battery used. If the battery is connected. Connect the lead from the charger... to the socket on the display or any calls can use the phone while the charger is completely empty, it may take a few minutes before the charging indicator appears on the bottom of your...

User Guide
Page 30
... other device. Copyright © 2004 Nokia. Always store and use the phone with the covers attached. 1. With the back of the phone facing you, push the back cover release button (1) and slide the back cover off the power and disconnect the phone from the front cover beginning at the bottom of the phone. All rights reserved. 30 Remove the...
... other device. Copyright © 2004 Nokia. Always store and use the phone with the covers attached. 1. With the back of the phone facing you, push the back cover release button (1) and slide the back cover off the power and disconnect the phone from the front cover beginning at the bottom of the phone. All rights reserved. 30 Remove the...

User Guide
Page 31
Copyright © 2004 Nokia. All rights reserved. 31 To attach the front cover, first place the phone and the front cover properly together and then gently push on t the top of the phone until the back cover release button is locked properly. 5. 4. Place the back cover and the phone properly together (1) and slide the back cover into its place (2) until the catch is properly locked.
Copyright © 2004 Nokia. All rights reserved. 31 To attach the front cover, first place the phone and the front cover properly together and then gently push on t the top of the phone until the back cover release button is locked properly. 5. 4. Place the back cover and the phone properly together (1) and slide the back cover into its place (2) until the catch is properly locked.

User Guide
Page 46
... Settings 9. Game downloads 3. Game sounds 2. Copyright © 2004 Nokia. All rights reserved. 46 Security settings 1. View folders 1. Go to a compatible headset, handsfree unit, Gaming cover or loopset available for the phone. Settings 1. Calculator 2. Loopset 4. Security level 6. Countdown timer 1.... This menu is shown only if the phone is or has been connected to date 4. Alarm tone ...
... Settings 9. Game downloads 3. Game sounds 2. Copyright © 2004 Nokia. All rights reserved. 46 Security settings 1. View folders 1. Go to a compatible headset, handsfree unit, Gaming cover or loopset available for the phone. Settings 1. Calculator 2. Loopset 4. Security level 6. Countdown timer 1.... This menu is shown only if the phone is or has been connected to date 4. Alarm tone ...

User Guide
Page 76
The gaming cover settings can not be renamed. Copyright © 2004 Nokia. The General profile can also be changed in standby mode, press the power key , scroll to the profile you want to menu. To select the ...
The gaming cover settings can not be renamed. Copyright © 2004 Nokia. The General profile can also be changed in standby mode, press the power key , scroll to the profile you want to menu. To select the ...

User Guide
Page 87
... Handsfree is or has been connected to select the profile you want or All calls and press Mark. Select • Default profile to the phone. Copyright © 2004 Nokia. Press Menu, and select Settings and Enhancement settings. All rights reserved. 87 • Alert for 15 seconds after five seconds. You can save... to Beep once or Off, automatic answer is or has been connected to be automatically activated when you can select Headset, Handsfree, Loopset or Gaming cover if the corresponding enhancement is selected.
... Handsfree is or has been connected to select the profile you want or All calls and press Mark. Select • Default profile to the phone. Copyright © 2004 Nokia. Press Menu, and select Settings and Enhancement settings. All rights reserved. 87 • Alert for 15 seconds after five seconds. You can save... to Beep once or Off, automatic answer is or has been connected to be automatically activated when you can select Headset, Handsfree, Loopset or Gaming cover if the corresponding enhancement is selected.

User Guide
Page 88
Note: Always deactivate the cover lights where they may be... security features that activation of the cover lights may consume the phone's battery faster. The PIN2 code is supported by your PIN code every time the phone is on . Note that restrict calls...a GPRS connection. Select • PIN code request to set the phone to selected phone numbers if this case, the recipient's phone number and the message centre number must be turned off. •... when using a Xpress-onTM Gaming cover. • Cover lights to restrict your phone. In this function is required. Copyright © 2004...
Note: Always deactivate the cover lights where they may be... security features that activation of the cover lights may consume the phone's battery faster. The PIN2 code is supported by your PIN code every time the phone is on . Note that restrict calls...a GPRS connection. Select • PIN code request to set the phone to selected phone numbers if this case, the recipient's phone number and the message centre number must be turned off. •... when using a Xpress-onTM Gaming cover. • Cover lights to restrict your phone. In this function is required. Copyright © 2004...

User Guide
Page 6
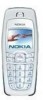
Phone security 62 Lock the keypad (keyguard 62 Security codes 62 PIN codes 63 PUK codes 64 Security code 64 Fixed dialing 65 Restrict calls 65 ... the mobile Internet 78 Set up for browsing 78 Connect 79 Browser options 79 Navigate 79 Bookmarks 80 Security issues 81 GPRS 82 Disconnect 83 Nokia 6010 User Guide v Copyright © 2004 Nokia Gallery 55 Display settings 56 Caller groups 57 Restore factory settings 58 Xpress-on™ coloUr...
Phone security 62 Lock the keypad (keyguard 62 Security codes 62 PIN codes 63 PUK codes 64 Security code 64 Fixed dialing 65 Restrict calls 65 ... the mobile Internet 78 Set up for browsing 78 Connect 79 Browser options 79 Navigate 79 Bookmarks 80 Security issues 81 GPRS 82 Disconnect 83 Nokia 6010 User Guide v Copyright © 2004 Nokia Gallery 55 Display settings 56 Caller groups 57 Restore factory settings 58 Xpress-on™ coloUr...

User Guide
Page 16
...instructions on the phone label. Find information about your phone This information is on the back of the phone (under the battery). The label is provided on how to access the phone label. See "Remove the back cover and battery" on page 8 for quick reference. If a Nokia representative asks ...a specific question about your phone. South Ajax, Ontario L1S 4N7 Tel: 1-905-427-1373 1-888-22-NOKIA (1-888-226-6542) Fax: 1-905-619-4360 Web site: www.nokia.ca Nokia 6010 User ...
...instructions on the phone label. Find information about your phone This information is on the back of the phone (under the battery). The label is provided on how to access the phone label. See "Remove the back cover and battery" on page 8 for quick reference. If a Nokia representative asks ...a specific question about your phone. South Ajax, Ontario L1S 4N7 Tel: 1-905-427-1373 1-888-22-NOKIA (1-888-226-6542) Fax: 1-905-619-4360 Web site: www.nokia.ca Nokia 6010 User ...

User Guide
Page 17
... cover release button. 2 Slide the cover up; This may be careful when handling, inserting, or removing the card. 1 With the phone positioned as instructions on using SIM card services, contact your phone by...of the reach of the phone facing you need to attach the optional headset. Remove the back cover and battery 1 With the back of small children. Always switch off the phone. 3 Lift out the ...battery. 2 3 1 Install the SIM card The SIM card and its contacts can easily be damaged by installing the SIM card and charging the battery. This chapter covers ...
... cover release button. 2 Slide the cover up; This may be careful when handling, inserting, or removing the card. 1 With the phone positioned as instructions on using SIM card services, contact your phone by...of the reach of the phone facing you need to attach the optional headset. Remove the back cover and battery 1 With the back of small children. Always switch off the phone. 3 Lift out the ...battery. 2 3 1 Install the SIM card The SIM card and its contacts can easily be damaged by installing the SIM card and charging the battery. This chapter covers ...

User Guide
Page 18
...card and battery 2 Install the SIM card by sliding it locks into place. Nokia 6010 User Guide 9 Copyright © 2004 Nokia Gold coloured contacts Replace the back cover 1 Direct the back cover towards the locking catches on the phone. 2 Slide the battery until it gently into place. SIM card installed SIM ...BATTERY 1 Position the battery (with the label side facing up), so the gold coloured contacts match up with those on the phone. 2 Slide the back cover until it snaps into the slot as shown in the illustration below, making sure the gold coloured contact area is face down.
...card and battery 2 Install the SIM card by sliding it locks into place. Nokia 6010 User Guide 9 Copyright © 2004 Nokia Gold coloured contacts Replace the back cover 1 Direct the back cover towards the locking catches on the phone. 2 Slide the battery until it gently into place. SIM card installed SIM ...BATTERY 1 Position the battery (with the label side facing up), so the gold coloured contacts match up with those on the phone. 2 Slide the back cover until it snaps into the slot as shown in the illustration below, making sure the gold coloured contact area is face down.

User Guide
Page 19
... charger plug into the round jack in the bottom of the phone. If the phone is on page 8. 10 Copyright © 2004 Nokia Note: Always store and use the phone with the covers attached. 1 2 Locking catches • CHARGE THE BATTERY You can use the phone while the charger is complete. Charger The battery power indicator (or...
... charger plug into the round jack in the bottom of the phone. If the phone is on page 8. 10 Copyright © 2004 Nokia Note: Always store and use the phone with the covers attached. 1 2 Locking catches • CHARGE THE BATTERY You can use the phone while the charger is complete. Charger The battery power indicator (or...
User Guide
Page 21
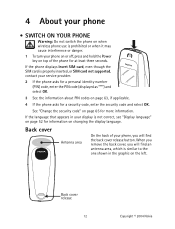
..., enter the security code and select OK. If the language that appears in the graphic on the left. Back cover release 12 Copyright © 2004 Nokia Back cover Antenna area On the back of the phone for at least three seconds. See "Change the security code" on page 65 for more information. When you...
..., enter the security code and select OK. If the language that appears in the graphic on the left. Back cover release 12 Copyright © 2004 Nokia Back cover Antenna area On the back of the phone for at least three seconds. See "Change the security code" on page 65 for more information. When you...

User Guide
Page 47
...Contacts and select Call. The icon represents the active call and the icon represents the call on hold . 38 Copyright © 2004 Nokia Contact your phone. End call-Ends the current call . Menu-Allows you to Contacts, so that you can be used for availability of any external ...enhancements connected to see the in all wireless networks. New call Enter the second phone number or recall it from Contacts and press the Talk key. 10 Advanced calling features This chapter covers advanced calling features, including: • In-call options and swapping between calls • ...
...Contacts and select Call. The icon represents the active call and the icon represents the call on hold . 38 Copyright © 2004 Nokia Contact your phone. End call-Ends the current call . Menu-Allows you to Contacts, so that you can be used for availability of any external ...enhancements connected to see the in all wireless networks. New call Enter the second phone number or recall it from Contacts and press the Talk key. 10 Advanced calling features This chapter covers advanced calling features, including: • In-call options and swapping between calls • ...

User Guide
Page 67
... logo received appears. However, it (you get a call from your Nokia 6010 mobile phone, you to the menu. 4 Select On. Nokia Xpress-on™ colour covers may have a picture associated with the covers attached. 58 Copyright © 2004 Nokia Avoid touching electronic components while changing the covers. Group graphic Each caller group can have entered. When you must...
... logo received appears. However, it (you get a call from your Nokia 6010 mobile phone, you to the menu. 4 Select On. Nokia Xpress-on™ colour covers may have a picture associated with the covers attached. 58 Copyright © 2004 Nokia Avoid touching electronic components while changing the covers. Group graphic Each caller group can have entered. When you must...

User Guide
Page 68
Personalize your phone Remove the back cover 1 With the back of the phone facing you, press and hold the back cover release button. 2 Slide the cover up. 3 Lift the cover off the phone. 3 2 1 Remove the phone from the front cover With the back of the phone facing you, gently separate the cover from inside the old front cover. Change the keypad 1 Lift the keypad from the phone, starting at the bottom. Nokia 6010 User Guide 59 Copyright © 2004 Nokia
Personalize your phone Remove the back cover 1 With the back of the phone facing you, press and hold the back cover release button. 2 Slide the cover up. 3 Lift the cover off the phone. 3 2 1 Remove the phone from the front cover With the back of the phone facing you, gently separate the cover from inside the old front cover. Change the keypad 1 Lift the keypad from the phone, starting at the bottom. Nokia 6010 User Guide 59 Copyright © 2004 Nokia

User Guide
Page 69
2 Place the keypad into the new front cover. 1 2 Replace the new front cover 1 To replace the front cover, align the top of the phone with their slots, as shown at right. 2 Align the cover and snap it shut all the way around the edge of the front cover. Tabs New front cover 60 Copyright © 2004 Nokia Make sure both sets of plastic tabs line up with the top of the phone. Replace the back cover 1 Direct the back cover towards the locking catches on the phone.
2 Place the keypad into the new front cover. 1 2 Replace the new front cover 1 To replace the front cover, align the top of the phone with their slots, as shown at right. 2 Align the cover and snap it shut all the way around the edge of the front cover. Tabs New front cover 60 Copyright © 2004 Nokia Make sure both sets of plastic tabs line up with the top of the phone. Replace the back cover 1 Direct the back cover towards the locking catches on the phone.


