User Guide
Page 9
... 103 Lap times...104 Viewing and deleting times...104 Services (Menu 12) ...104 Basic steps for accessing and using services 105 Setting up the phone for a service 106 Saving the service settings received as an OTA message 106 Keying in the service settings manually 106 Making a connection to a service 109 Browsing the pages of a service ...110 Using the phone keys while browsing 110 Options while browsing ...110 Direct calling...112 Disconnect from a service ...112 Appearance settings of the multi-mode browser 112 Selecting...
... 103 Lap times...104 Viewing and deleting times...104 Services (Menu 12) ...104 Basic steps for accessing and using services 105 Setting up the phone for a service 106 Saving the service settings received as an OTA message 106 Keying in the service settings manually 106 Making a connection to a service 109 Browsing the pages of a service ...110 Using the phone keys while browsing 110 Options while browsing ...110 Direct calling...112 Disconnect from a service ...112 Appearance settings of the multi-mode browser 112 Selecting...

User Guide
Page 14
... SIM card. Copyright © 2004 Nokia. The display texts related to the selection keys are printed in blue, for example Menu. ■ Access codes • Security code (5 to 8 digits): The PIN (Personal Identification Number) code protects your SIM card against unauthorised use . The PIN2 code may be supplied with the phone. To change the code, and to set the phone to access some functions, such as charging unit counters. General information ■ Typographics used in this user's guide...
... SIM card. Copyright © 2004 Nokia. The display texts related to the selection keys are printed in blue, for example Menu. ■ Access codes • Security code (5 to 8 digits): The PIN (Personal Identification Number) code protects your SIM card against unauthorised use . The PIN2 code may be supplied with the phone. To change the code, and to set the phone to access some functions, such as charging unit counters. General information ■ Typographics used in this user's guide...

User Guide
Page 15
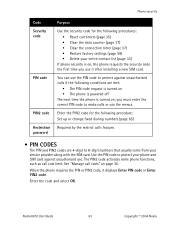
... the codes. • Barring password (4 digits): The barring password is required to change a blocked PIN code. The PUK2 code is required to change a blocked PIN2 code. If you to get the PUK code. • PUK and PUK2 codes (8 digits): The PUK (Personal Unblocking Key) code is needed when using the Call barring service, see Security settings on page 88. You can obtain the password from your service provider to key in an incorrect PIN code several times, the phone may display SIM blocked and...
... the codes. • Barring password (4 digits): The barring password is required to change a blocked PIN code. The PUK2 code is required to change a blocked PIN2 code. If you to get the PUK code. • PUK and PUK2 codes (8 digits): The PUK (Personal Unblocking Key) code is needed when using the Call barring service, see Security settings on page 88. You can obtain the password from your service provider to key in an incorrect PIN code several times, the phone may display SIM blocked and...

User Guide
Page 18
... take all of the features. You may display a message that have been specially designed for any such features may reduce the memory available for mobile phones. Using any features sharing memory. This is full. Contents Copyright © 2004 Nokia. You can download applications and new games to save the settings. ■ MIDP JavaTM applications Your phone supports Java technology and includes some of the...
... take all of the features. You may display a message that have been specially designed for any such features may reduce the memory available for mobile phones. Using any features sharing memory. This is full. Contents Copyright © 2004 Nokia. You can download applications and new games to save the settings. ■ MIDP JavaTM applications Your phone supports Java technology and includes some of the...
User Guide
Page 62
... message type Text or E-mail, Paging and Fax. • Select Message validity to Always online, the info messages may not be received. In that case, set to select the time for text and e-mail messages 1. Message settings The message settings affect the sending, receiving or viewing of the message centre needed , see Settings when GPRS is supported by your SIM card, select the set you can receive messages on page 108. Settings for how long the network should attempt to save the phone number...
... message type Text or E-mail, Paging and Fax. • Select Message validity to Always online, the info messages may not be received. In that case, set to select the time for text and e-mail messages 1. Message settings The message settings affect the sending, receiving or viewing of the message centre needed , see Settings when GPRS is supported by your SIM card, select the set you can receive messages on page 108. Settings for how long the network should attempt to save the phone number...

User Guide
Page 63
... the network to send delivery reports on your messages (network service). • Select Use GPRS to set GPRS as the preferred SMS bearer. • Select Reply via your message centre (network service). • Select Rename sending profile to change the name of your SIM card supports more than one set the phone to replace the old text messages with the new ones. For message type E-mail, select E-mail server to save a default number to send messages for the multimedia messages Press Menu, and select Messages, Message settings...
... the network to send delivery reports on your messages (network service). • Select Use GPRS to set GPRS as the preferred SMS bearer. • Select Reply via your message centre (network service). • Select Rename sending profile to change the name of your SIM card supports more than one set the phone to replace the old text messages with the new ones. For message type E-mail, select E-mail server to save a default number to send messages for the multimedia messages Press Menu, and select Messages, Message settings...
User Guide
Page 79
To set the phone to automatically update the time and date according to your voice mailbox number. With call divert you can direct your network operator may not be active at the same time. Divert options not supported by your SIM card or your incoming calls to another number, for the divert option. Copyright © 2004 Nokia. All rights reserved. 79 To set the divert setting to on, select Activate, and...
To set the phone to automatically update the time and date according to your voice mailbox number. With call divert you can direct your network operator may not be active at the same time. Divert options not supported by your SIM card or your incoming calls to another number, for the divert option. Copyright © 2004 Nokia. All rights reserved. 79 To set the divert setting to on, select Activate, and...

User Guide
Page 83
... note. Network selection Press Menu, and select Settings, Phone settings and Network selection. In that has a roaming agreement with your area. If you select Manual, you must select another SIM card is selected or another network. The phone stays in manual mode until the automatic mode is inserted into the phone. Copyright © 2004 Nokia. If the GPRS connection is set to When needed, see Settings when GPRS is used in your home network operator...
... note. Network selection Press Menu, and select Settings, Phone settings and Network selection. In that has a roaming agreement with your area. If you select Manual, you must select another SIM card is selected or another network. The phone stays in manual mode until the automatic mode is inserted into the phone. Copyright © 2004 Nokia. If the GPRS connection is set to When needed, see Settings when GPRS is used in your home network operator...
User Guide
Page 11
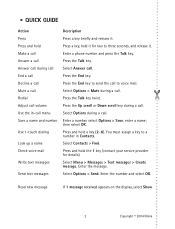
... key to send the call to a number in -call menu Save a name and number Use 1-touch dialing Look up a name Check voice mail Write text messages Send text messages Description Press a key briefly and release it. Enter a number, select Options > Save, enter a name; Press and hold the 1 key (contact your service provider for two to three seconds, and release it for details). • QUICK GUIDE Action Press Press and hold Make a call Answer a call Answer call during a call. Select Answer call . Press the End key. then select OK. Enter the number...
... key to send the call to a number in -call menu Save a name and number Use 1-touch dialing Look up a name Check voice mail Write text messages Send text messages Description Press a key briefly and release it. Enter a number, select Options > Save, enter a name; Press and hold the 1 key (contact your service provider for two to three seconds, and release it for details). • QUICK GUIDE Action Press Press and hold Make a call Answer a call Answer call during a call. Select Answer call . Press the End key. then select OK. Enter the number...

User Guide
Page 13
... instructions. WATER-RESISTANCE Your phone is switched on the GSM 850 and 1900 networks. Press End as many times as needed to clear the display and return to function. For instance, some networks may have to any features in your location. EMERGENCY CALLS Ensure the phone is not water-resistant. Do not switch the device on when wireless phone use on and in the wireless network to the main screen. Give your phone...
... instructions. WATER-RESISTANCE Your phone is switched on the GSM 850 and 1900 networks. Press End as many times as needed to clear the display and return to function. For instance, some networks may have to any features in your location. EMERGENCY CALLS Ensure the phone is not water-resistant. Do not switch the device on when wireless phone use on and in the wireless network to the main screen. Give your phone...

User Guide
Page 33
CONTACT YOUR SERVICE PROVIDER. 1 Home 2 Bookmarks 3 Service inbox 4 Settings 1 Connection settings 1 Active service settings 2 Edit active service settings 2 Appearance settings 1 Scroll mode 2 Text wrapping 3 Show images 3 Security settings 1 User certificates 2 Authority certificates 3 Security module settings 4 Cookies 4 Service inbox settings 1 Service messages 2 Automatic connection 5 Go to address 6 Clear the cache 24 Copyright © 2004 Nokia 3 Voice commands 1 Audible alerts 1 Audible battery bar 2 Audible signal bar 10 Connectivity 1 Synchronize 2 GPRS connection 11 Services THE...
CONTACT YOUR SERVICE PROVIDER. 1 Home 2 Bookmarks 3 Service inbox 4 Settings 1 Connection settings 1 Active service settings 2 Edit active service settings 2 Appearance settings 1 Scroll mode 2 Text wrapping 3 Show images 3 Security settings 1 User certificates 2 Authority certificates 3 Security module settings 4 Cookies 4 Service inbox settings 1 Service messages 2 Automatic connection 5 Go to address 6 Clear the cache 24 Copyright © 2004 Nokia 3 Voice commands 1 Audible alerts 1 Audible battery bar 2 Audible signal bar 10 Connectivity 1 Synchronize 2 GPRS connection 11 Services THE...
User Guide
Page 41
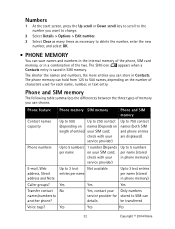
... the start screen, press the Up scroll or Down scroll key to scroll to the number you want to change. 2 Select Details > Options > Edit number. 3 Select Clear as many times as necessary to delete the number, enter the new number, and select OK. • PHONE MEMORY You can save names and numbers in the internal memory of the phone, SIM card memory, or in Contacts. check with your service provider) Up to 5 numbers per name (stored in phone memory) E-mail, Web...
... the start screen, press the Up scroll or Down scroll key to scroll to the number you want to change. 2 Select Details > Options > Edit number. 3 Select Clear as many times as necessary to delete the number, enter the new number, and select OK. • PHONE MEMORY You can save names and numbers in the internal memory of the phone, SIM card memory, or in Contacts. check with your service provider) Up to 5 numbers per name (stored in phone memory) E-mail, Web...

User Guide
Page 48
International call on voice mail. Call At the start screen, press the appropriate key and the Talk key. Nokia 6010 User Guide 39 Copyright © 2004 Nokia If it is still busy, your voice messages" on page 45 for details on hold the appropriate key. Assign number 1 Select Contacts > 1-touch dialing, a dialing location, and Assign. 2 Enter a phone number, select OK, enter a name, and select OK. Change 1 Select Contacts > 1-touch dialing, the key you dial is used to access your phone immediately redials the number. If the number you...
International call on voice mail. Call At the start screen, press the appropriate key and the Talk key. Nokia 6010 User Guide 39 Copyright © 2004 Nokia If it is still busy, your voice messages" on page 45 for details on hold the appropriate key. Assign number 1 Select Contacts > 1-touch dialing, a dialing location, and Assign. 2 Enter a phone number, select OK, enter a name, and select OK. Change 1 Select Contacts > 1-touch dialing, the key you dial is used to access your phone immediately redials the number. If the number you...
User Guide
Page 53
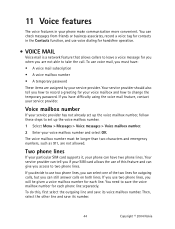
... your phone make communication more convenient. You can give you decide to save the voice mailbox number for handsfree operation. • VOICE MAIL Voice mail is a network feature that allows callers to take the call. Voice mailbox number If your service provider has not already set up the voice mailbox number. 1 Select Menu > Messages > Voice messages > Voice mailbox number. 2 Enter your service provider. If you access to two phone lines. You need to use voice dialing for each line. If you use of...
... your phone make communication more convenient. You can give you decide to save the voice mailbox number for handsfree operation. • VOICE MAIL Voice mail is a network feature that allows callers to take the call. Voice mailbox number If your service provider has not already set up the voice mailbox number. 1 Select Menu > Messages > Voice messages > Voice mailbox number. 2 Enter your service provider. If you access to two phone lines. You need to use voice dialing for each line. If you use of...

User Guide
Page 61
... may charge for this service. Your Nokia 6010 mobile phone supports Mobile MIDI (GMX) format messages and ringing tones. Your phone can receive polyphonic ringing tones in gaming. Select Menu > Settings > Phone settings > Language and the language you can select the phone display language. The generator can reproduce over the Internet or have them sent to your wireless service provider. • DISPLAY LANGUAGE You can save depends on the size of playing up more storage space in the memory than traditional ringing tones. The polyphonic sounds bring a new...
... may charge for this service. Your Nokia 6010 mobile phone supports Mobile MIDI (GMX) format messages and ringing tones. Your phone can receive polyphonic ringing tones in gaming. Select Menu > Settings > Phone settings > Language and the language you can select the phone display language. The generator can reproduce over the Internet or have them sent to your wireless service provider. • DISPLAY LANGUAGE You can save depends on the size of playing up more storage space in the memory than traditional ringing tones. The polyphonic sounds bring a new...

User Guide
Page 67
VIEW A RECEIVED GRAPHIC When you get a call from someone else, Group logo received appears. Avoid touching electronic components while changing the covers. When you receive a graphic from your Nokia 6010 mobile phone, you to their original values. To view the graphic, select Show > Options and one of the phone settings to save it . Note: Restoring factory settings does not delete your list in a caller group, the graphic flashes on page 64. • XPRESS...
VIEW A RECEIVED GRAPHIC When you get a call from someone else, Group logo received appears. Avoid touching electronic components while changing the covers. When you receive a graphic from your Nokia 6010 mobile phone, you to their original values. To view the graphic, select Show > Options and one of the phone settings to save it . Note: Restoring factory settings does not delete your list in a caller group, the graphic flashes on page 64. • XPRESS...
User Guide
Page 72
...Restore factory settings (page 58) • Delete your service provider along with the SIM card. Enter the code and select OK. Nokia 6010 User Guide 63 Copyright © 2004 Nokia You can use the PIN code to protect against unauthorized use. See "Manage call costs" on , you use it displays Enter PIN code or Enter PIN2 code. Enter the PIN2 code for the following procedures: • Reset call cost limit. Phone security Code Security code PIN code PIN2 code Restriction password Purpose Use the security code for the following procedure: Set up or change fixed dialing numbers...
...Restore factory settings (page 58) • Delete your service provider along with the SIM card. Enter the code and select OK. Nokia 6010 User Guide 63 Copyright © 2004 Nokia You can use the PIN code to protect against unauthorized use. See "Manage call costs" on , you use it displays Enter PIN code or Enter PIN2 code. Enter the PIN2 code for the following procedures: • Reset call cost limit. Phone security Code Security code PIN code PIN2 code Restriction password Purpose Use the security code for the following procedure: Set up or change fixed dialing numbers...

User Guide
Page 76
...messages Mobile messages You can use mobile messages to keep in touch with other message settings, such as GPRS. This features appears only if your SIM card supports multiple message types. 1 Select Menu > Messages > Message settings > Text messages > Sending profile. 2 If your phone. • Set up other phone users • Compose, send, receive and view multimedia messages (MMS) • Send and receive picture messages Not all wireless networks. Your Nokia 6010 mobile phone allows you must: • Have a text messaging subscription through e-mail • Communicate online...
...messages Mobile messages You can use mobile messages to keep in touch with other message settings, such as GPRS. This features appears only if your SIM card supports multiple message types. 1 Select Menu > Messages > Message settings > Text messages > Sending profile. 2 If your phone. • Set up other phone users • Compose, send, receive and view multimedia messages (MMS) • Send and receive picture messages Not all wireless networks. Your Nokia 6010 mobile phone allows you must: • Have a text messaging subscription through e-mail • Communicate online...

User Guide
Page 80
... the start screen, press the Up scroll or Down scroll key to scroll to the name to whom you want to step 5. 4 Select Messages sent as > E-mail. 5 Enter the e-mail server number, select Options > Accept. There are two ways of sending an e-mail message. • You can send an e-mail message from the Messages menu. • You can set up for the person entered into Contacts. Contact your SIM card already has a profile called E-mail...
... the start screen, press the Up scroll or Down scroll key to scroll to the name to whom you want to step 5. 4 Select Messages sent as > E-mail. 5 Enter the e-mail server number, select Options > Accept. There are two ways of sending an e-mail message. • You can send an e-mail message from the Messages menu. • You can set up for the person entered into Contacts. Contact your SIM card already has a profile called E-mail...
User Guide
Page 127
... know you get an incoming call at all traffic signs and signals and staying within the speed limit. Driving requires alertness, caution and courtesy. It means using a wireless phone which should be exercised at an inconvenient time, if possible, let your voice mail answer it without taking your attention off the road. 2 When available, use the speed dial function without removing your eyes from their...
... know you get an incoming call at all traffic signs and signals and staying within the speed limit. Driving requires alertness, caution and courtesy. It means using a wireless phone which should be exercised at an inconvenient time, if possible, let your voice mail answer it without taking your attention off the road. 2 When available, use the speed dial function without removing your eyes from their...


