
S640 User's Manual
Page 3
Introduction First Steps A Basic Photography and Playback: Auto Mode C Shooting Suited for the Scene F Taking Pictures of Smiling Faces (Smart Portrait Mode) s Focusing on a Moving Subject in Subject Tracking Mode c More on Playback/In-Camera Editing D Movies Connecting to Televisions, Computers and Printers d Shooting, Playback and Setup Menus Technical Notes i
Introduction First Steps A Basic Photography and Playback: Auto Mode C Shooting Suited for the Scene F Taking Pictures of Smiling Faces (Smart Portrait Mode) s Focusing on a Moving Subject in Subject Tracking Mode c More on Playback/In-Camera Editing D Movies Connecting to Televisions, Computers and Printers d Shooting, Playback and Setup Menus Technical Notes i

S640 User's Manual
Page 4
... should be performed only by the following safety precautions in the event of the camera or Charging AC Adapter could result from putting the battery or other accident, take the equipment to a Nikon-authorized service representative for inspection, after unplugging the product and/or removing the battery... that could result in the presence of flammable gas Do not use the product will read before using this Nikon product, to prevent possible injury. Handle the camera strap with care Never place the strap around the neck of a fall or other small parts into their entirety...
... should be performed only by the following safety precautions in the event of the camera or Charging AC Adapter could result from putting the battery or other accident, take the equipment to a Nikon-authorized service representative for inspection, after unplugging the product and/or removing the battery... that could result in the presence of flammable gas Do not use the product will read before using this Nikon product, to prevent possible injury. Handle the camera strap with care Never place the strap around the neck of a fall or other small parts into their entirety...

S640 User's Manual
Page 5
Charge the battery inserting it into the camera and connecting the Charging AC Adapter EH-68P/EH-68P (AR) (supplied). • When inserting the battery, do not attempt to insert it to observe ...
Charge the battery inserting it into the camera and connecting the Charging AC Adapter EH-68P/EH-68P (AR) (supplied). • When inserting the battery, do not attempt to insert it to observe ...

S640 User's Manual
Page 6
... equipment. For Your Safety Use appropriate cables When connecting cables to the input and output jacks, use only the cables provided or sold by Nikon for the purpose, to maintain compliance with liquid crystal Should the monitor break, care should be taken to avoid injury caused by broken glass ... power off when using while in a hospital. The electromagnetic waves given out by the lens cover or other objects are not pinched by this camera may disrupt the electronic systems of the airplane or the instruments of the hospital when using inside an airplane or the hospital Turn the power...
... equipment. For Your Safety Use appropriate cables When connecting cables to the input and output jacks, use only the cables provided or sold by Nikon for the purpose, to maintain compliance with liquid crystal Should the monitor break, care should be taken to avoid injury caused by broken glass ... power off when using while in a hospital. The electromagnetic waves given out by the lens cover or other objects are not pinched by this camera may disrupt the electronic systems of the airplane or the instruments of the hospital when using inside an airplane or the hospital Turn the power...

S640 User's Manual
Page 9
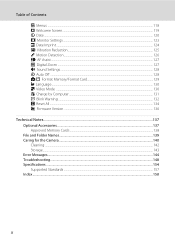
Table of Contents For Your Safety...ii WARNINGS...ii Notices ...v Introduction ...1 About This Manual ...1 Information and Precautions...2 Parts of the Camera...4 The Camera Body ...4 The Monitor...6 Basic Operations...8 The A (shooting mode) Button...8 The c (playback) Button ...9 The Rotary Multi Selector...10 The d... Language, Date and Time 20 Inserting Memory Cards ...22 Removing Memory Cards...22 A Basic Photography and Playback: Auto Mode 24 Step 1 Turn the Camera On and Select A (Auto) Mode 24 Indicators Displayed in A (Auto) Mode 25 Step 2 Frame a Picture ...26 Using the Zoom...27 ...
Table of Contents For Your Safety...ii WARNINGS...ii Notices ...v Introduction ...1 About This Manual ...1 Information and Precautions...2 Parts of the Camera...4 The Camera Body ...4 The Monitor...6 Basic Operations...8 The A (shooting mode) Button...8 The c (playback) Button ...9 The Rotary Multi Selector...10 The d... Language, Date and Time 20 Inserting Memory Cards ...22 Removing Memory Cards...22 A Basic Photography and Playback: Auto Mode 24 Step 1 Turn the Camera On and Select A (Auto) Mode 24 Indicators Displayed in A (Auto) Mode 25 Step 2 Frame a Picture ...26 Using the Zoom...27 ...

S640 User's Manual
Page 10
...Suited for the Scene 37 Shooting in Scene Mode ...37 Choosing a Scene Mode ...37 Features ...38 Shooting in the Scene Mode Selected by the Camera (Scene Auto Selector 45 Taking Pictures in Food Mode...47 Taking Pictures for a Panorama ...49 F Taking Pictures of Smiling Faces (Smart Portrait ...52 s Focusing on a Moving Subject in Subject Tracking Mode 54 Subject Tracking Mode ...54 Subject Tracking Menu ...56 c More on Playback/In-Camera Editing 57 Viewing Multiple Pictures: Thumbnail Playback 57 Calendar Display...59 Taking a Closer Look: Playback Zoom 60 Viewing Pictures by Date (List by ...
...Suited for the Scene 37 Shooting in Scene Mode ...37 Choosing a Scene Mode ...37 Features ...38 Shooting in the Scene Mode Selected by the Camera (Scene Auto Selector 45 Taking Pictures in Food Mode...47 Taking Pictures for a Panorama ...49 F Taking Pictures of Smiling Faces (Smart Portrait ...52 s Focusing on a Moving Subject in Subject Tracking Mode 54 Subject Tracking Mode ...54 Subject Tracking Menu ...56 c More on Playback/In-Camera Editing 57 Viewing Multiple Pictures: Thumbnail Playback 57 Calendar Display...59 Taking a Closer Look: Playback Zoom 60 Viewing Pictures by Date (List by ...

S640 User's Manual
Page 11
... Computers and Printers 79 Connecting to a TV...79 Connecting to a Computer...80 Before Connecting the Camera...80 Transferring Pictures from the Camera to a Computer 81 Charging While Connecting to a Computer 84 Connecting to a Printer...85 Connecting the Camera to a Printer...86 Printing Pictures One at a Time ...88 Printing Multiple Pictures ...89 Creating a... Options: The Playback Menu 110 Displaying the Playback Menu...110 b Slide Show...112 c Delete...113 d Protect ...113 f Rotate Image...114 h Copy...115 Basic Camera Setup: The Setup Menu 116 Displaying the Setup Menu...117 ix
... Computers and Printers 79 Connecting to a TV...79 Connecting to a Computer...80 Before Connecting the Camera...80 Transferring Pictures from the Camera to a Computer 81 Charging While Connecting to a Computer 84 Connecting to a Printer...85 Connecting the Camera to a Printer...86 Printing Pictures One at a Time ...88 Printing Multiple Pictures ...89 Creating a... Options: The Playback Menu 110 Displaying the Playback Menu...110 b Slide Show...112 c Delete...113 d Protect ...113 f Rotate Image...114 h Copy...115 Basic Camera Setup: The Setup Menu 116 Displaying the Setup Menu...117 ix
S640 User's Manual
Page 12
......118 c Welcome Screen...119 d Date ...120 e Monitor Settings ...123 f Date Imprint ...124 g Vibration Reduction...125 U Motion Detection...126 h AF Assist...127 u Digital Zoom ...127 i Sound Settings...128 k Auto Off ...128 l/m Format Memory/Format Card 129 n Language...130 o Video Mode ...130 V Charge by Computer ...131 d...Technical Notes...137 Optional Accessories ...137 Approved Memory Cards ...138 File and Folder Names...139 Caring for the Camera ...140 Cleaning ...142 Storage ...143 Error Messages...144 Troubleshooting...148 Specifications ...154 Supported Standards ...157 Index ...158 x
......118 c Welcome Screen...119 d Date ...120 e Monitor Settings ...123 f Date Imprint ...124 g Vibration Reduction...125 U Motion Detection...126 h AF Assist...127 u Digital Zoom ...127 i Sound Settings...128 k Auto Off ...128 l/m Format Memory/Format Card 129 n Language...130 o Video Mode ...130 V Charge by Computer ...131 d...Technical Notes...137 Optional Accessories ...137 Approved Memory Cards ...138 File and Folder Names...139 Caring for the Camera ...140 Cleaning ...142 Storage ...143 Error Messages...144 Troubleshooting...148 Specifications ...154 Supported Standards ...157 Index ...158 x
S640 User's Manual
Page 13
Introduction Introduction About This Manual Thank you for your Nikon digital camera. Read this camera can be stored in the camera's internal memory or on the memory card. This icon marks notes, C information that should be formatted or used : This icon marks... monitor are indicated in the Quick Start Guide. The memory card must be more A information is available elsewhere in the camera monitor, and the names of a Nikon COOLPIX S640 digital camera. D This icon marks tips, additional information that monitor indicators can be read it easier to find the information you enjoy...
Introduction Introduction About This Manual Thank you for your Nikon digital camera. Read this camera can be stored in the camera's internal memory or on the memory card. This icon marks notes, C information that should be formatted or used : This icon marks... monitor are indicated in the Quick Start Guide. The memory card must be more A information is available elsewhere in the camera monitor, and the names of a Nikon COOLPIX S640 digital camera. D This icon marks tips, additional information that monitor indicators can be read it easier to find the information you enjoy...
S640 User's Manual
Page 14
See the URL below for contact information: http://imaging.nikon.com/ Use Only Nikon Brand Electronic Accessories Nikon COOLPIX cameras are engineered and proven to operate within the operational and safety requirements of this electronic circuitry. The use with this ... ensure that the information in these manuals is functioning normally. About the Manuals • No part of the manuals included with this Nikon digital camera are designed to the highest standards and include complex electronic circuitry. Additional information may be held liable for use of third-party rechargeable ...
See the URL below for contact information: http://imaging.nikon.com/ Use Only Nikon Brand Electronic Accessories Nikon COOLPIX cameras are engineered and proven to operate within the operational and safety requirements of this electronic circuitry. The use with this ... ensure that the information in these manuals is functioning normally. About the Manuals • No part of the manuals included with this Nikon digital camera are designed to the highest standards and include complex electronic circuitry. Additional information may be held liable for use of third-party rechargeable ...
S640 User's Manual
Page 15
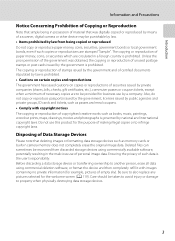
... commercial deletion software, or format the device and then completely refill it with copyright notices The copying or reproduction of a scanner, digital camera or other device may be punishable by law. • Items prohibited by national and international copyright laws. Ensuring the privacy of Data...or damage to infringe copyright laws. The copying or reproduction of empty sky). Unless the prior permission of the government was digitally copied or reproduced by the government is prohibited. The copying or reproduction of stamps issued by the government and of certified documents...
... commercial deletion software, or format the device and then completely refill it with copyright notices The copying or reproduction of a scanner, digital camera or other device may be punishable by law. • Items prohibited by national and international copyright laws. Ensuring the privacy of Data...or damage to infringe copyright laws. The copying or reproduction of empty sky). Unless the prior permission of the government was digitally copied or reproduced by the government is prohibited. The copying or reproduction of stamps issued by the government and of certified documents...

S640 User's Manual
Page 16
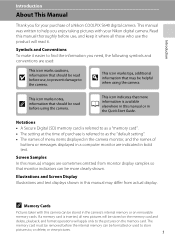
Parts of the Camera The Camera Body 12 3 4 5 67 Introduction 9 8 Lens cover closed Zoom control 27 f : Wide 27 1 g : Tele 27 h : Thumbnail playback..........57, 59 i : Playback zoom 60 j : Help 13 2 Shutter-release button 13, 28 3 Power switch/Power-on lamp 19, 128 4 Built-in microphone 67, 76 5 Built-in flash 32 6 Self-timer lamp 34 AF-assist illuminator 127 7 Speaker 67, 78 8 Lens 142, 154 9 Lens cover 4
Parts of the Camera The Camera Body 12 3 4 5 67 Introduction 9 8 Lens cover closed Zoom control 27 f : Wide 27 1 g : Tele 27 h : Thumbnail playback..........57, 59 i : Playback zoom 60 j : Help 13 2 Shutter-release button 13, 28 3 Power switch/Power-on lamp 19, 128 4 Built-in microphone 67, 76 5 Built-in flash 32 6 Self-timer lamp 34 AF-assist illuminator 127 7 Speaker 67, 78 8 Lens 142, 154 9 Lens cover 4

S640 User's Manual
Page 17
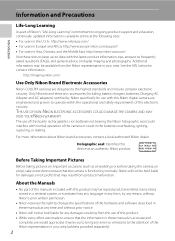
1 23 4 Parts of the Camera Introduction 12 13 5 6 7 8 9 10 11 14 15 1 Monitor 6, 25 2 Rotary multi selector 10 3 A (shooting mode) button 8 4 Charge lamp 17, 84 Flash lamp 33 5 Tripod socket 6 d ... slot cover 14, 22 16 17 18 10 Power connector cover (for optional AC adapter connection 137 11 k (apply selection) button 10 12 Eyelet for camera strap 13 13 c (playback) button 9, 30 14 Cable connector 79, 81, 86 15 Connector cover 79, 81, 86 16 Battery latch 14, 15 17 Battery...
1 23 4 Parts of the Camera Introduction 12 13 5 6 7 8 9 10 11 14 15 1 Monitor 6, 25 2 Rotary multi selector 10 3 A (shooting mode) button 8 4 Charge lamp 17, 84 Flash lamp 33 5 Tripod socket 6 d ... slot cover 14, 22 16 17 18 10 Power connector cover (for optional AC adapter connection 137 11 k (apply selection) button 10 12 Eyelet for camera strap 13 13 c (playback) button 9, 30 14 Cable connector 79, 81, 86 15 Connector cover 79, 81, 86 16 Battery latch 14, 15 17 Battery...
S640 User's Manual
Page 18
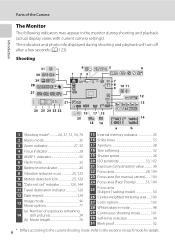
... "Date not set" indicator 120, 144 11 Travel destination indicator 120 12 Date imprint 124 13 Image mode 96 Movie options 77 (a) Number of the Camera Introduction The Monitor The following indicators may appear in the monitor during shooting and playback will turn off after a few seconds (A 123). Refer to the...
... "Date not set" indicator 120, 144 11 Travel destination indicator 120 12 Date imprint 124 13 Image mode 96 Movie options 77 (a) Number of the Camera Introduction The Monitor The following indicators may appear in the monitor during shooting and playback will turn off after a few seconds (A 123). Refer to the...

S640 User's Manual
Page 19
Parts of the Camera Introduction Playback 15 14 13 5 1 23 4 15/11/2009 12:00 6 18 9999.JPG 17 16 12 7 11 999 999 10 9 999 999 9999 9999 a 8 ...
Parts of the Camera Introduction Playback 15 14 13 5 1 23 4 15/11/2009 12:00 6 18 9999.JPG 17 16 12 7 11 999 999 10 9 999 999 9999 9999 a 8 ...

S640 User's Manual
Page 21
... displayed, press the c button to return to display the "playback-mode selection menu" and change the playback mode. • When the camera is off, holding down the c button will turn the camera on in playback mode to the current playback mode without changing the mode. 9 F Auto sort mode (A 64) 3 3. c Playback mode (A 30...
... displayed, press the c button to return to display the "playback-mode selection menu" and change the playback mode. • When the camera is off, holding down the c button will turn the camera on in playback mode to the current playback mode without changing the mode. 9 F Auto sort mode (A 64) 3 3. c Playback mode (A 30...

S640 User's Manual
Page 25
.... To set focus and rest of the currently selected menu option. Attaching the Camera Strap 13 Introduction Basic Operations Help Displays Rotate the zoom control to g (j) when M/L is held in camera shake and blurred pictures. Focus and exposure lock while the shutter-release button is... as this may result in this position. to g (j) again. Exit Back Pressing the Shutter-Release Button Halfway/All the Way Down The camera features a two-stage shutter-release button. Press the shutter- White balance For accurate color reproduction, choose a setting that matches the light source....
.... To set focus and rest of the currently selected menu option. Attaching the Camera Strap 13 Introduction Basic Operations Help Displays Rotate the zoom control to g (j) when M/L is held in camera shake and blurred pictures. Focus and exposure lock while the shutter-release button is... as this may result in this position. to g (j) again. Exit Back Pressing the Shutter-Release Button Halfway/All the Way Down The camera features a two-stage shutter-release button. Press the shutter- White balance For accurate color reproduction, choose a setting that matches the light source....
S640 User's Manual
Page 26
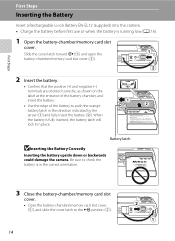
... (2). 14 Battery latch BInserting the Battery Correctly Inserting the battery upside down or backwards could damage the camera. First Steps First Steps Inserting the Battery Insert a Rechargeable Li-ion Battery EN-EL12 (supplied) into the camera. • Charge the battery before first use or when the battery is fully inserted, the battery...
... (2). 14 Battery latch BInserting the Battery Correctly Inserting the battery upside down or backwards could damage the camera. First Steps First Steps Inserting the Battery Insert a Rechargeable Li-ion Battery EN-EL12 (supplied) into the camera. • Charge the battery before first use or when the battery is fully inserted, the battery...

S640 User's Manual
Page 27
... lamp and the monitor are off before returning it to read and follow the warnings for "The Battery" (A 141) of the section "Caring for the Camera" thoroughly before using the battery. • If the battery will not be removed by hand (2). • Note that the power-on the Battery •... warnings and cautions of "For Your Safety" (A ii) thoroughly before using the battery. • Be sure to storage. 15 Removing the Battery Turn the camera off (A 19) and confirm that the battery may become hot during use; observe due caution when removing the battery. To eject the battery, open the...
... lamp and the monitor are off before returning it to read and follow the warnings for "The Battery" (A 141) of the section "Caring for the Camera" thoroughly before using the battery. • If the battery will not be removed by hand (2). • Note that the power-on the Battery •... warnings and cautions of "For Your Safety" (A ii) thoroughly before using the battery. • Be sure to storage. 15 Removing the Battery Turn the camera off (A 19) and confirm that the battery may become hot during use; observe due caution when removing the battery. To eject the battery, open the...

S640 User's Manual
Page 28
... forcibly remove the plug adapter could damage the product. * The shape of the plug adapter varies according to the country or region in which the camera was purchased in place. B Connecting the Cable When connecting the cable, be sure that supplied in other countries, and a plug adapter is securely held... in Argentina, the shape of the Charging AC Adapter EH-68P (AR) differs from that the camera connector is properly oriented. When disconnecting the cable, do not pull the 16 connector at an angle. Once the two are off. • Be ...
... forcibly remove the plug adapter could damage the product. * The shape of the plug adapter varies according to the country or region in which the camera was purchased in place. B Connecting the Cable When connecting the cable, be sure that supplied in other countries, and a plug adapter is securely held... in Argentina, the shape of the Charging AC Adapter EH-68P (AR) differs from that the camera connector is properly oriented. When disconnecting the cable, do not pull the 16 connector at an angle. Once the two are off. • Be ...


