
S51c User's Manual
Page 4
... service representative for inspection, after unplugging the product and/or removing the battery. Should the camera or AC adapter break open as this section are indicated by qualified technicians. ii Do not use the Camera or AC Adapter in the Event of Flammable Gas Do not use the...Keep these safety instructions where all those who use electronic equipment in their mouths. Introduction For Your Safety To prevent damage to your Nikon product or injury to yourself or to others, read the following symbol: This icon marks warnings, information that should be taken to...
... service representative for inspection, after unplugging the product and/or removing the battery. Should the camera or AC adapter break open as this section are indicated by qualified technicians. ii Do not use the Camera or AC Adapter in the Event of Flammable Gas Do not use the...Keep these safety instructions where all those who use electronic equipment in their mouths. Introduction For Your Safety To prevent damage to your Nikon product or injury to yourself or to others, read the following symbol: This icon marks warnings, information that should be taken to...

S51c User's Manual
Page 5
...the camera and connecting the AC Adapter EH-64 (supplied), or by inserting it is prone to leakage when fully discharged. Do not transport or store with metal objects such as discoloration or deformation. • If liquid from Nikon). • When inserting the battery, ...immediately should be sure to water. • Replace the terminal cover when transporting the battery. Observe the following precautions when handling the battery charger • Keep dry. Failure to a Nikon-authorized service representative for use in this precaution could result in contact with clothing or skin...
...the camera and connecting the AC Adapter EH-64 (supplied), or by inserting it is prone to leakage when fully discharged. Do not transport or store with metal objects such as discoloration or deformation. • If liquid from Nikon). • When inserting the battery, ...immediately should be sure to water. • Replace the terminal cover when transporting the battery. Observe the following precautions when handling the battery charger • Keep dry. Failure to a Nikon-authorized service representative for use in this precaution could result in contact with clothing or skin...

S51c User's Manual
Page 6
...'s eyes could result in burns or fire. Handle moving parts. iv Introduction For Your Safety • Do not handle the plug or battery charger with the flash window touching a person or object Failure to observe this precaution could cause hearing loss or damage the equipment. Playing ...the flash should not be taken to avoid injury caused by broken glass and to your fingers or other objects are not pinched by Nikon for the purpose, to observe this precaution could cause temporary visual impairment. Use appropriate cables When connecting cables to the input and output...
...'s eyes could result in burns or fire. Handle moving parts. iv Introduction For Your Safety • Do not handle the plug or battery charger with the flash window touching a person or object Failure to observe this precaution could cause hearing loss or damage the equipment. Playing ...the flash should not be taken to avoid injury caused by broken glass and to your fingers or other objects are not pinched by Nikon for the purpose, to observe this precaution could cause temporary visual impairment. Use appropriate cables When connecting cables to the input and output...

S51c User's Manual
Page 10
... 10 The Rotary Multi Selector 11 The m Button 12 Help Displays 13 First Steps...14 Inserting the Battery 14 Removing the Battery 15 Charging the Battery 16 Turning On and Off the Camera 17 Setting Display Language, Date, and Time 18 Inserting Memory Cards 20 Removing Memory Cards 21 L ...Basic Photography and Playback: Auto Mode 22 Step 1 Turn the Camera On and Select L (Auto) Mode 22 Step 2 Frame ...
... 10 The Rotary Multi Selector 11 The m Button 12 Help Displays 13 First Steps...14 Inserting the Battery 14 Removing the Battery 15 Charging the Battery 16 Turning On and Off the Camera 17 Setting Display Language, Date, and Time 18 Inserting Memory Cards 20 Removing Memory Cards 21 L ...Basic Photography and Playback: Auto Mode 22 Step 1 Turn the Camera On and Select L (Auto) Mode 22 Step 2 Frame ...
S51c User's Manual
Page 16
... general advice on digital imaging and photography. About the Manuals • No part of the manuals included with this product may be held liable for contact information: http://nikonimaging.com/ Use Only Nikon Brand Electronic Accessories Nikon COOLPIX cameras are engineered and ... manuals is functioning normally. Rechargeable Li-ion Battery EN-EL8 Before Taking Important Pictures Before taking the camera on important occasions (such as an authentic Nikon product. Additional information may result from the Nikon representative in your area (address provided separately)....
... general advice on digital imaging and photography. About the Manuals • No part of the manuals included with this product may be held liable for contact information: http://nikonimaging.com/ Use Only Nikon Brand Electronic Accessories Nikon COOLPIX cameras are engineered and ... manuals is functioning normally. Rechargeable Li-ion Battery EN-EL8 Before Taking Important Pictures Before taking the camera on important occasions (such as an authentic Nikon product. Additional information may result from the Nikon representative in your area (address provided separately)....

S51c User's Manual
Page 21
Introduction Parts of the Camera Rotary multi selector: c 11 J (flash mode): c 30 H (self-timer): c 32 F (macro mode): c 33 I (exposure compensation): c 34 d (apply selection) button: c 11 Zoom buttons (c 24) See also: &#..., 71) • l (help): c 13 Monitor (c 8) m button (c 12, 89, 98) Indicator lamp (c 69)/ Flash lamp (c 31) Eyelet for camera strap i (shooting/playback) button (c 10, 28) T (delete) button (c 28, 29, 53, 68) Battery-chamber/memory card slot cover (c 14, 20) Battery latch (c 14, 15) Tripod socket Memory card slot (c 20) Multi connector (c 74, 76, 80...
Introduction Parts of the Camera Rotary multi selector: c 11 J (flash mode): c 30 H (self-timer): c 32 F (macro mode): c 33 I (exposure compensation): c 34 d (apply selection) button: c 11 Zoom buttons (c 24) See also: &#..., 71) • l (help): c 13 Monitor (c 8) m button (c 12, 89, 98) Indicator lamp (c 69)/ Flash lamp (c 31) Eyelet for camera strap i (shooting/playback) button (c 10, 28) T (delete) button (c 28, 29, 53, 68) Battery-chamber/memory card slot cover (c 14, 20) Battery latch (c 14, 15) Tripod socket Memory card slot (c 20) Multi connector (c 74, 76, 80...

S51c User's Manual
Page 22
..., 44, 63 2 Exposure lock 43 3 Macro mode 33 4 Zoom indicator 24, 33 5 Focus indicator 26 6 Flash mode 30 7 Flash indicator 31 8 Internal memory indicator .......... 23 9 Battery level indicator 22 10 ISO sensitivity 31, 95 11 Vibration reduction icon 113 12 Self-timer indicator 32 13 "Date not set" indicator 156 Time... to the current shooting mode. Introduction The Monitor The following indicators may appear in the monitor during shooting and playback (actual display varies with current camera settings).
..., 44, 63 2 Exposure lock 43 3 Macro mode 33 4 Zoom indicator 24, 33 5 Focus indicator 26 6 Flash mode 30 7 Flash indicator 31 8 Internal memory indicator .......... 23 9 Battery level indicator 22 10 ISO sensitivity 31, 95 11 Vibration reduction icon 113 12 Self-timer indicator 32 13 "Date not set" indicator 156 Time... to the current shooting mode. Introduction The Monitor The following indicators may appear in the monitor during shooting and playback (actual display varies with current camera settings).

S51c User's Manual
Page 23
.../2007 12:00 M 3 9999.JPG w 4 5 7 O P 9999 9999 13 12 10 z 11 6 O8 P9 1 Date of recording 18 2 Time of recording 18 3 Internal memory indicator .......... 28 4 Battery level indicator 22 5 File number and type 151 6 Calendar guide/ list by date guide 54, 55 7 Volume indicator 53, 68 8 Voice memo recording guide...... 53...
.../2007 12:00 M 3 9999.JPG w 4 5 7 O P 9999 9999 13 12 10 z 11 6 O8 P9 1 Date of recording 18 2 Time of recording 18 3 Internal memory indicator .......... 28 4 Battery level indicator 22 5 File number and type 151 6 Calendar guide/ list by date guide 54, 55 7 Volume indicator 53, 68 8 Voice memo recording guide...... 53...

S51c User's Manual
Page 28
... the correct orientation. 3 Close the battery-chamber/memory card slot cover. 2 1 14 Charge the battery before first use or when the battery is fully inserted. 1 2 j Inserting the Battery Inserting the battery upside down or backwards could damage the camera. First Steps First Steps Inserting the Battery The camera uses a Rechargeable Li-ion Battery EN-EL8 (supplied). Be sure to...
... the correct orientation. 3 Close the battery-chamber/memory card slot cover. 2 1 14 Charge the battery before first use or when the battery is fully inserted. 1 2 j Inserting the Battery Inserting the battery upside down or backwards could damage the camera. First Steps First Steps Inserting the Battery The camera uses a Rechargeable Li-ion Battery EN-EL8 (supplied). Be sure to...

S51c User's Manual
Page 29
The battery can then be removed by hand 2. • Note that the battery may become hot during use; Inserting the Battery 1 2 First Steps j Note on the Battery Be sure to read and follow the warnings for the battery on page iii and the section, "Caring for the Camera" (c 153), before removing the battery. To eject the battery, open the battery-chamber/ memory card slot cover and slide the battery latch in the direction shown 1. observe due caution when removing the battery. Removing the Battery Turn the camera off before using the battery. 15
The battery can then be removed by hand 2. • Note that the battery may become hot during use; Inserting the Battery 1 2 First Steps j Note on the Battery Be sure to read and follow the warnings for the battery on page iii and the section, "Caring for the Camera" (c 153), before removing the battery. To eject the battery, open the battery-chamber/ memory card slot cover and slide the battery latch in the direction shown 1. observe due caution when removing the battery. Removing the Battery Turn the camera off before using the battery. 15
S51c User's Manual
Page 30
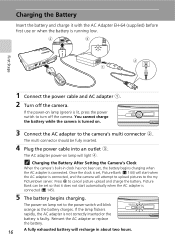
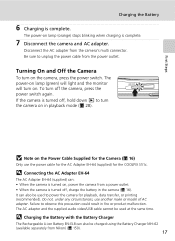
... lamp net to the power switch will blink orange as the battery charges. You cannot charge the battery while the camera is connected, and the camera will start automatically when the AC adapter is connected (c 145). 5 The battery begins charging. Once the clock is set, Picture Bank (c 144...cable and AC adapter 1. 2 Turn off the camera. Press d to turn off the camera. If the lamp flickers rapidly, the AC adapter is not correctly inserted or the battery is connected. k Charging the Battery After Setting the Camera's Clock When the camera's built-in about two hours. Picture Bank ...
... lamp net to the power switch will blink orange as the battery charges. You cannot charge the battery while the camera is connected, and the camera will start automatically when the AC adapter is connected (c 145). 5 The battery begins charging. Once the clock is set, Picture Bank (c 144...cable and AC adapter 1. 2 Turn off the camera. Press d to turn off the camera. If the lamp flickers rapidly, the AC adapter is not correctly inserted or the battery is connected. k Charging the Battery After Setting the Camera's Clock When the camera's built-in about two hours. Picture Bank ...
S51c User's Manual
Page 31
... the power switch. Be sure to power the camera for the COOLPIX S51c. First Steps Charging the Battery 6 Charging is complete. 7 Disconnect the camera and AC adapter. l Charging the Battery with the Battery Charger The Rechargeable Li-ion Battery EN-EL8 can also be used to unplug the power cable from Nikon) (c 150). 17 It can also be charged...
... the power switch. Be sure to power the camera for the COOLPIX S51c. First Steps Charging the Battery 6 Charging is complete. 7 Disconnect the camera and AC adapter. l Charging the Battery with the Battery Charger The Rechargeable Li-ion Battery EN-EL8 can also be used to unplug the power cable from Nikon) (c 150). 17 It can also be charged...

S51c User's Manual
Page 34
... transferred. Make sure that the memory card is inserted in the camera, pictures are stored in the camera's internal memory (approx.13 MB) or on the memory card and pictures recorded to turn off and open the battery-chamber/memory card slot cover. If a memory card is correctly oriented.... 20 First Steps Inserting Memory Cards Pictures are automatically stored on removable Secure Digital (SD...
... transferred. Make sure that the memory card is inserted in the camera, pictures are stored in the camera's internal memory (approx.13 MB) or on the memory card and pictures recorded to turn off and open the battery-chamber/memory card slot cover. If a memory card is correctly oriented.... 20 First Steps Inserting Memory Cards Pictures are automatically stored on removable Secure Digital (SD...
S51c User's Manual
Page 35
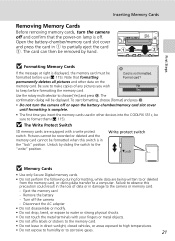
... keep before use (c 115). First Steps Inserting Memory Cards Removing Memory Cards Before removing memory cards, turn the camera off the camera - Open the battery-chamber/memory card slot cover and press the card in direct sunlight, closed vehicles, or areas exposed to high ...Format] and press d. • Do not turn the camera off and confirm that formatting permanently deletes all pictures and other devices into the COOLPIX S51c, be displayed. Write protect switch j Memory Cards • Use only Secure Digital memory cards. • Do not perform the following during...
... keep before use (c 115). First Steps Inserting Memory Cards Removing Memory Cards Before removing memory cards, turn the camera off the camera - Open the battery-chamber/memory card slot cover and press the card in direct sunlight, closed vehicles, or areas exposed to high ...Format] and press d. • Do not turn the camera off and confirm that formatting permanently deletes all pictures and other devices into the COOLPIX S51c, be displayed. Write protect switch j Memory Cards • Use only Secure Digital memory cards. • Do not perform the following during...

S51c User's Manual
Page 36
...This section describes how to take pictures. The camera enters L (auto) mode. w K Warning! Cannot take pictures in L (auto) mode, an automatic, "point-and-shoot" mode recommended for first-time users of digital cameras. 1 Press the power switch to turn on. Battery level indicator L M w W 5 Number... of exposures remaining Number of exposures remaining The number of pictures that can be stored depends on the camera. The power-on lamp will ...
...This section describes how to take pictures. The camera enters L (auto) mode. w K Warning! Cannot take pictures in L (auto) mode, an automatic, "point-and-shoot" mode recommended for first-time users of digital cameras. 1 Press the power switch to turn on. Battery level indicator L M w W 5 Number... of exposures remaining Number of exposures remaining The number of pictures that can be stored depends on the camera. The power-on lamp will ...

S51c User's Manual
Page 37
... turn off altogether if no operations are performed for about a minute during shooting and playback. Step 1 Turn the Camera On and Select L (Auto) Mode Indicators Displayed in L (Auto) Mode Shooting mode M displayed in L (auto... or your own preferences. l Auto Power Off in L (auto) mode displays the shooting menu. The camera will dim to reduce the drain on how you to specify the image mode (c 89), white balance setting...card. M W Image mode Choose from seven image-mode options depending on the battery if no operations are performed for about five seconds.
... turn off altogether if no operations are performed for about a minute during shooting and playback. Step 1 Turn the Camera On and Select L (Auto) Mode Indicators Displayed in L (Auto) Mode Shooting mode M displayed in L (auto... or your own preferences. l Auto Power Off in L (auto) mode displays the shooting menu. The camera will dim to reduce the drain on how you to specify the image mode (c 89), white balance setting...card. M W Image mode Choose from seven image-mode options depending on the battery if no operations are performed for about five seconds.

S51c User's Manual
Page 45
...lighting is poor, the AF-assist illuminator may light to take another picture. • Not recommended for when shutter-release timing is taken, Nikon's own In-Camera Red-Eye Fix processes the image as bright spots in above cases. 31 The illuminator has a range of about 3.5 m (11 ft.... when the camera automatically increases sensitivity. The AF-assist illuminator can be affected. results in on Using the Flash When using the flash and a low battery, the monitor display will fire when picture is pressed halfway. j Note on the subject. k Red-Eye Reduction The COOLPIX S51c is poor....
...lighting is poor, the AF-assist illuminator may light to take another picture. • Not recommended for when shutter-release timing is taken, Nikon's own In-Camera Red-Eye Fix processes the image as bright spots in above cases. 31 The illuminator has a range of about 3.5 m (11 ft.... when the camera automatically increases sensitivity. The AF-assist illuminator can be affected. results in on Using the Flash When using the flash and a low battery, the monitor display will fire when picture is pressed halfway. j Note on the subject. k Red-Eye Reduction The COOLPIX S51c is poor....

S51c User's Manual
Page 80
...press d. 2 Choose [Playback speed] and press d. The monitor turns off automatically with the auto off unexpectedly during recording, use a fully charged 66 battery or the AC Adapter EH-64 (supplied). Movies j Stop-Motion Movie • Flash mode (c 30), macro mode (c 33), and exposure compensation.... 5 Press the shutter-release button to end recording. Apply the appropriate settings before shooting begins. • To prevent the camera from turning off function (c 114) if no operations are performed for recording consecutive frames. The recorded picture will automatically stop if...
...press d. 2 Choose [Playback speed] and press d. The monitor turns off automatically with the auto off unexpectedly during recording, use a fully charged 66 battery or the AC Adapter EH-64 (supplied). Movies j Stop-Motion Movie • Flash mode (c 30), macro mode (c 33), and exposure compensation.... 5 Press the shutter-release button to end recording. Apply the appropriate settings before shooting begins. • To prevent the camera from turning off function (c 114) if no operations are performed for recording consecutive frames. The recorded picture will automatically stop if...
S51c User's Manual
Page 89
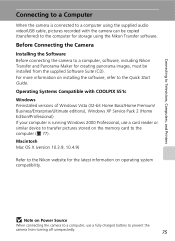
... with COOLPIX S51c Windows Preinstalled versions of Windows Vista (32-bit Home Basic/Home Premium/ Business/Enterprise/Ultimate editions), Windows XP Service Pack 2 (Home Edition/Professional) If your computer is running Windows 2000 Professional, use a fully charged battery to prevent the camera from... the supplied Software Suite (CD). Macintosh Mac OS X (version 10.3.9, 10.4.9) Refer to the Nikon website for storage using the Nikon Transfer software. j Note on Power Source When connecting the camera to a computer, use ...
... with COOLPIX S51c Windows Preinstalled versions of Windows Vista (32-bit Home Basic/Home Premium/ Business/Enterprise/Ultimate editions), Windows XP Service Pack 2 (Home Edition/Professional) If your computer is running Windows 2000 Professional, use a fully charged battery to prevent the camera from... the supplied Software Suite (CD). Macintosh Mac OS X (version 10.3.9, 10.4.9) Refer to the Nikon website for storage using the Nikon Transfer software. j Note on Power Source When connecting the camera to a computer, use ...

S51c User's Manual
Page 93
... and disconnect audio video/USB cable j Note on Power Source When connecting the camera to a printer, use a fully charged battery to prevent the camera from your personal printer and printing over a direct camera-to-printer connection, the following options are also available for details. 79 See "Connecting to a ImageLink-...printer for printing pictures: • Insert a memory card into a DPOF-compatible printer's card slot • Take a memory card to a digital photo lab For printing using these methods, specify the pictures and the number of prints each using [Print set menu (c 85).
... and disconnect audio video/USB cable j Note on Power Source When connecting the camera to a printer, use a fully charged battery to prevent the camera from your personal printer and printing over a direct camera-to-printer connection, the following options are also available for details. 79 See "Connecting to a ImageLink-...printer for printing pictures: • Insert a memory card into a DPOF-compatible printer's card slot • Take a memory card to a digital photo lab For printing using these methods, specify the pictures and the number of prints each using [Print set menu (c 85).


