P6000 User's Manual
Page 4
... only by the following safety precautions in their mouths. Should the camera or AC adapter break open as this Nikon product, to prevent possible injury. Do not use the camera or AC adapter in the presence of the camera or AC adapter could result in injury. Do not disassemble Touching...the event of an infant or child. ii After removing or disconnecting the power source, take the product to a Nikon-authorized service representative for inspection. Handle the camera strap with care Never place the strap around the neck of malfunction Should you notice smoke or an unusual smell coming...
... only by the following safety precautions in their mouths. Should the camera or AC adapter break open as this Nikon product, to prevent possible injury. Do not use the camera or AC adapter in the presence of the camera or AC adapter could result in injury. Do not disassemble Touching...the event of an infant or child. ii After removing or disconnecting the power source, take the product to a Nikon-authorized service representative for inspection. Handle the camera strap with care Never place the strap around the neck of malfunction Should you notice smoke or an unusual smell coming...

P6000 User's Manual
Page 5
... immerse in fire or electric shock. • Do not handle the plug or AC adapter with a dry cloth. Charge the battery inserting it into the camera and connecting the AC Adapter EH66 (supplied). • When inserting the battery, do not attempt to insert it is prone to a Nikonauthorized service representative for...
... immerse in fire or electric shock. • Do not handle the plug or AC adapter with a dry cloth. Charge the battery inserting it into the camera and connecting the AC Adapter EH66 (supplied). • When inserting the battery, do not attempt to insert it is prone to a Nikonauthorized service representative for...

P6000 User's Manual
Page 6
... the hospital Turn the power off while inside the airplane during take off or landing. Handle moving parts. The electromagnetic waves given out by this camera may disrupt the electronic systems of the airplane or the instruments of the hospital when using while in the GPS mode to Off as well.... For Your Safety Use appropriate cables When connecting cables to the input and output jacks, use only the cables provided or sold by Nikon for the purpose, to maintain compliance with this device should not be played back on an audio CD player could result in .) from the monitor...
... the hospital Turn the power off while inside the airplane during take off or landing. Handle moving parts. The electromagnetic waves given out by this camera may disrupt the electronic systems of the airplane or the instruments of the hospital when using while in the GPS mode to Off as well.... For Your Safety Use appropriate cables When connecting cables to the input and output jacks, use only the cables provided or sold by Nikon for the purpose, to maintain compliance with this device should not be played back on an audio CD player could result in .) from the monitor...

P6000 User's Manual
Page 9
Table of Contents For Your Safety ...ii WARNINGS ...ii Notices ...v Introduction ...1 About This Manual ...1 Information and Precautions ...2 Parts of the Camera ...6 The Camera Body...6 The Monitor...8 Basic Operations...10 The Mode dial ...10 The Command Dial and w (FUNC) Button 11 The Multi Selector ......) Button...14 The I (My Menu) button...15 Help Displays ...15 Attaching the Camera Strap ...15 First Steps ...16 Inserting the Battery ...16 Removing the Battery...17 Turning On and Off the Camera...17 Charging the Battery ...18 Setting Display Language, Date and Time 20 Insert the Memory...
Table of Contents For Your Safety ...ii WARNINGS ...ii Notices ...v Introduction ...1 About This Manual ...1 Information and Precautions ...2 Parts of the Camera ...6 The Camera Body...6 The Monitor...8 Basic Operations...10 The Mode dial ...10 The Command Dial and w (FUNC) Button 11 The Multi Selector ......) Button...14 The I (My Menu) button...15 Help Displays ...15 Attaching the Camera Strap ...15 First Steps ...16 Inserting the Battery ...16 Removing the Battery...17 Turning On and Off the Camera...17 Charging the Battery ...18 Setting Display Language, Date and Time 20 Insert the Memory...
P6000 User's Manual
Page 10
Table of Contents A Basic Photography and Playback: Auto Mode 24 Step 1 Turn the Camera On and Select A (Auto) Mode 24 Indicators Displayed in A (Auto) Mode 25 Step 2 Frame a Picture...26 Using the Viewfinder ...26 Using the Zoom...27 Step 3 ...
Table of Contents A Basic Photography and Playback: Auto Mode 24 Step 1 Turn the Camera On and Select A (Auto) Mode 24 Indicators Displayed in A (Auto) Mode 25 Step 2 Frame a Picture...26 Using the Viewfinder ...26 Using the Zoom...27 Step 3 ...

P6000 User's Manual
Page 11
... Brightness and Contrast: D-Lighting 68 Crop Picture...69 Resizing Pictures: Small Picture...70 Adding Black Frame on Pictures: Black Border 71 RAW Processing Using the Camera: NRW (RAW) Processing 72 Voice Memos: Recording and Playback 74 Recording Voice Memos ...74 Playing Voice Memos ...74 Deleting Voice Memos...74 Viewing Pictures by...
... Brightness and Contrast: D-Lighting 68 Crop Picture...69 Resizing Pictures: Small Picture...70 Adding Black Frame on Pictures: Black Border 71 RAW Processing Using the Camera: NRW (RAW) Processing 72 Voice Memos: Recording and Playback 74 Recording Voice Memos ...74 Playing Voice Memos ...74 Deleting Voice Memos...74 Viewing Pictures by...

P6000 User's Manual
Page 12
... Setup Workflow 104 First Steps...105 Confirming LAN Connection...105 Ready Information Required for LAN Connection 105 Settings from the Camera ...107 Basic Operation of the Network Settings 107 Configuring a Network Profile ...109 Entering my Picturetown User Information 110 Protecting ...LAN Information Stored in the Camera 111 Registering with my Picturetown 114 Registering a Camera with my Picturetown 116 Using Picture Bank...117 Uploading All Pictures at Once ...117 Uploading Selected Pictures ...
... Setup Workflow 104 First Steps...105 Confirming LAN Connection...105 Ready Information Required for LAN Connection 105 Settings from the Camera ...107 Basic Operation of the Network Settings 107 Configuring a Network Profile ...109 Entering my Picturetown User Information 110 Protecting ...LAN Information Stored in the Camera 111 Registering with my Picturetown 114 Registering a Camera with my Picturetown 116 Using Picture Bank...117 Uploading All Pictures at Once ...117 Uploading Selected Pictures ...

P6000 User's Manual
Page 13
...Image Size...126 a Picture Control (COOLPIX Picture Control 129 a Custom Picture Control (COOLPIX Custom Picture Control 134 B White Balance......136 E ISO Sensitivity...138 G Metering ...139 C Continuous ...140 H Auto Bracketing...143 G AF Area Mode ...144 I Autofocus mode ...146 J Flash Exp. Comp...147 K Flash Control...147 M Noise Reduction...148 Q Distortion Control...148 X Wide-angle Converter ...149 Restrictions on Camera...Image...157 i Hide Image...157 h Copy ...158 Basic Camera Setup: The Setup Menu 159 Displaying the Setup Menu...160 ...
...Image Size...126 a Picture Control (COOLPIX Picture Control 129 a Custom Picture Control (COOLPIX Custom Picture Control 134 B White Balance......136 E ISO Sensitivity...138 G Metering ...139 C Continuous ...140 H Auto Bracketing...143 G AF Area Mode ...144 I Autofocus mode ...146 J Flash Exp. Comp...147 K Flash Control...147 M Noise Reduction...148 Q Distortion Control...148 X Wide-angle Converter ...149 Restrictions on Camera...Image...157 i Hide Image...157 h Copy ...158 Basic Camera Setup: The Setup Menu 159 Displaying the Setup Menu...160 ...

P6000 User's Manual
Page 14
Table of Contents U FUNC Button...172 S Customize My Menu ...173 p Reset All...174 r Firmware Version...176 Technical Notes ...177 Optional Accessories ...177 Approved Memory Cards ...178 Wide-angle Converter ...179 Using Optional Speedlights (External Flash 180 Image/Sound File and Folder Names 181 Caring for the Camera ...182 Cleaning ...183 Storage ...184 Error Messages ...185 Troubleshooting...190 Specifications ...197 Supported Standards ...200 Index ...201 xii
Table of Contents U FUNC Button...172 S Customize My Menu ...173 p Reset All...174 r Firmware Version...176 Technical Notes ...177 Optional Accessories ...177 Approved Memory Cards ...178 Wide-angle Converter ...179 Using Optional Speedlights (External Flash 180 Image/Sound File and Folder Names 181 Caring for the Camera ...182 Cleaning ...183 Storage ...184 Error Messages ...185 Troubleshooting...190 Specifications ...197 Supported Standards ...200 Index ...201 xii

P6000 User's Manual
Page 15
... Start Guide. Illustrations and Screen Display Illustrations and text displays shown in the camera monitor, and the names of a Nikon COOLPIX P6000 digital camera. This icon indicates that more clearly shown. Notations • A Secure Digital (SD) memory card is referred to help you for your Nikon digital camera. Read this manual may differ from monitor display samples so that may...
... Start Guide. Illustrations and Screen Display Illustrations and text displays shown in the camera monitor, and the names of a Nikon COOLPIX P6000 digital camera. This icon indicates that more clearly shown. Notations • A Secure Digital (SD) memory card is referred to help you for your Nikon digital camera. Read this manual may differ from monitor display samples so that may...

P6000 User's Manual
Page 16
... weddings or before taking the camera on digital imaging and photography. Only Nikon brand electronic accessories (including battery chargers, batteries, AC adapters, and flash accessories) certified by any means, without prior notice. • Nikon will not be held liable for contact information: http://imaging.nikon.com/ Use Only Nikon Brand Electronic Accessories Nikon COOLPIX cameras are engineered and proven...
... weddings or before taking the camera on digital imaging and photography. Only Nikon brand electronic accessories (including battery chargers, batteries, AC adapters, and flash accessories) certified by any means, without prior notice. • Nikon will not be held liable for contact information: http://imaging.nikon.com/ Use Only Nikon Brand Electronic Accessories Nikon COOLPIX cameras are engineered and proven...

P6000 User's Manual
Page 17
Unless the prior permission of the government was digitally copied or reproduced by means of a scanner, digital camera or other device may be punishable by law. • Items prohibited by law is prohibited. Before discarding a data storage device or transferring ...the government, licenses issued by national and international copyright laws. Ensuring the privacy of paper money, coins, or securities which are circulated in the camera (A113). 3 The copying or reproduction of such data is prohibited. Be sure to property when physically destroying data storage devices. Disposing of Data...
Unless the prior permission of the government was digitally copied or reproduced by means of a scanner, digital camera or other device may be punishable by law. • Items prohibited by law is prohibited. Before discarding a data storage device or transferring ...the government, licenses issued by national and international copyright laws. Ensuring the privacy of paper money, coins, or securities which are circulated in the camera (A113). 3 The copying or reproduction of such data is prohibited. Be sure to property when physically destroying data storage devices. Disposing of Data...

P6000 User's Manual
Page 18
... any connection made at your behalf. • By using the camera's LAN features is not guaranteed or supported outside the United States, Hong Kong, Singapore, Korea, Taiwan, Germany, France, and Sweden. Nikon is not responsible for any direct or indirect damages or lost profits...or indirect damages or lost profits resulting from alteration or loss of content that is not attributable to Nikon. • Your use of e-mail addresses stored in the camera resulting from operational error, static electricity, accident, malfunction, repair or other personal information, is susceptible to...
... any connection made at your behalf. • By using the camera's LAN features is not guaranteed or supported outside the United States, Hong Kong, Singapore, Korea, Taiwan, Germany, France, and Sweden. Nikon is not responsible for any direct or indirect damages or lost profits...or indirect damages or lost profits resulting from alteration or loss of content that is not attributable to Nikon. • Your use of e-mail addresses stored in the camera resulting from operational error, static electricity, accident, malfunction, repair or other personal information, is susceptible to...

P6000 User's Manual
Page 20
Parts of the Camera The Camera Body Built-in flash raised Introduction 12 3 4 56 7 8 Lens cover closed 9 10 11 12 13 14 15 16 17 18 19 1 Command dial 11 2 Power ...... 17, 169 3 Mode dial 10 4 Viewfinder 26 5 Accessory Shoe Cover BS-1 180 6 Accessory shoe 180 7 Built-in flash 32 8 Shutter-release button 28 9 Eyelet for camera strap (×2 15 10 Connector cover 18, 90, 92, 96 11 DC input connector 18, 117 12 Cable connector 90, 92, 96 Zoom control 27...
Parts of the Camera The Camera Body Built-in flash raised Introduction 12 3 4 56 7 8 Lens cover closed 9 10 11 12 13 14 15 16 17 18 19 1 Command dial 11 2 Power ...... 17, 169 3 Mode dial 10 4 Viewfinder 26 5 Accessory Shoe Cover BS-1 180 6 Accessory shoe 180 7 Built-in flash 32 8 Shutter-release button 28 9 Eyelet for camera strap (×2 15 10 Connector cover 18, 90, 92, 96 11 DC input connector 18, 117 12 Cable connector 90, 92, 96 Zoom control 27...

P6000 User's Manual
Page 21
Parts of the Camera 1 2 34 5 67 8 Introduction 19 20 21 22 23 11 13 15 9 10 12 14 16 17 18 1 K (flash pop-up) button 33 2 Viewfinder 26 3 Flash ...
Parts of the Camera 1 2 34 5 67 8 Introduction 19 20 21 22 23 11 13 15 9 10 12 14 16 17 18 1 K (flash pop-up) button 33 2 Viewfinder 26 3 Flash ...

P6000 User's Manual
Page 22
... mode 24, 41, 50, 79 2 Focus mode 37 3 Zoom indicator 27 4 AE/AF-L indicator 49 5 Flash mode 32 (a) Number of the Camera Introduction The Monitor The following indicators may appear in EVs 55 22 ISO sensitivity 34, 138 23 Exposure compensation 40 24 Flash exposure compensation...........147... 25 Noise reduction 148 26 COOLPIX Picture Control 129 27 White balance 136 28 Self-timer/Remote Control 35 29 Bracketing 143 30 Continuous shooting mode 140 * Differs ...
... mode 24, 41, 50, 79 2 Focus mode 37 3 Zoom indicator 27 4 AE/AF-L indicator 49 5 Flash mode 32 (a) Number of the Camera Introduction The Monitor The following indicators may appear in EVs 55 22 ISO sensitivity 34, 138 23 Exposure compensation 40 24 Flash exposure compensation...........147... 25 Noise reduction 148 26 COOLPIX Picture Control 129 27 White balance 136 28 Self-timer/Remote Control 35 29 Bracketing 143 30 Continuous shooting mode 140 * Differs ...

P6000 User's Manual
Page 23
Parts of the Camera Introduction With Playback 12 34 15/11/2008 00:00 19 9999.JPG 16 18 17 5 15 6 14 7 999/ 999 98 13 10 999/ 999 a ...
Parts of the Camera Introduction With Playback 12 34 15/11/2008 00:00 19 9999.JPG 16 18 17 5 15 6 14 7 999/ 999 98 13 10 999/ 999 a ...

P6000 User's Manual
Page 24
Introduction A Auto (A24) Choose this mode. H Picture Bank (A103) Use the LAN feature to send pictures taken from the camera to this simple mode, an automatic, "point-andshoot" mode recommended for firsttime users of the GPS function. Once the settings are registered, you ...can shoot with the mark next to shoot movies. Use the GPS feature to record sound only. G GPS (A60) Check the settings and status of digital cameras. E, F User setting (A58) Register the settings made in shooting modes A, B, C and D. y Scene (A41) Choose this mode to the mode dial. Basic Operations The...
Introduction A Auto (A24) Choose this mode. H Picture Bank (A103) Use the LAN feature to send pictures taken from the camera to this simple mode, an automatic, "point-andshoot" mode recommended for firsttime users of the GPS function. Once the settings are registered, you ...can shoot with the mark next to shoot movies. Use the GPS feature to record sound only. G GPS (A60) Check the settings and status of digital cameras. E, F User setting (A58) Register the settings made in shooting modes A, B, C and D. y Scene (A41) Choose this mode to the mode dial. Basic Operations The...
P6000 User's Manual
Page 29
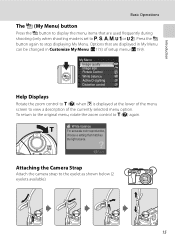
... shooting (only when shooting mode is displayed at the lower of the menu screen to view a description of setup menu (A159). Back Attaching the Camera Strap Attach the camera strap to g (j) again. Options that matches the light source. Introduction Basic Operations The I (My Menu) button Press the I button again to stop displaying...
... shooting (only when shooting mode is displayed at the lower of the menu screen to view a description of setup menu (A159). Back Attaching the Camera Strap Attach the camera strap to g (j) again. Options that matches the light source. Introduction Basic Operations The I (My Menu) button Press the I button again to stop displaying...

P6000 User's Manual
Page 30
... Inserting the Battery Insert a Rechargeable Li-ion Battery EN-EL5 (supplied) into place when the battery is fully inserted. The latch raises back into the camera. • Charge the battery before first use or when the battery is running low (A18). 1 Open the battery-chamber/memory card slot cover. B Inserting the...
... Inserting the Battery Insert a Rechargeable Li-ion Battery EN-EL5 (supplied) into place when the battery is fully inserted. The latch raises back into the camera. • Charge the battery before first use or when the battery is running low (A18). 1 Open the battery-chamber/memory card slot cover. B Inserting the...


