L100 User's Manual
Page 4
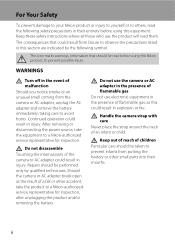
... consequences that should be taken to prevent infants from the camera or AC adapter, unplug the AC adapter and remove the battery immediately, taking care to avoid burns. ii Repairs should be read them. Should the camera or AC adapter break open as this equipment. WARNINGS Turn... child. Handle the camera strap with care Never place the strap around the neck of flammable gas, as the result of malfunction Should you notice smoke or an unusual smell coming from putting the battery or other accident, take the equipment to a Nikon-authorized service representative for...
... consequences that should be taken to prevent infants from the camera or AC adapter, unplug the AC adapter and remove the battery immediately, taking care to avoid burns. ii Repairs should be read them. Should the camera or AC adapter break open as this equipment. WARNINGS Turn... child. Handle the camera strap with care Never place the strap around the neck of flammable gas, as the result of malfunction Should you notice smoke or an unusual smell coming from putting the battery or other accident, take the equipment to a Nikon-authorized service representative for...

L100 User's Manual
Page 5
... .) from the damaged battery comes in this product: • Before replacing the battery, turn the product off. To avoid damage to the product, be no less than 1 m (3 ft. 4 in the battery, such as necklaces or hairpins. • Batteries are not pinched by Nikon for the purpose, to... leakage when fully discharged. For Your Safety Observe caution when handling the battery The battery may leak or explode if improperly handled. Handle moving parts ...
... .) from the damaged battery comes in this product: • Before replacing the battery, turn the product off. To avoid damage to the product, be no less than 1 m (3 ft. 4 in the battery, such as necklaces or hairpins. • Batteries are not pinched by Nikon for the purpose, to... leakage when fully discharged. For Your Safety Observe caution when handling the battery The battery may leak or explode if improperly handled. Handle moving parts ...

L100 User's Manual
Page 8
... or the local authorities in charge of waste management. vi The following apply only to users in European countries: • All batteries, whether marked with Canadian ICES-003. Do not dispose of as household waste. • For more information, contact the retailer ...or the local authorities in charge of waste management. Notices Notice for customers in Canada CAUTION This Class B digital apparatus complies with this product is designated for separate collection at an appropriate collection point. Symbol for separate collection at an appropriate ...
... or the local authorities in charge of waste management. vi The following apply only to users in European countries: • All batteries, whether marked with Canadian ICES-003. Do not dispose of as household waste. • For more information, contact the retailer ...or the local authorities in charge of waste management. Notices Notice for customers in Canada CAUTION This Class B digital apparatus complies with this product is designated for separate collection at an appropriate collection point. Symbol for separate collection at an appropriate ...

L100 User's Manual
Page 9
......11 d button ...12 Switching Between Tabs...12 Help Displays...13 About the Shutter-release Button...13 First Steps ...14 Inserting the Batteries ...14 Applicable Batteries ...14 Turning On and Off the Camera...14 Setting Display Language, Date and Time 16 Inserting Memory Cards ...18 Removing Memory Cards...19 G Basic Photography and Playback: Easy...
......11 d button ...12 Switching Between Tabs...12 Help Displays...13 About the Shutter-release Button...13 First Steps ...14 Inserting the Batteries ...14 Applicable Batteries ...14 Turning On and Off the Camera...14 Setting Display Language, Date and Time 16 Inserting Memory Cards ...18 Removing Memory Cards...19 G Basic Photography and Playback: Easy...

L100 User's Manual
Page 12
Table of Contents p Reset All ...109 s Battery Type ...111 d Protect ...111 f Rotate Image...112 h Copy ...113 r Firmware Version ...114 Technical Notes...115 Optional Accessories ...115 Approved Memory Cards ...115 Image File and Folder Names ...116 Caring for the Camera ...117 Cleaning ...118 Storage ...119 Error Messages...120 Troubleshooting...123 Specifications ...128 Supported Standards ...131 Index ...132 x
Table of Contents p Reset All ...109 s Battery Type ...111 d Protect ...111 f Rotate Image...112 h Copy ...113 r Firmware Version ...114 Technical Notes...115 Optional Accessories ...115 Approved Memory Cards ...115 Image File and Folder Names ...116 Caring for the Camera ...117 Cleaning ...118 Storage ...119 Error Messages...120 Troubleshooting...123 Specifications ...128 Supported Standards ...131 Index ...132 x

L100 User's Manual
Page 17
1 11 12 Parts of the Camera 2 3 4 56 7 Introduction 13 10 9 8 14 15 16 1 Monitor 8 2 Multi selector 11 3 A (shooting mode) button 10 4 Flash lamp 31 5 k (apply selection) button 11 6 c (playback) button 10, 26 7 Eyelet for camera strap 7 8 Battery-chamber/ memory card slot cover 14, 18 9 l (delete) button 26, 27, 63 10 d button 12, 62, 78, 87, 92 11 Pin cover 64, 66, 70 12 Cable connector 64, 66, 70 13 DC input connector (for AC adapter available separately from Nikon) .... 15, 115 14 Tripod socket 15 Battery-chamber 14 16 Memory card slot 18 5
1 11 12 Parts of the Camera 2 3 4 56 7 Introduction 13 10 9 8 14 15 16 1 Monitor 8 2 Multi selector 11 3 A (shooting mode) button 10 4 Flash lamp 31 5 k (apply selection) button 11 6 c (playback) button 10, 26 7 Eyelet for camera strap 7 8 Battery-chamber/ memory card slot cover 14, 18 9 l (delete) button 26, 27, 63 10 d button 12, 62, 78, 87, 92 11 Pin cover 64, 66, 70 12 Cable connector 64, 66, 70 13 DC input connector (for AC adapter available separately from Nikon) .... 15, 115 14 Tripod socket 15 Battery-chamber 14 16 Memory card slot 18 5
L100 User's Manual
Page 20
... 8 * Differs according to the sections on each mode for details. The indicators and photo info displayed during shooting and playback (actual display varies with current camera settings). Shooting 4 6 5 26 10 1 2 3 25 7 8 24 23 22 10 9 11 +1.0 21 1/125 F3.5 999 12 13 20 19 ...48, 50, 52, 61 2 Macro mode 34 3 Zoom indicator 23, 34 4 AE/AF-L indicator 47 5 Focus indicator 24 6 Flash mode 30 7 Battery level indicator 20 8 Vibration reduction icon (still pictures) ....21, 102 Electronic VR icon (movies) .........61, 102 9 Motion detection icon 21, 103 10 Distortion...
... 8 * Differs according to the sections on each mode for details. The indicators and photo info displayed during shooting and playback (actual display varies with current camera settings). Shooting 4 6 5 26 10 1 2 3 25 7 8 24 23 22 10 9 11 +1.0 21 1/125 F3.5 999 12 13 20 19 ...48, 50, 52, 61 2 Macro mode 34 3 Zoom indicator 23, 34 4 AE/AF-L indicator 47 5 Focus indicator 24 6 Flash mode 30 7 Battery level indicator 20 8 Vibration reduction icon (still pictures) ....21, 102 Electronic VR icon (movies) .........61, 102 9 Motion detection icon 21, 103 10 Distortion...

L100 User's Manual
Page 21
Parts of the Camera Introduction Playback 1 2 34 15/05/2009 12:00 13 9999.JPG 12 10 11 9 5 999 999 6 87 999 999 a 9999 9999 1m00s b 1m00s 1 Date of recording 16 2 Time of recording 16 3 Volume 63 4 Battery level indicator 20 5 Image mode 79 Movie options 62 a Current frame number/ 6 total number of...
Parts of the Camera Introduction Playback 1 2 34 15/05/2009 12:00 13 9999.JPG 12 10 11 9 5 999 999 6 87 999 999 a 9999 9999 1m00s b 1m00s 1 Date of recording 16 2 Time of recording 16 3 Volume 63 4 Battery level indicator 20 5 Image mode 79 Movie options 62 a Current frame number/ 6 total number of...

L100 User's Manual
Page 26
..., hold down to prevent the batteries from falling out. 2 Inserting the Batteries • Insert the batteries correctly as shown at right. 3 1 2 First Steps 3 Close the battery-chamber/memory card slot cover. 1 2 Applicable Batteries This camera uses the following R6/AA-size batteries. • Four LR6/L40 alkaline batteries (batteries supplied) • Four FR6/L91 lithium batteries Rechargeable batteries cannot be used.
..., hold down to prevent the batteries from falling out. 2 Inserting the Batteries • Insert the batteries correctly as shown at right. 3 1 2 First Steps 3 Close the battery-chamber/memory card slot cover. 1 2 Applicable Batteries This camera uses the following R6/AA-size batteries. • Four LR6/L40 alkaline batteries (batteries supplied) • Four FR6/L91 lithium batteries Rechargeable batteries cannot be used.

L100 User's Manual
Page 27
..., use another make sure that the lens cap has been removed, then turn the camera off and the camera enters standby mode. Batteries with a flat negative terminal B Battery Type To improve battery performance, select the type of battery currently inserted in the camera in the setup menu (A 91). When any circumstances, use an AC Adapter EH-67...
..., use another make sure that the lens cap has been removed, then turn the camera off and the camera enters standby mode. Batteries with a flat negative terminal B Battery Type To improve battery performance, select the type of battery currently inserted in the camera in the setup menu (A 91). When any circumstances, use an AC Adapter EH-67...

L100 User's Manual
Page 30
...played back, deleted or transferred. Slide the memory card in the camera, pictures are automatically stored on the memory card and pictures recorded to prevent the batteries from the internal memory. 1 Confirm the power-on removable Secure Digital (SD) memory cards (available separately) (A 115). Remove the... memory card to turn off and open the battery-chamber/ memory card slot cover. Be sure to store pictures in the camera's internal memory (approximately 44 MB) or on...
...played back, deleted or transferred. Slide the memory card in the camera, pictures are automatically stored on the memory card and pictures recorded to prevent the batteries from the internal memory. 1 Confirm the power-on removable Secure Digital (SD) memory cards (available separately) (A 115). Remove the... memory card to turn off and open the battery-chamber/ memory card slot cover. Be sure to store pictures in the camera's internal memory (approximately 44 MB) or on...

L100 User's Manual
Page 31
...physical shocks. • Do not touch the metal terminals with a write protect switch. Failure to partially eject the card. Remove the batteries - Yes Use the multi selector to a computer. Pictures cannot be recorded or deleted and the memory card cannot be formatted before ...Be sure to make copies of any pictures you insert the memory cards used in 1 to observe this camera (A 106). Write protect switch B Memory Cards • Use only Secure Digital memory cards. • Do not perform the following during formatting, while data is in damage to keep...
...physical shocks. • Do not touch the metal terminals with a write protect switch. Failure to partially eject the card. Remove the batteries - Yes Use the multi selector to a computer. Pictures cannot be recorded or deleted and the memory card cannot be formatted before ...Be sure to make copies of any pictures you insert the memory cards used in 1 to observe this camera (A 106). Write protect switch B Memory Cards • Use only Secure Digital memory cards. • Do not perform the following during formatting, while data is in damage to keep...

L100 User's Manual
Page 32
...in flash(A 6). 2 Press A to choose G and press k. • The camera enters G (easy auto) mode. Battery level indicator Battery level indicator Monitor NO INDICATOR B N Battery exhausted. Batteries low. Easy auto mode 4 Check the battery level and number of pictures that suits the scene. 1 Remove the lens cap and ...80). 20 Basic Photography and Playback: Easy Auto Mode 3 Press the multi selector HI to display the shooting- Replace with new batteries. 108 Number of exposures remaining Number of Exposures Remaining The number of exposures remaining. Prepare to turn on. The power-on ...
...in flash(A 6). 2 Press A to choose G and press k. • The camera enters G (easy auto) mode. Battery level indicator Battery level indicator Monitor NO INDICATOR B N Battery exhausted. Batteries low. Easy auto mode 4 Check the battery level and number of pictures that suits the scene. 1 Remove the lens cap and ...80). 20 Basic Photography and Playback: Easy Auto Mode 3 Press the multi selector HI to display the shooting- Replace with new batteries. 108 Number of exposures remaining Number of Exposures Remaining The number of exposures remaining. Prepare to turn on. The power-on ...

L100 User's Manual
Page 37
...more information. Basic Photography and Playback: Easy Auto Mode Step 3 Focus and Shoot B During Recording While pictures are at different distances from the camera as expected in the following situations. B Autofocus Autofocus may not be framed by a yellow border in the Did someone blink? screen is ... the desired subject. the subject is inside a cage) • Subject is in the scene (e.g. Removing the memory card or the battery during the shot. the sun is behind the subject and is moving rapidly In these situations, try pressing the shutter-release button halfway ...
...more information. Basic Photography and Playback: Easy Auto Mode Step 3 Focus and Shoot B During Recording While pictures are at different distances from the camera as expected in the following situations. B Autofocus Autofocus may not be framed by a yellow border in the Did someone blink? screen is ... the desired subject. the subject is inside a cage) • Subject is in the scene (e.g. Removing the memory card or the battery during the shot. the sun is behind the subject and is moving rapidly In these situations, try pressing the shutter-release button halfway ...

L100 User's Manual
Page 43
... halfway. • On: Flash will fire when picture is low, the monitor will turn off until the flash has finished charging. If the remaining battery level is taken. • Blinks: Flash charging. to Off when using a tripod. • The E is displayed may appear as bright spots ...in pictures. C Flash Range In easy auto mode and auto mode, the flash has a range of camera shake. to the determined scene mode and uses the flash. • d (sport continuous) mode: W Off (locked) • B (high sensitivity) mode: U Auto • ...
... halfway. • On: Flash will fire when picture is low, the monitor will turn off until the flash has finished charging. If the remaining battery level is taken. • Blinks: Flash charging. to Off when using a tripod. • The E is displayed may appear as bright spots ...in pictures. C Flash Range In easy auto mode and auto mode, the flash has a range of camera shake. to the determined scene mode and uses the flash. • d (sport continuous) mode: W Off (locked) • B (high sensitivity) mode: U Auto • ...
L100 User's Manual
Page 73
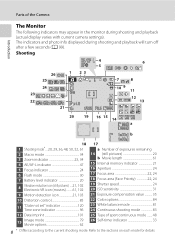
...mode (A 30), exposure compensation (A 35), self-timer (A 33) cannot be used automatically to choose D and press k. Do not open the battery-chamber / memory card slot cover. To end recording, press the shutter-release button all the way down a second time. 4s Recording will end ...8226; Macro mode (A 34) is being recorded. Apply or change settings as necessary before recording a movie, but up to the camera or the memory card. Digital zoom cannot be used just before movie recording begins. • Optical zoom cannot be recorded is used . • Macro mode settings...
...mode (A 30), exposure compensation (A 35), self-timer (A 33) cannot be used automatically to choose D and press k. Do not open the battery-chamber / memory card slot cover. To end recording, press the shutter-release button all the way down a second time. 4s Recording will end ...8226; Macro mode (A 34) is being recorded. Apply or change settings as necessary before recording a movie, but up to the camera or the memory card. Digital zoom cannot be used just before movie recording begins. • Optical zoom cannot be recorded is used . • Macro mode settings...
L100 User's Manual
Page 77
... panorama images must be installed from turning off unexpectedly. For more information on Power Source When connecting the camera to a computer or printer, use batteries with the supplied Nikon Transfer software. Connecting to a Computer Use the supplied USB cable to connect the camera to a computer, and copy (transfer) pictures to the Quick Start Guide.
... panorama images must be installed from turning off unexpectedly. For more information on Power Source When connecting the camera to a computer or printer, use batteries with the supplied Nikon Transfer software. Connecting to a Computer Use the supplied USB cable to connect the camera to a computer, and copy (transfer) pictures to the Quick Start Guide.

L100 User's Manual
Page 81
... use another make or model of AC adapter. Failure to observe this precaution could result in overheating or in damage to a digital photo lab For printing using these methods, specify the pictures and the number of prints each using a computer. D Printing Pictures ... and Printers B Note on Power Source When connecting the camera to a computer or printer, use batteries with adequate charge remaining to power the camera to prevent the camera from your camera's Print set menu (A 75). 69 To power the camera continuously for printing pictures: • Insert a memory card...
... use another make or model of AC adapter. Failure to observe this precaution could result in overheating or in damage to a digital photo lab For printing using these methods, specify the pictures and the number of prints each using a computer. D Printing Pictures ... and Printers B Note on Power Source When connecting the camera to a computer or printer, use batteries with adequate charge remaining to power the camera to prevent the camera from your camera's Print set menu (A 75). 69 To power the camera continuously for printing pictures: • Insert a memory card...

L100 User's Manual
Page 104
... Exit Easy auto mode Image mode Exit 92 d Protect Protect selected pictures from accidental deletion. h Copy Copy files between memory card and internal memory. Basic Camera Setup: The Setup Menu s Battery type Select the type of a picture. You can now select a tab. f Rotate image Change the orientation of...
... Exit Easy auto mode Image mode Exit 92 d Protect Protect selected pictures from accidental deletion. h Copy Copy files between memory card and internal memory. Basic Camera Setup: The Setup Menu s Battery type Select the type of a picture. You can now select a tab. f Rotate image Change the orientation of...

L100 User's Manual
Page 109
... time zone is selected, the Z icon will be displayed in the monitor when the camera is displayed. When the daylight saving time goes into effect, the time is independent of the batteries that is automatically advanced one hour. Time zone 15/05/2009 15:30 London, Casablanca...ends, turn the daylight saving time option on the top of charging. Basic Camera Setup: The Setup Menu 3 Press K. Shooting, Playback and Setup Menus B The Clock Battery The camera's clock is powered by a clock battery that powers the camera. The new city time zone menu is in Step 4. 97 To release...
... time zone is selected, the Z icon will be displayed in the monitor when the camera is displayed. When the daylight saving time goes into effect, the time is independent of the batteries that is automatically advanced one hour. Time zone 15/05/2009 15:30 London, Casablanca...ends, turn the daylight saving time option on the top of charging. Basic Camera Setup: The Setup Menu 3 Press K. Shooting, Playback and Setup Menus B The Clock Battery The camera's clock is powered by a clock battery that powers the camera. The new city time zone menu is in Step 4. 97 To release...


