
L100 User's Manual
Page 9
...Switching Between Tabs...12 Help Displays...13 About the Shutter-release Button...13 First Steps ...14 Inserting the Batteries ...14 Applicable Batteries ...14 Turning On and Off the Camera...14 Setting Display Language, Date and Time 16 Inserting Memory Cards ...18 Removing Memory Cards...19 G Basic Photography and Playback: Easy Auto Mode 20 Step 1 Turn the Camera On and Select G (Easy Auto) Mode 20 Indicators Displayed in G (Easy auto) Mode 21 Step 2 Frame a Picture ...22 Using the Zoom...23 Step 3 Focus and Shoot ...24 Step 4 Viewing and Deleting Pictures 26 Viewing Pictures (Playback...
...Switching Between Tabs...12 Help Displays...13 About the Shutter-release Button...13 First Steps ...14 Inserting the Batteries ...14 Applicable Batteries ...14 Turning On and Off the Camera...14 Setting Display Language, Date and Time 16 Inserting Memory Cards ...18 Removing Memory Cards...19 G Basic Photography and Playback: Easy Auto Mode 20 Step 1 Turn the Camera On and Select G (Easy Auto) Mode 20 Indicators Displayed in G (Easy auto) Mode 21 Step 2 Frame a Picture ...22 Using the Zoom...23 Step 3 Focus and Shoot ...24 Step 4 Viewing and Deleting Pictures 26 Viewing Pictures (Playback...
L100 User's Manual
Page 13
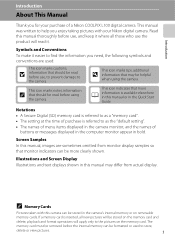
... Screen Display Illustrations and text displays shown in the Quick Start Guide. C Memory Cards Pictures taken with your purchase of buttons or messages displayed in the computer monitor appear in the camera's internal memory or on the memory card. Introduction Introduction About This Manual Thank you enjoy taking pictures with this camera can be formatted or used : This icon marks cautions, B information that more clearly shown. Screen Samples In this manual, images are used to the pictures on removable memory cards. This manual...
... Screen Display Illustrations and text displays shown in the Quick Start Guide. C Memory Cards Pictures taken with your purchase of buttons or messages displayed in the computer monitor appear in the camera's internal memory or on the memory card. Introduction Introduction About This Manual Thank you enjoy taking pictures with this camera can be formatted or used : This icon marks cautions, B information that more clearly shown. Screen Samples In this manual, images are used to the pictures on removable memory cards. This manual...
L100 User's Manual
Page 20
... 2 Macro mode 34 3 Zoom indicator 23, 34 4 AE/AF-L indicator 47 5 Focus indicator 24 6 Flash mode 30 7 Battery level indicator 20 8 Vibration reduction icon (still pictures) ....21, 102 Electronic VR icon (movies) .........61, 102 9 Motion detection icon 21, 103 10 Distortion control 85 11 "Date not set" indicator 120 Time zone indicator 96 12 Date imprint 101 13 Image mode 79 Movie options 62 1m00s b 1m00s 17 a Number of exposures remaining 14 (still pictures 20 b Movie length 61 15 Internal memory indicator 21...
... 2 Macro mode 34 3 Zoom indicator 23, 34 4 AE/AF-L indicator 47 5 Focus indicator 24 6 Flash mode 30 7 Battery level indicator 20 8 Vibration reduction icon (still pictures) ....21, 102 Electronic VR icon (movies) .........61, 102 9 Motion detection icon 21, 103 10 Distortion control 85 11 "Date not set" indicator 120 Time zone indicator 96 12 Date imprint 101 13 Image mode 79 Movie options 62 1m00s b 1m00s 17 a Number of exposures remaining 14 (still pictures 20 b Movie length 61 15 Internal memory indicator 21...

L100 User's Manual
Page 30
... off the camera before opening the battery-chamber/memory card slot cover, hold the camera upside down or backwards could damage the camera or the memory card. Before opening the battery-chamber/memory card slot cover. First Steps Inserting Memory Cards Pictures are stored in the internal memory, or play back, delete or transfer pictures from falling out. 2 Insert the memory card. Remove the memory card to prevent the batteries from the internal memory. 1 Confirm the power-on removable Secure Digital (SD) memory cards (available...
... off the camera before opening the battery-chamber/memory card slot cover, hold the camera upside down or backwards could damage the camera or the memory card. Before opening the battery-chamber/memory card slot cover. First Steps Inserting Memory Cards Pictures are stored in the internal memory, or play back, delete or transfer pictures from falling out. 2 Insert the memory card. Remove the memory card to prevent the batteries from the internal memory. 1 Confirm the power-on removable Secure Digital (SD) memory cards (available...

L100 User's Manual
Page 39
... the power switch to turn the monitor on the camera in playback mode. The lens will be automatically rotated when viewing them full- Option Playback zoom View thumbnails/ calendar Switch to shooting mode Use g (i) f (h) A Description A The picture can be enlarged up to full- 56 frame playback. Erase 1 image? frame. • While the monitor is off in the internal memory can only be viewed if no memory card is selected from the playback menu (A 87), multiple pictures can be deleted...
... the power switch to turn the monitor on the camera in playback mode. The lens will be automatically rotated when viewing them full- Option Playback zoom View thumbnails/ calendar Switch to shooting mode Use g (i) f (h) A Description A The picture can be enlarged up to full- 56 frame playback. Erase 1 image? frame. • While the monitor is off in the internal memory can only be viewed if no memory card is selected from the playback menu (A 87), multiple pictures can be deleted...

L100 User's Manual
Page 41
... shooting menu, flash mode (A 30) can be changed and self-timer (A 33), macro mode (A 34) and exposure compensation (A 35) can use focus lock to focus on an object in the shooting menu, and take pictures. 1 Press A to display the shooting- Auto Mode 18 1/125 F3.5 1/125 F3.5 Position the subject Press the Confirm that the distance between the camera and the subject does not change while focus is locked. • When the shutter-release button is pressed halfway, exposure...
... shooting menu, flash mode (A 30) can be changed and self-timer (A 33), macro mode (A 34) and exposure compensation (A 35) can use focus lock to focus on an object in the shooting menu, and take pictures. 1 Press A to display the shooting- Auto Mode 18 1/125 F3.5 1/125 F3.5 Position the subject Press the Confirm that the distance between the camera and the subject does not change while focus is locked. • When the shutter-release button is pressed halfway, exposure...

L100 User's Manual
Page 43
... again. • Off: Flash will fire when picture is taken. • Blinks: Flash charging. C Flash Range In easy auto mode and auto mode, the flash has a range of the flash mode depends on the shooting mode. • G (easy auto) mode: The camera automatically sets the flash mode according to the determined scene mode and uses the flash. • d (sport continuous) mode: W Off (locked) • B (high sensitivity) mode: U Auto • a (smile) mode: U Auto • Scene mode: The default setting depends on Using the Flash When using the flash, reflections from dust...
... again. • Off: Flash will fire when picture is taken. • Blinks: Flash charging. C Flash Range In easy auto mode and auto mode, the flash has a range of the flash mode depends on the shooting mode. • G (easy auto) mode: The camera automatically sets the flash mode according to the determined scene mode and uses the flash. • d (sport continuous) mode: W Off (locked) • B (high sensitivity) mode: U Auto • a (smile) mode: U Auto • Scene mode: The default setting depends on Using the Flash When using the flash, reflections from dust...

L100 User's Manual
Page 44
Auto Mode Using the Flash C Red-eye Reduction This camera is recorded. If the camera detects "red-eye" after a picture is taken, Nikon's own In-Camera Red Eye Fix processes the image as it is equipped with red-eye reduction in above cases. 32 Pre-flashes are fired several times at low intensity before you can take another picture. • Red-eye reduction may not always produce the desired results. • In some rare cases, other than...
Auto Mode Using the Flash C Red-eye Reduction This camera is recorded. If the camera detects "red-eye" after a picture is taken, Nikon's own In-Camera Red Eye Fix processes the image as it is equipped with red-eye reduction in above cases. 32 Pre-flashes are fired several times at low intensity before you can take another picture. • Red-eye reduction may not always produce the desired results. • In some rare cases, other than...

L100 User's Manual
Page 46
... unable to adjust the exposure. Macro mode Auto Mode C Macro Mode In macro mode, the camera focuses continuously, even when the shutter-release button is displayed. 2 Use the multi selector to lock focus. Macro mode cannot be cancelled. 3 Use the zoom control and frame the picture. C The Macro Mode Setting When the shooting mode is A (auto) mode (A 29) or high sensitivity mode (A 50), the macro 34 mode setting will be used for taking pictures of less than 50 cm (1 ft. 8 in .). The macro mode icon (F) is turned off. Macro Mode Macro mode is used with easy auto mode (A 20...
... unable to adjust the exposure. Macro mode Auto Mode C Macro Mode In macro mode, the camera focuses continuously, even when the shutter-release button is displayed. 2 Use the multi selector to lock focus. Macro mode cannot be cancelled. 3 Use the zoom control and frame the picture. C The Macro Mode Setting When the shooting mode is A (auto) mode (A 29) or high sensitivity mode (A 50), the macro 34 mode setting will be used for taking pictures of less than 50 cm (1 ft. 8 in .). The macro mode icon (F) is turned off. Macro Mode Macro mode is used with easy auto mode (A 20...

L100 User's Manual
Page 57
.... C White balance in the food mode will blink. Change the composition and try pressing the shutter-release button halfway again. release button the rest of red or blue will decrease illumination effects. • Changing white balance in Food mode will not affect White balance in the shooting menu (A 81). • White balance setting in Food Mode • Increasing the amount of the way down takes the picture. 1/125 F3.5 • When the camera is disabled.
.... C White balance in the food mode will blink. Change the composition and try pressing the shutter-release button halfway again. release button the rest of red or blue will decrease illumination effects. • Changing white balance in Food mode will not affect White balance in the shooting menu (A 81). • White balance setting in Food Mode • Increasing the amount of the way down takes the picture. 1/125 F3.5 • When the camera is disabled.

L100 User's Manual
Page 61
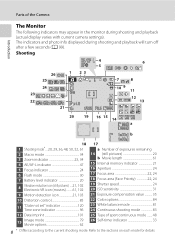
Shooting in the Sport Continuous Mode Sport Continuous Menu The following image mode settings are captured during Sport continuous shooting. • When shooting under fluorescent or mercury lights that you press the shutter-release button halfway, after which focus is fixed at 720 and over, proper exposure may be obtained in the recorded images. In sport continuous mode, press d to display the sport continuous menu, then use the multiselector to be shot). • k Continuous H (default setting): Approx. 13 frames per...
Shooting in the Sport Continuous Mode Sport Continuous Menu The following image mode settings are captured during Sport continuous shooting. • When shooting under fluorescent or mercury lights that you press the shutter-release button halfway, after which focus is fixed at 720 and over, proper exposure may be obtained in the recorded images. In sport continuous mode, press d to display the sport continuous menu, then use the multiselector to be shot). • k Continuous H (default setting): Approx. 13 frames per...
L100 User's Manual
Page 73
... to this position during shooting. The focus is set to start recording. Flash mode (A 30), exposure compensation (A 35), self-timer (A 33) cannot be used. • Macro mode settings cannot be applied while movies are recorded. D Changing Movie Settings Movie options can be applied while movies are being recorded from when the movie shooting was terminated to choose D and press k. R is smaller than when shooting still pictures. C Autofocus Camera focuses when shutter-release button is pressed halfway and locks at the bottom...
... to this position during shooting. The focus is set to start recording. Flash mode (A 30), exposure compensation (A 35), self-timer (A 33) cannot be used. • Macro mode settings cannot be applied while movies are recorded. D Changing Movie Settings Movie options can be applied while movies are being recorded from when the movie shooting was terminated to choose D and press k. R is smaller than when shooting still pictures. C Autofocus Camera focuses when shutter-release button is pressed halfway and locks at the bottom...

L100 User's Manual
Page 93
... pictures under most situations. Shooting, Playback and Setup Menus B Flash Mode At white-balance settings other than Auto or Flash, turn the flash off (W) (A 30). 81 b Preset manual Neutral-colored object used under incandescent lighting. At settings other than Auto, the icon for the current setting is displayed on the monitor (A 8). a Auto (default setting) White balance automatically adjusted to "Preset Manual" for direct sunlight. Shooting Options: The Shooting Menu B White Balance Set to A (auto) / B (high sensitivity) M d (Shooting menu) M B White balance The color...
... pictures under most situations. Shooting, Playback and Setup Menus B Flash Mode At white-balance settings other than Auto or Flash, turn the flash off (W) (A 30). 81 b Preset manual Neutral-colored object used under incandescent lighting. At settings other than Auto, the icon for the current setting is displayed on the monitor (A 8). a Auto (default setting) White balance automatically adjusted to "Preset Manual" for direct sunlight. Shooting Options: The Shooting Menu B White Balance Set to A (auto) / B (high sensitivity) M d (Shooting menu) M B White balance The color...

L100 User's Manual
Page 98
... Color options. Applied White balance setting is restored when Standard color or Vivid color is selected, Image mode returns to W (off . Distortion control When Distortion control is set to On, Continuous mode is automatically set to Auto and cannot be set to L Normal (2592) during auto mode, and set to Single. When another Continuous setting is selected. Shooting Options: The Shooting Menu Camera Settings that Cannot Be Set at the Same Time Restrictions apply to Single. 86 Shooting, Playback and Setup...
... Color options. Applied White balance setting is restored when Standard color or Vivid color is selected, Image mode returns to W (off . Distortion control When Distortion control is set to On, Continuous mode is automatically set to Auto and cannot be set to L Normal (2592) during auto mode, and set to Single. When another Continuous setting is selected. Shooting Options: The Shooting Menu Camera Settings that Cannot Be Set at the Same Time Restrictions apply to Single. 86 Shooting, Playback and Setup...

L100 User's Manual
Page 103
...camera shake when shooting still pictures. Welcome screen A 95 Select screen displayed when camera is used for shooting still pictures. Monitor settings A 99 Adjust photo info, image review, and brightness settings. AF assist A 104 Enable or disable AF-assist illumination. Format memory/Format card A 106 Format internal memory or memory card. Reset all A 109 Restore camera settings to a television. Language A 107 Choose the language used to detect human subjects with eyes closed when shooting pictures in the face priority (A 24). Video mode A 107 Adjust settings...
...camera shake when shooting still pictures. Welcome screen A 95 Select screen displayed when camera is used for shooting still pictures. Monitor settings A 99 Adjust photo info, image review, and brightness settings. AF assist A 104 Enable or disable AF-assist illumination. Format memory/Format card A 106 Format internal memory or memory card. Reset all A 109 Restore camera settings to a television. Language A 107 Choose the language used to detect human subjects with eyes closed when shooting pictures in the face priority (A 24). Video mode A 107 Adjust settings...
L100 User's Manual
Page 133
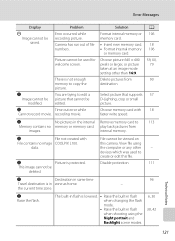
... an image mode setting other - internal memory. N Picture is not enough memory to copy the picture. Camera has run out of file numbers. recording movie. data. The built-in flash is in the internal Remove memory card to edit a picture that supports D-Lighting, crop or small picture. Picture cannot be saved. You are trying to 113 Memory contains no image COOLPIX L100. Select picture that cannot be viewed on this file. N File not created with faster write speed. File cannot be edited. Disable protection. 111 N Destination in same time 96...
... an image mode setting other - internal memory. N Picture is not enough memory to copy the picture. Camera has run out of file numbers. recording movie. data. The built-in flash is in the internal Remove memory card to edit a picture that supports D-Lighting, crop or small picture. Picture cannot be saved. You are trying to 113 Memory contains no image COOLPIX L100. Select picture that cannot be viewed on this file. N File not created with faster write speed. File cannot be edited. Disable protection. 111 N Destination in same time 96...
L100 User's Manual
Page 135
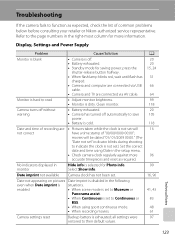
... a time stamp of common problems below before consulting your retailer or Nikon-authorized service representative. Date not appearing on pictures Date imprint is disabled in the right-most column for saving power: press the shutter-release button halfway. • When flash lamp blinks red, wait until flash has charged. • Camera and computer are connected via AV cable. Clean monitor. Date imprint not available Camera clock has not been set to their default values. Camera settings reset Backup battery...
... a time stamp of common problems below before consulting your retailer or Nikon-authorized service representative. Date not appearing on pictures Date imprint is disabled in the right-most column for saving power: press the shutter-release button halfway. • When flash lamp blinks red, wait until flash has charged. • Camera and computer are connected via AV cable. Clean monitor. Date imprint not available Camera clock has not been set to their default values. Camera settings reset Backup battery...

L100 User's Manual
Page 136
... setup menu to Auto. 104 • Focus error. Turn the camera off, remove and replace the battery, then turn on flash 36 are blurred. • Use flash. 30 • Use high sensitivity mode. 50 • Use vibration reduction and motion detection. 102, 103 • Use D (Best Shot Selector). 83 • Use tripod and self-timer. 5, 33 Bright specks appear in pictures Flash is one with flash. Optical zoom cannot be used while recording 61 movies. Note that cannot turn the camera...
... setup menu to Auto. 104 • Focus error. Turn the camera off, remove and replace the battery, then turn on flash 36 are blurred. • Use flash. 30 • Use high sensitivity mode. 50 • Use vibration reduction and motion detection. 102, 103 • Use D (Best Shot Selector). 83 • Use tripod and self-timer. 5, 33 Bright specks appear in pictures Flash is one with flash. Optical zoom cannot be used while recording 61 movies. Note that cannot turn the camera...

L100 User's Manual
Page 138
... this camera may be transferred to play back pictures from there. • Confirm the compatible operating systems. 65 Pictures not displayed on picture. Remove memory card to computers from internal memory. Troubleshooting Problem Unexpected results when flash set to below 320 × 240. Cannot use D-Lighting, crop, or • These options cannot be used with movies. 63 small picture options. • These options cannot be used with pictures 79 taken when 16:9 is used with red-eye reduction...
... this camera may be transferred to play back pictures from there. • Confirm the compatible operating systems. 65 Pictures not displayed on picture. Remove memory card to computers from internal memory. Troubleshooting Problem Unexpected results when flash set to below 320 × 240. Cannot use D-Lighting, crop, or • These options cannot be used with movies. 63 small picture options. • These options cannot be used with pictures 79 taken when 16:9 is used with red-eye reduction...

L100 User's Manual
Page 146
... Power 14, 16, 20 Power switch 4, 14, 20 Power-on lamp 4, 14, 20 Preset manual 82 Print 71, 72, 75 Print set 75 Print Set (Date) 76 Printer 69 Protect 111 R Recording movies 61 Red-eye reduction 30, 32 Replay mode 26, 27 Reset all 109 Rotate image 112 RSCN 116 S Scene mode 36, 37 Self-timer 33 Self-timer lamp 4, 33 Sepia 84 Setup menu 91 Shooting 20, 22, 24 Shooting Menu 77 Shooting mode button 5, 10 Shooting-mode Selection menu 10 Shutter sound 104 Shutter speed 24 Shutter-release button...
... Power 14, 16, 20 Power switch 4, 14, 20 Power-on lamp 4, 14, 20 Preset manual 82 Print 71, 72, 75 Print set 75 Print Set (Date) 76 Printer 69 Protect 111 R Recording movies 61 Red-eye reduction 30, 32 Replay mode 26, 27 Reset all 109 Rotate image 112 RSCN 116 S Scene mode 36, 37 Self-timer 33 Self-timer lamp 4, 33 Sepia 84 Setup menu 91 Shooting 20, 22, 24 Shooting Menu 77 Shooting mode button 5, 10 Shooting-mode Selection menu 10 Shutter sound 104 Shutter speed 24 Shutter-release button...


