
L100 User's Manual
Page 9
...Displays...13 About the Shutter-release Button...13 First Steps ...14 Inserting the Batteries ...14 Applicable Batteries ...14 Turning On and Off the Camera...14 Setting Display Language, Date and Time 16 Inserting Memory Cards ...18 Removing Memory Cards...19 G Basic Photography and Playback: Easy Auto... Mode 20 Step 1 Turn the Camera On and Select G (Easy Auto) Mode 20 Indicators Displayed in G (Easy auto) Mode 21 Step 2 Frame a Picture ...22 Using the Zoom...23 Step 3 Focus and Shoot ...24 Step 4 Viewing and Deleting...
...Displays...13 About the Shutter-release Button...13 First Steps ...14 Inserting the Batteries ...14 Applicable Batteries ...14 Turning On and Off the Camera...14 Setting Display Language, Date and Time 16 Inserting Memory Cards ...18 Removing Memory Cards...19 G Basic Photography and Playback: Easy Auto... Mode 20 Step 1 Turn the Camera On and Select G (Easy Auto) Mode 20 Indicators Displayed in G (Easy auto) Mode 21 Step 2 Frame a Picture ...22 Using the Zoom...23 Step 3 Focus and Shoot ...24 Step 4 Viewing and Deleting...
L100 User's Manual
Page 10
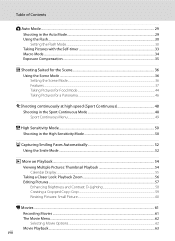
Table of Contents A Auto Mode...29 Shooting in the Auto Mode...29 Using the Flash...30 Setting the Flash Mode...30 Taking Pictures with the Self-timer 33 Macro Mode...34 Exposure Compensation ...35 C Shooting Suited for the Scene 36 Using the Scene Mode ...36 Setting... the Scene Mode...36 Features ...37 Taking Pictures for Food Mode...44 Taking Pictures for a Panorama ...46 d Shooting continuously at high speed (Sport Continuous 48 Shooting in the Sport Continuous Mode 48 Sport Continuous Menu...
Table of Contents A Auto Mode...29 Shooting in the Auto Mode...29 Using the Flash...30 Setting the Flash Mode...30 Taking Pictures with the Self-timer 33 Macro Mode...34 Exposure Compensation ...35 C Shooting Suited for the Scene 36 Using the Scene Mode ...36 Setting... the Scene Mode...36 Features ...37 Taking Pictures for Food Mode...44 Taking Pictures for a Panorama ...46 d Shooting continuously at high speed (Sport Continuous 48 Shooting in the Sport Continuous Mode 48 Sport Continuous Menu...

L100 User's Manual
Page 11
... and Printers 64 Connecting to a TV ...64 Connecting to a Computer...65 Before Connecting the Camera...65 Transferring Pictures from a Camera to a Computer 66 Connecting to a Printer...69 Connecting the Camera and Printer...70 Printing Pictures One at a Time ...71 Printing Multiple Pictures ...72 Creating a DPOF Print Order: Print Set 75 d Shooting, Playback and Setup Menus 77...
... and Printers 64 Connecting to a TV ...64 Connecting to a Computer...65 Before Connecting the Camera...65 Transferring Pictures from a Camera to a Computer 66 Connecting to a Printer...69 Connecting the Camera and Printer...70 Printing Pictures One at a Time ...71 Printing Multiple Pictures ...72 Creating a DPOF Print Order: Print Set 75 d Shooting, Playback and Setup Menus 77...
L100 User's Manual
Page 13
... a "memory card". • The setting at the time of a Nikon COOLPIX L100 digital camera. Notations • A Secure Digital (SD) memory card is inserted, all those who use the product will apply only to store, delete or view pictures. 1 Screen Samples In this manual, images are used to the pictures on the memory card. Illustrations and Screen Display Illustrations...
... a "memory card". • The setting at the time of a Nikon COOLPIX L100 digital camera. Notations • A Secure Digital (SD) memory card is inserted, all those who use the product will apply only to store, delete or view pictures. 1 Screen Samples In this manual, images are used to the pictures on the memory card. Illustrations and Screen Display Illustrations...

L100 User's Manual
Page 14
... prior notice. • Nikon will not be held liable for any damages resulting from product malfunction. Before Taking Important Pictures Before taking pictures on important occasions (such as at weddings or before taking the camera on digital imaging and photography. See ...any language in any form, by Nikon specifically for contact information: http://imaging.nikon.com/ Use Only Nikon Brand Electronic Accessories Nikon COOLPIX cameras are engineered and proven to operate within the operational and safety requirements of this Nikon digital camera are designed to ensure that the ...
... prior notice. • Nikon will not be held liable for any damages resulting from product malfunction. Before Taking Important Pictures Before taking pictures on important occasions (such as at weddings or before taking the camera on digital imaging and photography. See ...any language in any form, by Nikon specifically for contact information: http://imaging.nikon.com/ Use Only Nikon Brand Electronic Accessories Nikon COOLPIX cameras are engineered and proven to operate within the operational and safety requirements of this Nikon digital camera are designed to ensure that the ...

L100 User's Manual
Page 15
... business use by national and international copyright laws. Do not use of personal image data. Care should be provided for example, pictures of empty sky). Introduction Information and Precautions Notice Concerning Prohibition of Copying or Reproduction Note that simply being copied or reproduced Do not... Please note that was obtained, the copying or reproduction of unused postage stamps or post cards issued by means of a scanner, digital camera or other device may be recovered from being in possession of paper money, coins, or securities which are circulated in the malicious ...
... business use by national and international copyright laws. Do not use of personal image data. Care should be provided for example, pictures of empty sky). Introduction Information and Precautions Notice Concerning Prohibition of Copying or Reproduction Note that simply being copied or reproduced Do not... Please note that was obtained, the copying or reproduction of unused postage stamps or post cards issued by means of a scanner, digital camera or other device may be recovered from being in possession of paper money, coins, or securities which are circulated in the malicious ...

L100 User's Manual
Page 19
Parts of the Camera Introduction B Lens Cap • Remove the lens cap before you shoot a picture. • At times when you will not be shooting pictures such as when the power is off or while you are carrying the camera, attach the lens cap to the camera to the camera (at two places). Attaching the Camera Strap and Lens Cap Attach the lens cap to the camera strap, and then attach the strap to protect the lens. 7
Parts of the Camera Introduction B Lens Cap • Remove the lens cap before you shoot a picture. • At times when you will not be shooting pictures such as when the power is off or while you are carrying the camera, attach the lens cap to the camera to the camera (at two places). Attaching the Camera Strap and Lens Cap Attach the lens cap to the camera strap, and then attach the strap to protect the lens. 7
L100 User's Manual
Page 20
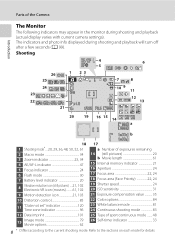
... Zoom indicator 23, 34 4 AE/AF-L indicator 47 5 Focus indicator 24 6 Flash mode 30 7 Battery level indicator 20 8 Vibration reduction icon (still pictures) ....21, 102 Electronic VR icon (movies) .........61, 102 9 Motion detection icon 21, 103 10 Distortion control 85 11 "Date not set" indicator 120...21 Exposure compensation value 35 22 Color options 84 23 White balance mode 81 24 Continuous shooting mode 83 25 Type of the Camera Introduction The Monitor The following indicators may appear in the monitor during shooting and playback will turn off after a few seconds (A...
... Zoom indicator 23, 34 4 AE/AF-L indicator 47 5 Focus indicator 24 6 Flash mode 30 7 Battery level indicator 20 8 Vibration reduction icon (still pictures) ....21, 102 Electronic VR icon (movies) .........61, 102 9 Motion detection icon 21, 103 10 Distortion control 85 11 "Date not set" indicator 120...21 Exposure compensation value 35 22 Color options 84 23 White balance mode 81 24 Continuous shooting mode 83 25 Type of the Camera Introduction The Monitor The following indicators may appear in the monitor during shooting and playback will turn off after a few seconds (A...

L100 User's Manual
Page 21
Parts of the Camera Introduction Playback 1 2 34 15/05/2009 12:00 13 9999.JPG 12 10 11 9 5 999 999 6 87 999 999 a 9999 9999 1m00s b 1m00s 1 Date of ... a Current frame number/ 6 total number of frames 26 b Movie length 63 7 Internal memory indicator 26 8 Movie playback indicator 63 9 Print-order icon 75 10 Small picture 60 11 D-Lighting icon 58 12 Protect icon 111 13 File number and type 116 * The displayed icons vary with the settings in shooting mode. 9
Parts of the Camera Introduction Playback 1 2 34 15/05/2009 12:00 13 9999.JPG 12 10 11 9 5 999 999 6 87 999 999 a 9999 9999 1m00s b 1m00s 1 Date of ... a Current frame number/ 6 total number of frames 26 b Movie length 63 7 Internal memory indicator 26 8 Movie playback indicator 63 9 Print-order icon 75 10 Small picture 60 11 D-Lighting icon 58 12 Protect icon 111 13 File number and type 116 * The displayed icons vary with the settings in shooting mode. 9
L100 User's Manual
Page 23
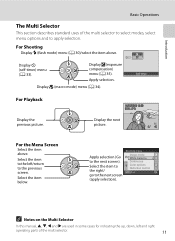
... apply selection. For Shooting Display m (flash mode) menu (A 30)/select the item above . Self-timer For Playback Display the previous picture. 15/05/2009 15:30 0004.JPG Display the next picture. 44 For the Menu Screen Select the item above . Introduction Basic Operations The Multi Selector This section describes standard uses...
... apply selection. For Shooting Display m (flash mode) menu (A 30)/select the item above . Self-timer For Playback Display the previous picture. 15/05/2009 15:30 0004.JPG Display the next picture. 44 For the Menu Screen Select the item above . Introduction Basic Operations The Multi Selector This section describes standard uses...
L100 User's Manual
Page 25
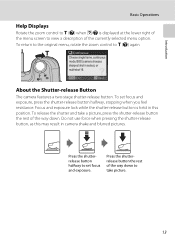
Continuous Choose single frame, continuous mode, BSS (camera chooses sharpest shot in camera shake and blurred pictures. To release the shutter and take a picture, press the shutter-release button the rest of the way down to take picture. 13 Focus and exposure lock while the shutter-release button is displayed at the lower right of the... currently selected menu option. Do not use force when pressing the shutter-release button, as this position. Exit Back About the Shutter-release Button The camera features a two-stage shutter-release button.
Continuous Choose single frame, continuous mode, BSS (camera chooses sharpest shot in camera shake and blurred pictures. To release the shutter and take a picture, press the shutter-release button the rest of the way down to take picture. 13 Focus and exposure lock while the shutter-release button is displayed at the lower right of the... currently selected menu option. Do not use force when pressing the shutter-release button, as this position. Exit Back About the Shutter-release Button The camera features a two-stage shutter-release button.

L100 User's Manual
Page 29
... Smile Mode" (A 52), or "Recording Movies" (A 61) for shooting-mode selection menu. 8 When Easy auto mode is displayed, press k. • The camera enters the shooting mode and you can take pictures in the following order. First Steps Setting Display Language, Date and Time 5 Change the date and time. • Press H or I before...
... Smile Mode" (A 52), or "Recording Movies" (A 61) for shooting-mode selection menu. 8 When Easy auto mode is displayed, press k. • The camera enters the shooting mode and you can take pictures in the following order. First Steps Setting Display Language, Date and Time 5 Change the date and time. • Press H or I before...

L100 User's Manual
Page 30
... internal memory. 1 Confirm the power-on removable Secure Digital (SD) memory cards (available separately) (A 115). Before opening the battery-chamber/memory card slot cover. Slide the memory card in the camera, pictures are off the camera before opening the battery-chamber/memory card slot cover, hold the camera upside down or backwards could damage the...
... internal memory. 1 Confirm the power-on removable Secure Digital (SD) memory cards (available separately) (A 115). Before opening the battery-chamber/memory card slot cover. Slide the memory card in the camera, pictures are off the camera before opening the battery-chamber/memory card slot cover, hold the camera upside down or backwards could damage the...

L100 User's Manual
Page 31
...or expose to water or strong physical shocks. • Do not touch the metal terminals with a write protect switch. deletes all pictures and other devices into the camera, be formatted before formatting No the memory card. Yes Use the multi selector to the "write" position. B The Write Protect ...press k. Write protect switch B Memory Cards • Use only Secure Digital memory cards. • Do not perform the following during formatting, while data is being careful not to the camera or memory card: - Turn off the camera - Note that the power-on the memory card. Be sure to ...
...or expose to water or strong physical shocks. • Do not touch the metal terminals with a write protect switch. deletes all pictures and other devices into the camera, be formatted before formatting No the memory card. Yes Use the multi selector to the "write" position. B The Write Protect ...press k. Write protect switch B Memory Cards • Use only Secure Digital memory cards. • Do not perform the following during formatting, while data is being careful not to the camera or memory card: - Turn off the camera - Note that the power-on the memory card. Be sure to ...

L100 User's Manual
Page 32
... Photography and Playback: Easy Auto Mode Step 1 Turn the Camera On and Select G (Easy Auto) Mode In G (easy auto) mode, the camera automatically determines an appropriate shooting mode when you frame a picture, allowing you to easily take pictures. The lens will turn on lamp (green) will light ...for a moment and the monitor will extend at this time. The power-on the camera. Easy auto mode 4...
... Photography and Playback: Easy Auto Mode Step 1 Turn the Camera On and Select G (Easy Auto) Mode In G (easy auto) mode, the camera automatically determines an appropriate shooting mode when you frame a picture, allowing you to easily take pictures. The lens will turn on lamp (green) will light ...for a moment and the monitor will extend at this time. The power-on the camera. Easy auto mode 4...

L100 User's Manual
Page 33
... image size and quality (compression) set in flash (A 6). When memory card is inserted, C is not displayed and pictures will turn off and W appears at a person's face, the camera automatically recognizes the face and focuses on it. • The self-timer (A 33) and exposure compensation (A 35) are... and Playback: Easy Auto Mode Step 1 Turn the Camera On and Select G (Easy Auto) Mode Indicators Displayed in easy auto mode • When the camera is pointed at the top of camera shake. 108 Internal memory indicator Pictures will be recorded to Off when using a tripod. 21...
... image size and quality (compression) set in flash (A 6). When memory card is inserted, C is not displayed and pictures will turn off and W appears at a person's face, the camera automatically recognizes the face and focuses on it. • The self-timer (A 33) and exposure compensation (A 35) are... and Playback: Easy Auto Mode Step 1 Turn the Camera On and Select G (Easy Auto) Mode Indicators Displayed in easy auto mode • When the camera is pointed at the top of camera shake. 108 Internal memory indicator Pictures will be recorded to Off when using a tripod. 21...

L100 User's Manual
Page 34
... In this case, select another shooting mode. 22 • When digital zoom is U. Shooting mode icon • When the camera determines the scene mode, the shooting mode icon will change (A 28). • When the camera recognizes a human face (front view), that face will be framed ... other objects away from the lens, flash, AFassist illuminator and microphone. Step 2 Frame a Picture 1 Ready the camera. Basic Photography and Playback: Easy Auto Mode 2 Frame the picture. Hold the camera steadily in effect, the shooting mode is in both hands, keeping your fingers and other faces...
... In this case, select another shooting mode. 22 • When digital zoom is U. Shooting mode icon • When the camera determines the scene mode, the shooting mode icon will change (A 28). • When the camera recognizes a human face (front view), that face will be framed ... other objects away from the lens, flash, AFassist illuminator and microphone. Step 2 Frame a Picture 1 Ready the camera. Basic Photography and Playback: Easy Auto Mode 2 Frame the picture. Hold the camera steadily in effect, the shooting mode is in both hands, keeping your fingers and other faces...
L100 User's Manual
Page 35
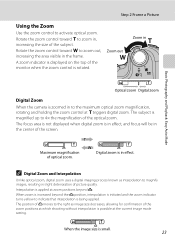
...of the monitor when the zoom control is being applied. The subject is small. 23 Maximum magnification of picture quality. C Digital Zoom and Interpolation Unlike optical zoom, digital zoom uses a digital imaging process known as image size decreases, allowing for confirmation of the subject. When the image size ...zoom control toward f to activate optical zoom. Zoom out Zoom in Basic Photography and Playback: Easy Auto Mode Optical zoom Digital zoom Digital Zoom When the camera is in effect, and focus will be in the center of the optical zoom. The focus area is not displayed when...
...of the monitor when the zoom control is being applied. The subject is small. 23 Maximum magnification of picture quality. C Digital Zoom and Interpolation Unlike optical zoom, digital zoom uses a digital imaging process known as image size decreases, allowing for confirmation of the subject. When the image size ...zoom control toward f to activate optical zoom. Zoom out Zoom in Basic Photography and Playback: Easy Auto Mode Optical zoom Digital zoom Digital Zoom When the camera is in effect, and focus will be in the center of the optical zoom. The focus area is not displayed when...

L100 User's Manual
Page 36
... shutter-release button is pressed halfway. • Focus and exposure remain locked while the shutter release button is pressed halfway. • When the camera is in focus, the focus area will glow green. 1/125 F3.5 Focus indicator 1/125 F3.5 • The shutter speed and aperture are recognized...: Basic Photography and Playback: Easy Auto Mode 1/125 F3.5 Shutter Aperture Speed • When using the digital zoom, the camera focuses on the center of the way down. • The picture will be recorded to focus. When the subject is unable to focus, the focus area, or focus indicator...
... shutter-release button is pressed halfway. • Focus and exposure remain locked while the shutter release button is pressed halfway. • When the camera is in focus, the focus area will glow green. 1/125 F3.5 Focus indicator 1/125 F3.5 • The shutter speed and aperture are recognized...: Basic Photography and Playback: Easy Auto Mode 1/125 F3.5 Shutter Aperture Speed • When using the digital zoom, the camera focuses on the center of the way down. • The picture will be recorded to focus. When the subject is unable to focus, the focus area, or focus indicator...

L100 User's Manual
Page 37
...shutter-release button all the way down. 25 B Autofocus Autofocus may have been closed will blink. when the subject is the same distance from the camera (e.g. screen. • To return to refocus, several times if necessary. C Blink Warning If the Did someone blink? In some rare cases, ...focusing on an object that is standing in the setup menu (A 91) or "Operating the Did someone blink? screen is displayed shortly after the picture is poorly lit, the AF-assist illuminator (A 104) may light by pressing the shutter-release button halfway, or the flash (A 30) may ...
...shutter-release button all the way down. 25 B Autofocus Autofocus may have been closed will blink. when the subject is the same distance from the camera (e.g. screen. • To return to refocus, several times if necessary. C Blink Warning If the Did someone blink? In some rare cases, ...focusing on an object that is standing in the setup menu (A 91) or "Operating the Did someone blink? screen is displayed shortly after the picture is poorly lit, the AF-assist illuminator (A 104) may light by pressing the shutter-release button halfway, or the flash (A 30) may ...


