Product Data Sheet
Page 1
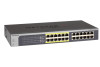
... storm controls • IGMP snooping v1, v2 and v3 support for multicast optimization • Rate limiting for better bandwidth allocation • Port mirroring for network monitoring • Port trunking for bigger uplink bandwidth • Jumbo frame support • Energy Efficient Ethernet (IEEE802.3az) support for low cost PoE deployments. However, companies do not necessarily have more on applicable models Page 1 of configurations ranging from 5 port desktop to separate the voice and video traffic from data...
... storm controls • IGMP snooping v1, v2 and v3 support for multicast optimization • Rate limiting for better bandwidth allocation • Port mirroring for network monitoring • Port trunking for bigger uplink bandwidth • Jumbo frame support • Energy Efficient Ethernet (IEEE802.3az) support for low cost PoE deployments. However, companies do not necessarily have more on applicable models Page 1 of configurations ranging from 5 port desktop to separate the voice and video traffic from data...
Product Data Sheet
Page 3
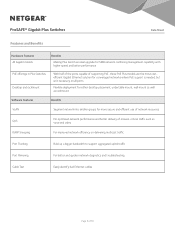
..., undertable mount, wall mount as well as rackmount Software Features VLAN Benefits Segment network into smaller groups for more secure and efficient use of network resources QoS For optimized network performance and better delivery of mission-critical traffic such as voice and video IGMP Snooping For improved network efficiency on delivering multicast traffic Port Trunking Port Mirroring Build up a bigger bandwidth to support aggregated uplink traffic For better and quicker network diagnotics and troubleshooting Cable Test...
..., undertable mount, wall mount as well as rackmount Software Features VLAN Benefits Segment network into smaller groups for more secure and efficient use of network resources QoS For optimized network performance and better delivery of mission-critical traffic such as voice and video IGMP Snooping For improved network efficiency on delivering multicast traffic Port Trunking Port Mirroring Build up a bigger bandwidth to support aggregated uplink traffic For better and quicker network diagnotics and troubleshooting Cable Test...
Product Data Sheet
Page 6
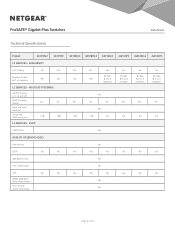
...Port Trunking No No Number of LAGs & # of 10 Multicast Filtering IGMP Snooping (v1, v2 and v3) IGMP Snooping queries No No Block unknown Multicast Supported Mulitcast groups 128 128 L3 Services - ProSAFE® Gigabit Plus Switches Data Sheet Technical Specifications Product GS105Ev2 GS105PE L2 Services - DHCP DHCP Client Quality of Service (QoS) Rate limiting DSCP Yes Yes IEEE 802.1p COS Port-based VLAN... Yes Yes Yes Yes Yes Yes JGS516PE JGS524Ev2 JGS524PE Yes 8 LAGs & 2 to 4 members Yes 8 LAGs & 2 to 4 members Yes 8 LAGs & 2 to 4 members Yes Yes Yes ...
...Port Trunking No No Number of LAGs & # of 10 Multicast Filtering IGMP Snooping (v1, v2 and v3) IGMP Snooping queries No No Block unknown Multicast Supported Mulitcast groups 128 128 L3 Services - ProSAFE® Gigabit Plus Switches Data Sheet Technical Specifications Product GS105Ev2 GS105PE L2 Services - DHCP DHCP Client Quality of Service (QoS) Rate limiting DSCP Yes Yes IEEE 802.1p COS Port-based VLAN... Yes Yes Yes Yes Yes Yes JGS516PE JGS524Ev2 JGS524PE Yes 8 LAGs & 2 to 4 members Yes 8 LAGs & 2 to 4 members Yes 8 LAGs & 2 to 4 members Yes Yes Yes ...
ProSafe Plus Switches Configuration Utility User Guide
Page 3
...QoS 11 Help 11 Switch Settings 11 Uninstall the Utility 12 Chapter 2 Network and System Configuration Network Switch Access 14 System Features 14 Network 16 Switch Selection 16 Switch Information 18 DHCP Mode Selection 18 Set the IP Address Information 19 Maintenance 19 Change Password 19 Device Reboot 19 Reset Factory Defaults 20 Firmware Upgrade 20 Save Configuration 20 Restore Configuration 21 Monitoring 21 Port Statistics 21 Port Mirroring 21 Cable Test 22 MultiCast 22 IGMP Snooping 22 Management 23 LAG 24 Chapter 3 Virtual LAN Configuration VLAN Overview 26 Port...
...QoS 11 Help 11 Switch Settings 11 Uninstall the Utility 12 Chapter 2 Network and System Configuration Network Switch Access 14 System Features 14 Network 16 Switch Selection 16 Switch Information 18 DHCP Mode Selection 18 Set the IP Address Information 19 Maintenance 19 Change Password 19 Device Reboot 19 Reset Factory Defaults 20 Firmware Upgrade 20 Save Configuration 20 Restore Configuration 21 Monitoring 21 Port Statistics 21 Port Mirroring 21 Cable Test 22 MultiCast 22 IGMP Snooping 22 Management 23 LAG 24 Chapter 3 Virtual LAN Configuration VLAN Overview 26 Port...

ProSafe Plus Switches Configuration Utility User Guide
Page 4
ProSafe Plus Switch Utility Basic Port-Based VLAN Configuration 27 Advanced Port-Based VLAN Configuration 27 802.1Q-Based Configuration 28 Basic 802.1Q VLAN Configuration 28 Advanced 802.1Q VLAN Configuration 28 VLAN Configuration 28 VLAN Membership 29 Port PVID 29 Port Tagging 30 Chapter 4 Quality of Service QoS Overview 32 QoS Global Configuration 32 Rate Limiting 35 Broadcast Filtering 35 Chapter 5 Help Online Help 38 User Guide 39 Support Information 39 About the Utility 39 Registration 40 Appendix A Default Settings Index 4
ProSafe Plus Switch Utility Basic Port-Based VLAN Configuration 27 Advanced Port-Based VLAN Configuration 27 802.1Q-Based Configuration 28 Basic 802.1Q VLAN Configuration 28 Advanced 802.1Q VLAN Configuration 28 VLAN Configuration 28 VLAN Membership 29 Port PVID 29 Port Tagging 30 Chapter 4 Quality of Service QoS Overview 32 QoS Global Configuration 32 Rate Limiting 35 Broadcast Filtering 35 Chapter 5 Help Online Help 38 User Guide 39 Support Information 39 About the Utility 39 Registration 40 Appendix A Default Settings Index 4
ProSafe Plus Switches Configuration Utility User Guide
Page 10
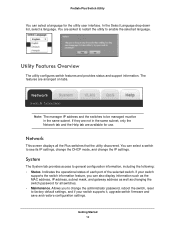
... its IP settings, change the DHCP mode, and change the administrator password, reboot the switch, reset to factory default settings, and if your switch supports the switch information feature, you to change the IP settings. Note: The manager IP address and the switches to be managed must be in the same subnet, only the Network tab and the Help tab are arranged on tabs. System The System tab provides access to enable the selected...
... its IP settings, change the DHCP mode, and change the administrator password, reboot the switch, reset to factory default settings, and if your switch supports the switch information feature, you to change the IP settings. Note: The manager IP address and the switches to be managed must be in the same subnet, only the Network tab and the Help tab are arranged on tabs. System The System tab provides access to enable the selected...

ProSafe Plus Switches Configuration Utility User Guide
Page 11
Allows you to change the IGMP snooping settings. • Management. QoS The QoS (Quality of normal data. Uses communication priorities from broadcast packet storms that block further access to the switch you to enable or disable the system-wide setting for loop detection. • LAG. If you do reset the switch manually, your previous settings are listed in the data. • Rate Limit. Allows you to mirror ports. • MultiCast. Allows you to assign ports to specify port settings that can...
Allows you to change the IGMP snooping settings. • Management. QoS The QoS (Quality of normal data. Uses communication priorities from broadcast packet storms that block further access to the switch you to enable or disable the system-wide setting for loop detection. • LAG. If you do reset the switch manually, your previous settings are listed in the data. • Rate Limit. Allows you to mirror ports. • MultiCast. Allows you to assign ports to specify port settings that can...

ProSafe Plus Switches Configuration Utility User Guide
Page 15
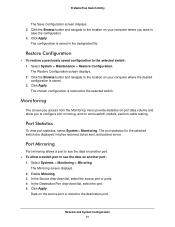
... selected switch using configured settings. Checks cable connections for entering the path to enable or disable LAGs (link aggregation group). Network and System Configuration 15 Allows you to change the administrator password, reboot the switch, reset to the switch. Provides a field for the ports of each port, and enables you to selectively forward multicast traffic. Allows you to assign a name to factory default settings, and if supported by the selected switch, upgrade switch firmware and use the configuration save the backed-up configuration settings as a file. Updates...
... selected switch using configured settings. Checks cable connections for entering the path to enable or disable LAGs (link aggregation group). Network and System Configuration 15 Allows you to change the administrator password, reboot the switch, reset to the switch. Provides a field for the ports of each port, and enables you to selectively forward multicast traffic. Allows you to assign a name to factory default settings, and if supported by the selected switch, upgrade switch firmware and use the configuration save the backed-up configuration settings as a file. Updates...

ProSafe Plus Switches Configuration Utility User Guide
Page 19
... Switch Utility Set the IP Address Information Enter IP address and subnet mask values for a switch: 1. Click Apply. Device Reboot WARNING: Rebooting the switch to its factory default settings, or upgrade the switch firmware. Select the check box in the Device Reboot screen. 3. In the DHCP Mode list, select Disable. Select System > Maintenance. Enter the old password (the default is password) and then enter the new password. 3. The Switch Information screen displays. 2. Select System > Status > Switch Information. Network...
... Switch Utility Set the IP Address Information Enter IP address and subnet mask values for a switch: 1. Click Apply. Device Reboot WARNING: Rebooting the switch to its factory default settings, or upgrade the switch firmware. Select the check box in the Device Reboot screen. 3. In the DHCP Mode list, select Disable. Select System > Maintenance. Enter the old password (the default is password) and then enter the new password. 3. The Switch Information screen displays. 2. Select System > Status > Switch Information. Network...

ProSafe Plus Switches Configuration Utility User Guide
Page 20
... the link or power down the switch during firmware upgrade. To upgrade switch firmware, first download a firmware upgrade file for the selected switch from your computer to the switch and the switch automatically reboots. Select the upgrade file and click Apply. Select System > Maintenance > Factory Default. Click the Browse button and navigate to the location on your computer. To upgrade firmware on the selected switch: 1. Click Apply. Select System > Maintenance > Save Configuration. This briefly disrupts network traffic...
... the link or power down the switch during firmware upgrade. To upgrade switch firmware, first download a firmware upgrade file for the selected switch from your computer to the switch and the switch automatically reboots. Select the upgrade file and click Apply. Select System > Maintenance > Factory Default. Click the Browse button and navigate to the location on your computer. To upgrade firmware on the selected switch: 1. Click Apply. Select System > Maintenance > Save Configuration. This briefly disrupts network traffic...
ProSafe Plus Switches Configuration Utility User Guide
Page 21
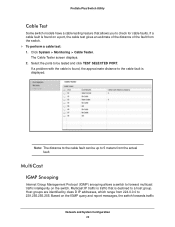
... button and navigate to the location on your computer where you to see the data on another port: 1. The Mirroring screen displays. 2. Port Mirroring Port mirroring allows a port to configure port mirroring, and on the source port is restored to the selected switch: 1. Select System > Maintenance > Restore Configuration. Network and System Configuration 21 Data on some switch models, perform cable testing. In the Destination Port drop-down list, select the source port or ports. 4. ProSafe Plus Switch Utility The Save Configuration...
... button and navigate to the location on your computer where you to see the data on another port: 1. The Mirroring screen displays. 2. Port Mirroring Port mirroring allows a port to configure port mirroring, and on the source port is restored to the selected switch: 1. Select System > Maintenance > Restore Configuration. Network and System Configuration 21 Data on some switch models, perform cable testing. In the Destination Port drop-down list, select the source port or ports. 4. ProSafe Plus Switch Utility The Save Configuration...
ProSafe Plus Switches Configuration Utility User Guide
Page 22
... ports to be up to 5 meters from 224.0.0.0 to 239.255.255.255. Multicast IP traffic is displayed. Click System > Monitoring > Cable Tester. MultiCast IGMP Snooping Internet Group Management Protocol (IGMP) snooping allows a switch to check for cable faults. If a cable fault is found , the approximate distance to the cable fault is traffic that allows you to forward multicast traffic intelligently on the IGMP query and report messages, the switch forwards traffic Network and System Configuration...
... ports to be up to 5 meters from 224.0.0.0 to 239.255.255.255. Multicast IP traffic is displayed. Click System > Monitoring > Cable Tester. MultiCast IGMP Snooping Internet Group Management Protocol (IGMP) snooping allows a switch to check for cable faults. If a cable fault is found , the approximate distance to the cable fault is traffic that allows you to forward multicast traffic intelligently on the IGMP query and report messages, the switch forwards traffic Network and System Configuration...

ProSafe Plus Switches Configuration Utility User Guide
Page 23
... Control), and the router alert IP option (9404) set; Validate IGMPv3 IP header Some network devices might not conform to the ports that are in the network for IGMP Snooping field, enter a valid VLAN ID, and click Apply. Block Unknown MultiCast Address When this feature is enabled. All unknown multicast packets are ignored. This feature prevents the switch from IGMP snooping. Only some models support the any in the IGMP Snooping Status list...
... Control), and the router alert IP option (9404) set; Validate IGMPv3 IP header Some network devices might not conform to the ports that are in the network for IGMP Snooping field, enter a valid VLAN ID, and click Apply. Block Unknown MultiCast Address When this feature is enabled. All unknown multicast packets are ignored. This feature prevents the switch from IGMP snooping. Only some models support the any in the IGMP Snooping Status list...
ProSafe Plus Switches Configuration Utility User Guide
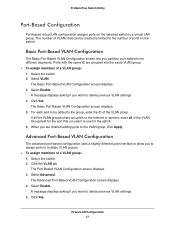
Page 27
... created is limited to delete previous VLAN settings. 4. The Advanced Port-Based VLAN Configuration screen displays. 4. Select Enable. The number of ports on the selected switch to the VLAN group, click Apply. Ports with the same ID are finished adding ports to a virtual LAN group. Select Enable. When you want to multiple VLAN groups. To assign members of the VLAN group. ProSafe Plus Switch Utility Port-Based Configuration Port-based virtual LAN configuration...
... created is limited to delete previous VLAN settings. 4. The Advanced Port-Based VLAN Configuration screen displays. 4. Select Enable. The number of ports on the selected switch to the VLAN group, click Apply. Ports with the same ID are finished adding ports to a virtual LAN group. Select Enable. When you want to multiple VLAN groups. To assign members of the VLAN group. ProSafe Plus Switch Utility Port-Based Configuration Port-based virtual LAN configuration...

ProSafe Plus Switches Configuration Utility User Guide
Page 32
... port number (port based) or by the type of data being forwarded to data. • Rate Limit. Depending on the volume of traffic on the network and the capacity of the equipment in the ProSafe Plus switches allows you to be stored on transmission rates for how the switch transmits data. The following table lists the default settings. The QoS tab has these options: • QoS. QoS Global Configuration Default Settings Feature Setting QoS Mode 802.1p Based Port...
... port number (port based) or by the type of data being forwarded to data. • Rate Limit. Depending on the volume of traffic on the network and the capacity of the equipment in the ProSafe Plus switches allows you to be stored on transmission rates for how the switch transmits data. The following table lists the default settings. The QoS tab has these options: • QoS. QoS Global Configuration Default Settings Feature Setting QoS Mode 802.1p Based Port...

ProSafe Plus Switches Configuration Utility User Guide
Page 35
... of broadcast packets being forwarded to configure. 2. Click the System tab and select the radio button for the switch that you want to every port on 802.1p priority tags in addition to other data. The QoS Broadcast Filtering screen displays. 4. Rate limiting can be set for each port; If a port has a rate limit set rate values. Quality of data to select a storm control rate for a port in the data. Data is...
... of broadcast packets being forwarded to configure. 2. Click the System tab and select the radio button for the switch that you want to every port on 802.1p priority tags in addition to other data. The QoS Broadcast Filtering screen displays. 4. Rate limiting can be set for each port; If a port has a rate limit set rate values. Quality of data to select a storm control rate for a port in the data. Data is...
ProSafe Plus Switches Configuration Utility User Guide
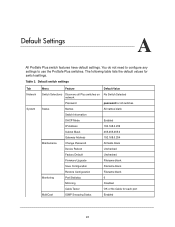
Page 41
... Selected network Password password for all switches Status Names All names blank Switch Information DHCP Mode Enabled IP Address 192.168.0.239 Subnet Mask 255.255.255.0 Gateway Address 192.168.0.254 Maintenance Change Password All fields blank Device Reboot Unchecked Factory Default Unchecked Firmware Upgrade Filename blank Save Configuration Filename blank Restore Configuration Filename blank Monitoring Port Statistics 0 Mirroring Disabled Cable Tester OK or No Cable for switch settings. A. You do not need to configure any settings to use the ProSafe...
... Selected network Password password for all switches Status Names All names blank Switch Information DHCP Mode Enabled IP Address 192.168.0.239 Subnet Mask 255.255.255.0 Gateway Address 192.168.0.254 Maintenance Change Password All fields blank Device Reboot Unchecked Factory Default Unchecked Firmware Upgrade Filename blank Save Configuration Filename blank Restore Configuration Filename blank Monitoring Port Statistics 0 Mirroring Disabled Cable Tester OK or No Cable for switch settings. A. You do not need to configure any settings to use the ProSafe...
ProSafe Plus Switches Configuration Utility User Guide
Page 42
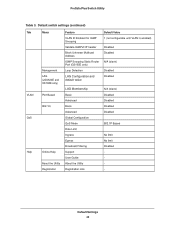
ProSafe Plus Switch Utility Table 3. Default Settings 42 Default switch settings (continued) Tab VLAN QoS Help Menu Management LAG (JGS524E and XS708E only) Port Based 802.1Q Online Help About the Utility Registration Feature VLAN ID Enabled for IGMP Snooping Validate IGMPv3 IP header Block Unknown Multicast Address IGMP Snooping Static Router Port (GS105E only) Loop Detection LAG Configuration and default value LAG Membership Basic Advanced Basic Advanced Global Configuration QoS Mode Rate Limit Ingress Egress Broadcast Filtering Support User Guide About the Utility Registration Link...
ProSafe Plus Switch Utility Table 3. Default Settings 42 Default switch settings (continued) Tab VLAN QoS Help Menu Management LAG (JGS524E and XS708E only) Port Based 802.1Q Online Help About the Utility Registration Feature VLAN ID Enabled for IGMP Snooping Validate IGMPv3 IP header Block Unknown Multicast Address IGMP Snooping Static Router Port (GS105E only) Loop Detection LAG Configuration and default value LAG Membership Basic Advanced Basic Advanced Global Configuration QoS Mode Rate Limit Ingress Egress Broadcast Filtering Support User Guide About the Utility Registration Link...

ProSafe Plus Switches Configuration Utility User Guide
Page 43
... DHCP 18 F factory defaults 20, 21 features 10 firewall applications 9 firmware upgrade 20 H Help 11, 38 I installation 6 InstallShield Wizard 8 M maintenance 10, 15, 19 monitoring 11, 15, 21 P port mirroring 21 port statistics 21 port tagging 30 port-based 26 port-based priority 33 PVID (Port Default VLAN ID) 29 Q QoS 11, 32 R rate limiting 35 rebooting device 19 reset 20 resetting factory defaults 20, 21 S status 10, 15 support 39 switch discovery 9 switch selection 16 T technical support 2 trademarks 2 U user guide...
... DHCP 18 F factory defaults 20, 21 features 10 firewall applications 9 firmware upgrade 20 H Help 11, 38 I installation 6 InstallShield Wizard 8 M maintenance 10, 15, 19 monitoring 11, 15, 21 P port mirroring 21 port statistics 21 port tagging 30 port-based 26 port-based priority 33 PVID (Port Default VLAN ID) 29 Q QoS 11, 32 R rate limiting 35 rebooting device 19 reset 20 resetting factory defaults 20, 21 S status 10, 15 support 39 switch discovery 9 switch selection 16 T technical support 2 trademarks 2 U user guide...
Installation Guide
Page 2
... subsidiaries in the password field. Click Install ProSafe Plus Utility and follow the prompts to register your product and use NETGEAR telephone support. The switch's default password is only supported on the local network. 2. Use the utility to configure. You can use it discovers on Windows. For indoor use only the official NETGEAR support resources. Support Thank you can access the user guide through the NETGEAR website. The configuration home screen displays a list of the...
... subsidiaries in the password field. Click Install ProSafe Plus Utility and follow the prompts to register your product and use NETGEAR telephone support. The switch's default password is only supported on the local network. 2. Use the utility to configure. You can use it discovers on Windows. For indoor use only the official NETGEAR support resources. Support Thank you can access the user guide through the NETGEAR website. The configuration home screen displays a list of the...


