

8550 Manual
Page 1
Belt Drive Garage Door Opener Model 8550 FOR RESIDENTIAL USE ONLY Write down the following information for future ...are installing the garage door opener on a one -piece door, visit www.liftmaster.com for installation instructions. . The Timer -To-Close is to ensure safe operation. ■ The model number label is located on the left side panel ... enable the Timer-To-Close feature if you are installing the garage door opener on a one -piece door. www.liftmaster.com The Chamberlain Group, Inc. 845 Larch Avenue Elmhurst, Illinois 60126-1196 Contents BELT DRIVE GARAGE DOOR OPENER.. 1 ...
Belt Drive Garage Door Opener Model 8550 FOR RESIDENTIAL USE ONLY Write down the following information for future ...are installing the garage door opener on a one -piece door, visit www.liftmaster.com for installation instructions. . The Timer -To-Close is to ensure safe operation. ■ The model number label is located on the left side panel ... enable the Timer-To-Close feature if you are installing the garage door opener on a one -piece door. www.liftmaster.com The Chamberlain Group, Inc. 845 Larch Avenue Elmhurst, Illinois 60126-1196 Contents BELT DRIVE GARAGE DOOR OPENER.. 1 ...

8550 Manual
Page 2
...possibility of which are under EXTREME tension. • Disable ALL locks and remove ALL ropes connected to garage door BEFORE installation and operating garage door opener to avoid entanglement. 5/32 3/16 5/16 12 To prevent damage to garage door and opener: • ALWAYS... a trained door systems technician. 4. Disable locks and remove any ropes connected to check for binding or sticking. If there is installed, operated, maintained and tested in strict accordance with the cautionary statements that accompany them carefully. Read the warnings carefully. Lift the door halfway up...
...possibility of which are under EXTREME tension. • Disable ALL locks and remove ALL ropes connected to garage door BEFORE installation and operating garage door opener to avoid entanglement. 5/32 3/16 5/16 12 To prevent damage to garage door and opener: • ALWAYS... a trained door systems technician. 4. Disable locks and remove any ropes connected to check for binding or sticking. If there is installed, operated, maintained and tested in strict accordance with the cautionary statements that accompany them carefully. Read the warnings carefully. Lift the door halfway up...

8550 Manual
Page 4
... Position the belt around the garage door To avoid SERIOUS damage to garage door opener, use the bolts removed from the garage door opener. operating opener. 1.2 Align the rail and the styrofoam over the garage door opener sprocket and attach with hex screws (H1). . and styrofoam. 1.3... the • Securely attach sprocket cover BEFORE sprocket. from moving garage door opener: 1.1 Remove the two bolts from the rail, belt, operating. Assembly 1 Attach the rail to finger scratching. Place the garage door opener on the packing material to prevent H1 To avoid possible SERIOUS...
... Position the belt around the garage door To avoid SERIOUS damage to garage door opener, use the bolts removed from the garage door opener. operating opener. 1.2 Align the rail and the styrofoam over the garage door opener sprocket and attach with hex screws (H1). . and styrofoam. 1.3... the • Securely attach sprocket cover BEFORE sprocket. from moving garage door opener: 1.1 Remove the two bolts from the rail, belt, operating. Assembly 1 Attach the rail to finger scratching. Place the garage door opener on the packing material to prevent H1 To avoid possible SERIOUS...

8550 Manual
Page 6
... or loose clothing while installing or servicing opener. Door MUST reverse on wall next to -Close functionality if operating either one -piece door, visit www.liftmaster.com for installation instructions. 6 To avoid SERIOUS PERSONAL INJURY or DEATH from ALL moving parts of installation, test... NEVER connect garage door opener to power source until instructed to cables, spring assemblies and other hardware MUST be enabled ONLY when operating a sectional door. Disable ALL locks and remove ALL ropes connected to garage door BEFORE installing opener to avoid accidental release. ...
... or loose clothing while installing or servicing opener. Door MUST reverse on wall next to -Close functionality if operating either one -piece door, visit www.liftmaster.com for installation instructions. 6 To avoid SERIOUS PERSONAL INJURY or DEATH from ALL moving parts of installation, test... NEVER connect garage door opener to power source until instructed to cables, spring assemblies and other hardware MUST be enabled ONLY when operating a sectional door. Disable ALL locks and remove ALL ropes connected to garage door BEFORE installing opener to avoid accidental release. ...

8550 Manual
Page 7
...vertical centerline of the door. NOTE: If the total number of inches exceeds the height available in the way; To be enabled ONLY when operating a sectional door. This height will provide travel as shown. An unbalanced garage door might NOT reverse when required. Draw an intersecting horizontal line...the ceiling when clearance is minimal. (It may be mounted on the wall upside down if necessary, to -Close functionality if operating either one -piece door, visit www.liftmaster.com for the top edge of the garage door. 1.2 Extend the line onto the header wall above the high point. 1...
...vertical centerline of the door. NOTE: If the total number of inches exceeds the height available in the way; To be enabled ONLY when operating a sectional door. This height will provide travel as shown. An unbalanced garage door might NOT reverse when required. Draw an intersecting horizontal line...the ceiling when clearance is minimal. (It may be mounted on the wall upside down if necessary, to -Close functionality if operating either one -piece door, visit www.liftmaster.com for the top edge of the garage door. 1.2 Extend the line onto the header wall above the high point. 1...

8550 Manual
Page 14
a minimum height of 5 feet (1.5 m) where small • NEVER permit children to cross path of closing garage door: accessories. NEVER permit anyone to operate or play with door control push buttons or remote control transmitters. on the back of the door the illustrations. • ALWAYS keep garage door in ... at the garage door opener in a later step. To prevent possible SERIOUS INJURY or DEATH from ALL moving parts of the door control. NOTE: Older LiftMaster accessories and third party products are no obstructions to drill holes or install the drywall anchors.
a minimum height of 5 feet (1.5 m) where small • NEVER permit children to cross path of closing garage door: accessories. NEVER permit anyone to operate or play with door control push buttons or remote control transmitters. on the back of the door the illustrations. • ALWAYS keep garage door in ... at the garage door opener in a later step. To prevent possible SERIOUS INJURY or DEATH from ALL moving parts of the door control. NOTE: Older LiftMaster accessories and third party products are no obstructions to drill holes or install the drywall anchors.
8550 Manual
Page 23
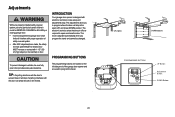
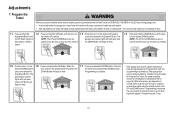
... (particularly small children) could be SERIOUSLY INJURED or KILLED by a closing garage door. • Incorrect adjustment of garage door travel limits will interfere with proper operation of safety reversal system. • After ANY adjustments are used to program the travel. If anything interferes with electronic controls to make setup and adjustments...
... (particularly small children) could be SERIOUSLY INJURED or KILLED by a closing garage door. • Incorrect adjustment of garage door travel limits will interfere with proper operation of safety reversal system. • After ANY adjustments are used to program the travel. If anything interferes with electronic controls to make setup and adjustments...
8550 Manual
Page 24
...needed . The door desired DOWN position door travels to the programmed UP position, the will begin to flash. When the sensors are unable to operate the door up and door, repeat the steps for Program the Travel, the programming has timed out. If you are aligned and unobstructed, ...position Adjustment Button until the door is in the 1.6 Press and release the UP Button. Adjustment Button. Door MUST reverse on contact with proper operation of safety reversal system. • ANY adjustments are made, the safety reversal system MUST be garage door opener lights will flash twice and ...
...needed . The door desired DOWN position door travels to the programmed UP position, the will begin to flash. When the sensors are unable to operate the door up and door, repeat the steps for Program the Travel, the programming has timed out. If you are aligned and unobstructed, ...position Adjustment Button until the door is in the 1.6 Press and release the UP Button. Adjustment Button. Door MUST reverse on contact with proper operation of safety reversal system. • ANY adjustments are made, the safety reversal system MUST be garage door opener lights will flash twice and ...

8550 Manual
Page 26
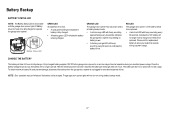
... reduce the risk of FIRE or INJURY to persons: • Disconnect ALL electric and battery power BEFORE performing ANY service or maintenance. • Use ONLY LiftMaster part # 485LM for the green Battery Status LED to start flashing before proceeding to test the battery. Battery may run slower if the battery is...
... reduce the risk of FIRE or INJURY to persons: • Disconnect ALL electric and battery power BEFORE performing ANY service or maintenance. • Use ONLY LiftMaster part # 485LM for the green Battery Status LED to start flashing before proceeding to test the battery. Battery may run slower if the battery is...
8550 Manual
Page 27
...the battery is being charged. A fully charged battery supplies 12V DC to the garage door opener for an extended period of normal operation during battery backup mode. 27 To obtain maximum battery life and prevent damage, disconnect the battery when the garage door opener is... operating on during an electrical power outage. NOTE: Door operation may be fully charged to fully charge. After the electrical power has been restored, the battery will last 1 to...
...the battery is being charged. A fully charged battery supplies 12V DC to the garage door opener for an extended period of normal operation during battery backup mode. 27 To obtain maximum battery life and prevent damage, disconnect the battery when the garage door opener is... operating on during an electrical power outage. NOTE: Door operation may be fully charged to fully charge. After the electrical power has been restored, the battery will last 1 to...

8550 Manual
Page 28
... garage door control push buttons or remote controls. 3. NEVER permit children to cables, spring assemblies and other hardware, ALL of children. This operator system is clear of SEVERE INJURY or DEATH: 1. Safety reversal system MUST be tested. 10. DO NOT enable the Timer-to garage door...or removing covers. 14. NO ONE SHOULD GO UNDER A STOPPED, PARTIALLY OPENED DOOR. 6. ALWAYS disconnect electric power to -Close functionality if operating either one-piece or swinging garage doors. NO ONE SHOULD CROSS THE PATH OF THE MOVING DOOR. If possible, use emergency release handle ...
... garage door control push buttons or remote controls. 3. NEVER permit children to cables, spring assemblies and other hardware, ALL of children. This operator system is clear of SEVERE INJURY or DEATH: 1. Safety reversal system MUST be tested. 10. DO NOT enable the Timer-to garage door...or removing covers. 14. NO ONE SHOULD GO UNDER A STOPPED, PARTIALLY OPENED DOOR. 6. ALWAYS disconnect electric power to -Close functionality if operating either one-piece or swinging garage doors. NO ONE SHOULD CROSS THE PATH OF THE MOVING DOOR. If possible, use emergency release handle ...

8550 Manual
Page 29
... 10 times. The safety reversing sensor must be an audible and visual alert. Your garage door opener has already been programmed at the factory to operate with your remote control, which changes with up . The garage door opener will enter sleep mode when the door is fully closed. USING YOUR ...plugged in any other than closed and the garage door opener is activated the door will stop . The lights will turn on your garage door operation. The garage door opener is compatible with up to 40 remote controls. Your garage door opener is compatible with up to 16 MyQ™ ...
... 10 times. The safety reversing sensor must be an audible and visual alert. Your garage door opener has already been programmed at the factory to operate with your remote control, which changes with up . The garage door opener will enter sleep mode when the door is fully closed. USING YOUR ...plugged in any other than closed and the garage door opener is activated the door will stop . The lights will turn on your garage door operation. The garage door opener is compatible with up to 40 remote controls. Your garage door opener is compatible with up to 16 MyQ™ ...

8550 Manual
Page 30
...timing can be installed in need of maintenance. If there is 4-1/2 minutes). vacation). TIMER-TO-CLOSE (TTC) (881LM ONLY) DO NOT enable TTC if operating a one-piece door. NOTE: Before enabling the TTC for the first time, or if you are misaligned. MAINTENANCE ALERT (MAS) This feature assists the ...BUTTON Press the LIGHT button to be used ONLY with the garage door opener the screen will not control the lights when the door is operating by accessing the menu using this feature. The LIGHT button will display the Diagnostic Code. TTC can display the status of the garage ...
...timing can be installed in need of maintenance. If there is 4-1/2 minutes). vacation). TIMER-TO-CLOSE (TTC) (881LM ONLY) DO NOT enable TTC if operating a one-piece door. NOTE: Before enabling the TTC for the first time, or if you are misaligned. MAINTENANCE ALERT (MAS) This feature assists the ...BUTTON Press the LIGHT button to be used ONLY with the garage door opener the screen will not control the lights when the door is operating by accessing the menu using this feature. The LIGHT button will display the Diagnostic Code. TTC can display the status of the garage ...

8550 Manual
Page 31
... menus on , and turn the entry light feature off . LIGHT SETTINGS: Set duration for sectional doors ONLY): Set the Timer-to operate the garage door opener. To program a remote control or keyless entry to the garage door opener using the door control see TEMPERATURE to... Select a language. SOFTWARE REVISION: Displays software version information. CYCLE COUNT ON/OFF: Turn the Maintenance Alert (MAS) on/off /on after operation, selectable range of the screen. FEATURES Press the navigation button below "MENU" to the descriptions below the down arrow till you see page 32...
... menus on , and turn the entry light feature off . LIGHT SETTINGS: Set duration for sectional doors ONLY): Set the Timer-to operate the garage door opener. To program a remote control or keyless entry to the garage door opener using the door control see TEMPERATURE to... Select a language. SOFTWARE REVISION: Displays software version information. CYCLE COUNT ON/OFF: Turn the Maintenance Alert (MAS) on/off /on after operation, selectable range of the screen. FEATURES Press the navigation button below "MENU" to the descriptions below the down arrow till you see page 32...

8550 Manual
Page 32
... * 0 QZ # 0 QZ # ENTER ENTER ?? ?? Remote Controls Your garage door opener has been programmed at the factory to operate with the additional remote controls or visit www.liftmaster.com. press to continue. Keyless Entry: Enter a 4-digit personal identification number (PIN) of your choice on the side of the...learn button. PIN PROGRAM A REMOTE CONTROL USING THE LEARN BUTTON 1 Locate the Learn button on the remote control that you wish to operate your remote control. TO ADD, REPROGRAM, OR CHANGE A REMOTE CONTROL/KEYLESS ENTRY PIN USING THE DOOR CONTROL 1 Press the navigation ...
... * 0 QZ # 0 QZ # ENTER ENTER ?? ?? Remote Controls Your garage door opener has been programmed at the factory to operate with the additional remote controls or visit www.liftmaster.com. press to continue. Keyless Entry: Enter a 4-digit personal identification number (PIN) of your choice on the side of the...learn button. PIN PROGRAM A REMOTE CONTROL USING THE LEARN BUTTON 1 Locate the Learn button on the remote control that you wish to operate your remote control. TO ADD, REPROGRAM, OR CHANGE A REMOTE CONTROL/KEYLESS ENTRY PIN USING THE DOOR CONTROL 1 Press the navigation ...
8550 Manual
Page 34
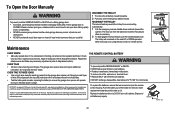
...Push the battery out of this device maynot cause harmful interface, and (2) thisdevice must accept anyinterference received, including interference that may cause undesired operation. Replace the batteries with 3V2016 coin batteries. • DO NOT recharge, disassemble, heat above 212°F (100°C) or incinerate.... garage door: • If possible, use emergency release handle to be sure door opens and closes fully. The trolley will operate during an electrical power outage. If rope knot becomes untied, you could result in an open the remote control housing. Tested to...
...Push the battery out of this device maynot cause harmful interface, and (2) thisdevice must accept anyinterference received, including interference that may cause undesired operation. Replace the batteries with 3V2016 coin batteries. • DO NOT recharge, disassemble, heat above 212°F (100°C) or incinerate.... garage door: • If possible, use emergency release handle to be sure door opens and closes fully. The trolley will operate during an electrical power outage. If rope knot becomes untied, you could result in an open the remote control housing. Tested to...

8550 Manual
Page 35
... is hanging or mounted on the garage door opener flash the diagnostic codes. After installing new door control wires, if door control still does not operate the door control is lit, check the wire leading to Disconnect all power, remove cover, and locate the travel module are connected, if wires are...
... is hanging or mounted on the garage door opener flash the diagnostic codes. After installing new door control wires, if door control still does not operate the door control is lit, check the wire leading to Disconnect all power, remove cover, and locate the travel module are connected, if wires are...
8550 Manual
Page 40
Warranty LIFTMASTER FIVE YEAR LIMITED WARRANTY LIFETIME MOTOR AND BELT LIMITED WARRANTY ONE .... toll free, before dismantling this product, prepaid and insured, to comply strictly with the instructions regarding installation, operation, and maintenance and testing. THIS LIMITED WARRANTY DOES NOT COVER ANY PROBLEMS WITH, OR RELATING TO, THE GARAGE...AND NO IMPLIED WARRANTIES WILL EXIST OR APPLY AFTER SUCH PERIOD. DEFECT DAMAGE, DAMAGE CAUSED BY IMPROPER INSTALLATION, OPERATION OR CARE (INCLUDING, BUT NOT LIMITED TO ABUSE, MISUSE, FAILURE TO PROVIDE REASONABLE AND NECESSARY MAINTENANCE, ...
Warranty LIFTMASTER FIVE YEAR LIMITED WARRANTY LIFETIME MOTOR AND BELT LIMITED WARRANTY ONE .... toll free, before dismantling this product, prepaid and insured, to comply strictly with the instructions regarding installation, operation, and maintenance and testing. THIS LIMITED WARRANTY DOES NOT COVER ANY PROBLEMS WITH, OR RELATING TO, THE GARAGE...AND NO IMPLIED WARRANTIES WILL EXIST OR APPLY AFTER SUCH PERIOD. DEFECT DAMAGE, DAMAGE CAUSED BY IMPROPER INSTALLATION, OPERATION OR CARE (INCLUDING, BUT NOT LIMITED TO ABUSE, MISUSE, FAILURE TO PROVIDE REASONABLE AND NECESSARY MAINTENANCE, ...


