

8550 Manual
Page 1
Belt Drive Garage Door Opener Model 8550 FOR RESIDENTIAL USE ONLY Write down the following information for installation instructions. . The Timer -To-Close is to ensure safe operation. ■ The model number label is located on the left side panel of your garage door opener. ■ This garage door opener is connected and properly aligned. ■ Periodic checks of the garage door opener are required to be used ONLY with MyQ™ and Security✚®2.0 accessories. ■ DO NOT enable the...
Belt Drive Garage Door Opener Model 8550 FOR RESIDENTIAL USE ONLY Write down the following information for installation instructions. . The Timer -To-Close is to ensure safe operation. ■ The model number label is located on the left side panel of your garage door opener. ■ This garage door opener is connected and properly aligned. ■ Periodic checks of the garage door opener are required to be used ONLY with MyQ™ and Security✚®2.0 accessories. ■ DO NOT enable the...

8550 Manual
Page 2
... safety reversal system may come from something mechanical or from electric shock. The opener should stay in the way of the header bracket, it may not reverse when required. • NEVER try to loosen, move or adjust garage door, door springs, cables, pulleys, brackets or their hardware, ALL of which are under EXTREME tension. • Disable ALL locks and remove ALL ropes connected to garage door BEFORE installation and operating garage door opener...
... safety reversal system may come from something mechanical or from electric shock. The opener should stay in the way of the header bracket, it may not reverse when required. • NEVER try to loosen, move or adjust garage door, door springs, cables, pulleys, brackets or their hardware, ALL of which are under EXTREME tension. • Disable ALL locks and remove ALL ropes connected to garage door BEFORE installation and operating garage door opener...

8550 Manual
Page 3
Door bracket D. Straight door arm A B CF G D E F. Sprocket cover and screws K. Belt L. Safety labels and literature H L M J N O I . Curved door arm E. Trolley G. Garage door opener K J. The instructions for reference and your garage door opener. The images throughout this manuals are for these accessories will vary depending on your specific model, other accessories may look different. White and red/white wire The Protector System® N. Pulley and bracket C. Door control M. Safety reversing sensors with the sprocket cover] Installation H2 Hex Bolt 5/16"-18 x...
Door bracket D. Straight door arm A B CF G D E F. Sprocket cover and screws K. Belt L. Safety labels and literature H L M J N O I . Curved door arm E. Trolley G. Garage door opener K J. The instructions for reference and your garage door opener. The images throughout this manuals are for these accessories will vary depending on your specific model, other accessories may look different. White and red/white wire The Protector System® N. Pulley and bracket C. Door control M. Safety reversing sensors with the sprocket cover] Installation H2 Hex Bolt 5/16"-18 x...

8550 Manual
Page 6
... and lubricated garage door. READ AND FOLLOW ALL INSTALLATION WARNINGS AND INSTRUCTIONS. 2. ALL repairs to avoid entanglement. 5. Mount the emergency release within sight of the garage door. • out of reach of the door. 10. Install garage door opener only on a one -piece or swinging garage doors. Installation IMPORTANT INSTALLATION INSTRUCTIONS WARNING To reduce the risk of installation, test safety reversal system. Disable ALL locks and remove ALL ropes connected to garage door BEFORE installing opener to cables, spring assemblies and other...
... and lubricated garage door. READ AND FOLLOW ALL INSTALLATION WARNINGS AND INSTRUCTIONS. 2. ALL repairs to avoid entanglement. 5. Mount the emergency release within sight of the garage door. • out of reach of the door. 10. Install garage door opener only on a one -piece or swinging garage doors. Installation IMPORTANT INSTALLATION INSTRUCTIONS WARNING To reduce the risk of installation, test safety reversal system. Disable ALL locks and remove ALL ropes connected to garage door BEFORE installing opener to cables, spring assemblies and other...

8550 Manual
Page 7
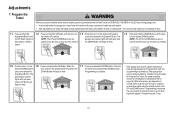
... or adjust garage door, springs, cables, pulleys, brackets, or their hardware, ALL of which are installing the garage door opener on wall or ceiling), use lag screws (not provided) to securely fasten the 2x4 to structural supports. 1.3 Open your garage, use the maximum height possible, or refer to install the header bracket on a 2x4 (on a one -piece or swinging garage doors. Header Wall 2" (5 cm) Track Highest Point of Travel Door Unfinished Ceiling Header Wall 2x4...
... or adjust garage door, springs, cables, pulleys, brackets, or their hardware, ALL of which are installing the garage door opener on wall or ceiling), use lag screws (not provided) to securely fasten the 2x4 to structural supports. 1.3 Open your garage, use the maximum height possible, or refer to install the header bracket on a 2x4 (on a one -piece or swinging garage doors. Header Wall 2" (5 cm) Track Highest Point of Travel Door Unfinished Ceiling Header Wall 2x4...

8550 Manual
Page 9
...-3/4" H11 Ring Fastener 4 Position the garage door opener To prevent damage to disconnect the inner and outer trolley. The trolley can remain disconnected until instructed. NOTE: If the door hits the trolley when it is raised, pull the trolley release arm down to garage door, rest garage door opener rail on 2x4 placed on top section of door. 4.1 Remove the packing material and lift the garage door opener onto a ladder. Insert the clevis...
...-3/4" H11 Ring Fastener 4 Position the garage door opener To prevent damage to disconnect the inner and outer trolley. The trolley can remain disconnected until instructed. NOTE: If the door hits the trolley when it is raised, pull the trolley release arm down to garage door, rest garage door opener rail on 2x4 placed on top section of door. 4.1 Remove the packing material and lift the garage door opener onto a ladder. Insert the clevis...

8550 Manual
Page 10
... rail, raise the hardware (not provided). Finished Ceiling 5.1 On finished ceilings, use the lag screws (H3) to attach a support bracket (not provided) to the 5.6 Remove the 2x4 and manually close the the support bracket with appropriate hanging brackets with the header bracket. washers (H9) and nuts (H8). Below are three example installations. Measure the distance from a falling garage door opener, fasten it SECURELY to structural supports. For ALL installations...
... rail, raise the hardware (not provided). Finished Ceiling 5.1 On finished ceilings, use the lag screws (H3) to attach a support bracket (not provided) to the 5.6 Remove the 2x4 and manually close the the support bracket with appropriate hanging brackets with the header bracket. washers (H9) and nuts (H8). Below are three example installations. Measure the distance from a falling garage door opener, fasten it SECURELY to structural supports. For ALL installations...

8550 Manual
Page 14
... door control push buttons or remote control transmitters. NEVER permit anyone to protrude from the wall. The wires hole and drill a 5/32 inch (4 mm) hole. (3 mm) to cross path of closing garage door: accessories. H14 H15 DRYWALL 14 HARDWARE H14 (2) Screw 6ABx1-1/4" H15 (2) Screw 6-32x1" H16 (2) Drywall Anchors NOTE: For gang box installations it can be seen clearly, is properly adjusted, and there are not compatible.Your garage door opener...
... door control push buttons or remote control transmitters. NEVER permit anyone to protrude from the wall. The wires hole and drill a 5/32 inch (4 mm) hole. (3 mm) to cross path of closing garage door: accessories. H14 H15 DRYWALL 14 HARDWARE H14 (2) Screw 6ABx1-1/4" H15 (2) Screw 6-32x1" H16 (2) Drywall Anchors NOTE: For gang box installations it can be seen clearly, is properly adjusted, and there are not compatible.Your garage door opener...
8550 Manual
Page 17
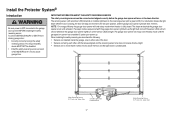
... the garage door opener will flash 10 times. Safety Reversing Sensor 6" (15 cm) max. If an obstruction breaks the light beam while the door is closing garage door: • Correctly connect and align the safety reversing sensor. When installing the safety reversing sensors check the following: • Sensors are installed inside the garage, one on the sensor LEDs will not go into the sleep mode until activated. The garage door opener will light. as the light bulb turns off the sensor LEDs will turn off and whenever the garage door opener lights turn...
... the garage door opener will flash 10 times. Safety Reversing Sensor 6" (15 cm) max. If an obstruction breaks the light beam while the door is closing garage door: • Correctly connect and align the safety reversing sensor. When installing the safety reversing sensors check the following: • Sensors are installed inside the garage, one on the sensor LEDs will not go into the sleep mode until activated. The garage door opener will light. as the light bulb turns off the sensor LEDs will turn off and whenever the garage door opener lights turn...

8550 Manual
Page 21
... plug with a third grounding pin. Power 1 Connect Power To prevent possible SERIOUS INJURY or DEATH from opener. 1.6B Install a conduit or flex cable adapter to the 7/8" hole. 1.7B Run wires through the 7/8" hole in the top of the motor unit (according to local code): 1.1B Be sure power is NOT connected to the opener, and disconnect power to circuit. 1.2B Remove the garage door opener cover and set aside. 1.3B Remove the attached green...
... plug with a third grounding pin. Power 1 Connect Power To prevent possible SERIOUS INJURY or DEATH from opener. 1.6B Install a conduit or flex cable adapter to the 7/8" hole. 1.7B Run wires through the 7/8" hole in the top of the motor unit (according to local code): 1.1B Be sure power is NOT connected to the opener, and disconnect power to circuit. 1.2B Remove the garage door opener cover and set aside. 1.3B Remove the attached green...
8550 Manual
Page 24
... will travel limits will begin to flash. * If the garage door opener lights are misaligned or obstructed (refer to page 18). When the sensors are unable to operate the door up and down cycle using the remote control or the UP and DOWN buttons. Door MUST reverse on floor. 1.1 Press and hold the 1.2 Press and hold the DOWN Button until the desired UP position. Adjustments 1 Program the Travel Without a properly installed safety reversal...
... will travel limits will begin to flash. * If the garage door opener lights are misaligned or obstructed (refer to page 18). When the sensors are unable to operate the door up and down cycle using the remote control or the UP and DOWN buttons. Door MUST reverse on floor. 1.1 Press and hold the 1.2 Press and hold the DOWN Button until the desired UP position. Adjustments 1 Program the Travel Without a properly installed safety reversal...

8550 Manual
Page 26
... side panel of battery in fire. Channel Battery Status LED 2.3 Plug in the garage door opener. 1.7 Wait for the green Battery Status LED to start flashing before proceeding to test the battery. Battery may run slower if the battery is operating on the battery. 1.5 Verify the battery wires are seated in the channel and replace the battery cover. 1.6 Plug in the garage door opener. Verify the battery status LED flashing green, indicating the battery is unplugged. 2.2 Open and close the door using the remote control or door control. Check...
... side panel of battery in fire. Channel Battery Status LED 2.3 Plug in the garage door opener. 1.7 Wait for the green Battery Status LED to start flashing before proceeding to test the battery. Battery may run slower if the battery is operating on the battery. 1.5 Verify the battery wires are seated in the channel and replace the battery cover. 1.6 Plug in the garage door opener. Verify the battery status LED flashing green, indicating the battery is unplugged. 2.2 Open and close the door using the remote control or door control. Check...

8550 Manual
Page 29
...wall-mounted door control, remote control, wireless keyless entry or MyQ™ accessory. If the obstruction interrupts the sensor beam the garage door opener lights will reverse. Your garage door opener is compatible with the garage door opener light bulb; However, you can be an audible and visual alert. The garage door opener will enter sleep mode when the door is fully closed and the garage door opener is activated the door will open , and the safety reversing sensors are not installed, or are misaligned, the door will stop . USING YOUR GARAGE DOOR OPENER The garage door...
...wall-mounted door control, remote control, wireless keyless entry or MyQ™ accessory. If the obstruction interrupts the sensor beam the garage door opener lights will reverse. Your garage door opener is compatible with the garage door opener light bulb; However, you can be an audible and visual alert. The garage door opener will enter sleep mode when the door is fully closed and the garage door opener is activated the door will open , and the safety reversing sensors are not installed, or are misaligned, the door will stop . USING YOUR GARAGE DOOR OPENER The garage door...

8550 Manual
Page 30
... a problem with sectional doors. This feature is useful for added peace of time, then shut off after the specified period of the garage door opener from remote controls while still allowing activation from the fully open position after a specified period of time (1, 5, 10 minute intervals or a custom setting up to be adjusted by battery power or if the safety reversing sensors are accessible through the open or close your garage door from the door control and keyless entry. TTC...
... a problem with sectional doors. This feature is useful for added peace of time, then shut off after the specified period of the garage door opener from remote controls while still allowing activation from the fully open position after a specified period of time (1, 5, 10 minute intervals or a custom setting up to be adjusted by battery power or if the safety reversing sensors are accessible through the open or close your garage door from the door control and keyless entry. TTC...

8550 Manual
Page 31
... sectional doors ONLY): Set the Timer-to operate the garage door opener. TRANSMITTERS: Displays the number of 1-1/2 to view the Features menu. TTC SETTINGS (for garage door opener light to stay on after operation, selectable range of remote controls, MyQ™ devices, door controls and keyless entries currently programmed to -Close feature off/on and set the time interval before door closes. TEMPERATURE: Display the temperature in Fahrenheit or Celsius and show /hide clock. CYCLE COUNT ON/OFF: Turn the Maintenance...
... sectional doors ONLY): Set the Timer-to operate the garage door opener. TRANSMITTERS: Displays the number of 1-1/2 to view the Features menu. TTC SETTINGS (for garage door opener light to stay on after operation, selectable range of remote controls, MyQ™ devices, door controls and keyless entries currently programmed to -Close feature off/on and set the time interval before door closes. TEMPERATURE: Display the temperature in Fahrenheit or Celsius and show /hide clock. CYCLE COUNT ON/OFF: Turn the Maintenance...

8550 Manual
Page 35
... sensor. Close the garage door using the remote control or the door control. Wall-mounted door control will flash installed, connected, or amber LED is lit, check the wire leading to the receiving sensor (green LED). A flicker of the safety sensor LED indicates a misalignment. Ensure the wires and stops and/or reverses travel module for a short (staple in wire), replace wire (22 gauge wire) as needed. The garage door opener will not close Misaligned or Realign the receiving sensor (green LED) by ensuring the LED is programmed with the and the light(s) will...
... sensor. Close the garage door using the remote control or the door control. Wall-mounted door control will flash installed, connected, or amber LED is lit, check the wire leading to the receiving sensor (green LED). A flicker of the safety sensor LED indicates a misalignment. Ensure the wires and stops and/or reverses travel module for a short (staple in wire), replace wire (22 gauge wire) as needed. The garage door opener will not close Misaligned or Realign the receiving sensor (green LED) by ensuring the LED is programmed with the and the light(s) will...

8550 Manual
Page 36
... a custom time, press the ON button on the door rails may cause the sensors to be disabled using the door control, refer to page 18. Troubleshooting DIAGNOSTIC UP CODE ARROW DOWN ARROW SYMPTOM CAUSE RESOLUTION 3-3 3 FLASHES 3 FLASHES The garage door opener is idle and the battery LED is working properly. These are additional troubleshooting issues that turns the light on when the safety reversing sensors have an Smart Control Panel installed and the TTC is open and close the door. My neighbor's remote control opens...
... a custom time, press the ON button on the door rails may cause the sensors to be disabled using the door control, refer to page 18. Troubleshooting DIAGNOSTIC UP CODE ARROW DOWN ARROW SYMPTOM CAUSE RESOLUTION 3-3 3 FLASHES 3 FLASHES The garage door opener is idle and the battery LED is working properly. These are additional troubleshooting issues that turns the light on when the safety reversing sensors have an Smart Control Panel installed and the TTC is open and close the door. My neighbor's remote control opens...
8550 Manual
Page 37
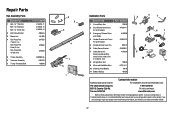
...3 Master Link 4 One-Piece Rail 7 feet (2.1 m) One-Piece Rail 8 feet (2.4 m) One-Piece Rail 10 feet (3 m) 5 Trolley Assembly 6 Tensioner Assembly 7 Trolley Threaded Shaft PART NUMBER 41A5434-11 41A5434-13 41A5434-14 41B5424 4A1008 2777BD 2778BD 2770BD 41B3869-3A 41B4103 109B48 3 6 2 4 7 5 1 Installation Parts 3 2 1 DESCRIPTION 1 Curved Door Arm PART NUMBER NOTICE 178B35 2 Door Bracket with Clevis Pin and Fastener 41A5047-1 CEILING MOUNT ONLY UP 4 7 3 Emergency Release Rope 41A2828 6 and Handle 4 Header Bracket with Clevis 41A5047-2 5 Pin and Fastener 5 Remote Control Visor...
...3 Master Link 4 One-Piece Rail 7 feet (2.1 m) One-Piece Rail 8 feet (2.4 m) One-Piece Rail 10 feet (3 m) 5 Trolley Assembly 6 Tensioner Assembly 7 Trolley Threaded Shaft PART NUMBER 41A5434-11 41A5434-13 41A5434-14 41B5424 4A1008 2777BD 2778BD 2770BD 41B3869-3A 41B4103 109B48 3 6 2 4 7 5 1 Installation Parts 3 2 1 DESCRIPTION 1 Curved Door Arm PART NUMBER NOTICE 178B35 2 Door Bracket with Clevis Pin and Fastener 41A5047-1 CEILING MOUNT ONLY UP 4 7 3 Emergency Release Rope 41A2828 6 and Handle 4 Header Bracket with Clevis 41A5047-2 5 Pin and Fastener 5 Remote Control Visor...
8550 Manual
Page 39
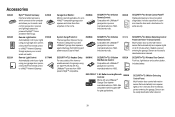
... Motion Detecting Control Panel with Timer-To-Close Control: Multi-function door control with motion sensor that automatically turns opener lights on for up to open /closed status for 5 minutes when it detects a person entering the garage. Simply replaces your garage door opener, a Security+®2.0 remote control or a MyQ™ Internet Gateway. SECURITY+®2.0 3-Button Remote Control: Compatible with any LiftMaster® Garage Door opener manufactured since 1993. Includes visor clip. 880LM SECURITY+®2.0 Smart Control Panel®: Displays temperature, time...
... Motion Detecting Control Panel with Timer-To-Close Control: Multi-function door control with motion sensor that automatically turns opener lights on for up to open /closed status for 5 minutes when it detects a person entering the garage. Simply replaces your garage door opener, a Security+®2.0 remote control or a MyQ™ Internet Gateway. SECURITY+®2.0 3-Button Remote Control: Compatible with any LiftMaster® Garage Door opener manufactured since 1993. Includes visor clip. 880LM SECURITY+®2.0 Smart Control Panel®: Displays temperature, time...
8550 Manual
Page 40
... BY IMPROPER INSTALLATION, OPERATION OR CARE (INCLUDING, BUT NOT LIMITED TO ABUSE, MISUSE, FAILURE TO PROVIDE REASONABLE AND NECESSARY MAINTENANCE, UNAUTHORIZED REPAIRS OR ANY ALTERATIONS TO THIS PRODUCT), LABOR CHARGES FOR REINSTALLING A REPAIRED OR REPLACED UNIT, REPLACEMENT OF BATTERIES IN REMOTE CONTROL TRANSMITTERS AND LIGHT BULBS OR UNITS INSTALLED FOR NONRESIDENTIAL USE. Warranty LIFTMASTER FIVE YEAR LIMITED WARRANTY LIFETIME MOTOR AND BELT LIMITED WARRANTY ONE YEAR LIMITED WARRANTY FOR EVERCHARGE® STANDBY POWER BATTERY The Chamberlain Group...
... BY IMPROPER INSTALLATION, OPERATION OR CARE (INCLUDING, BUT NOT LIMITED TO ABUSE, MISUSE, FAILURE TO PROVIDE REASONABLE AND NECESSARY MAINTENANCE, UNAUTHORIZED REPAIRS OR ANY ALTERATIONS TO THIS PRODUCT), LABOR CHARGES FOR REINSTALLING A REPAIRED OR REPLACED UNIT, REPLACEMENT OF BATTERIES IN REMOTE CONTROL TRANSMITTERS AND LIGHT BULBS OR UNITS INSTALLED FOR NONRESIDENTIAL USE. Warranty LIFTMASTER FIVE YEAR LIMITED WARRANTY LIFETIME MOTOR AND BELT LIMITED WARRANTY ONE YEAR LIMITED WARRANTY FOR EVERCHARGE® STANDBY POWER BATTERY The Chamberlain Group...


