

8550 Manual
Page 1
...Door Opener Model 8550 FOR RESIDENTIAL USE ONLY Write down the following information for future reference: Serial Number: Date of Purchase: ■ Please read this manual and the enclosed safety materials carefully! ■ Fasten the manual near the garage door after installation. ■... The door WILL NOT CLOSE unless the Protector System® is ONLY compatible with sectional doors. NOTE: If you are installing the garage door opener on a one -piece door, visit www.liftmaster.com for installation instructions. ....
...Door Opener Model 8550 FOR RESIDENTIAL USE ONLY Write down the following information for future reference: Serial Number: Date of Purchase: ■ Please read this manual and the enclosed safety materials carefully! ■ Fasten the manual near the garage door after installation. ■... The door WILL NOT CLOSE unless the Protector System® is ONLY compatible with sectional doors. NOTE: If you are installing the garage door opener on a one -piece door, visit www.liftmaster.com for installation instructions. ....

8550 Manual
Page 2
...Preparation Safety Symbol and Signal Word Review This garage door opener has been designed and tested to offer safe service provided it is installed, operated, maintained and tested in strict accordance with the cautionary statements that accompany them carefully. Check the seal on the following pages...system may come from something mechanical or from electric shock. An unbalanced garage door may be installed above the center of serious injury or death if you see this manual. Mechanical Electrical When you see these Safety Symbols and Signal Words on the following pages, ...
...Preparation Safety Symbol and Signal Word Review This garage door opener has been designed and tested to offer safe service provided it is installed, operated, maintained and tested in strict accordance with the cautionary statements that accompany them carefully. Check the seal on the following pages...system may come from something mechanical or from electric shock. An unbalanced garage door may be installed above the center of serious injury or death if you see this manual. Mechanical Electrical When you see these Safety Symbols and Signal Words on the following pages, ...

8550 Manual
Page 3
...and white/black wire attached: Sending Sensor (1) Receiving Sensor (1) and Safety Sensor Brackets (2) O. The images throughout this manual. Garage door opener K J. The instructions for these accessories will vary depending on your specific model, other accessories may ...174;2.0 ACCESSORIES 880LM Smart Control Panel® 895MAX Remote Control 829LM Garage Door Monitor Hardware Assembly H1 Hex Screw #8x3/8" (3) [packed with the sprocket cover] Installation H2 Hex Bolt 5/16"-18 x 7/8" (4) H3 Lag Screw 5/16"-9 x 1-5/8" (2) H4 Lag Screw 5/16"-18 x 1-5/8" (2) H5 Clevis Pin 5/...
...and white/black wire attached: Sending Sensor (1) Receiving Sensor (1) and Safety Sensor Brackets (2) O. The images throughout this manual. Garage door opener K J. The instructions for these accessories will vary depending on your specific model, other accessories may ...174;2.0 ACCESSORIES 880LM Smart Control Panel® 895MAX Remote Control 829LM Garage Door Monitor Hardware Assembly H1 Hex Screw #8x3/8" (3) [packed with the sprocket cover] Installation H2 Hex Bolt 5/16"-18 x 7/8" (4) H3 Lag Screw 5/16"-9 x 1-5/8" (2) H4 Lag Screw 5/16"-18 x 1-5/8" (2) H5 Clevis Pin 5/...

8550 Manual
Page 6
... by a trained door systems technician BEFORE installing opener. 4. NEVER wear watches, rings or loose clothing while installing or servicing opener. Place manual release/safety reverse test label in plain view on .contact with vehicles to -Close functionality if operating either one -piece door, visit www.liftmaster.com for installation instructions. 6 Door MUST reverse on inside...
... by a trained door systems technician BEFORE installing opener. 4. NEVER wear watches, rings or loose clothing while installing or servicing opener. Place manual release/safety reverse test label in plain view on .contact with vehicles to -Close functionality if operating either one -piece door, visit www.liftmaster.com for installation instructions. 6 Door MUST reverse on inside...

8550 Manual
Page 10
...lag screws (H3) to attach a support bracket (not provided) to structural supports. header bracket. (not provided) H2 H9 H8 10 Below are three example installations. washers (H9) and nuts (H8). H4 (2) Lag Screw 5/16"- 18x1-5/8" HARDWARE H9 (2) Lock Washer 5/16"-16 H8 (2) Nut 5/16"-18 ...Unfinished Ceiling 5.4 Attach the end of each hanging bracket to 5.5 Attach the garage door opener to the 5.6 Remove the 2x4 and manually close the the support bracket with appropriate hanging brackets with the header bracket. Measure the distance from a falling garage door opener, fasten...
...lag screws (H3) to attach a support bracket (not provided) to structural supports. header bracket. (not provided) H2 H9 H8 10 Below are three example installations. washers (H9) and nuts (H8). H4 (2) Lag Screw 5/16"- 18x1-5/8" HARDWARE H9 (2) Lock Washer 5/16"-16 H8 (2) Nut 5/16"-18 ...Unfinished Ceiling 5.4 Attach the end of each hanging bracket to 5.5 Attach the garage door opener to the 5.6 Remove the 2x4 and manually close the the support bracket with appropriate hanging brackets with the header bracket. Measure the distance from a falling garage door opener, fasten...
8550 Manual
Page 16
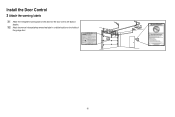
Install the Door Control 3 Attach the warning labels 3.1 Attach the entrapment warning label on the wall near the door control with tacks or staples. 3.2 Attach the manual release/safety reverse test label in a visible location on the inside of the garage door. 16
Install the Door Control 3 Attach the warning labels 3.1 Attach the entrapment warning label on the wall near the door control with tacks or staples. 3.2 Attach the manual release/safety reverse test label in a visible location on the inside of the garage door. 16

8550 Manual
Page 36
... systems technician. These are additional troubleshooting issues that turns the light on when the safety reversing sensors have an Smart Control Panel installed and the TTC is okay, reprogram reverses sticking door the travel, refer to Disconnect all power, remove cover, and locate the... 4 FLASHES 5 FLASHES The opener runs Communication error to page 24. 4-2 4 FLASHES 2 FLASHES The door stops while opening Obstruction, binding or Manually open : The garage door opener is open and close the door. touching the floor 4-4 4 FLASHES 4 FLASHES My door reverses for a traveling...
... systems technician. These are additional troubleshooting issues that turns the light on when the safety reversing sensors have an Smart Control Panel installed and the TTC is okay, reprogram reverses sticking door the travel, refer to Disconnect all power, remove cover, and locate the... 4 FLASHES 5 FLASHES The opener runs Communication error to page 24. 4-2 4 FLASHES 2 FLASHES The door stops while opening Obstruction, binding or Manually open : The garage door opener is open and close the door. touching the floor 4-4 4 FLASHES 4 FLASHES My door reverses for a traveling...


