

8550 Manual
Page 3
...Carton Inventory NOTE: Accessories will be included with your product may look different. GARAGE DOOR OPENER ASSEMBLY A. Pulley and bracket C. Door bracket D. Trolley G. Emergency release rope and handle H. Rail I 3 MyQ™ AND SECURITY✚®2.0 ACCESSORIES 880LM Smart Control Panel® 895MAX ...Remote Control 829LM Garage Door Monitor Hardware Assembly H1 Hex Screw #8x3/8" (3) [packed with white and...
...Carton Inventory NOTE: Accessories will be included with your product may look different. GARAGE DOOR OPENER ASSEMBLY A. Pulley and bracket C. Door bracket D. Trolley G. Emergency release rope and handle H. Rail I 3 MyQ™ AND SECURITY✚®2.0 ACCESSORIES 880LM Smart Control Panel® 895MAX ...Remote Control 829LM Garage Door Monitor Hardware Assembly H1 Hex Screw #8x3/8" (3) [packed with white and...

8550 Manual
Page 4
...the two bolts from the garage door opener. HARDWARE Mounted in the top of sprocket while garage door opener. operating opener. 1.2 Align the rail and the styrofoam over the garage door opener sprocket and attach with the previously removed bolts. 1.4 Position the belt around the garage door To ... damage to garage door opener, use the bolts removed from the top of the • ALWAYS keep hand clear of the opener. Assembly 1 Attach the rail to the garage door opener NOTE: ONLY use ONLY those bolts/fasteners mounted in the garage door opener H1 (3) Hex Screw #8x3/8"...
...the two bolts from the garage door opener. HARDWARE Mounted in the top of sprocket while garage door opener. operating opener. 1.2 Align the rail and the styrofoam over the garage door opener sprocket and attach with the previously removed bolts. 1.4 Position the belt around the garage door To ... damage to garage door opener, use the bolts removed from the top of the • ALWAYS keep hand clear of the opener. Assembly 1 Attach the rail to the garage door opener NOTE: ONLY use ONLY those bolts/fasteners mounted in the garage door opener H1 (3) Hex Screw #8x3/8"...
8550 Manual
Page 37
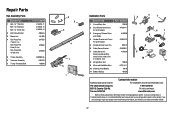
Repair Parts Rail Assembly Parts DESCRIPTION 1 Belt - for 7 foot door Belt - Country Club Rd. Tucson, AZ 85706 For installation and service information call: 1-800-528-9131 Or visit us online at: www.liftmaster.com Before calling, please have access to : The Chamberlain Group, Inc. ... number. 37 for 10 foot door 2 Belt Pulley Bracket 3 Master Link 4 One-Piece Rail 7 feet (2.1 m) One-Piece Rail 8 feet (2.4 m) One-Piece Rail 10 feet (3 m) 5 Trolley Assembly 6 Tensioner Assembly 7 Trolley Threaded Shaft PART NUMBER 41A5434-11 41A5434-13 41A5434-14 41B5424 4A1008 2777BD 2778BD 2770BD...
Repair Parts Rail Assembly Parts DESCRIPTION 1 Belt - for 7 foot door Belt - Country Club Rd. Tucson, AZ 85706 For installation and service information call: 1-800-528-9131 Or visit us online at: www.liftmaster.com Before calling, please have access to : The Chamberlain Group, Inc. ... number. 37 for 10 foot door 2 Belt Pulley Bracket 3 Master Link 4 One-Piece Rail 7 feet (2.1 m) One-Piece Rail 8 feet (2.4 m) One-Piece Rail 10 feet (3 m) 5 Trolley Assembly 6 Tensioner Assembly 7 Trolley Threaded Shaft PART NUMBER 41A5434-11 41A5434-13 41A5434-14 41B5424 4A1008 2777BD 2778BD 2770BD...


