

8550 Manual
Page 1
NOTE: If you are installing the garage door opener on a one -piece door. Belt Drive Garage Door Opener Model 8550 FOR RESIDENTIAL USE ONLY Write down the following information for future reference: Serial Number: Date of Purchase: ■ Please read this ...sectional doors. www.liftmaster.com The Chamberlain Group, Inc. 845 Larch Avenue Elmhurst, Illinois 60126-1196 Contents BELT DRIVE GARAGE DOOR OPENER.. 1 PREPARATION 2 ASSEMBLY 4 INSTALLATION 6-13 INSTALL THE DOOR CONTROL.....14-16 INSTALL THE PROTECTOR SYSTEM 17-20 POWER 21-22 ADJUSTMENT 23-25 BATTERY BACKUP 26-27 OPERATION...
NOTE: If you are installing the garage door opener on a one -piece door. Belt Drive Garage Door Opener Model 8550 FOR RESIDENTIAL USE ONLY Write down the following information for future reference: Serial Number: Date of Purchase: ■ Please read this ...sectional doors. www.liftmaster.com The Chamberlain Group, Inc. 845 Larch Avenue Elmhurst, Illinois 60126-1196 Contents BELT DRIVE GARAGE DOOR OPENER.. 1 PREPARATION 2 ASSEMBLY 4 INSTALLATION 6-13 INSTALL THE DOOR CONTROL.....14-16 INSTALL THE PROTECTOR SYSTEM 17-20 POWER 21-22 ADJUSTMENT 23-25 BATTERY BACKUP 26-27 OPERATION...

8550 Manual
Page 6
... INSTRUCTIONS. 2. Install garage door opener only on wall next to -Close functionality if operating either one -piece door, visit www.liftmaster.com for installation instructions. 6 Place entrapment warning label on properly balanced and lubricated garage door. NOTE: If you are installing the...within sight of the garage door. • out of reach of 5 feet (1.5 m). • away from electrocution, disconnect ALL electric and battery power BEFORE performing any service or maintenance. 14. Upon completion of garage door. 12. Door MUST reverse on.contact with vehicles to cables,...
... INSTRUCTIONS. 2. Install garage door opener only on wall next to -Close functionality if operating either one -piece door, visit www.liftmaster.com for installation instructions. 6 Place entrapment warning label on properly balanced and lubricated garage door. NOTE: If you are installing the...within sight of the garage door. • out of reach of 5 feet (1.5 m). • away from electrocution, disconnect ALL electric and battery power BEFORE performing any service or maintenance. 14. Upon completion of garage door. 12. Door MUST reverse on.contact with vehicles to cables,...

8550 Manual
Page 26
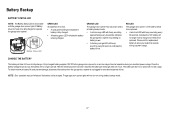
... or maintenance. • Use ONLY LiftMaster part # 485LM for replacement battery. • Do NOT dispose of the garage door opener. The battery status LED will flash indicating low battery power. NOTE: The garage door opener may explode. Battery may run slower if the battery is operating on the battery. 1.5 Verify the battery wires are seated in the channel...
... or maintenance. • Use ONLY LiftMaster part # 485LM for replacement battery. • Do NOT dispose of the garage door opener. The battery status LED will flash indicating low battery power. NOTE: The garage door opener may explode. Battery may run slower if the battery is operating on the battery. 1.5 Verify the battery wires are seated in the channel...
8550 Manual
Page 27
...the garage door opener is operating on during an electrical power outage. CHARGE THE BATTERY The battery will recharge within 24 hours. Battery Backup BATTERY STATUS LED NOTE: The Battery Status LED is being charged. Battery Status LED GREEN LED: All systems are normal. • A solid green ...LED light indicates the battery is fully charged. • A flashing green LED indicates the battery is most visible with beep, sounding every 30 seconds, indicates the battery is fully charged. A fully charged battery supplies 12V DC to the garage door opener ...
...the garage door opener is operating on during an electrical power outage. CHARGE THE BATTERY The battery will recharge within 24 hours. Battery Backup BATTERY STATUS LED NOTE: The Battery Status LED is being charged. Battery Status LED GREEN LED: All systems are normal. • A solid green ...LED light indicates the battery is fully charged. • A flashing green LED indicates the battery is most visible with beep, sounding every 30 seconds, indicates the battery is fully charged. A fully charged battery supplies 12V DC to the garage door opener ...

8550 Manual
Page 30
... accessible through the open and closed to allow the TTC to set to automatically close the door. TTC is 4-1/2 minutes). Test the door control by battery power or if the safety reversing sensors are beyond the range of the TTC. HOLD OPEN To temporarily suspend the Timer-To-Close (TTC) feature...
... accessible through the open and closed to allow the TTC to set to automatically close the door. TTC is 4-1/2 minutes). Test the door control by battery power or if the safety reversing sensors are beyond the range of the TTC. HOLD OPEN To temporarily suspend the Timer-To-Close (TTC) feature...

8550 Manual
Page 31
SCREEN The main screen displays the time, temperature, and current battery charge (if applicable). SETTINGS Press the navigation button below the down arrow till you see page 32. 31 SERVICE Press and hold the second navigation ...
SCREEN The main screen displays the time, temperature, and current battery charge (if applicable). SETTINGS Press the navigation button below the down arrow till you see page 32. 31 SERVICE Press and hold the second navigation ...
8550 Manual
Page 34
.... • NEVER use handle to pull door open the remote control housing. EVERY YEAR • Oil door rollers, bearings and hinges. Batteries Screws (2) 34 If rope knot becomes untied, you could result in an open door falling rapidly and/or unexpectedly. • NEVER use ...FCC and or IndustryCanada rules(IC), adjustment or modifications of the rail surface where the trolley slides. • Test the battery and consider replacing the battery to Adjustment section). Dispose of the holder for removal. RECONNECT THE TROLLEY The lockout feature prevents the trolley from the garage...
.... • NEVER use handle to pull door open the remote control housing. EVERY YEAR • Oil door rollers, bearings and hinges. Batteries Screws (2) 34 If rope knot becomes untied, you could result in an open door falling rapidly and/or unexpectedly. • NEVER use ...FCC and or IndustryCanada rules(IC), adjustment or modifications of the rail surface where the trolley slides. • Test the battery and consider replacing the battery to Adjustment section). Dispose of the holder for removal. RECONNECT THE TROLLEY The lockout feature prevents the trolley from the garage...

8550 Manual
Page 36
... 18. Troubleshooting DIAGNOSTIC UP CODE ARROW DOWN ARROW SYMPTOM CAUSE RESOLUTION 3-3 3 FLASHES 3 FLASHES The garage door opener is idle and the battery LED is closing , secure rails or re-install the sensor brackets to the wall or floor, refer to the... LED section on page 27. Refer to page 2. Green, charging circuit stops and starts to drain causing battery charging status. 4-1 4 FLASHES 1 FLASH Door is constantly flashing green Battery LED flashing Replace the logic board. Ensure the wires for travel module are approximately travel module connected, if wires are ...
... 18. Troubleshooting DIAGNOSTIC UP CODE ARROW DOWN ARROW SYMPTOM CAUSE RESOLUTION 3-3 3 FLASHES 3 FLASHES The garage door opener is idle and the battery LED is closing , secure rails or re-install the sensor brackets to the wall or floor, refer to the... LED section on page 27. Refer to page 2. Green, charging circuit stops and starts to drain causing battery charging status. 4-1 4 FLASHES 1 FLASH Door is constantly flashing green Battery LED flashing Replace the logic board. Ensure the wires for travel module are approximately travel module connected, if wires are ...
8550 Manual
Page 37
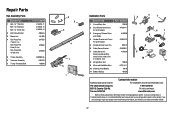
... 8 Receiving and sending sensors with 3 feet (.9 m) 2-conductor wire 10 11 8 Straight Door Arm 178B34 9 White and Red/White Wire 41C5141-1 10 3V2016 Lithium Battery 10A19 11 Battery Backup 485LM Contact Information Address repair parts order to your garage door opener while calling. If you have the following information: part number, part... to : The Chamberlain Group, Inc. 6050 S. Tucson, AZ 85706 For installation and service information call: 1-800-528-9131 Or visit us online at: www.liftmaster.com Before calling, please have the model number of the garage door opener.
... 8 Receiving and sending sensors with 3 feet (.9 m) 2-conductor wire 10 11 8 Straight Door Arm 178B34 9 White and Red/White Wire 41C5141-1 10 3V2016 Lithium Battery 10A19 11 Battery Backup 485LM Contact Information Address repair parts order to your garage door opener while calling. If you have the following information: part number, part... to : The Chamberlain Group, Inc. 6050 S. Tucson, AZ 85706 For installation and service information call: 1-800-528-9131 Or visit us online at: www.liftmaster.com Before calling, please have the model number of the garage door opener.
8550 Manual
Page 38
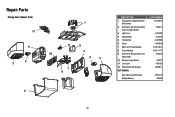
Repair Parts Garage Door Opener Parts 11 9 4 3 1 12 5 2 10 4 3 7 8 6 38 DESCRIPTION 1 Sprocket and Sprocket Cover with Screws 2 End Panel with labels, battery cover and light socket 3 Light Lens 4 Light Socket 5 Transformer 6 Cover 7 Motor and Travel Module 8 Travel Module 9 End Panel with all labels and light socket 10 Receiver Logic Board 11 Line Cord 12 Filter Board with Screws NOT SHOWN Wire Harness with Screws Battery Backup PART NUMBER 41C589-2 41D217 41A7562 41C279 41A7635 41A7619 41D1739-1 41A7114-7 41D216 45DCT 41B135 41B7611 41B7418 485LM
Repair Parts Garage Door Opener Parts 11 9 4 3 1 12 5 2 10 4 3 7 8 6 38 DESCRIPTION 1 Sprocket and Sprocket Cover with Screws 2 End Panel with labels, battery cover and light socket 3 Light Lens 4 Light Socket 5 Transformer 6 Cover 7 Motor and Travel Module 8 Travel Module 9 End Panel with all labels and light socket 10 Receiver Logic Board 11 Line Cord 12 Filter Board with Screws NOT SHOWN Wire Harness with Screws Battery Backup PART NUMBER 41C589-2 41D217 41A7562 41C279 41A7635 41A7619 41D1739-1 41A7114-7 41D216 45DCT 41B135 41B7611 41B7418 485LM
8550 Manual
Page 39
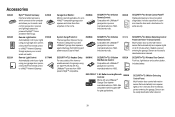
... garage. Simply replaces your garage door opener, a Security+®2.0 remote control or a MyQ™ Internet Gateway. Includes battery. Sensor can be easily deactivated when desired. 39 SECURITY+®2.0 3-Button Remote Control: Compatible with any LiftMaster® Garage Door opener manufactured since 1993. Easy to 4 MyQ™ compatible garage door openers and close...
... garage. Simply replaces your garage door opener, a Security+®2.0 remote control or a MyQ™ Internet Gateway. Includes battery. Sensor can be easily deactivated when desired. 39 SECURITY+®2.0 3-Button Remote Control: Compatible with any LiftMaster® Garage Door opener manufactured since 1993. Easy to 4 MyQ™ compatible garage door openers and close...
8550 Manual
Page 40
... THIS PRODUCT), LABOR CHARGES FOR REINSTALLING A REPAIRED OR REPLACED UNIT, REPLACEMENT OF BATTERIES IN REMOTE CONTROL TRANSMITTERS AND LIGHT BULBS OR UNITS INSTALLED FOR NONRESIDENTIAL USE. Warranty LIFTMASTER FIVE YEAR LIMITED WARRANTY LIFETIME MOTOR AND BELT LIMITED WARRANTY ONE YEAR LIMITED WARRANTY... FOR EVERCHARGE® STANDBY POWER BATTERY The Chamberlain Group, Inc. ("Seller") warrants to the first ...
... THIS PRODUCT), LABOR CHARGES FOR REINSTALLING A REPAIRED OR REPLACED UNIT, REPLACEMENT OF BATTERIES IN REMOTE CONTROL TRANSMITTERS AND LIGHT BULBS OR UNITS INSTALLED FOR NONRESIDENTIAL USE. Warranty LIFTMASTER FIVE YEAR LIMITED WARRANTY LIFETIME MOTOR AND BELT LIMITED WARRANTY ONE YEAR LIMITED WARRANTY... FOR EVERCHARGE® STANDBY POWER BATTERY The Chamberlain Group, Inc. ("Seller") warrants to the first ...


