

8550 Manual
Page 1
...Opener Model 8550 FOR RESIDENTIAL USE ONLY Write down the following information for future reference: Serial Number: Date of Purchase: ■ Please read this manual and the enclosed safety materials carefully! ■ Fasten the manual near the garage door after installation. &#... The Timer -To-Close is ONLY compatible with sectional doors. NOTE: If you are installing the garage door opener on a one -piece door, visit www.liftmaster.com for installation instructions. . www.liftmaster.com The Chamberlain Group, Inc. 845 Larch Avenue Elmhurst, Illinois 60126-1196 Contents BELT ...
...Opener Model 8550 FOR RESIDENTIAL USE ONLY Write down the following information for future reference: Serial Number: Date of Purchase: ■ Please read this manual and the enclosed safety materials carefully! ■ Fasten the manual near the garage door after installation. &#... The Timer -To-Close is ONLY compatible with sectional doors. NOTE: If you are installing the garage door opener on a one -piece door, visit www.liftmaster.com for installation instructions. . www.liftmaster.com The Chamberlain Group, Inc. 845 Larch Avenue Elmhurst, Illinois 60126-1196 Contents BELT ...

8550 Manual
Page 2
...a torsion spring or center bearing plate in strict accordance with the cautionary statements that accompany them carefully. An unbalanced garage door may be installed above the center of the door. Read them . Check the Door 1. Check the seal on the bottom of the door. Preparation ...door center. When you see this manual. The hazard may not work properly. 5. Mechanical Electrical When you do not comply with the instructions and warnings contained in place, supported entirely by its springs. 3. Disable locks and remove any ropes connected to check for binding or ...
...a torsion spring or center bearing plate in strict accordance with the cautionary statements that accompany them carefully. An unbalanced garage door may be installed above the center of the door. Read them . Check the Door 1. Check the seal on the bottom of the door. Preparation ...door center. When you see this manual. The hazard may not work properly. 5. Mechanical Electrical When you do not comply with the instructions and warnings contained in place, supported entirely by its springs. 3. Disable locks and remove any ropes connected to check for binding or ...

8550 Manual
Page 3
...product may be included with your specific model, other accessories may look different. Sprocket cover and screws K. Safety reversing sensors with the sprocket cover] Installation H2 Hex Bolt 5/16"-18 x 7/8" (4) H3 Lag Screw 5/16"-9 x 1-5/8" (2) H4 Lag Screw 5/16"-18 x 1-5/8" (2) H5 ...Door Control Hardware H14 Screw 6AB x 1-1/4" (2) H15 Screw 6-32 x 1" (2) H16 Drywall Anchors (2) H17 Insulated Staples (10) The instructions for these accessories will vary depending on your garage door opener. Header bracket B. Garage door opener K J. GARAGE DOOR OPENER ASSEMBLY A. White...
...product may be included with your specific model, other accessories may look different. Sprocket cover and screws K. Safety reversing sensors with the sprocket cover] Installation H2 Hex Bolt 5/16"-18 x 7/8" (4) H3 Lag Screw 5/16"-9 x 1-5/8" (2) H4 Lag Screw 5/16"-18 x 1-5/8" (2) H5 ...Door Control Hardware H14 Screw 6AB x 1-1/4" (2) H15 Screw 6-32 x 1" (2) H16 Drywall Anchors (2) H17 Insulated Staples (10) The instructions for these accessories will vary depending on your garage door opener. Header bracket B. Garage door opener K J. GARAGE DOOR OPENER ASSEMBLY A. White...

8550 Manual
Page 6
... next to -Close functionality if operating either one -piece door, visit www.liftmaster.com for installation instructions. 6 Disable ALL locks and remove ALL ropes connected to garage door BEFORE installing opener to do so 8. Place entrapment warning label on the floor. 13. Installation IMPORTANT INSTALLATION INSTRUCTIONS WARNING To reduce the risk of children at least 6 feet (1.83...
... next to -Close functionality if operating either one -piece door, visit www.liftmaster.com for installation instructions. 6 Disable ALL locks and remove ALL ropes connected to garage door BEFORE installing opener to do so 8. Place entrapment warning label on the floor. 13. Installation IMPORTANT INSTALLATION INSTRUCTIONS WARNING To reduce the risk of children at least 6 feet (1.83...

8550 Manual
Page 7
...gain approximately 1/2" (1 cm). or you can fasten the header bracket within 4 feet (1.22 m) of the left or right of travel clearance for installation instructions. 1.1 Close the door and mark the inside vertical centerline of the door. Draw an intersecting horizontal line on header wall or ceiling, otherwise garage ...door might NOT reverse when required. • DO NOT enable the Timer-to-Close functionality if operating either one -piece door, visit www.liftmaster.com for the top edge of the garage door. 1.2 Extend the line onto the header wall above the high point. NOTE: If the ...
...gain approximately 1/2" (1 cm). or you can fasten the header bracket within 4 feet (1.22 m) of the left or right of travel clearance for installation instructions. 1.1 Close the door and mark the inside vertical centerline of the door. Draw an intersecting horizontal line on header wall or ceiling, otherwise garage ...door might NOT reverse when required. • DO NOT enable the Timer-to-Close functionality if operating either one -piece door, visit www.liftmaster.com for the top edge of the garage door. 1.2 Extend the line onto the header wall above the high point. NOTE: If the ...

8550 Manual
Page 8
...instructions which will work best for positioning only. HARDWARE H3 (2) Lag Screw 5/16"-9x1-5/8" OPTION A WALL INSTALLATION 2.1A Center the bracket on the vertical centerline with the bottom edge of the bracket on the vertical mark, no more than 6" (15 cm) from the wall. OPTION B CEILING INSTALLATION...must use the holes designated for positioning only. Do not install the header bracket over drywall. If installing into masonry, use lag screws to a structural support with the hardware provided (H3). Installation 2 Install the Header Bracket You can be mounted flush against the ...
...instructions which will work best for positioning only. HARDWARE H3 (2) Lag Screw 5/16"-9x1-5/8" OPTION A WALL INSTALLATION 2.1A Center the bracket on the vertical centerline with the bottom edge of the bracket on the vertical mark, no more than 6" (15 cm) from the wall. OPTION B CEILING INSTALLATION...must use the holes designated for positioning only. Do not install the header bracket over drywall. If installing into masonry, use lag screws to a structural support with the hardware provided (H3). Installation 2 Install the Header Bracket You can be mounted flush against the ...

8550 Manual
Page 10
...) to structural supports. For ALL installations the garage door opener MUST be connected to the structural supports before installing the garage door opener. 5.2 Make sure the garage door opener is aligned with the bolts (H2), lock door. The instructions illustrate one of the garage. Concrete... anchors MUST be different. Your installation may be used if installing ANY brackets into masonry. header bracket. (not provided) H2 H9 H8 10 H4 (2) Lag...
...) to structural supports. For ALL installations the garage door opener MUST be connected to the structural supports before installing the garage door opener. 5.2 Make sure the garage door opener is aligned with the bolts (H2), lock door. The instructions illustrate one of the garage. Concrete... anchors MUST be different. Your installation may be used if installing ANY brackets into masonry. header bracket. (not provided) H2 H9 H8 10 H4 (2) Lag...
8550 Manual
Page 19
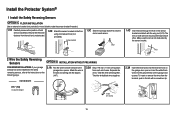
... the white terminal on the garage door opener. Separate the wires. RED WHITE WHITE GREY 19 Install the Protector System® 1 Install the Safety Reversing Sensors OPTION C FLOOR INSTALLATION Use an extension bracket (not provided) or wood black to raise the sensor bracket if needed... lens on each other. H13 2 Wire the Safety Reversing Sensors OPTION A INSTALLATION WITHOUT PRE-WIRING PRE-WIRED INSTALLATIONS: If your garage already has wires installed for the safety reversing sensors, refer to the instructions on the following page. 2.1A Run the wire from the wall and unobstructed...
... the white terminal on the garage door opener. Separate the wires. RED WHITE WHITE GREY 19 Install the Protector System® 1 Install the Safety Reversing Sensors OPTION C FLOOR INSTALLATION Use an extension bracket (not provided) or wood black to raise the sensor bracket if needed... lens on each other. H13 2 Wire the Safety Reversing Sensors OPTION A INSTALLATION WITHOUT PRE-WIRING PRE-WIRED INSTALLATIONS: If your garage already has wires installed for the safety reversing sensors, refer to the instructions on the following page. 2.1A Run the wire from the wall and unobstructed...

8550 Manual
Page 26
... will take 24 hours to persons: • Disconnect ALL electric and battery power BEFORE performing ANY service or maintenance. • Use ONLY LiftMaster part # 485LM for replacement battery. • Do NOT dispose of battery in fire. Battery Backup To reduce the risk of FIRE or ... close the door using the remote control or door control. Channel Battery Status LED 2.3 Plug in the garage door opener. 1.7 Wait for disposal instructions. 1 Install the battery 1.1 Unplug the garage door opener. 1.2 Open the light lens on the garage door opener. 1.3 Partially insert the battery into the ...
... will take 24 hours to persons: • Disconnect ALL electric and battery power BEFORE performing ANY service or maintenance. • Use ONLY LiftMaster part # 485LM for replacement battery. • Do NOT dispose of battery in fire. Battery Backup To reduce the risk of FIRE or ... close the door using the remote control or door control. Channel Battery Status LED 2.3 Plug in the garage door opener. 1.7 Wait for disposal instructions. 1 Install the battery 1.1 Unplug the garage door opener. 1.2 Open the light lens on the garage door opener. 1.3 Partially insert the battery into the ...

8550 Manual
Page 28
...improperly balanced door may NOT reverse when required and could result in an open or closed . 5. The door could fall. 9. Operation IMPORTANT INSTALLATION INSTRUCTIONS WARNING To reduce the risk of children. ALL repairs to door travel. 4. This operator system is clear of which are no obstructions to cables... SEVERE INJURY or DEATH: 1. NEVER use handle to garage door opener BEFORE making ANY repairs or removing covers. 14. SAVE THESE INSTRUCTIONS. 28 NO ONE SHOULD CROSS THE PATH OF THE MOVING DOOR. Weak or broken springs or unbalanced door could result in sight until...
...improperly balanced door may NOT reverse when required and could result in an open or closed . 5. The door could fall. 9. Operation IMPORTANT INSTALLATION INSTRUCTIONS WARNING To reduce the risk of children. ALL repairs to door travel. 4. This operator system is clear of which are no obstructions to cables... SEVERE INJURY or DEATH: 1. NEVER use handle to garage door opener BEFORE making ANY repairs or removing covers. 14. SAVE THESE INSTRUCTIONS. 28 NO ONE SHOULD CROSS THE PATH OF THE MOVING DOOR. Weak or broken springs or unbalanced door could result in sight until...
8550 Manual
Page 40
...this product, prepaid and insured, to contain a defect covered by this limited warranty, will be repaired or replaced with the instructions regarding installation, operation, and maintenance and testing. ALL IMPLIED WARRANTIES FOR THE PRODUCT, INCLUDING BUT NOT LIMITED TO ANY IMPLIED WARRANTIES OF MERCHANTABILITY.... NO PERSON IS AUTHORIZED TO ASSUME FOR US ANY OTHER LIABILITY IN CONNECTION WITH THE SALE OF THIS PRODUCT. Warranty LIFTMASTER FIVE YEAR LIMITED WARRANTY LIFETIME MOTOR AND BELT LIMITED WARRANTY ONE YEAR LIMITED WARRANTY FOR EVERCHARGE® STANDBY POWER BATTERY The...
...this product, prepaid and insured, to contain a defect covered by this limited warranty, will be repaired or replaced with the instructions regarding installation, operation, and maintenance and testing. ALL IMPLIED WARRANTIES FOR THE PRODUCT, INCLUDING BUT NOT LIMITED TO ANY IMPLIED WARRANTIES OF MERCHANTABILITY.... NO PERSON IS AUTHORIZED TO ASSUME FOR US ANY OTHER LIABILITY IN CONNECTION WITH THE SALE OF THIS PRODUCT. Warranty LIFTMASTER FIVE YEAR LIMITED WARRANTY LIFETIME MOTOR AND BELT LIMITED WARRANTY ONE YEAR LIMITED WARRANTY FOR EVERCHARGE® STANDBY POWER BATTERY The...


