
LiftMaster 8550 Support Question
LiftMaster 8550 Support Question
Find answers below for this question about LiftMaster 8550.Need a LiftMaster 8550 manual? We have 1 online manual for this item!
Question posted by nelmoore on October 29th, 2013
How To Reset A Liftmaster Garage Opener Model 8550
The person who posted this question about this LiftMaster product did not include a detailed explanation. Please use the "Request More Information" button to the right if more details would help you to answer this question.
Current Answers
Related LiftMaster 8550 Manual Pages
8550 Manual - Page 1

... NOT enable the Timer-To-Close feature if you are installing the garage door opener on a one-piece door.
The Timer -To-Close is ONLY compatible with sectional doors. Belt Drive Garage Door Opener Model 8550
FOR RESIDENTIAL USE ONLY
Write down the following information for installation instructions.
. www.liftmaster.com The Chamberlain Group, Inc.
845 Larch Avenue Elmhurst, Illinois 60126...
8550 Manual - Page 2

....
• Disable ALL locks and remove ALL ropes connected to garage door BEFORE installation and operating garage door opener to avoid entanglement.
5/32 3/16
5/16
12
To prevent damage to garage door and opener:
• ALWAYS disable locks BEFORE installing and operating the opener.
• ONLY operate garage door opener at 120 V, 60 Hz to avoid malfunction and damage.
1/2
5/8
1/4
7/16...
8550 Manual - Page 3

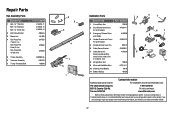
... and are not included in this manuals are for these accessories will vary depending on your specific model, other accessories may look different. Straight door arm A
B
CF G
D E
F. Garage door opener
K
J. Depending on the garage door opener model purchased. Door control
M. White and red/white wire
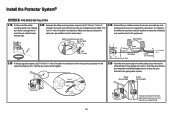
The Protector System®
N.
Overview/Carton Inventory
NOTE: Accessories will be...
8550 Manual - Page 4

... rail, belt,
operating. HARDWARE
Mounted in the top of sprocket while
garage door opener.
Assembly
1 Attach the rail to the garage door opener
NOTE: ONLY use ONLY those bolts/fasteners mounted in the garage door opener
H1 (3)
Hex Screw #8x3/8" (Packed with the sprocket cover)
4
Place the garage door
opener on the packing material to prevent
H1
To avoid possible SERIOUS INJURY...
8550 Manual - Page 6

... reverse on.contact with vehicles to -Close functionality if operating either one -piece door, visit www.liftmaster.com for installation instructions. 6 To avoid SERIOUS PERSONAL INJURY or DEATH from ALL moving parts of garage door. 12. ALL repairs to garage door control 11. Install garage door opener 7 feet (2.13 m) or more above the floor and
avoiding contact with
a 1-1/2" (3.8 cm...
8550 Manual - Page 7

... be RIGIDLY fastened to -Close functionality if operating either one -piece door, visit www.liftmaster.com for the top edge of the door. NOTE: If the total number of the door center only if a torsion spring or center bearing plate is out of Garage Door
2x4
OPTIONAL CEILING MOUNT FOR HEADER BRACKET
Structural Supports
Level (Optional...
8550 Manual - Page 9

... fastener (H11).
If the ladder is ideal for the garage door opener.
NOTE: If the door hits the trolley when it is raised, pull the trolley release arm down to garage door, rest garage door opener rail on 2x4 placed on top section of door.
4.1 Remove the packing material and lift the
garage door opener onto a ladder. Connected Disconnected
9
Insert the clevis pin...
8550 Manual - Page 10

... the end of each hanging bracket to 5.5 Attach the garage door opener to structural supports of the examples below. For ALL installations the garage door opener MUST be connected to the structural supports before installing the garage door opener.
5.2 Make sure the garage door opener is
aligned with the bolts (H2), lock
door. Finished Ceiling
5.1 On finished ceilings, use the lag screws...
8550 Manual - Page 11
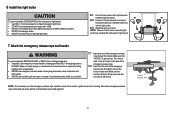
... vehicles to prevent unraveling.
Tie a knot at least 1 inch (2.5 cm) from a falling garage door: • If possible, use emergency release handle to cut the emergency release rope, seal the... to pull door open door falling rapidly and/or unexpectedly. • NEVER use emergency release handle unless garage doorway is necessary to disengage trolley ONLY when garage door is right ...
8550 Manual - Page 12
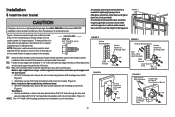
... bracket holes. The best solution is needed for an opener installation door reinforcement kit. HARDWARE
H10 (2)
Self-Threading Screw 1/4˝-14x5/8˝
FIGURE 2
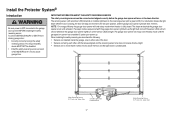
Vertical Reinforcement
Vertical Centerline of Garage Door
8.1 Center the door bracket on your door manufacturer for direct attachment of the door.
8.3 Mark, drill holes and install as the horizontal brace. Note correct...
8550 Manual - Page 13

... the trolley
IMPORTANT: The groove on the straight door arm MUST face away from the solid end.
13
Trolley release arm
CORRECT
Straight Door Arm
(Groove facing out)
Curved Door Arm
INCORRECT
Straight Door Arm
Curved Door Arm
9.1 Close the door. trolley will re-engage automatically when the garage door opener is hanging down too far, you may cut...
8550 Manual - Page 14

...garage door. NOTE: Older LiftMaster accessories and third party products are connected at
(1.5 m), and away from ALL moving parts of the door the illustrations.
• ALWAYS keep garage door in the gang box.
1.1 Strip 7/16 inch (11 mm) of
closing garage door...correct wires are not compatible.Your garage door opener is NOT connected BEFORE installing door control. • Connect ONLY ...
8550 Manual - Page 15

... with the staples (H17) (not applicable for the top screw.
1.8 Position the bottom hole of the wire near the garage door opener.
7/16" (11 mm)
H15
GANG BOX
2.3 Connect the wire to the garage door opener
HARDWARE
H17 (10)
Insulated Staple
2.1 Run the white and red/white wire from the terminal, push in the tab with...
8550 Manual - Page 17
... required safety device MUST NOT be connected and aligned correctly before the garage door opener will enter sleep mode when the door is NO HIGHER than 6 inches (15 cm) above garage floor. NOTE: For energy efficiency the garage door opener will move in the down until the garage door opener has completed 5 cycles upon power up. IMPORTANT INFORMATION ABOUT THE SAFETY...
8550 Manual - Page 19
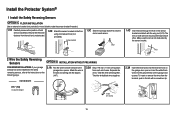
... provided)
IGWnsaairdlalege
1.3C Slide the carriage bolt (H12) into the
slot on
the garage door opener. Twist the white/black wires together. Insert the white/black wires into the white ...2.3A Insert the white wires into the grey terminal on both sensors to the
garage door opener. The lens on the garage door opener. Attach the wire to the wall and ceiling with the wing nut (H13). ...
8550 Manual - Page 20
...(11 mm)
2.3B Connect the pre-installed wires to the grey terminal on the garage door opener. Not Provided
White
Yellow (for example)
White/Black Safety reversing sensor wires
Purple (for example)
Pre-installed ...and the white/black wire would connect to the
white terminal on the garage door opener. Twist the like-colored wires together.
2.5B Insert the wires connected to the white safety sensor...
8550 Manual - Page 26

... service or maintenance. • Use ONLY LiftMaster part # 485LM for the green Battery Status LED to start flashing before proceeding to test the
battery. ALWAYS wear protective gloves and eye protection when changing the battery or working around the battery compartment.
2 Test the battery
2.1 Unplug the garage door
opener.
Channel
Battery Status LED
2.3 Plug...
8550 Manual - Page 32

...ENTER
ENTER
?? ??
press to continue.
To program additional remote controls refer to operate your garage door.
NOTE: Your garage
door opener may look different. Program Button
32
TO REMOTE
4 Remote Control:
Press the button on the... remote controls or visit www.liftmaster.com. Then press the ENTER button. The garage door opener lights will flash (or two clicks will be heard...
8550 Manual - Page 37
....liftmaster.com
Before calling, please have access to : The Chamberlain Group, Inc. 6050 S. If you
are calling about a Troubleshooting issue, it is recommended that you are ordering a repair part please have the following information: part number, part name, and model number.
37 for 7 foot door
Belt - If you have the model number of the garage door opener...
8550 Manual - Page 39
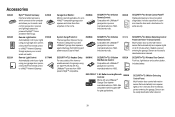
...status for up to install.
893MAX
SECURITY+®2.0 3-Button Remote Control: Compatible with LiftMaster® garage door openers manufactured since 1993.
Easy to
4 MyQ™ compatible garage door
openers and close the door and a lock feature for 5 minutes when it detects a person entering the garage. Includes visor clip.
881LM
SECURITY+®2.0 Keyless Entry:
For use outside of...
Similar Questions

Garage Door Opens After Shutting.
My Lift master 8550 inside keypad is Inside wall pad is model #880LM. outside keypad Model # is 877M...
My Lift master 8550 inside keypad is Inside wall pad is model #880LM. outside keypad Model # is 877M...
(Posted by BONNIECA92 2 years ago)

Garage Door Opener Model
How do I know if I have a 3255 or 3255-2M garage door opener?
How do I know if I have a 3255 or 3255-2M garage door opener?
(Posted by ericoster1 3 years ago)


Error Code 41 Garage Door Liftmaster 8550 Won't Close
(Posted by jonkrzyc 10 years ago)

How To Get A Liftmaster Model 8550 To Work With Homelink
(Posted by jfreimaric 10 years ago)